- Restart your Mac in macOS or Windows
- How to start up in macOS from Windows
- How to start up in Windows from macOS
- Learn more
- Install Windows 10 on your Mac with Boot Camp Assistant
- What you need to install Windows 10 on Mac
- How to install Windows 10 on Mac
- 1. Check your Secure Boot setting
- 2. Use Boot Camp Assistant to create a Windows partition
- 3. Format the Windows (BOOTCAMP) partition
- 4. Install Windows
- 5. Use the Boot Camp installer in Windows
- How to switch between Windows and macOS
- Learn more
- How to create and run Windows To Go on a Mac computer?
- Tutorial to create and run Windows To Go on a Mac computer with WinToUSB.
- Как я перешел на Мак-ос после 20 лет работы на Виндоус
- Минусы
- Смена языка
- Порты
- Новый процессор М1 Apple
- Из плюсов
- Выводы
Restart your Mac in macOS or Windows
After installing Microsoft Windows on your Mac, you can choose whether your Mac starts up in macOS or Windows.
How to start up in macOS from Windows
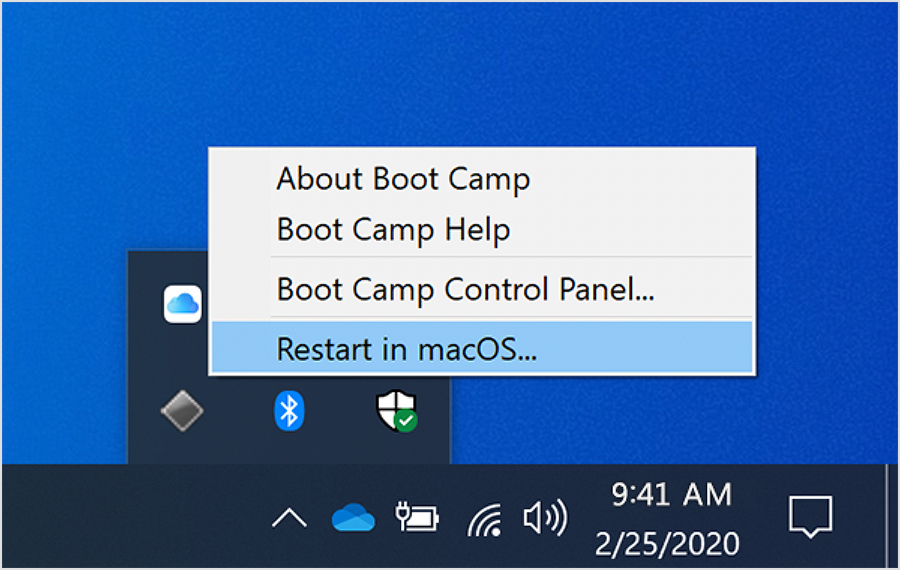
- From the notification area on the right side of the Windows taskbar, click to show hidden icons.
- Click the Boot Camp icon .
- From the menu shown, choose Restart in macOS.
If you haven’t installed the latest Boot Camp updates, you might get the message ”Could not locate the OS X boot volume.»
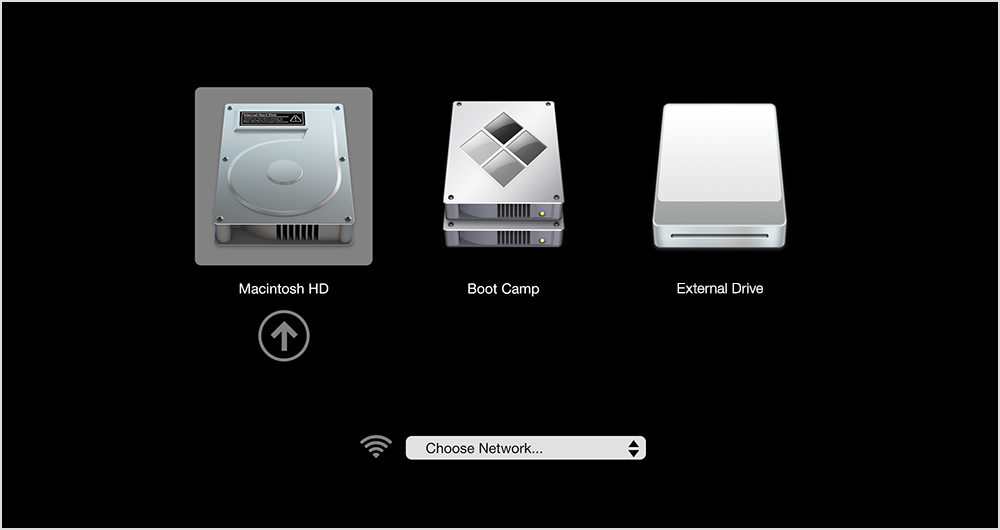
Or use Startup Manager as your Mac starts up:
- Restart your Mac from the Start menu in Windows.
- Press and hold the Option (or Alt) ⌥ key as your Mac begins to restart.
- Select your Mac startup volume (Macintosh HD) in the Startup Manager window, then press Return or click the up arrow:
How to start up in Windows from macOS
- Use Startup Manager to choose your Windows (Boot Camp) volume during startup.
- Or select your Boot Camp volume in Startup Disk preferences, then restart.
Learn more
- If you’re having difficulty using VoiceOver or another screen reader to complete these steps, please contact Apple Support.
- Learn how to install Windows 10 on your Mac.
Information about products not manufactured by Apple, or independent websites not controlled or tested by Apple, is provided without recommendation or endorsement. Apple assumes no responsibility with regard to the selection, performance, or use of third-party websites or products. Apple makes no representations regarding third-party website accuracy or reliability. Contact the vendor for additional information.
Install Windows 10 on your Mac with Boot Camp Assistant
With Boot Camp, you can install Microsoft Windows 10 on your Mac, then switch between macOS and Windows when restarting your Mac.
What you need to install Windows 10 on Mac
- MacBook introduced in 2015 or later
- MacBook Air introduced in 2012 or later
- MacBook Pro introduced in 2012 or later
- Mac mini introduced in 2012 or later
- iMac introduced in 2012 or later 1
- iMac Pro (all models)
- Mac Pro introduced in 2013 or later
The latest macOS updates, which can include updates to Boot Camp Assistant. You will use Boot Camp Assistant to install Windows 10.
64GB or more free storage space on your Mac startup disk:
- Your Mac can have as little as 64GB of free storage space, but at least 128GB of free storage space provides the best experience. Automatic Windows updates require that much space or more.
- If you have an iMac Pro or Mac Pro with 128GB of memory (RAM) or more, your startup disk needs at least as much free storage space as your Mac has memory. 2
An external USB flash drive with a storage capacity of 16GB or more, unless you’re using a Mac that doesn’t need a flash drive to install Windows.
A 64-bit version of Windows 10 Home or Windows 10 Pro on a disk image (ISO) or other installation media. If installing Windows on your Mac for the first time, this must be a full version of Windows, not an upgrade.
- If your copy of Windows came on a USB flash drive, or you have a Windows product key and no installation disc, download a Windows 10 disk image from Microsoft.
- If your copy of Windows came on a DVD, you might need to create a disk image of that DVD.

![]()
How to install Windows 10 on Mac
To install Windows, use Boot Camp Assistant, which is included with your Mac.
1. Check your Secure Boot setting
Learn how to check your Secure Boot setting. The default Secure Boot setting is Full Security. If you changed it to No Security, change it back to Full Security before installing Windows. After installing Windows, you can use any Secure Boot setting without affecting your ability to start up from Windows.
2. Use Boot Camp Assistant to create a Windows partition
Open Boot Camp Assistant, which is in the Utilities folder of your Applications folder. Follow the onscreen instructions.
- If you’re asked to insert a USB drive, plug your USB flash drive into your Mac. Boot Camp Assistant will use it to create a bootable USB drive for Windows installation.
- When Boot Camp Assistant asks you to set the size of the Windows partition, remember the minimum storage-space requirements in the previous section. Set a partition size that meets your needs, because you can’t change its size later.
3. Format the Windows (BOOTCAMP) partition
When Boot Camp Assistant finishes, your Mac restarts to the Windows installer. If the installer asks where to install Windows, select the BOOTCAMP partition and click Format. In most cases, the installer selects and formats the BOOTCAMP partition automatically.
4. Install Windows
Unplug any external devices that aren’t necessary during installation. Then click Next and follow the onscreen instructions to begin installing Windows.
5. Use the Boot Camp installer in Windows
After Windows installation completes, your Mac starts up in Windows and opens a ”Welcome to the Boot Camp installer” window. Follow the onscreen instructions to install Boot Camp and Windows support software (drivers). You will be asked to restart when done.
- If the Boot Camp installer never opens, open the Boot Camp installer manually and use it to complete Boot Camp installation.
- If you have an external display connected to a Thunderbolt 3 port on your Mac, the display will be blank (black, gray, or blue) for up to 2 minutes during installation.
How to switch between Windows and macOS
Restart, then press and hold the Option (or Alt) ⌥ key during startup to switch between Windows and macOS.
Learn more
If you have one of these Intel-based Mac models using OS X El Capitan or later, you don’t need a USB flash drive to install Windows:
- MacBook introduced in 2015 or later
- MacBook Air introduced in 2017 or later 3
- MacBook Pro introduced in 2015 or later 3
- iMac introduced in 2015 or later
- iMac Pro (all models)
- Mac Pro introduced in late 2013 or later
For more information about using Windows on your Mac, open Boot Camp Assistant and click the Open Boot Camp Help button.
1. If you’re using an iMac (Retina 5K, 27-inch, Late 2014) or iMac (27-inch, Late 2013) or iMac (27-inch, Late 2012) with a 3TB hard drive and macOS Mojave or later, learn about an alert you might see during installation.
2. For example, if your Mac has 128GB of memory, its startup disk must have at least 128GB of storage space available for Windows. To see how much memory your Mac has, choose Apple menu > About This Mac. To see how much storage space is available, click the Storage tab in the same window.
3. These Mac models were offered with 128GB hard drives as an option. Apple recommends 256GB or larger hard drives so that you can create a Boot Camp partition of at least 128GB.
Information about products not manufactured by Apple, or independent websites not controlled or tested by Apple, is provided without recommendation or endorsement. Apple assumes no responsibility with regard to the selection, performance, or use of third-party websites or products. Apple makes no representations regarding third-party website accuracy or reliability. Contact the vendor for additional information.
How to create and run Windows To Go on a Mac computer?
This tutorial will show you how to create a Windows To Go USB drive that supports Mac computers, then you can run Windows to go on a Mac computer to complete the work that must be done under Windows.
I hav a late 2016 MacBook Pro with MacOS and Windows 10 Pro dual systems installed on it, so far so good, but I only use Windows 10 Pro to play some games that can’t be run on MacOS. Now I’m trying to get rid of my Bootcamp installation, because of low space on main SSD drive. I noticed that WinToUSB can install Windows to a USB drive, can the Windows USB drive created by WinToUSB be started from a Mac computer? How do I make it? Could let me know step by step for using your tools.
Yes, the Windows To Go USB drive created by WinToUSB can be started from a Mac computer, but not all Windows To Go USB drive created by WinToUSB can be started from a Mac computer. So we need to understand what causes the WinToUSB USB drive to fail to boot and then we can effectively avoid it.
1. Now All of Apple’s computers use Intel CPUs, and Apple selected the Intel-designed Extensible Firmware Interface (EFI) as its BIOS firmware to replace the Open firmware used on the PowerPC architecture. So in order to boot a Mac computer, we have to make sure that the Windows To Go USB drive that we created supports EFI booting.
2. For booting Windows on an (U)EFI-based computer, the Windows version must match the PC architecture, that means a 64-bit (U)EFI-based computer can only boot 64-bit versions of Windows and a 32-bit (U)EFI-based computer can only boot 32-bit versions of Windows. Mac computers use 64-bit Intel CPUs, so make sure you use 64-bit Windows to create Windows To Go.
Tutorial to create and run Windows To Go on a Mac computer with WinToUSB.
Step 1. Download Mac Boot Camp Support Software for Windows To Go, please refer to: How to download Boot Camp Windows Support Software for Windows To Go?
Step 2. Copy the Boot Camp Support Software downloaded in the previous step to the computer with an installed copy of WinToUSB, and connect the destination external hard drive or USB flash drive to this computer, then run WinToUSB.
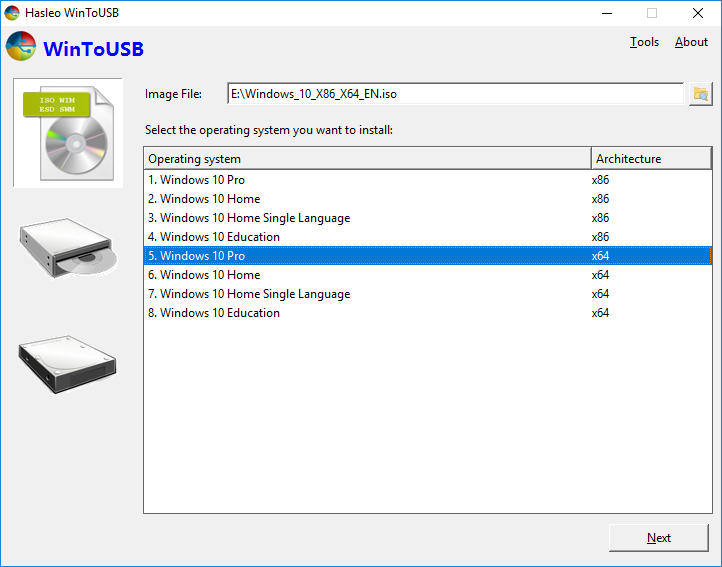
Step 3. Click the button, then click the button and select the Windows installation ISO file from the open dialog box.
Step 4. WinToUSB scans for and lists available operating systems. Pleae select the edition of Windows you want to install, then click «Next».
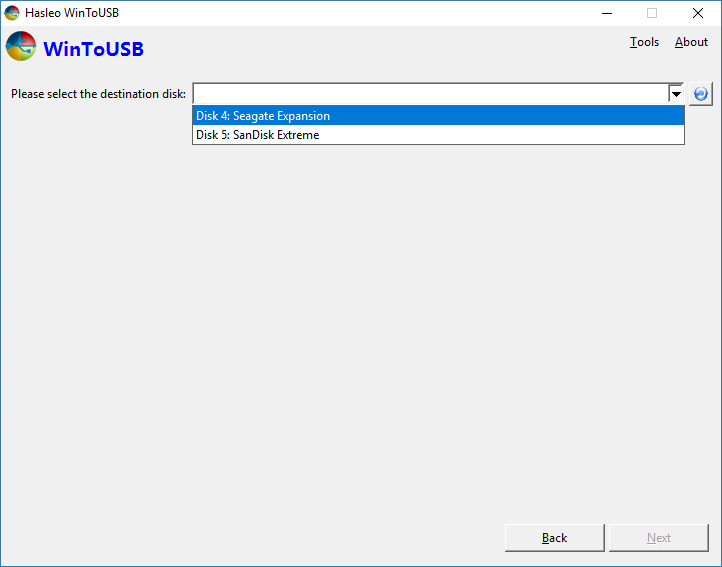
Step 5. Select the destination drive in the drop-down list. If the drive is not correctly recognized by WinToUSB, please click the button for the program to recognize the drive.
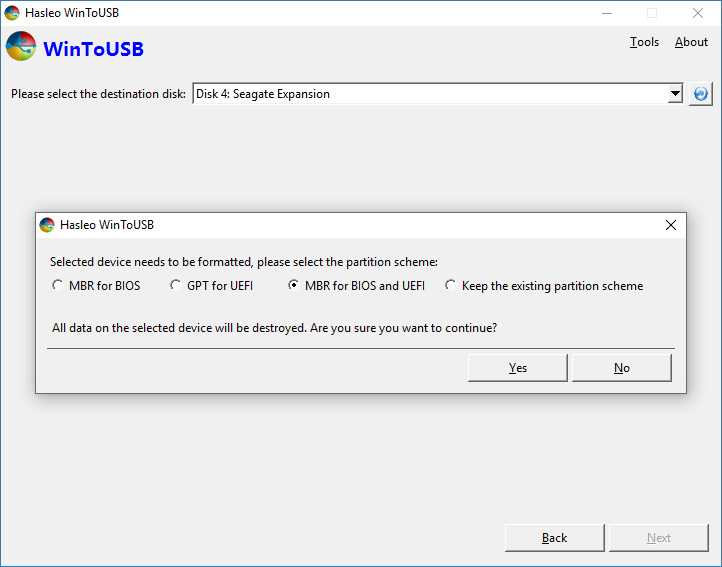
Step 6. A pop-up will appear asking you if you want to format it to continue, select the partition scheme you want to use and click «Yes» to format it. Mac computer is a UEFI based computer, so you have to select the ‘GPT for UEFI’ or ‘MBR for BIOS and UEFI’ option as the partition scheme. If you choose «Keep the existing partition scheme», you need to manually prepare the partitions on the USB drive before this step, and here is the user guide on how to manually prepare partitions for Windows To Go. Please note that the «Keep the existing partition scheme» option is valid only for an external disk.
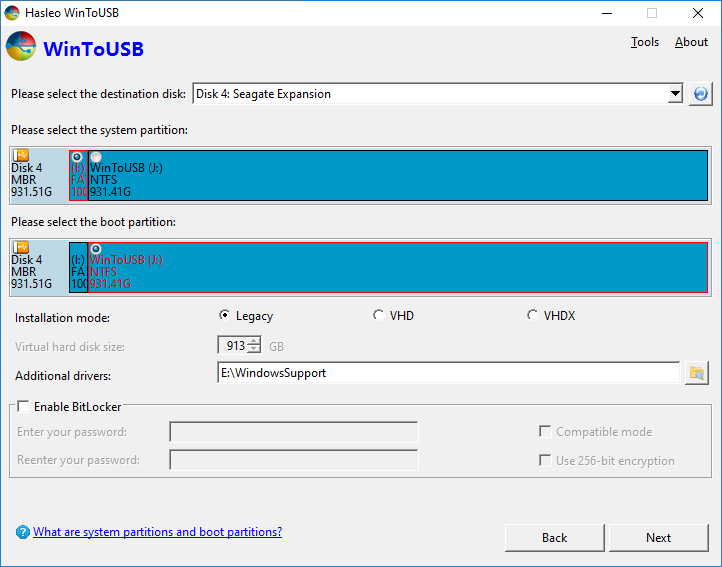
Step 7. Select the system partition and boot partition from the partition list, the selected partitions will be marked as red, specify the directory of the additional drivers as the save path of Boot Camp Support Software, then click «Next».
 Tips:
Tips:
- The directory of the additional drivers you specify should only contain drivers that need to be injected into Windows. If this directory contains too many useless files, the process of injecting drivers will become very slow.
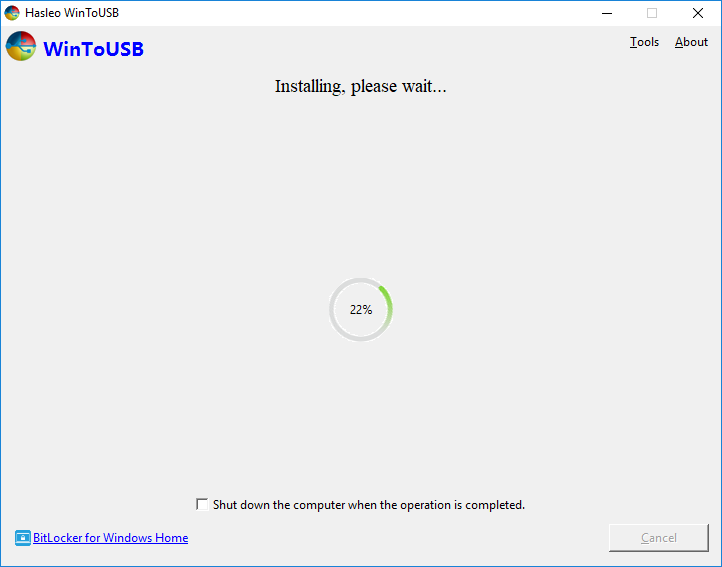
Step 8. After clicking «Next», WinToUSB begins installing Windows.
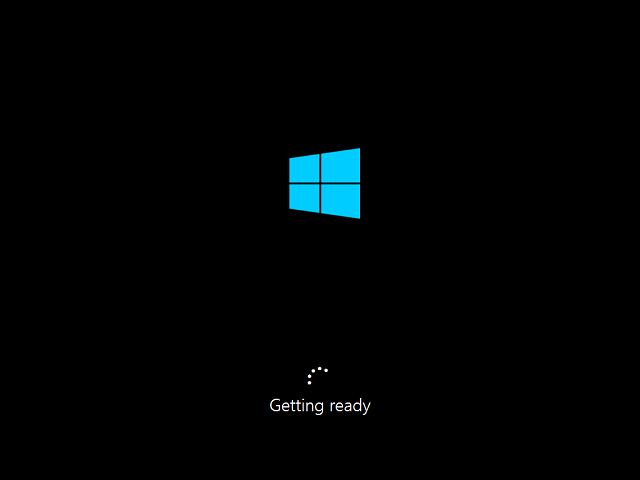
Step 9. It takes some time to install. After installation, safely unplug the USB drive from the Windows computer, then connect the USB drive to the Mac computer you want to boot. If you have only the USB-C interface on your Mac computer, you will need to use the USB-C to USB Adapter to connect the USB device to your Mac computer.
Step 10. Power on the Mac computer, and then immediately hold down the Option key, then select the USB drive and press Return to boot from it.
Step 11. Windows normal installation starts up and you have to complete all the installation steps. If the Mac’s own keyboard or touchpad does not work, you have to use an external USB keyboard or mouse to complete the installation. After that, you can install Windows Support Software (Boot Camp drivers), programs, copy files, etc.
Now you know how to create and run Windows To Go on a Mac computer with the best free Windows To Go Creator WinToUSB, you can also use WinToUSB to clone existing Windows to a USB drive and then boot Windows from that USB drive on a Mac computer.
Как я перешел на Мак-ос после 20 лет работы на Виндоус
Я расскажу, существует ли магия Apple и какие основные неудобства вы будете испытывать при переходе на эту операционную систему. Плюсы тоже зацеплю.
Я не адепт ни одной из систем, это беспристрастная заметка «продвинутого» пользователя. К продажам и рекламе отношения не имею, никаких ссылок на магазины нет и не будет.
Итак, я остановился на «Макбук Эйр» М1 на 8 гб оперативной памяти. Всегда использовал только самосборки стационарного ПК, но мне надоела одна вещь — в случае если ты в гостях или путешествии работать невозможно. Нужно иметь 2 устройства: нормальный стационарный ПК и нормальный ноутбук. На них разная клавиатура, нет под рукой документов и локальных файлов. Облако решает эту проблему лишь частично, но видеопроекты в облаке — это боль.
Особо остро встал вопрос на удаленке: мой ПК 2012 года кряхтел, пердел и умирал. Я хотел полноценную мобильную рабочую станцию.
Минусы
Первый и самый жирный — работа с RDP. Хоткеи на маке удобные, но не виндовые. Здесь нет контрол+в, здесь команд+в, софт от мелкомягких передает только 5 команд в RDP. Остальное не передает и часть хоткеев надо делать через контрол, часть через команд. Можно переназначить клавиши в макос, но решение мне не зашло.
Смена языка
Удаленная машина так и не настроилась к переключению по капслоку или вин+пробел. На маке я меняю язык по капсу, на винде — шифт контрол. Это до сих пор взрывает голову. Мак не передает информацию в RDP, что ты нажал капслок, сторонний софт не помогает. Вин пробел не работает, только шифт вин пробел. В интернете я не нашел, почему, подскажите — буду рад.
Компоновка клавиатур: фн в левом нижнем углу вместо контрола. Зачем я не знаю, не удобно. Видимо, чтобы не как у людей.
Порты
На ноутбуке есть только 2 порта и оба USB C — tunderbolt. И все. Чтобы нормально работать, нужны либо ультрадорогие девайсы типа беспроводного монитора и мыши, либо хаб. Мой стоит 2 тысячи рублей… И работает он плохо. Иногда отваливаются все подключенные через него девайсы, в том числе монитор. Особенно бесит, когда это происходит при работе с внешним жестким диском при рендере видео. А нормальные стоят 6-10к.
Новый процессор М1 Apple
Часть софта работает некорректно. Например, в «Телеграм» нельзя копировать картинку из «Вотсапп» или RDP — телега виснет намертво. Давинчи бета для мак зависает (бета 2), починят, наверное. Но я перешел в файнал кат. RDP от майкрософт — отваливается буфер обмена.
Блокировка экрана и выход в спящий режим: можно закрыть ноут — а он не вырубится. Можно отправить в спящий режим, а он не уйдет. Не знаю, в чем проблема, но это дико раздражает. В первые дни некорректно работало больше софта, но патчи приводят ситуацию в норму.
Стандартные приложения типа таблиц и «Ворда» — неудобные. Тут смысла переезжать с офиса нет. Говорят, презентации красивые.
Машина свопается как мразь, но что вы хотите от 8 гб оперативы. Визуально это незаметно, только циферки в мониторинге системы.
За ССД не боюсь, его ресурса хватит на весь срок службы.
Из плюсов
Страницы в интернете стали открываться как выстрел из пистолета, никакой подгрузки нет. И это с учетом, что я сижу по wifi 5 ггц, а на ПК сидел через провод. Даже при рендере видео работа ноутбука визуально никак не замедляется, ничего не лагает и не тормозит. Греется, ну так ноут без кулера.
Экран и клавиатура очень приятные. Моментально привык к клавиатуре, любая другая кажется жутко неудобной. Тачпад — я всегда работал на мыши, на ноутбуке с виндой возил с собой беспроводную. Но сейчас даже в работе с монитором дома я использую мышь только 50% времени. Тачпад с его жестами заменяет кучу действий. А перемещение по рабочим столам — что-то запредельное.
Автономная работа — 16 часов заявлено, от 100 до 0 пока не проверял, но по скорости уменьшения заряда в дороге —примерно так и есть.
Мощный процессор. Рендерит быстро, работа с 4к видео без проблем, особенно раскрывается в софте под Silicon.
Выводы
Мне потребовался почти месяц на привыкание к макос. Не все логично устроено, например, установка программ очень странная. Раскладка клавиатуры и хоткеи — все другое. Но в целом удобное. С пиратским софтом проблем нет. Файнал кат для видео — сказка.
Я пришел к выводу, что это устройство стоит своих денег по сумме комплектующих с учетом качества. Несмотря на минусы, у меня не появилось желания возвращаться на вин. Однако, если 100% вашей работы связано с РДП — вы будете испытывать боль. Ну, и берите версию на 16 Гб ОЗУ.
Вот такая заметка рядового пользователя, надеюсь полезна. Ничего подобного я сам не находил, когда думал о переходе. Буду рад, если научите крутым и не очевидным фишкам макос.
Читатели пишут. Вы тоже можете написать текст на любую тему о финансах, которая вам интересна. Нужно всего лишь…


