- Перезапуск компьютера Mac в macOS или Windows
- Запуск macOS из Windows
- Запуск ОС Windows из macOS
- Дополнительная информация
- Move your data from a Windows PC to your Mac
- Before you begin
- Move your data
- How to move your information from a PC to your Mac
- After you move your data
- If you have issues moving your data
- What data can I transfer?
- Установка Windows 10 на компьютере Mac с помощью приложения «Ассистент Boot Camp»
- Необходимые условия для установки Windows 10 на компьютере Mac
- Инструкции по установке Windows 10 на компьютере Mac
- 1. Проверьте настройки функции «Безопасная загрузка»
- 2. Использование приложения «Ассистент Boot Camp» для создания раздела Windows
- 3. Форматирование раздела Windows (BOOTCAMP)
- 4. Установка Windows
- 5. Использование установщика Boot Camp в Windows
- Процедура переключения между Windows и macOS
- Дополнительная информация
Перезапуск компьютера Mac в macOS или Windows
После установки Microsoft Windows на компьютер Mac можно переключать режим запуска компьютера между операционными системами MacOS или Windows.
Запуск macOS из Windows
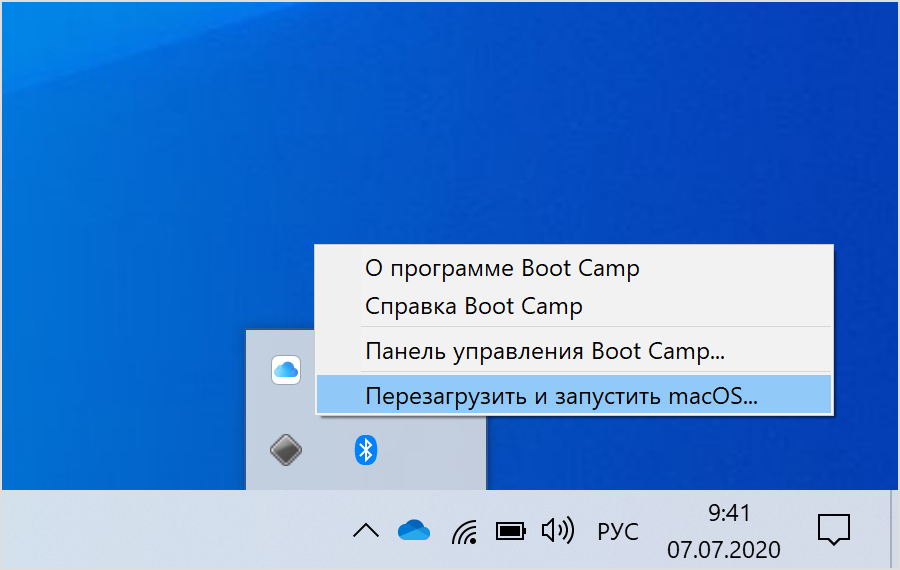
- В области уведомлений в правой части панели задач Windows щелкните , чтобы показать скрытые значки.
- Щелкните значок Boot Camp .
- В появившемся меню выберите команду «Restart in macOS» (Перезапуск в macOS).
Если последние обновления Boot Camp не установлены, может отобразиться сообщение «Could not locate the OS X boot volume» (Не удалось найти загрузочный том OS X).
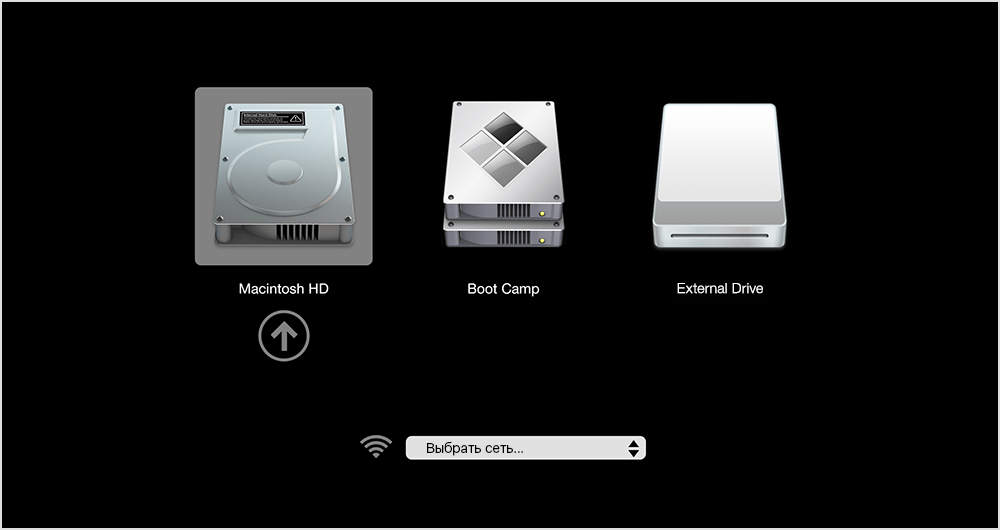
Также можно воспользоваться менеджером загрузки в процессе запуска компьютера Mac:
- Перезапустите Mac с помощью меню «Пуск» в ОС Windows.
- Нажмите и удерживайте клавишу Option (или Alt) ⌥, когда компьютер Mac начнет перезагружаться.
- Выберите загрузочный том Mac (Macintosh HD) в окне менеджера загрузки, затем нажмите клавишу «Return» или щелкните стрелку вверх:
Запуск ОС Windows из macOS
- Воспользуйтесь менеджером загрузки, чтобы выбрать том Windows (Boot Camp) при запуске компьютера.
- Также можно выбрать том Boot Camp в окне настроек «Загрузочный диск» и перезапустить компьютер.
Дополнительная информация
- Если у вас возникли проблемы с использованием VoiceOver или другой программы чтения с экрана для выполнения этих действий, обратитесь в службу поддержки Apple.
- Узнайте, как установить Windows 10 на компьютер Mac.
Информация о продуктах, произведенных не компанией Apple, или о независимых веб-сайтах, неподконтрольных и не тестируемых компанией Apple, не носит рекомендательного или одобрительного характера. Компания Apple не несет никакой ответственности за выбор, функциональность и использование веб-сайтов или продукции сторонних производителей. Компания Apple также не несет ответственности за точность или достоверность данных, размещенных на веб-сайтах сторонних производителей. Обратитесь к поставщику за дополнительной информацией.
Move your data from a Windows PC to your Mac
Use Windows Migration Assistant to transfer your pictures, documents, and other data from a Windows PC to your Mac.
Windows Migration Assistant transfers your contacts, calendars, email accounts, and more from a PC. It migrates this data to the appropriate places on your Mac. After migrating data to your Mac, authorize your computer for iTunes Store purchases. It’s important to authorize before you sync or play content that you download from the iTunes Store.
If you’re migrating from one Mac to another Mac, follow the steps to move your content to a new Mac.
Before you begin
To prepare for a smooth migration:
- Make sure that Windows is up to date. Migration Assistant works with Windows 7 and later.
- Make sure that you know the name and password of an administrator account on your PC.
- Connect your Mac and PC to the same network, such as your home Wi-Fi network. Or connect an Ethernet cable between the ports on your Mac and PC to create a direct network connection. Some Mac models require an Ethernet adapter, such as the Belkin USB-C to Gigabit Ethernet Adapter or Apple Thunderbolt to Gigabit Ethernet Adapter.
- If you’re using Microsoft OneDrive on your PC, follow Microsoft’s instructions for uninstalling OneDrive before continuing. You can reinstall OneDrive after migration is complete.
Then use the check disk (chkdsk) utility on your PC to make sure that your Windows hard drive doesn’t have any issues:
- Right-click the Start button, then click Run.
- Type cmd and press Enter. Command Prompt opens.
- At the prompt, type chkdsk and press Enter.
- If the utility reports that it found problems, type the following, where drive is the letter that represents your Windows startup disk, such as D:
- Press Enter.
- At the prompt, type Y , then restart your PC.
- Repeat this process until the check disk utility reports no issues. If the utility can’t fix every issue that it finds, you might need to have your PC serviced. Then migrate your data to your Mac.
Move your data
This section guides you through migration, post-migration, and what to do if the steps don’t work for you.
How to move your information from a PC to your Mac
- On your PC, download and install the appropriate Windows Migration Assistant, based on the version of macOS on your Mac:
- Windows Migration Assistant for macOS Big Sur
- Windows Migration Assistant for macOS Mojave and macOS Catalina
- Windows Migration Assistant for macOS Sierra and High Sierra
- Windows Migration Assistant for OS X El Capitan or earlier
- Quit any open Windows apps.
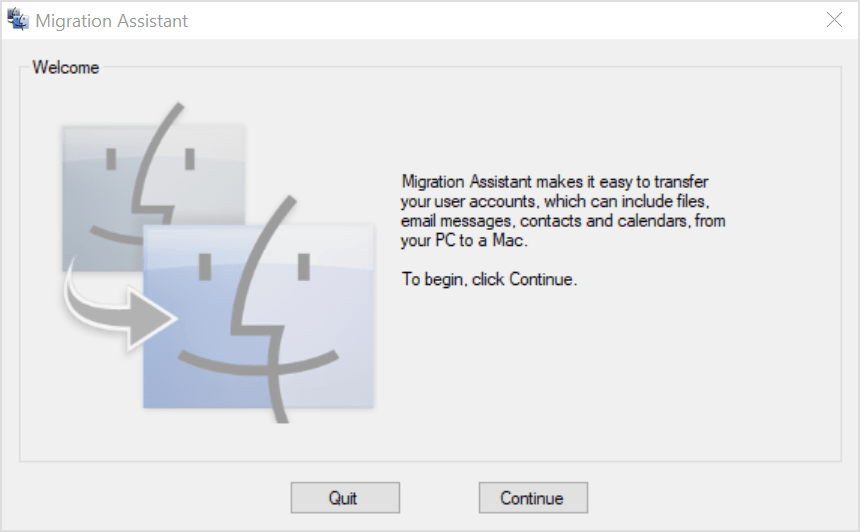
- Open Windows Migration Assistant, then click Continue.
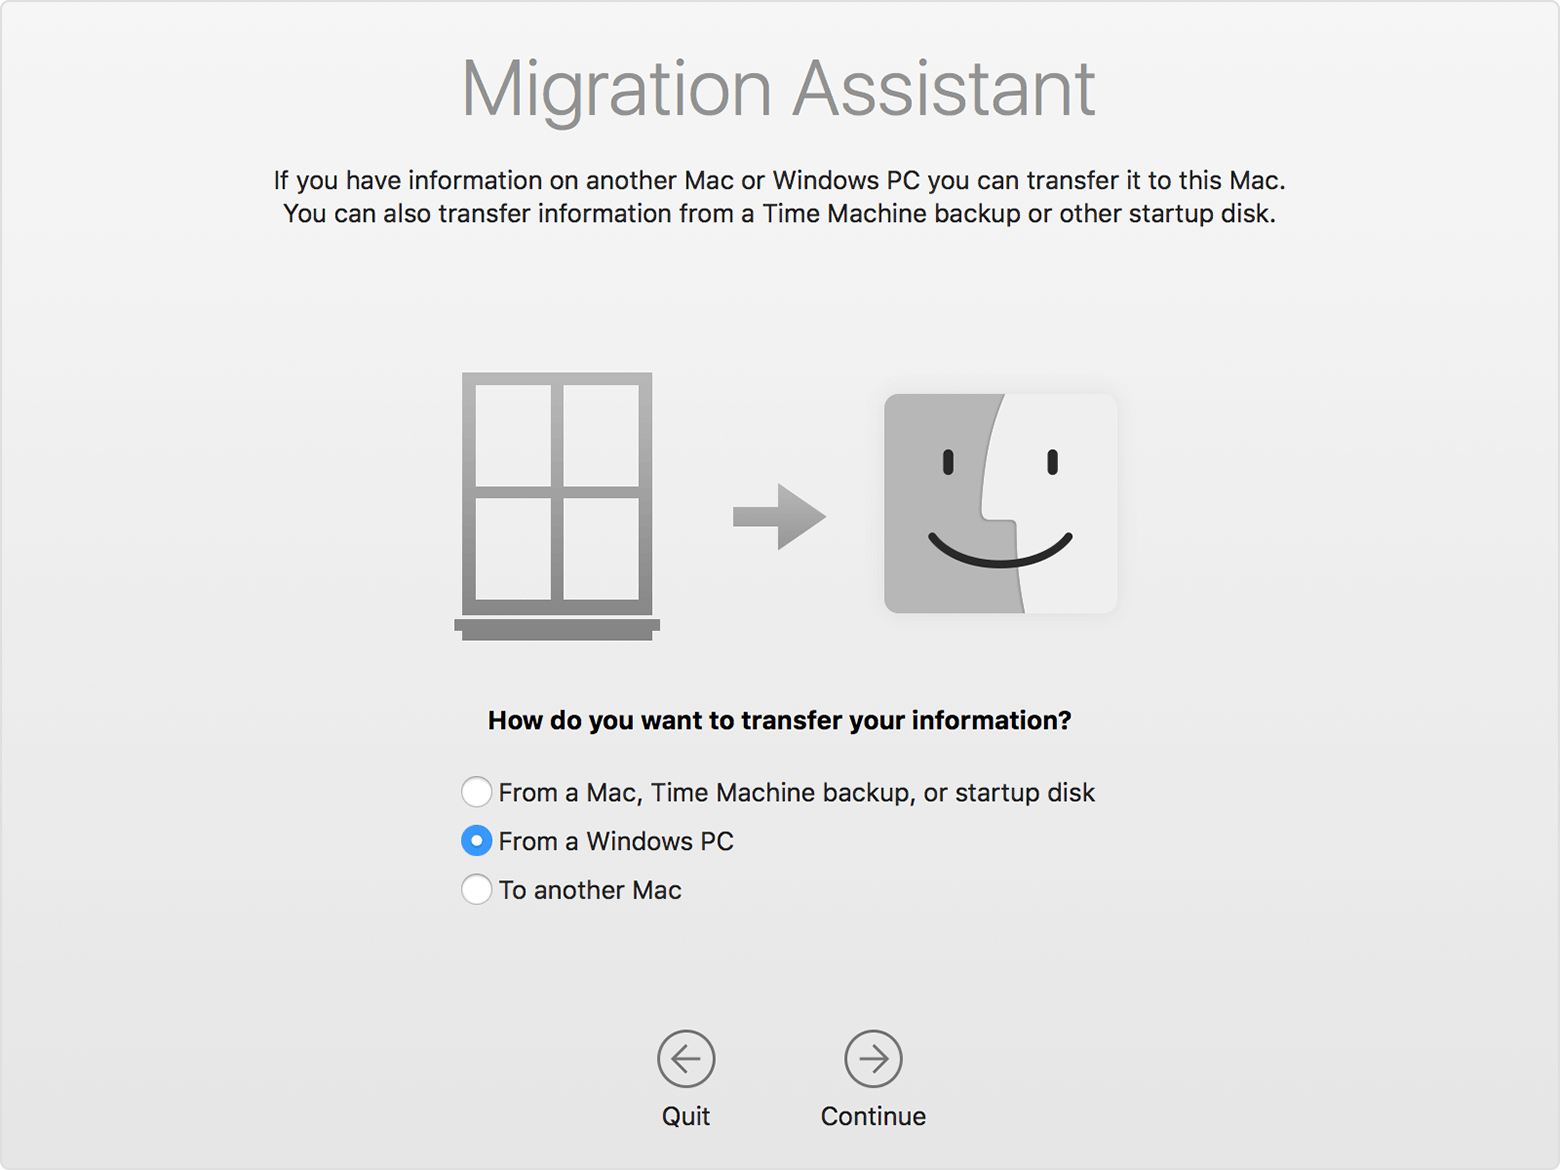
- Start up your Mac. Setup Assistant automatically opens the first time you turn on your Mac. If you’ve already set up your Mac, open Migration Assistant, which is in the Utilities folder of your Applications folder.
- On your Mac, follow the onscreen prompts until you get to the migration pane of the assistant. Select the option to transfer your information “From a Windows PC,” then click Continue.
- When prompted, enter an administrator name and password.
- Click Continue to close any other open apps.
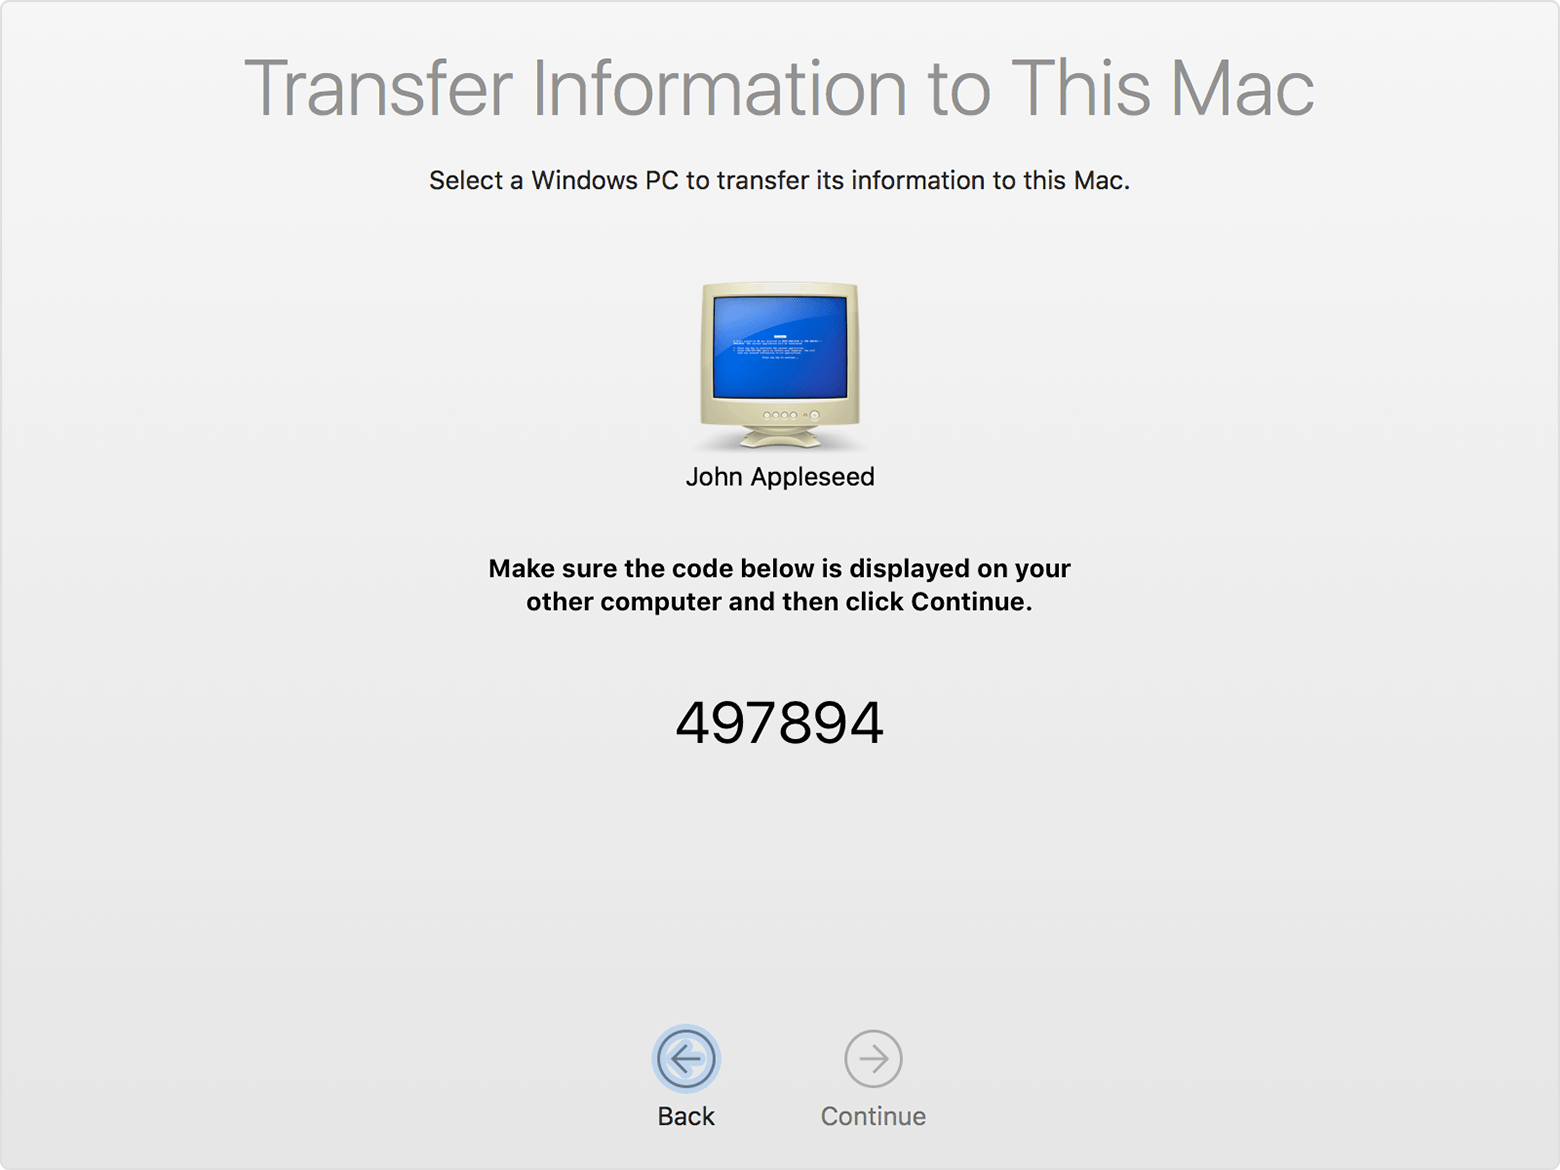
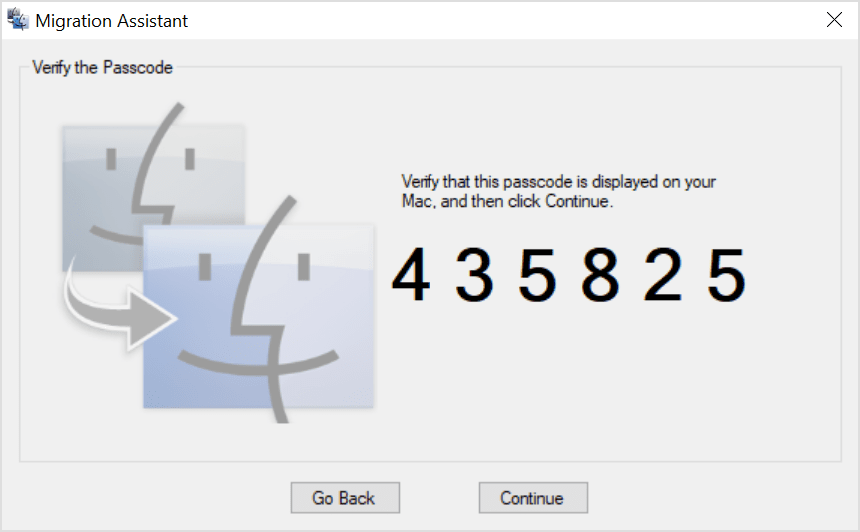
- In the migration window on your Mac, select your PC from the list of available computers. Then wait for the PC to show the same passcode that your Mac shows.
- When both computers display the same passcode, click Continue on your PC and Mac.
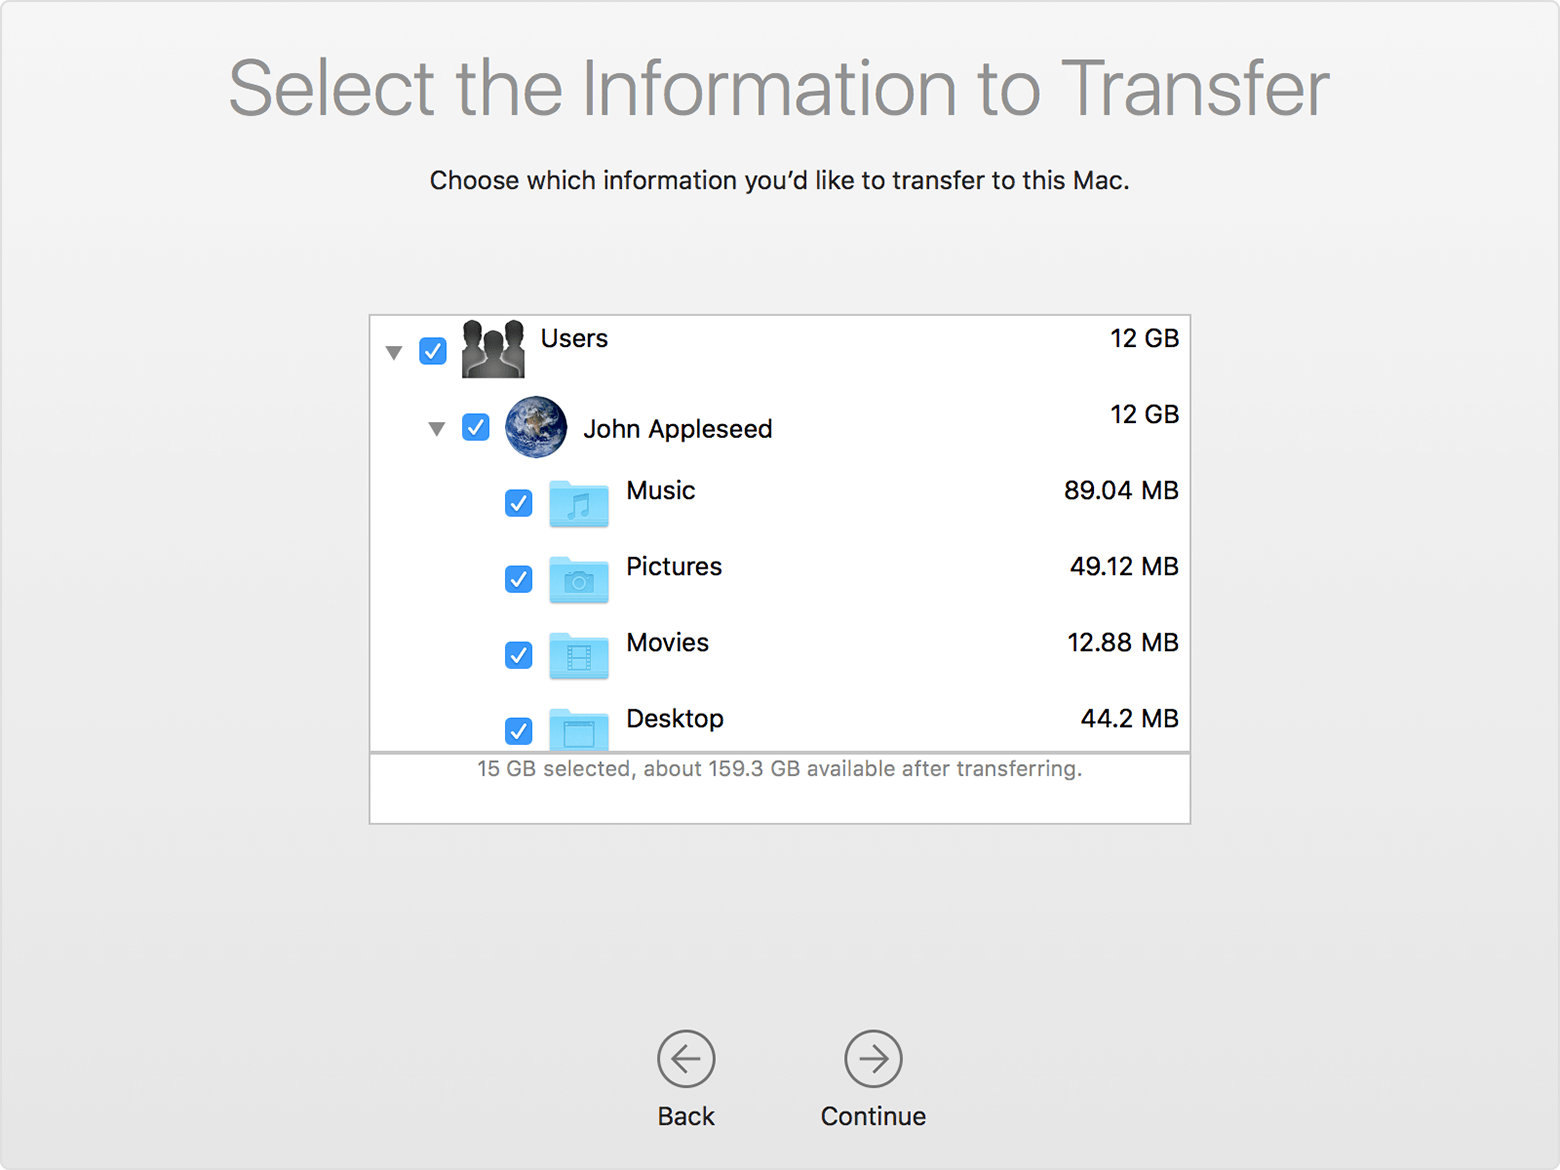
- Your Mac scans the drives on your PC to build a list of information to migrate. When the scan completes, select the information that you want to migrate to your Mac and click Continue. Learn about some of the data that you can transfer.
You can watch the progress and estimated time remaining on both the PC and your Mac. They tell you when migration is complete.
After you move your data
When migration completes, close Windows Migration Assistant on your PC. Then log in to the new user account on your Mac. The first time you log in to a user account migrated from your PC, you’re asked to set a password. You can use the same password that you used on your PC, or create a new password.
After logging in to the user account that you migrated, authorize your computer for iTunes Store purchases. It’s important to authorize before you sync or play content downloaded from the iTunes Store.
If you have issues moving your data
- Quit all open apps on your PC, then try migrating your content again. For example, you can press Alt-Tab to choose an open application, then press Alt-F4 to quit it.
- If your PC doesn’t appear in the Setup Assistant or Migration Assistant window on your Mac, make sure the computers are connected to the same network. You can create a network by connecting a single Ethernet cable between your Mac and PC. If that doesn’t help, check for firewall software on your PC and turn it off. After migration completes, you can turn firewall software on again.
- If Migration Assistant doesn’t open on your PC, turn off any antivirus software on your PC. Then try to open Migration Assistant again. After migration completes. You can turn that software on again.
- If you still can’t migrate your information successfully, you can use an external drive or file sharing to manually copy important data to your Mac.
What data can I transfer?
Migration Assistant lets you choose the data to move to your Mac. Here’s what moves over for specific apps and data types:
Email, contacts, and calendar information
Email messages, email-account settings, contacts, and appointments move based on which version of Windows you’re using and which accounts you have.
Outlook 1
Data from 32-bit versions of Outlook in Windows 7 and later move as follows:
- People move to Contacts 2
- Appointments move to the Calendar app
- IMAP and Exchange settings and messages move to the Mail app
- POP settings and messages move to Mail 2
Windows Live Mail
Data from Windows Live Mail in Windows 7 and later moves as follows:
- IMAP settings and messages move to Mail
- POP settings and messages move to Mail 2
Windows Mail
Data from Windows Mail in Windows 7 and later (excluding Windows 8) move as follows:
- IMAP settings and messages move to Mail
- POP settings and messages move to Mail 2
- People move to Contacts
Bookmarks
Bookmarks from Internet Explorer, Safari for Windows, and Firefox move to Safari.
System settings
Language and location settings, and custom desktop pictures move to System Preferences. Your web browser homepage moves to Safari preferences.
Pictures
Photos and other images move to your home folder. You can then add them to Photos, or open Photos and let it search your Mac for photos to import.
iTunes content
Migration Assistant transfers your iTunes media as follows: music to the Apple Music app, videos to the Apple TV app, podcasts to the Apple Podcasts app, and audiobooks to the Apple Books app.
Other files
Migration Assistant also moves these files:
- Files from the top-level folder of the currently logged-in user’s home directory
- Non-system files located in the Windows or Program Files folders
- Top-level folders located on the Windows system disk and other attached disks
1. Migration Assistant doesn’t support 64-bit versions of Outlook. You can manually migrate Mail, Contacts, or Calendars from Outlook 2013 or Outlook 2016 by signing in and entering the content on your Mac manually.
2. Migration Assistant transfers only the Mail or Contacts data that belongs to the logged-in Windows user. To transfer data from another user account, use Migration Assistant again while you’re logged in to another Windows account. Each time you migrate, your Mac creates a new user account.
Information about products not manufactured by Apple, or independent websites not controlled or tested by Apple, is provided without recommendation or endorsement. Apple assumes no responsibility with regard to the selection, performance, or use of third-party websites or products. Apple makes no representations regarding third-party website accuracy or reliability. Contact the vendor for additional information.
Установка Windows 10 на компьютере Mac с помощью приложения «Ассистент Boot Camp»
С помощью Boot Camp можно установить Microsoft Windows 10 на компьютере Mac и переключаться между macOS и Windows при его перезагрузке.
Необходимые условия для установки Windows 10 на компьютере Mac
- MacBook, выпущенный в 2015 г. или позже
- MacBook Air, выпущенный в 2012 г. или позже
- MacBook Pro, выпущенный в 2012 г. или позже
- Mac mini, выпущенный в 2012 г. или позже
- iMac, выпущенный в 2012 г. или позже 1
- iMac Pro (все модели)
- Mac Pro, выпущенный в 2013 году или позже
Последние обновления macOS, которые могут включать обновления приложения «Ассистент Boot Camp». Приложение «Ассистент Boot Camp» необходимо для установки Windows 10.
Не менее 64 ГБ свободного места на загрузочном диске Mac:
- Достаточно 64 ГБ дискового пространства, но для оптимальной работы требуется не менее 128 ГБ. Это минимальный объем, необходимый для автоматических обновлений Windows.
- Если объем оперативной памяти (ОЗУ) компьютера iMac Pro или Mac Pro составляет 128 ГБ или больше, на загрузочном диске должно быть как минимум столько же свободного места 2 .
Внешний флеш-накопитель USB объемом памяти не менее 16 ГБ, если только не используется компьютер Mac, для которого не требуется флеш-накопитель для установки Windows.
64-разрядная версия Windows 10 Home или Windows 10 Pro в виде образа диска (ISO) или на другом установочном носителе. При первой установке Windows на компьютере Mac используйте полную версию Windows, а не обновление.
- Если ваша копия Windows записана на флеш-накопитель USB или у вас есть ключ продукта Windows и нет установочного диска, загрузите образ диска Windows 10 на сайте Microsoft.
- Если ваша копия Windows записана на диск DVD, может потребоваться создать его образ.
Инструкции по установке Windows 10 на компьютере Mac
Для установки Windows используйте приложение «Ассистент Boot Camp», входящее в комплект поставки компьютера Mac.
1. Проверьте настройки функции «Безопасная загрузка»
Узнайте, как проверить настройки функции «Безопасная загрузка». В настройках функции «Безопасная загрузка» по умолчанию выбран параметр «Высший уровень безопасности». Если вы выбрали параметр «Функции безопасности отключены», перед установкой Windows снова включите параметр «Высший уровень безопасности». После установки Windows вы можете использовать любые настройки функции «Безопасная загрузка». Это не повлияет на запуск ОС Windows.
2. Использование приложения «Ассистент Boot Camp» для создания раздела Windows
Откройте приложение «Ассистент Boot Camp» во вложенной папке «Утилиты» папки «Программы». Следуйте инструкциям на экране.
- Если появится сообщение о необходимости использовать накопитель USB, вставьте флеш-накопитель USB в компьютер Mac. Приложение «Ассистент Boot Camp» использует его, чтобы создать загружаемый накопитель USB для установки Windows.
- Когда приложение «Ассистент Boot Camp» попросит указать размер раздела Windows, руководствуйтесь минимальными требованиями к объему памяти, указанными в предыдущем разделе. Укажите размер раздела в соответствии со своими потребностями. В дальнейшем изменить его будет нельзя.
3. Форматирование раздела Windows (BOOTCAMP)
По завершении работы приложения «Ассистент Boot Camp» компьютер Mac перезагрузится в среде установки Windows. Если установщик спросит, куда установить Windows, выберите раздел BOOTCAMP и нажмите «Форматировать». В большинстве случаев установщик автоматически выберет и отформатирует раздел BOOTCAMP.
4. Установка Windows
Отсоедините все внешние устройства, которые не требуются во время установки. Затем нажмите «Далее» и следуйте инструкциям на экране, чтобы начать установку Windows.
5. Использование установщика Boot Camp в Windows
По завершении установки Windows компьютер Mac запускается в Windows и отображает приветствие установщика Boot Camp. Следуйте инструкциям на экране, чтобы установить Boot Camp и вспомогательное программное обеспечение Windows (драйверы). По завершении будет предложено выполнить перезапуск.
- Если установщик Boot Camp не открывается, откройте его вручную и используйте для выполнения установки Boot Camp.
- При наличии внешнего дисплея, подключенного к порту Thunderbolt 3 на компьютере Mac, его экран во время установки (до 2 минут) будет пустым (черным, серым или синим).
Процедура переключения между Windows и macOS
Перезапустите компьютер, во время запуска нажмите и удерживайте клавишу Option (или Alt) ⌥ для переключения между операционными системами Windows и macOS.
Дополнительная информация
Если используется одна из перечисленных ниже моделей Mac на базе процессора Intel с OS X El Capitan или более поздней версии, для установки Windows не требуется флеш-накопитель USB.
- MacBook, выпущенный в 2015 г. или позже
- MacBook Air, выпущенный в 2017 г. или позже 3
- MacBook Pro, выпущенный в 2015 г. или позже 3
- iMac, выпущенный в 2015 г. или позже
- iMac Pro (все модели)
- Mac Pro, выпущенный в конце 2013 г. или позже
Для получения дополнительных сведений об использовании Windows на компьютере Mac откройте приложение «Ассистент Boot Camp» и нажмите кнопку «Открыть Справку Boot Camp».
1. Если используется компьютер iMac (с дисплеем Retina 5K, 27 дюймов, конец 2014 г.), iMac (27 дюймов, конец 2013 г.) или iMac (27 дюймов, конец 2012 г.) с жестким диском объемом 3 ТБ и операционной системой macOS Mojave или более поздней версии, узнайте об оповещении, которое может отображаться во время установки.
2. Например, если объем ОЗУ на компьютере Mac составляет 128 ГБ, то на загрузочном диске должно быть доступно не менее 128 ГБ для Windows. Чтобы узнать объем ОЗУ компьютера Mac, перейдите в меню Apple > «Об этом Mac». Чтобы узнать объем доступного дискового пространства, перейдите на вкладку «Хранилище» в этом же окне.
3. Эти модели Mac также были доступны с жесткими дисками емкостью 128 ГБ. Компания Apple рекомендует жесткие диски емкостью не менее 256 ГБ, чтобы можно было создать раздел Boot Camp размером не менее 128 ГБ.
Информация о продуктах, произведенных не компанией Apple, или о независимых веб-сайтах, неподконтрольных и не тестируемых компанией Apple, не носит рекомендательного или одобрительного характера. Компания Apple не несет никакой ответственности за выбор, функциональность и использование веб-сайтов или продукции сторонних производителей. Компания Apple также не несет ответственности за точность или достоверность данных, размещенных на веб-сайтах сторонних производителей. Обратитесь к поставщику за дополнительной информацией.
