- Setting Up a Secure FTP Server using SSL/TLS on Ubuntu
- Requirements
- Step 1: Generating SSL/TLS Certificate for FTP on Ubuntu
- Step 2: Configuring VSFTPD to Use SSL/TLS on Ubuntu
- Step 3: Verify FTP with SSL/TLS Connections on Ubuntu
- Step 4:Install FileZilla On Clients to Connect FTP Securely
- If You Appreciate What We Do Here On TecMint, You Should Consider:
- Использование SSL/TLS на vsftpd (Ubuntu)
- Вступление
- Установка vsftpd
- Настройка основных функций
- Создание FTP-пользователя
- Настройка SSL для работы с vsftpd
- Внесение SSL в конфигурации Vsftpd
- Подключение к серверу через FileZilla
- Итоги
- Сервис ftp Установка ProFTPd with TLS support на Ubuntu Linux Server
- 1) Добавим репозитории ubuntu
- 2)проверка списка обновлений репозиториев
- 3)Установка фтп сервера proftpd и openssl
- 4)Ограничить пользователя домашней папкой и скрыть версию програмного обеспечения ftp сервера и ОС
- 5.1)Создадим папку
- 5.2)Отвечаем на вопросы
- 5.3)Защитите созданные файлы сертификатов. Secure the generated certificate files.(owner can read and write)
- 6)Включим TLS в ProFTPd
- 7)Редактируем файл tls.conf
- 6.1)Перезапуск сервиса proftpd
- 8)Добавим фтп пользователя без доступа к ssh консоли
- Your Own Linux.
- Linux How To’s | Bash Scripting | Python
- Thursday, 11 June 2015
- How To : Set up a FTPS (FTP over SSL) Server on Linux
- Installation of required packages
- Generating the SSL certificate and RSA key file
- The vsftpd configuration part
- Add vsftpd service to startup
- Adding FTP users
Setting Up a Secure FTP Server using SSL/TLS on Ubuntu
In this tutorial, we will describe how to secure a FTP server (VSFTPD stands for “Very Secure FTP Daemon”) using SSL/TLS in Ubuntu 16.04/16.10.
If you’re looking to setup a secure FTP server for CentOS based distributions, you can read – Secure an FTP Server Using SSL/TLS on CentOS
After following the various steps in this guide, we will have learned the fundamentals of enabling encryption services in a FTP server for secure data transfers is crucial.
Requirements
Before we move further, make sure that all commands in this article will be run as root or sudo privileged account.
Step 1: Generating SSL/TLS Certificate for FTP on Ubuntu
1. We will begin by creating a subdirectory under: /etc/ssl/ to store the SSL/TLS certificate and key files if it doesn’t exist:
2. Now let’s generate the certificate and key in a single file, by running the command below.
The above command will prompt you to answer the questions below, don’t forget to enter values that applicable to your scenario.
Step 2: Configuring VSFTPD to Use SSL/TLS on Ubuntu
3. Before we perform any VSFTPD configurations, for those who have UFW firewall enabled, you have to open the ports 990 and 40000-50000 to allow TLS connections and the port range of passive ports to set in the VSFTPD configuration file respectively:
4. Now, open the VSFTPD config file and define the SSL details in it:
Then, add or locate the option ssl_enable and set its value to YES to activate the use of SSL, again, because TLS is more secure than SSL, we will restrict VSFTPD to use TLS instead, by enabling the ssl_tlsv1 option:
5. Next, comment out the lines below using the # character as follows:
Afterwards, add the lines below to define the location of the SSL certificate and key file:
6. Now, we also have to prevent anonymous users from using SSL, then force all non-anonymous logins to use a secure SSL connection for data transfer and to send the password during login:
7. Furthermore, we can use the options below to add more security features in the FTP server. With option require_ssl_reuse=YES , all SSL data connections are required to exhibit SSL session reuse; proving that they know the same master secret as the control channel. So, we should disable it.
In addition, we can set which SSL ciphers VSFTPD will permit for encrypted SSL connections with the ssl_ciphers option. This will help frustrate any efforts by attackers who try to force a specific cipher which they possibly discovered vulnerabilities in:
8. Then, let’s define the port range (min and max port) of passive ports.
9. To enable SSL debugging, meaning openSSL connection diagnostics are recorded to the VSFTPD log file, we can use the debug_ssl option:
Finally save the file and close it. Then restart VSFTPD service:
Step 3: Verify FTP with SSL/TLS Connections on Ubuntu
10. After performing all the above configurations, test if VSFTPD is now using SSL/TLS connections by trying to use FTP from the command line as below.
From the output below, there is an error message telling us VSFTPD can only permit users (non-anonymous) to login from secure clients which support encryption services.
The command line doesn’t support encryption services thus resulting to the error above. Therefore, to securely connect to a FTP server with encryption services enabled, we need a FTP client that supports SSL/TLS connections by default, such as FileZilla.
Step 4:Install FileZilla On Clients to Connect FTP Securely
FileZilla is a powerful, widely used cross-platform FTP client which supports FTP over SSL/TLS and more. To install FileZilla on a Linux client machine, use the following command.
12. Once the installation completes, open it and go to File=>Sites Manager or (press Ctrl+S) to get the Site Manager interface below.
![]() Filezilla Site Manager
Filezilla Site Manager
13. Now, define the host/site name, add the IP address, define the protocol to use, encryption and logon type as in the screen shot below (use values that apply to your scenario):
Click on New Site button to configure a new site/host connection.
![]() Configure New FTP Site on Filezilla
Configure New FTP Site on Filezilla
14. Then click on Connect from the interface above to enter the password, and then verify the certificate being used for the SSL/TLS connection, and click OK once more to connect to the FTP server:
![]() Verify FTP SSL Certificate
Verify FTP SSL Certificate
15. Now, you should have logged successfully into the FTP server over a TLS connection, check the connection status section for more information from the interface below.
![]() Connected to Ubuntu FTP Server
Connected to Ubuntu FTP Server
16. Lastly, let’s transfer files from the local machine to the FTP sever in the files folder, take a look at the lower end of the FileZilla interface to view reports concerning file transfers.
![]() Secure FTP File Transfer using Filezilla
Secure FTP File Transfer using Filezilla
That’s all! Always remember that installing a FTP server without enabling encryption services has certain security implications. As we explained in this tutorial, you can configure a FTP server to use SSL/TLS connections to implement security in Ubuntu 16.04/16.10.
If you face any issues in setting up SSL/TLS on FTP server, do use the comment form below to share your problems or thoughts concerning this tutorial/topic.
If You Appreciate What We Do Here On TecMint, You Should Consider:
TecMint is the fastest growing and most trusted community site for any kind of Linux Articles, Guides and Books on the web. Millions of people visit TecMint! to search or browse the thousands of published articles available FREELY to all.
If you like what you are reading, please consider buying us a coffee ( or 2 ) as a token of appreciation.

We are thankful for your never ending support.
Источник
Использование SSL/TLS на vsftpd (Ubuntu)
Вступление
Предупреждение: FTP по своей сути небезопасен! В большинстве случаев рекомендуется использовать SFTP вместо FTP.
Раньше FTP (или File Transfer Protocol – протокол передачи файлов) был очень популярным способом обмена файлами между локальным и удаленным компьютерами. Тем не менее, он небезопасен, потому его использование подвергает компьютер определенному риску.
При необходимости использовать именно FTP (вместо более безопасного SFTP, который для передачи файлов использует протокол SSH) его можно несколько обезопасить при помощи SSL.
Данное руководство демонстрирует, как настроить vsftpd для использования SSL-сертификатов на сервере Ubuntu 12.04.
Установка vsftpd
Сервер vsftpd можно получить из репозиториев Ubuntu по умолчанию. Чтобы установить его, наберите:
sudo apt-get install vsftpd
Теперь vsftpd установлен, можно приступить к его настройке.
Настройка основных функций
По умолчанию конфигурационный файл находится в /etc/vsftpd.conf. Откройте его с привилегиями root:
sudo nano /etc/vsftpd.conf
Отключите возможность входа в систему анонимно: найдите параметр anonymous_enable и измените его значение на “NO”:
Затем нужно позволить вход пользователям, использующим локальные файлы аутентификации, так как анонимный доступ отключен. Раскомментируйте данную строку:
Чтобы разрешить пользователям вносить изменения в файловую систему, раскомментируйте параметр:
Кроме того, необходимо раскомментировать опцию chroot_local_user, чтобы ограничить пользователей их домашними каталогами:
Сохраните изменения и закройте файл.
Создание FTP-пользователя
Поскольку vsftpd защищает все jail-ы chroot, chroot не должен принадлежать пользователю и не должен иметь право на изменение. Поэтому удобнее всего создать отдельного пользователя для работы с FTP.
Для этого наберите:
sudo adduser ftpuser
Установите пароль; на остальные извещения можно нажать ENTER. Теперь нужно передать root -привилегии домашнему каталогу пользователя ftpuser.
sudo chown root:root /home/ftpuser
Внутри этого домашнего каталога создайте отдельный каталог, в который можно выгрузить файлы. Затем передайте этот каталог пользователю FTP:
sudo mkdir /home/ftpuser/files
sudo chown ftpuser:ftpuser /home/ftpuser/files
Теперь можно установить (незащищенное) соединение как ftpuser и выгрузить файлы в каталог files.
Настройка SSL для работы с vsftpd
Теперь нужно создать сертификаты SSL, чтобы использовать их с vsftpd. Это делается так:
sudo openssl req -x509 -nodes -days 365 -newkey rsa:1024 -keyout /etc/ssl/private/vsftpd.pem -out /etc/ssl/private/vsftpd.pem
Это создаст сертификат, действительный на протяжении года. Он будет размещен в каталоге /etc/ssl/private/, который нужно добавить в конфигурационный файл.
Внесение SSL в конфигурации Vsftpd
Откройте конфигурационный файл с привилегиями root:
sudo nano /etc/vsftpd.conf
В нижней части файла найдите строку, соответствующую только что созданному сертификату SSL:
Под этой строкой нужно внести дополнительную информацию об SSL.
При создании сертификата ключевой файл и сертификат были помещены в один файл, поэтому можно указать строку закрытого ключа:
Затем нужно внести следующие строки, которые ограничат доступ клиентов к TLS.
ssl_enable=YES
allow_anon_ssl=NO
force_local_data_ssl=YES
force_local_logins_ssl=YES
Затем нужно настроить сервер на использование TLS (преемник SSL):
ssl_tlsv1=YES
ssl_sslv2=NO
ssl_sslv3=NO
Чтобы расширить конфигурационный файл, необходимо внести дополнительные опции:
Сохранив изменения, закройте файл.
Затем перезапустите сервер, чтоб активировать внесенные изменения:
sudo service vsftpd restart
Подключение к серверу через FileZilla
Современные клиенты FTP могут использовать механизмы шифрования SSL и TLS. Ниже будет продемонстрировано, как установить подключение с помощью FileZilla (используя поперечные платформы).
Слева на конфигурационной панели найдите и нажмите кнопку, которая открывает “Site Manager”.
Затем нажмите на кнопку “New Site” в правом нижнем углу появившегося окна.
Введите IP-адрес. В поле “Encryption” разверните меню и выберите “Require explicit FTP over TLS”.
В поле “Logon Type” выберите “Ask for password”. В поле “User” укажите ранее созданного пользователя ftp.
Затем нажмите “Connect” в нижней части интерфейса, после чего введите пароль пользователя ftp.
На данном этапе нужно будет принять TLS-сертификат.
Готово! Теперь соединение с сервером с помощью механизма шифрования TLS/SSL установлено.
Итоги
Инструкции данного руководства помогут повысить защиту FTP; тем не менее, FTP по-прежнему имеет некоторые уязвимости при установлении соединения. Если это возможно, некоторые операции лучше выполнять по SFTP. В любом случае, при работе с FTP настоятельно рекомендуется использовать TLS/SSL.
Источник
Сервис ftp Установка ProFTPd with TLS support на Ubuntu Linux Server
ProFTPD (Professional FTP Daemon) — FTP-сервер для Linux и UNIX-подобных операционных систем.
ProFTPD использует лишь один конфигурационный файл proftpd.conf, который располагается по умолчанию в:
Linux — /etc/proftpd/proftpd.conf ( CentOS 7: /etc/proftpd.conf )
FreeBSD — /usr/local/etc/proftpd.conf.
1) Добавим репозитории ubuntu
2)проверка списка обновлений репозиториев
3)Установка фтп сервера proftpd и openssl
узнать версию proftpd -v
4)Ограничить пользователя домашней папкой и скрыть версию програмного обеспечения ftp сервера и ОС
The first option enables chrooting of FTP users into their home directory and the second option enables a ServerIdent message that does not contain any information about the used FTP server software, version or OS so that a potential attacker don’t gets these details on the silver plate.
5.1)Создадим папку
5.2)Отвечаем на вопросы
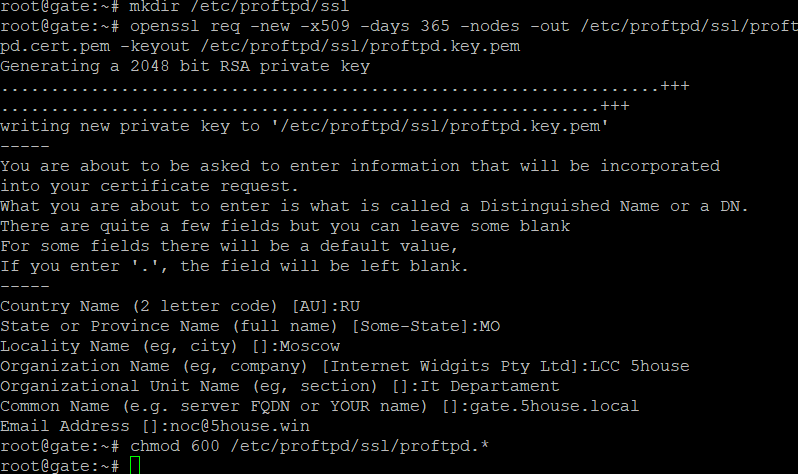
5.3)Защитите созданные файлы сертификатов. Secure the generated certificate files.(owner can read and write)
6)Включим TLS в ProFTPd
Enable TLS in ProFTPd
7)Редактируем файл tls.conf
6.1)Перезапуск сервиса proftpd
Если вы используете TLSRequired on, то разрешены только TLS-соединения (это блокирует всех пользователей со старыми FTP-клиентами, у которых нет поддержки TLS); путем комментирования этой строки или использования TLSRequired как с TLS, так и с не-TLS-соединениями, в зависимости от того, что поддерживает FTP-клиент.
If you use TLSRequired on, then only TLS connections are allowed (this locks out any users with old FTP clients that don’t have TLS support); by commenting out that line or using TLSRequired off both TLS and non-TLS connections are allowed, depending on what the FTP client supports.
8)Добавим фтп пользователя без доступа к ssh консоли
9)Создаём профиль пользователя ftp1
и даём на него права
9.1)Смена пароля пользователя ftp1
10)Бесплатный фтп ftp клиент https://filezilla-project.org/ 
Источник
Your Own Linux.
Linux How To’s | Bash Scripting | Python
Thursday, 11 June 2015
How To : Set up a FTPS (FTP over SSL) Server on Linux
FTP is a standardized network protocol and probably the quickest as well as easiest option available when a large chunk of data is to be transferred, from one host to another, over a TCP-based network. FTP defines a client-server architecture which uses two separate ‘well-known’ ports, for data (port no. 20, used for data transfer) and control (port no. 21, used for authentication) connections, in order to establish connectivity between the server and the client.

Installation of required packages
- openssl
- vsftpd
To install above packages in Debian-based systems, you can run:
On Red hat Linux- based systems, you can run:
Generating the SSL certificate and RSA key file
For our convenience, we will put the certificate and the key in the same file, and store that file as ‘/etc/vsftpd/vsftpd.pem’.
Once above command is executed, you will be asked to provide some basic information. The output would be very much similar to:
The vsftpd configuration part
Now, let us edit the configuration file as per our requirement. You might need to find out the lines, or add them if they do not pre-exist.
Step 1 : Turn on SSL
Step 2 : Mention the Certificate and key file location
Step 3 : Enable TLS
TLS is considered to be more secure than SSL and we would definitely like to use TLS whenever required.
Step 4 : Other basic configurations
To allow all the local users added to the system to use FTP service, edit following line:
To prevent anonymous logins, edit the following line:
To accept FTP write commands, edit the following line:
To enable logging of the transfers carried out, edit the following lines:
Add vsftpd service to startup
With all the configurations done, you will have to restart the service so that the changes incorporated can take effect.
You can verify this by issuing the ‘chkconfig’ command as follows:
To overcome this and to configure the service to start automatically, you can use:
Adding FTP users
Now, your FTP server is ready to use and you can add users who can access it. Adding the FTP users is very similar to adding users in the operating system, using ‘useradd’ command. With this, every user will get a separate home directory and with the ‘chroot jail’ activated, users will be forced to work within their home directories.
To add a user ‘mandar’, simply run:
To set the password for ‘mandar’, use ‘passwd’ command as follows:
You will have to mention the new password and confirm it once.
Now the user ‘mandar’ will be able to use the FTPS Services using any FTP Client that support SSL/TLS, such as FileZilla. In order to access FTPS server through browsers, you may require to install some addons like ‘fireFTP’.
Источник


