- Настройка прав доступа к файлам, папкам и дискам на Mac
- Назначение прав доступа пользователям и группам
- Применение прав доступа ко всем объектам в папке или на диске
- Смена владельца объекта
- Добавление и удаление пользователей и групп в столбце «Имя».
- MacBooster
- MacOS: Asking for «Full Disk Access» during installation process
- Background
- Problem
- Question
- 1 Answer 1
- Advances in macOS Security — WWDDC 2019
- Full Disk Access and why you shouldn’t be afraid of It
- Before we start
- What is Full Disk Access in macOS Mojave?
- What does Full Disk Access mean to you?
- Explore the latest security features of your Mac
- When should you grant Full disk Access for an application?
- How to give Full Disk Access?
- What are Full Permissions, and how to give them?
- Broken permissions?
- Privacy Permissions not working on Mojave (Camera and Mic)
- macOS Mojave privacy changes (and challenges)
- Final thoughts: Check your app permissions with CleanMyMac X
Настройка прав доступа к файлам, папкам и дискам на Mac
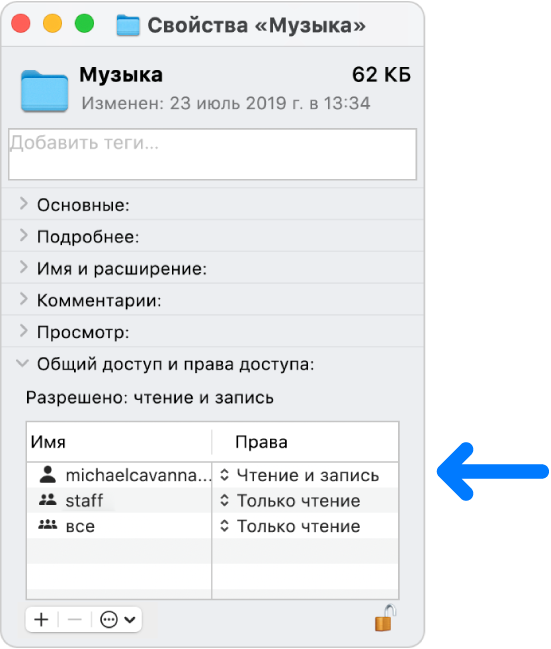
Настройки прав доступа определяют, кто может просматривать и изменять файлы на компьютере. Настройки прав доступа файла, папки или диска можно изменить в нижней части окна «Свойства». Это окно можно открыть в Finder. Например, можно изменить права доступа папки так, чтобы другие пользователи этого Mac или пользователи, подключающиеся к нему для доступа к файлам, могли просматривать файлы в папке, но не могли изменять их.
Назначение прав доступа пользователям и группам
На Mac выберите диск, папку или файл, затем выберите «Файл» > «Свойства».
Если информация в разделе «Общий доступ и права доступа» не отображается, нажмите стрелку  .
.
Если замок в правом нижнем углу закрыт  , нажмите его, чтобы разблокировать панель «Свойства», затем введите имя и пароль администратора.
Нажмите пользователя или группу в столбце «Имя», затем во всплывающем меню выберите настройки прав доступа.
Чтение и запись. Пользователь сможет открывать объект и изменять его.
Только чтение. Пользователь сможет открывать объект, но не сможет изменять его.
Только запись (почтовый ящик). Преобразует папку в папку типа «почтовый ящик». Пользователи смогут копировать объекты в такую папку, но не смогут открывать ее. Открыть «почтовый ящик» может только его владелец.
Нет доступа. Блокируется любой доступ к объекту.
Пока открыто окно «Свойства», можно отменить любые изменения прав доступа пользователя или группы в разделе «Общий доступ и права доступа». Прежде чем закрывать окно «Свойства», нажмите раскрывающееся меню действий  и выберите «Отменить изменения».
Применение прав доступа ко всем объектам в папке или на диске
На Mac выберите папку или диск, затем выберите «Файл» > «Свойства».
Если замок в правом нижнем углу закрыт , нажмите его, чтобы разблокировать панель «Свойства», затем введите имя и пароль администратора.
Нажмите всплывающее меню действий , затем выберите «Применить к вложенным объектам».
Смена владельца объекта
На Mac выберите объект, затем выберите «Файл» > «Свойства».
Если замок в правом нижнем углу закрыт , нажмите его, чтобы разблокировать панель «Свойства», затем введите имя и пароль администратора.
Если имя нового владельца отсутствует в столбце «Имя» (в разделе «Общий доступ и права доступа»), нажмите кнопку «Добавить»  , чтобы добавить нового владельца.
Выберите нового владельца в столбце «Имя», нажмите всплывающее меню действий , затем выберите «Сделать __ владельцем».
Пока открыто окно «Свойства», можно отменить любые изменения владельца объекта в разделе «Общий доступ и права доступа». Прежде чем закрывать окно «Свойства», нажмите раскрывающееся меню действий и выберите «Отменить изменения».
Добавление и удаление пользователей и групп в столбце «Имя».
На Mac выберите объект, затем выберите «Файл» > «Свойства».
Если замок в правом нижнем углу закрыт , нажмите его, чтобы разблокировать панель «Свойства», затем введите имя и пароль администратора.
В разделе «Общий доступ и права доступа» выполните одно из следующих действий:
Добавление пользователя или группы. нажмите кнопку «Добавить» под списком, выберите пользователя или группу, затем нажмите «Выбрать».
Удаление пользователя или группы. выберите пользователя или группу, затем нажмите кнопку «Удалить»  под списком.
Пока открыто окно «Свойства», можно отменить добавление или удаление пользователя или группы в разделе «Общий доступ и права доступа». Прежде чем закрывать окно «Свойства», нажмите раскрывающееся меню действий и выберите «Отменить изменения».
Источник
MacBooster
What is Full Disk Access?
Full Disk Access is a new security feature in macOS Mojave that requires some applications to be given full permission to access a user’s protected files, like backup solutions, virus scanners, and hard drive cleaners need access to scan all of your files, including ones locked down by the system and used for other apps like Messages, Safari, Home, Time Machine.
When and How to give full disk access?
Although many applications require Full Disk Access, you cannot accept it all. So in what circumstances can be granted Full Disk Access? First, make sure the app comes from trusted sources. Try to download reliable developer’s apps from the official website or credible download site as possible. Second, there are reasonable explanations to get Full Disk Access. Read the reasons carefully why it needs Full Disk Access and consider whether to allow it or not. In short, follow these two principles when you give the Full Disk Access:
1. Apps come from trusted sources
2. The explanation for Full Disk Access is reasonable

Typically, those apps need to grant Full Disk Access will get the authorization in a pop-up window at installation time. And you can also manage it in the system preference if you want to change your mind.
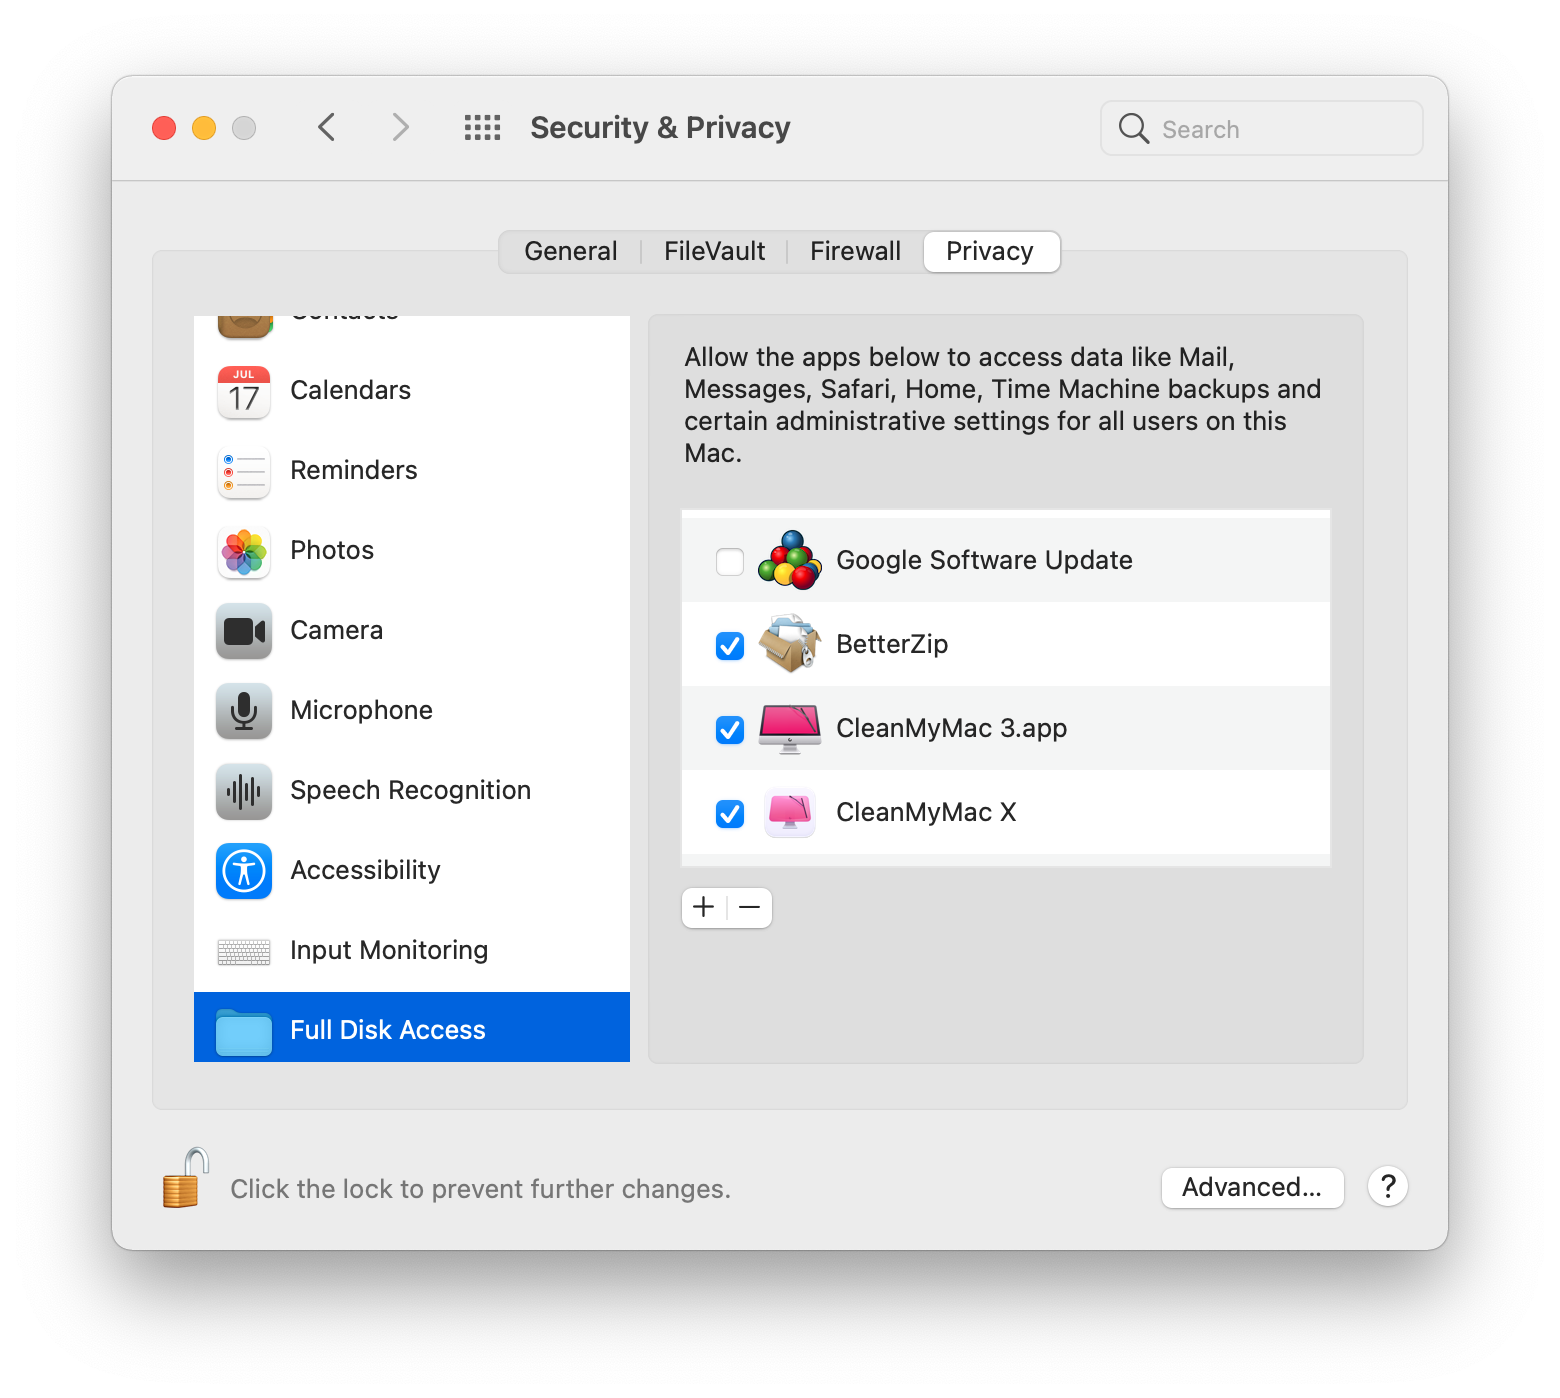
1. Click the Apple Icon → System Preference.
2. Go to Security & Privacy → Privacy.
3. Find the Full Disk Access and click the “-”“+” to add or remove the items.
4. Click the lock to prevent further changes.

How to protect your privacy and security with Macbooster?
I bet that two of your biggest concerns about granting Full Disk Access are privacy protection and computer security. But with MacBooster you will not worry about that anymore. Published by IObit, world’s top system utility and security software provider since 2004, MacBooster, as a one-stop Mac maintenance tool, spare no effort to secure your Mac. MacBooster gives you full protection for your Mac in just a few steps:
1. Download MacBooster from the official site. ( Free Download )
2. Go to Virus & Malware Scan to secure your Mac.
3. Go to Turbo Boost module can fix disk permission issues.
4. Privacy Protection module protects your Mac privacy in-real time.

MacBooster has many other powerful tools which are equally simple to operate. You can try it, and you’ll find that your Mac is cleaner and faster than ever. And your privacy is well protected. Don’t be afraid of granting full disk access, just remember to read carefully when granting it.
Check out more useful tips:
Источник
MacOS: Asking for «Full Disk Access» during installation process
Background
I have a daemon which tracks all activity on system. To work correctly it needs «Full Disk Access».
Problem
If user manually adds daemon to list in «Preferences/Protection and privacy/Privacy/Full Disk Access» everything works as it suppose to. Problem is that my application is a daemon so it doesn’t have access to UI. So when it accesses restricted resources user can’t be prompted to grant «Full Disk Access». As a result user may not be aware that software is not fully operational.
Basically this solution doesn’t work (it is not enough for a daemon).
Question
To solve this issue I want to prompt user to grant «Full Disk Access» during installation process. I have no idea how to achieve that.
Is it possible to grant «Full Disk Access» during pkg installation process? If yes how to do it?
1 Answer 1
So when it accesses restricted resources user can’t be prompted to grant «Full Disk Access»
No apps can prompt to grant «Full Disk Access». You can prompt for access to other privileged «Finders and Folders» locations (Desktop, Documents, Downloads, etc.) but not for the Full Disk Access locations (mail database, etc.)
Your daemon should be able to prompt for «Finders and Folders» access, despite it being a daemon.
Granting access to helper apps specifically was discussed at WWDC 2019:
Advances in macOS Security — WWDDC 2019
And while we’re here, I’d like to talk about one of the enhancements that we’ve made in macOS Catalina to how apps are approved for Full Disk Access, while users can still manually add apps to the list using the plus button here.
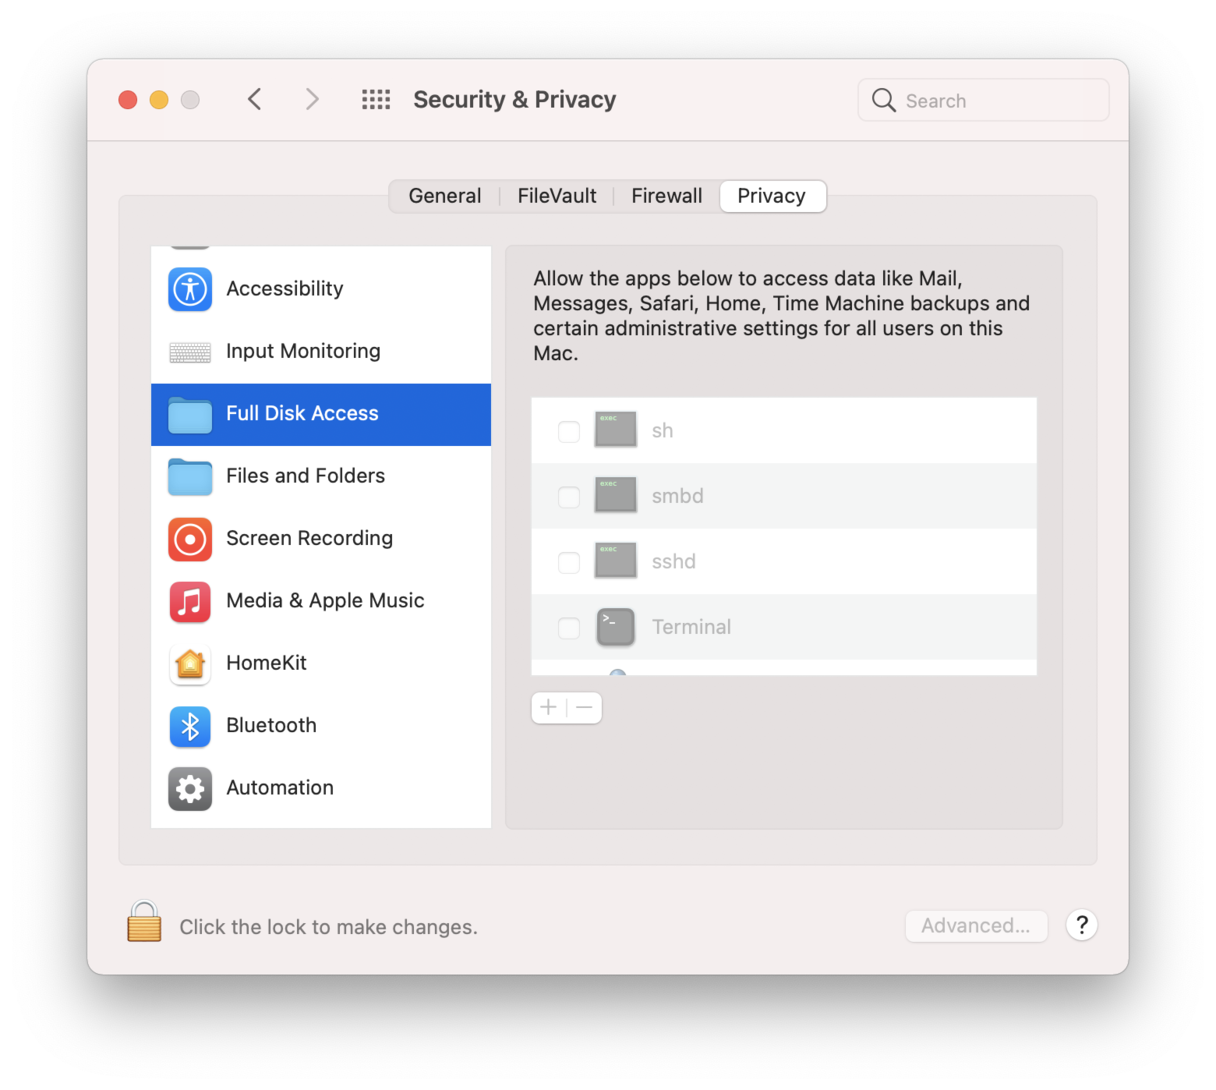
One piece of feedback that we’ve gotten from developers is that it can be awkward for users to locate their app’s privileged helpers.
So, now in macOS Catalina, executables that are denied access to files due to a lack of Full Disk Access approval are now pre-populated unchecked.
Here, we see one such helper identified by its executable name.
If that helper were embedded in a bundle, the display name in icon specifying the bundles Info.plist would be displayed instead.
This is the Apple-approved way to request Full Disk Access.
Источник
Full Disk Access and why you shouldn’t be afraid of It

Before we start
Having spent some years coding applications for macOS we’ve created a tool that everybody can use. The all-round problem fixer for Mac.

So here’s a tip for you: Download CleanMyMac to quickly solve some of the issues mentioned in this article. But to help you do it all by yourself, we’ve gathered our best ideas and solutions below.
Features described in this article refer to the MacPaw site version of CleanMyMac X.
Full Disk Access as a term first appeared on macOS 10.14 Mojave. That macOS update introduced unprecedented restrictions on third-party apps that operated on your Mac. These restrictions made it impossible for apps to easily access your content, Calendar, Contacts, Camera, and Microphone. With global data leakages happening on the daily, no wonder that Apple placed a kind of “an Iron Curtain” that sealed up your most important data, namely, Full Disk Access permission.
What is Full Disk Access in macOS Mojave?
Full Disk Access feature is much like a security check at an airport. When you grant “Full Disk Access” to an app, it is added to the whitelist of applications that are now marked as safe to work with your data. At the same time, all other applications will be greeted with “You Shall Not Pass.” The protected areas that require Full Disk Access permission are your Mail, Messages, Safari, Home, Time Machine.
Full Disk Access gives access to certain parts of your drive, although, it’s not as «full» as the name suggests. For example, it doesn’t give anyone access to your personal files.
What if an app tries to go beyond its allowed zone?
According to Apple: “So if your app attempts to access any data that is part of one of the protected categories, the system will automatically terminate it.” And by “terminate,” Apple really means a forced crash.
What does Full Disk Access mean to you?
Full Disk Access doesn’t sound exotic as of 2021, because every app today asks for permissions the very moment you install it. More so on the mobile.
The Internet now is much more regulated than even a couple of years ago. It’s no longer the Wild West it once was. Unless you download an app from a torrent tracker, it’s likely to operate under an official data regulation rules, like EULA. Today, it’s economically unviable for an app to mistreat your data.
Explore the latest security features of your Mac
What you should do, though, is to go to your System Preferences and spend a few minutes studying the security layers built there.
In System Preferences, click on Privacy and Security. In the sidebar on the left you can scroll down and find Full Disk Access. In Files and Folders you can specify exactly which of your folders are open for access.
Check the apps that have access to these devices because most people think they can be used for spying.
When should you grant Full disk Access for an application?
First, if an app comes from a credible developer and you want it to do its job properly. Obviously, a daily scheduler or some an app from the “Productivity” category would absolutely need to access your Calendar in order to simply function. On the other hand, if a Chess application asks to access your Mail, you should be concerned about its real intentions.

Normally, credible apps would politely explain why they want to access your disk and specify their activity limits. For example, like disk cleaners or disk backup software, apps from the utility category are designed to analyze your disk contents to do their job properly, so giving them “Full Disk Access” makes sense. But even if you don’t, these apps will still retain much of their functionality, though be limited in certain actions. To sum it up, providing “Full Disk Access” is perfectly normal if you follow these 2 main conditions:
- An app comes from a trusted source.
- The explanation for the FDA is reasonable.
If you doubt the app’s declared intentions, you can contact the app developers — usually, their response will be quick and to the point.
How to give Full Disk Access?
We’ve just seen that Full Disk Access is administered via System Preferences > Security & Privacy. Easily enough, you can drag & drop your apps onto a pane right from the Applications folder. But before that, you should “unlock” this dialogue window.
How to see Full Disk Access utility:
- Click on Apple icon > System Preferences.
- Go to Security & Privacy.
- Click on a Privacy Tab.
- Click the Full Disk Access section in the sidebar.
Now click the “lock” icon and enter your system password to unlock the panel settings. Well done! Now you can drag & drop apps directly from your Applications, so they have Full Disk Access. You can also do it in bulk by adding many apps at once. Alternatively, you might click the “+” sign to add apps one by one.
Note: For more security of your accounts, you can click “Advanced…” in the same window and tick the checkbox that reads “Require an administrative password…”. This will prevent other users of your Mac from accessing the most important system parts and thus minimize the potential damage from such actions.
Tip: To protect yourself against malware you should opt to use a non-administrative account on your Mac. The standard account, as opposed to an administrative one, doesn’t allow serious system-wide intrusions.
What are Full Permissions, and how to give them?
How is Full Disk Access different from standard permissions requests on macOS? Permissions are granted for individual actions, like accessing your Photos, whereas Full Disk Access gives unrestricted rights to do multiple operations on your Mac. System permissions come in 3 types.
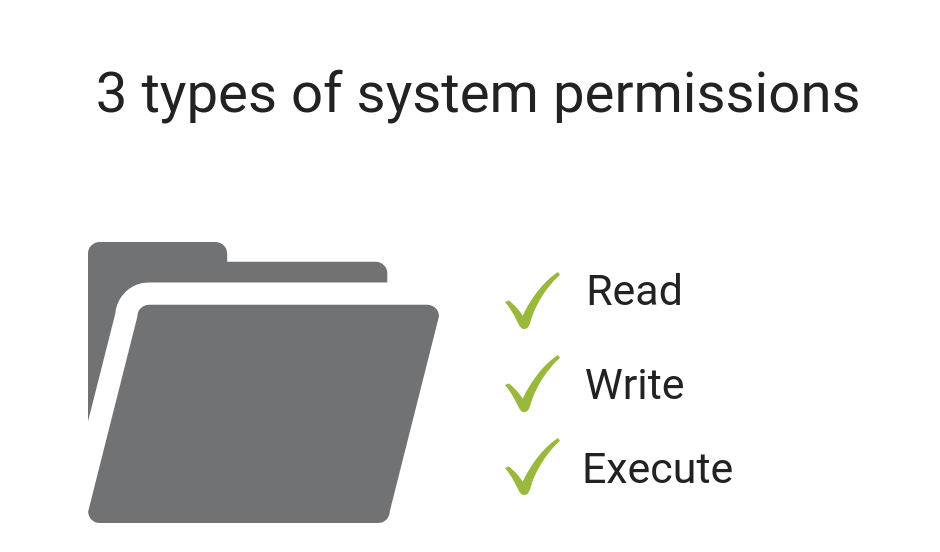
Permission-protected areas are contacts, microphone, webcam, Mail, remote desktop control, and Calendars. Whenever an app wants to have access to your a, b, c. it will initiate a standard dialogue box (you’ve seen it million times) where you can click either “Ok” or “Don’t Allow.” In the second case, an app will crash if it attempts to access the restricted areas on your Mac.
The new reality is that permissions become an important part of data culture, not just a boring thing to click through. You should rather view permissions as a tool, which means you can grant and revoke permissions when necessary. For example, if an app is overdoing it with notifications, you can easily take away its privileges in System Preferences > Privacy. The reality is such that this pane is to be visited much more often than before.
Broken permissions?
The problem comes when some user permissions get lost or broken. One morning you may find that you no longer can open a file or access a certain folder on your Mac. Luckily, there is an easy way to fix it.
I usually fix disk permissions with a tool called CleanMyMac X, which has a pretty strong reputation within the Mac community.
To fix broken disk permissions:
- Download CleanMyMac from the developer’s site (free version you can download)
- Click the Maintenance tab.
- Check Repair Disk Permissions.

If you perform the rest of the maintenance tasks from the said section, you may even see your Mac running faster and smoother.
The following part was written for newcomers to macOS Mojave. If you have a different or newer macOS, skip this fragment and go the Final Thoughts
Privacy Permissions not working on Mojave (Camera and Mic)
An often reported issue on macOS Mojave is camera and microphone permissions not working properly. While Apple’s own apps handle camera and mic perfectly well, many third-party apps (like Skype) end up becoming totally unusable due to missing permissions or “Full Disk Access denied.” In such cases, a dialogue box that requests permission is never displayed, for whatever reason. And if a program hasn’t requested permission — you guessed right — there is no way to make it work. What can you do?
- Reinstall the app in question
- Add the app to the Full Disk Access folder (see above)
- If nothing else helps, you may want to downgrade to macOS High Sierra
macOS Mojave privacy changes (and challenges)
Apple’s decision to harden security requirements on macOS Mojave was a long-expected move. During the first days of the macOS Mojave release, the users faced a swarm of software conflicts linked with macOS permissions. Some have reported their audio apps crashing while attempting to enable microphone access. Still, the stronger grip on security will be beneficial for all of us in the long run.
To save yourself from the misfortune of constantly crashing software, it is recommended that you update all your apps to the latest available versions. The good news, it no longer means hours of googling. You can use the tool I described above, CleanMyMac X, which has a quick built-in Updater module.

This will reduce the chances of your apps crashing on macOS Mojave.
Final thoughts: Check your app permissions with CleanMyMac X
We’ve seen that you can grant and revoke permissions, like Full Disk Access in System Preferences.
But what you are suspicious about a particular app? Or want to quickly say no to many permissions request? The app we’ve just mentioned, CleanMyMac X has a nice tool for that, sadly not widely known.
If you have CleanMyMac X, click on the Privacy tab from the sidebar.
Next, choose Application Permissions.
Voila! Now I can see which app can do what. Apparently, many apps will have more permissions than you thought.
_1623081977.png)
Tip: Get the free version of CleanMyMac X here.
Under today’s security standards, users must explicitly authorize an app i.e., “an opt-in” logic will become prevalent. Previously, malicious programs could simulate the consent using the so-called synthetic clicks — a term from a hacker universe. This practice becomes more difficult, but it doesn’t mean “data leaks” will disappear anytime soon.
The described pre-authorization logic is nothing new for iOS users and has gradually become an industry standard. But who would complain about having stronger security on their Mac? Eventually, we’ll get there, even if it means a few more thoughtful clicks on our part every day.
Источник


