- Installation on Debian and Ubuntu
- Manually install FusionInventory Sid packages:
- Install dependencies as root :
- Download desired packages from Deb fusioninventory-agent tracker :
- Install desired packages as root :
- Configure the agent :
- Start the agent :
- On configuration change, reload the agent :
- To start an immediate run :
- Using FusionInventory Debian (and Ubuntu) packages:
- Install Agent 2.3.10 on Debian 7 using debian-backports repository
- Install Agent 2.3.16 from old FusionInventory repository
- Fusioninventory agent linux portable
- Fusioninventory agent linux portable
- Compulsory
- Optional
- Configuration and deployment
- On which platforms is the FusionInventory agent available?
- Is FusionInventory agent compatible with OCS Inventory NG Server?
- How to redirect OCS agent with Apache?
- How can I …
- How can I configure two or more servers?
- How can I use a mastering software like Ghost to deploy my agent?
- How can I inventory my virtual machines ?
- How can I inventory my printers ?
- How can I debug agent ssl issue ?
- Usual issues
- Task X is not enabled message
- Unable to find agent to run this job message
- Bad token message
- end_request: I/O error, dev fd0, sector 0 message
- Duplicated computers in inventory
- Missing information when called from cron
- Strange agent token “12345678”
- FusionInventory Agent WakeOnLan task fails on windows
- Установка и настройка GLPI и FusionInventory, инвентаризация ИТ инфраструктуры
- Установка и настройка стека LAMP в Linux
- Установка GLPI
- Базовая настройка GLPI
- Обзор интерфейса GLPI
- Плагин FusionInventory — автоматическая инвентаризация серверов и компьютеров
- Установка Fusion Inventory
- Установка Fusion Agent в Windows
- Установка Fusion Agent на Linux
- Статистика и отчеты в GLPI
Installation on Debian and Ubuntu


Manually install FusionInventory Sid packages:
Latest FusionInventory Agent Debian and Ubuntu compatible packages are now integrated in Debian Sid.
At the time of this writing, fusioninventory-agent_2.5.2-1 is available from github release.
The agent will be included in Debian Buster (Debian 10) planed to be released on 2019 jul 06.
| Tested Debian version | Agent version | Tested Ubuntu version | Agent version |
|---|---|---|---|
| Buster — Debian 10 — Stable | 2.5.2-1 | Ubuntu 18.04.1 LTS (bionic) | 2.5.2-1 |
| Stretch — Debian 9 — OldStable | 2.5.2-1 |
Install dependencies as root :
For fusioninventory-agent, you’ll need to install these dependencies:
For fusioninventory-agent-task-network, you’ll need to install these other dependencies:
If you need SNMPv3 support for network inventory, you should also install this one:
For fusioninventory-agent-task-deploy, you’ll need to install these other dependencies:
If you need to run WakeOnLan task, you’ll need to instal this other dependency:
Download desired packages from Deb fusioninventory-agent tracker :
| Packages | Included tasks |
|---|---|
| fusioninventory-agent_2.5.2-1_all.deb | Inventory — WakeOnLan |
| fusioninventory-agent-task-collect_2.5.2-1_all.deb | Collect |
| fusioninventory-agent-task-network_2.5.2-1_all.deb | NetDiscovery — NetInventory |
| fusioninventory-agent-task-deploy_2.5.2-1_all.deb | Deploy |
| fusioninventory-agent-task-esx_2.5.2-1_all.deb | ESX |
Install desired packages as root :
Only fusioninventory-agent deb package is mandatory
Configure the agent :
Edit /etc/fusioninventory/agent.cfg setting at least one target
Start the agent :
On configuration change, reload the agent :
To start an immediate run :
You can send USR1 signal to the process with the following command to start a run immediatly :
Using FusionInventory Debian (and Ubuntu) packages:
These packages are based on deprecated source versions.
| Debian version | Agent version | Ubuntu version | Agent version |
|---|---|---|---|
| Wheezy — Debian 7 — OldStable | 2.2.3-8 | Ubuntu 16.04.2 LTS (xenial) | 2.3.16-1 |
| Jessie — Debian 8 — Stable | 2.3.10.1-1 | ||
| Sid — Unstable | 2.3.16-1 |
Install Agent 2.3.10 on Debian 7 using debian-backports repository
Install Agent 2.3.16 from old FusionInventory repository
The FusionInventory project maintained a debian package until 2.3.16 version, in a extra repository.
First, you need to import the repository GnuPG key, if apt-key is available you can use these command as root:
Otherwise this one will work:
Now you can install the agent.
Note: On Debian Testing, you need to fix the /etc/apt/sources.list update so you use jessie repo. You can better replace the second line from the previous commands with:
The content of the dists pages can help you do identify support operating system.
Источник
Fusioninventory agent linux portable


The FusionInventory agent is a generic management agent. It can perform a certain number of tasks, according to its own execution plan, or on behalf of a GLPI server with fusioninventory plugin, acting as a control point.
Minimum perl version: 5.8
Mandatory Perl modules:
- File::Which
- LWP::UserAgent
- Net::IP
- Text::Template
- UNIVERSAL::require
- XML::TreePP
Optional Perl modules:
- Compress::Zlib, for message compression
- HTTP::Daemon, for web interface
- IO::Socket::SSL, for HTTPS support
- LWP::Protocol::https, for HTTPS support
- Proc::Daemon, for daemon mode (Unix only)
- Proc::PID::File, for daemon mode (Unix only)
Optional Perl modules:
- Net::CUPS, for printers detection
- Parse::EDID, for EDID data parsing
- DateTime, for reliable timezone name extraction
- dmidecode, for DMI data retrieval
- lspci, for PCI bus scanning
- hdparm, for additional disk drive info retrieval
- monitor-get-edid-using-vbe, monitor-get-edid or get-edid, for EDID data access
- ssh-keyscan, for host SSH public key retrieval
Network discovery tasks
Mandatory Perl modules:
Optional Perl modules:
- Net::NBName, for NetBios method support
- Net::SNMP, for SNMP method support
- arp, for arp table lookup method support
Network inventory tasks
Mandatory Perl modules:
Optional Perl modules:
- Crypt::DES, for SNMPv3 support
Wake on LAN task
Optional Perl modules:
- Net::Write::Layer2, for ethernet method support
Mandatory Perl modules:
Mandatory Perl modules for P2P Support:
See CONTRIB to find references to FusionInventory Agent related scritps/files
Project mailing lists:
Project IRC channel:
- #FusionInventory on FreeNode IRC Network
Please report any issues on Github.
- Guillaume Rousse guillomovitch@gmail.com
- Guillaume Bougard gbougard@teclib.com
This software is licensed under the terms of GPLv2+, see LICENSE file for details.
Additional pieces of software
The fusioninventory-injector script:
- author: Pascal Danek
- copyright: 2005 Pascal Danek
FusionInventory::Agent::Task::Inventory::Input::Virtualization::Vmsystem contains code from imvirt:
Источник
Fusioninventory agent linux portable
Setup is at the script begining, after the license (blame the laws not us).
Most of the parameters are explained in the script, and you should know them from Fusioninventory Agent configuration itself.
Let’s split them in two groups. Compulsory and optional.
Compulsory
- fiaglpiserver : Fusioninventory for GLPI installation URL. Without this one, the script won’t run.
- fiainstallmodules : Which modules you want to install. If you only need local inventory choose (0).
- fiaver : Which Fusioninventory agent you want to install. Note that this might not be exactly the version number. Currently, it is 2.5 (it should be 2.5.0) but the agent is named like 2.5-2
Optional
- resetagent : If set to 0 will remove previous agent data. Great for VM cloning.
- client : Changes agent config file name.
- fiatag : Adds a tag.
- fiadebug : Sets debug level.
- fianosslcheck : Don’t check SSL certificate validation.
- fialogger : Defaults to file. Where should logs be sent.
- fianocategory : Defaults to printer. Avoids some inventories.
Would you add another setting to the script?
We’ll do our best. Head to fia-installer-4l.sh github repository and open an issue.
If you have some bash scripting knowledge you can submit a PR and help improving the script.
Would you support (put your favorite distro here)?
Maybe. These are the desired steps:
- First you need to be sure if fusioninventory agent runs on it. Check official documentation.
- Head to fia-installer-4l.sh github repository and open an issue. Add as much information as possible.
- If you have some bash knowledge, please create a PR.
I think your bash skills are not great!
You’re right. However, we fell this was easier than executing the same commands over and over. That’s exactly what scripts are for. Even the not so good!
We are looking forward to hearing from your improvement proposals at the script github.
Источник
Configuration and deployment
On which platforms is the FusionInventory agent available?
The agent is available on Windows, OS X, Linux, FreeBSD, OpenBSD, NetBSD, DragonFlyBSD, AIX, Solaris, HP-UX. The agent shares the same codebase on all these platforms.
Is FusionInventory agent compatible with OCS Inventory NG Server?
Yes, your server will need to be configured to accept the Fusioninventory UserAgent in the ocsinventory-server.conf
The /tmp/yourfile.txt is a list of the UserAgent that should be accepted. For example:
This step is not required with the legacy 1.x server.
Please note that FusionInventory-Agent doesn’t support OCS’s IP Discover feature, and that OCS Deployment module is now deprecated and will not be developped anymore.
If you’re looking for a software deployment solution, FusionInventory provides it’s own, which is integrated into GLPI.
How to redirect OCS agent with Apache?
You can use an alias directive to redirect traffic from /ocsinventory to FusionInventory.
Take care to declare this directive before an Alias / XXX or it will be ignored.
It’s also possible to use a regular expression for that.
How can I …
How can I configure two or more servers?
In the agent configuration file, you can define several servers to communicate with. For example to communicate with three servers: FusionInventory Server for GLPI 0.80 and 0.83, and OCSInventory server:
The agent will contact each server in the order defined in the configuration file, and perform the actions requested from each of them.
How can I use a mastering software like Ghost to deploy my agent?
Yes. However, take care to not duplicate agent state directory, otherwise multiple agents will use the same identifier.
How can I inventory my virtual machines ?
As for every other machine: install an agent on it.
Running a local inventory on a host doesn’t actually perform an actual inventory of its guests, it just retrieve minimal information, such as virtual machine identifier, so as to compute the relationship between the guest and the host.
How can I inventory my printers ?
For local (USB) printers, run a local inventory on the host.
For network printers, run a network inventory from any agent able to communicate through SNMP with the printer.
How can I debug agent ssl issue ?
With FusionInventory Agent 2.3.20, you can diagnostic agent to server SSL communications by starting the agent from a command line with the following parameters:
You will obtain very verbose SSL library messages from which you can better understand what’s going on like wrong server certificate, missing CA certificate on agent side, …
Usual issues
Task X is not enabled message
These messages show up in the agent log when the server do not ask for an Network Discovery or a Network Inventory.
Unable to find agent to run this job message
You will get Unable to find agent to run this job message when the server can’t find an agent to run a task in push mode:
- Ensure an agent is running as service or daemon
- The server can contact http://[agentIP]:62354 directly
- Check in http://glpi/plugins/fusioninventory/front/agent.php if the agent has Network discovery and Network inventory (SNMP) modules turned on
Bad token message
“Bad token” problems means the agent and the server are not synchronized anymore. You can resolve the situation either:
- just by running an inventory
- by using httpd-trust parameter to allow request from the server IP.
end_request: I/O error, dev fd0, sector 0 message
This can append on Linux box with floppy driver like most of the VMware virtual machine. You can work around the problem by unloading the floppy kernel module:
The error is generated when the agent launch the following command fdisk -l .
Duplicated computers in inventory
With the default settings, FusionInventory for GLPI use the follow criteria to identify computer:
One of this information is probably duplicated.
Missing information when called from cron
Most of the time, cron do not define a default PATH. In this case the agent won’t find important tools like dmidecode , lspci , etc ( See old Fusioninventory forge issue 1747 ).
Just define the PATH in the crontab:
Strange agent token “12345678”
Since the agent 2.3.0, the agent doesn’t use any token anymore to authenticate server messages. Any target server is automatically trusted, as well as any other IP address given through httpd-trust configuration directive.
FusionInventory Agent WakeOnLan task fails on windows
WakeOnLan agent task requires a system library (DLL) provided by WinPcap.
Just download and install the lastest WinPcap package before being able to use WOL from a win32 agent.
See also: issue #392 solved by tabad
FusionInventory website with documentation and news of this wonderful inventory and software deployment tool 😉
The FusionInventory documentation is licensed under CC BY-SA 4.0
Источник
Установка и настройка GLPI и FusionInventory, инвентаризация ИТ инфраструктуры
В этой статье мы рассмотрим пошаговую установку и настройку GLPI. GLPI (Gestionnaire Libre de Parc Informatique — франц.) – это полноценная open-source ITSM система для управления процессами, инвентаризации оборудования и софта, а также для управления заявками и инцидентами. GLPI это большой комбайн, в котором заложено большое количество функционала по управлению ИТ на предприятии. Некоторые из возможностей GLPI:
- Инвентаризация компьютеров, серверов, оргтехники (принтеры, мониторы, МФУ, картриджи и прочее)
- Инвентаризация установленных на компьютерах программ и лицензий
- Управление заявками и инцидентами (регистрация обращений пользоватетелей, HelpDesk)
- База знаний
- Ведение проектов
- Управление бюджетом
Установка и настройка стека LAMP в Linux
GLPI это обычное веб приложение с базой данных, поэтому на сервере нужно развернуть LAMP стек (в данной статье GLPI будет установлен на apache, но возможна также установка на nginx).
apt update
apt install mysql-server mysql-client apache2 php php-mysql libapache2-mod-php php-json php-gd php-curl php-mbstring php-cas php-xml php-cli php-imap php-ldap php-xmlrpc php-apcu
Создайте новую mysql базу данных (можно использовать и mariadb) и пользователя для GLPI:
mysql -u root -p
CREATE DATABASE glpi;
CREATE USER ‘glpi’@’localhost’ IDENTIFIED BY ‘password’;
GRANT ALL PRIVILEGES ON glpi.* TO ‘glpi’@’localhost’;
FLUSH PRIVILEGES;
exit;
Скачайте и распакуйте дистрибутив GLPI:
wget https://github.com/glpi-project/glpi/releases/download/9.4.5/glpi-9.4.5.tgz
tar xvf glpi-9.4.5.tgz
Скопируйте GLPI в веб директорию:
mkdir /var/www/glpi
cp -R glpi/* /var/www/glpi
chown -R www-data:www-data /var/www/glpi
Создайте файл виртуал хоста:
И вставляем следующую конфигурацию Virtual Host:
a2ensite glpi
service apache2 reload
Проверьте, что виртуалхост активен.

Откройте браузер и переходим по URL адресу, который вы указали в виртуал хосте. В моём случае это glpi.local .

Перед вами должно появится окно веб-установщика GLPI.
Установка GLPI
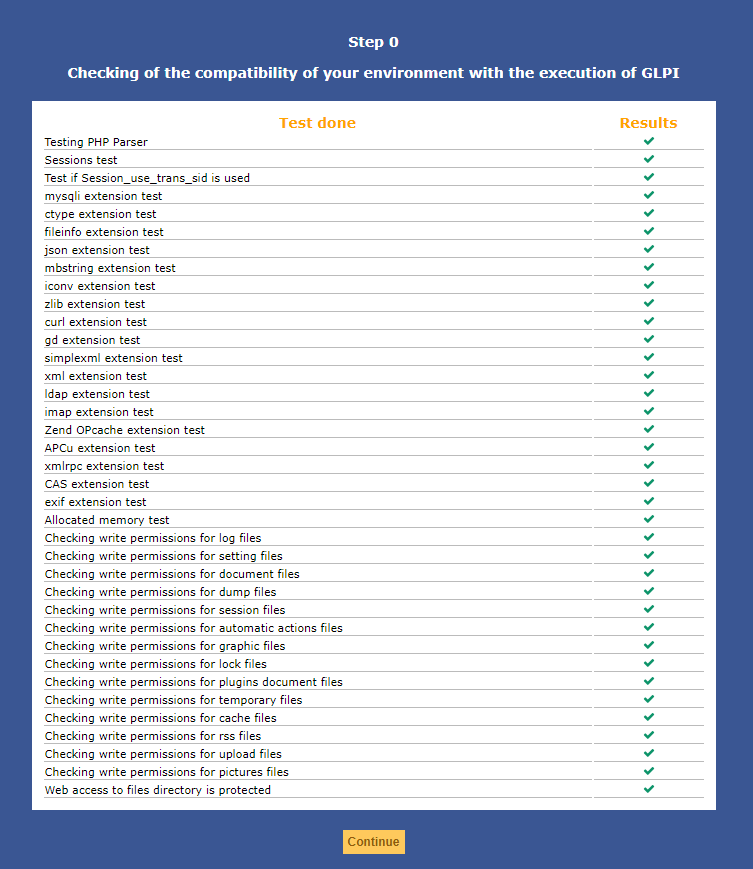
Сначала нужно выбрать язык интерфейса GLPI и принять лицензионное соглашение. На следующем шаге нажмите Install и убедитесь, чтобы все тесты прошли успешно.
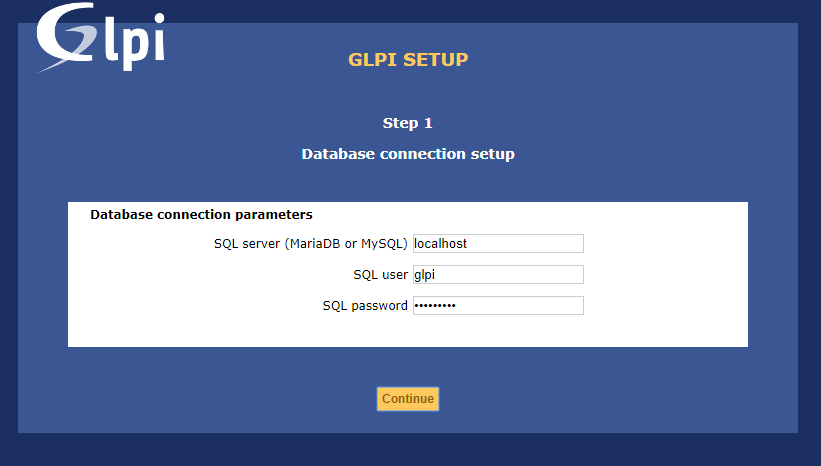
Укажите данные для подключения к базе данных.
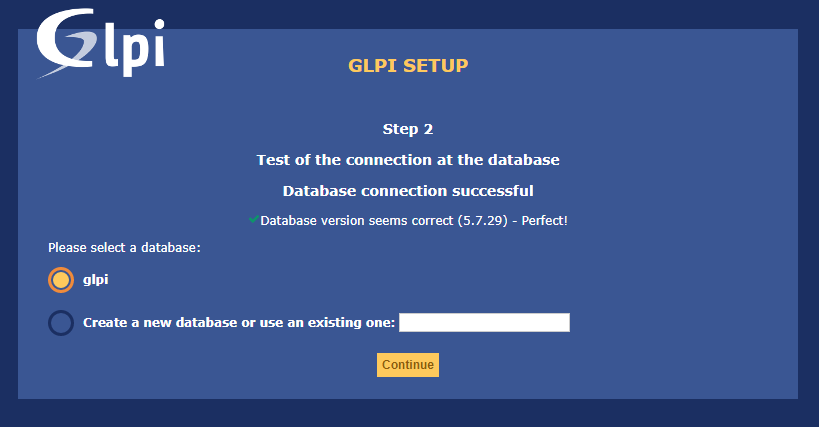
Выберите ранее созданную базу данных:
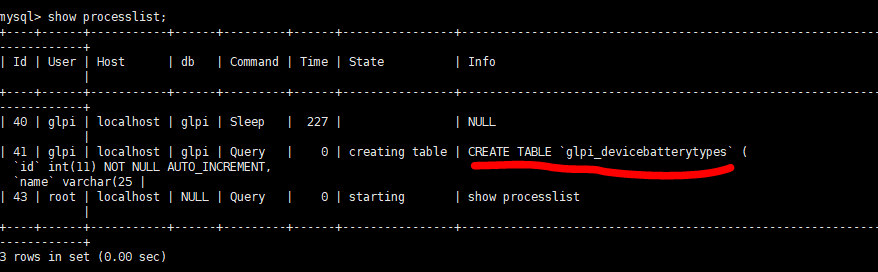
Нажмите Continue и дождитесь импорта данных. База данных может наполняться продолжительное время (несколько минут). Это можно проверить командой show processlist; в mysql.
После этого установка GLPI практически завершена. Зайдите в панель управления (по-умолчанию, логин и пароль – glpi).
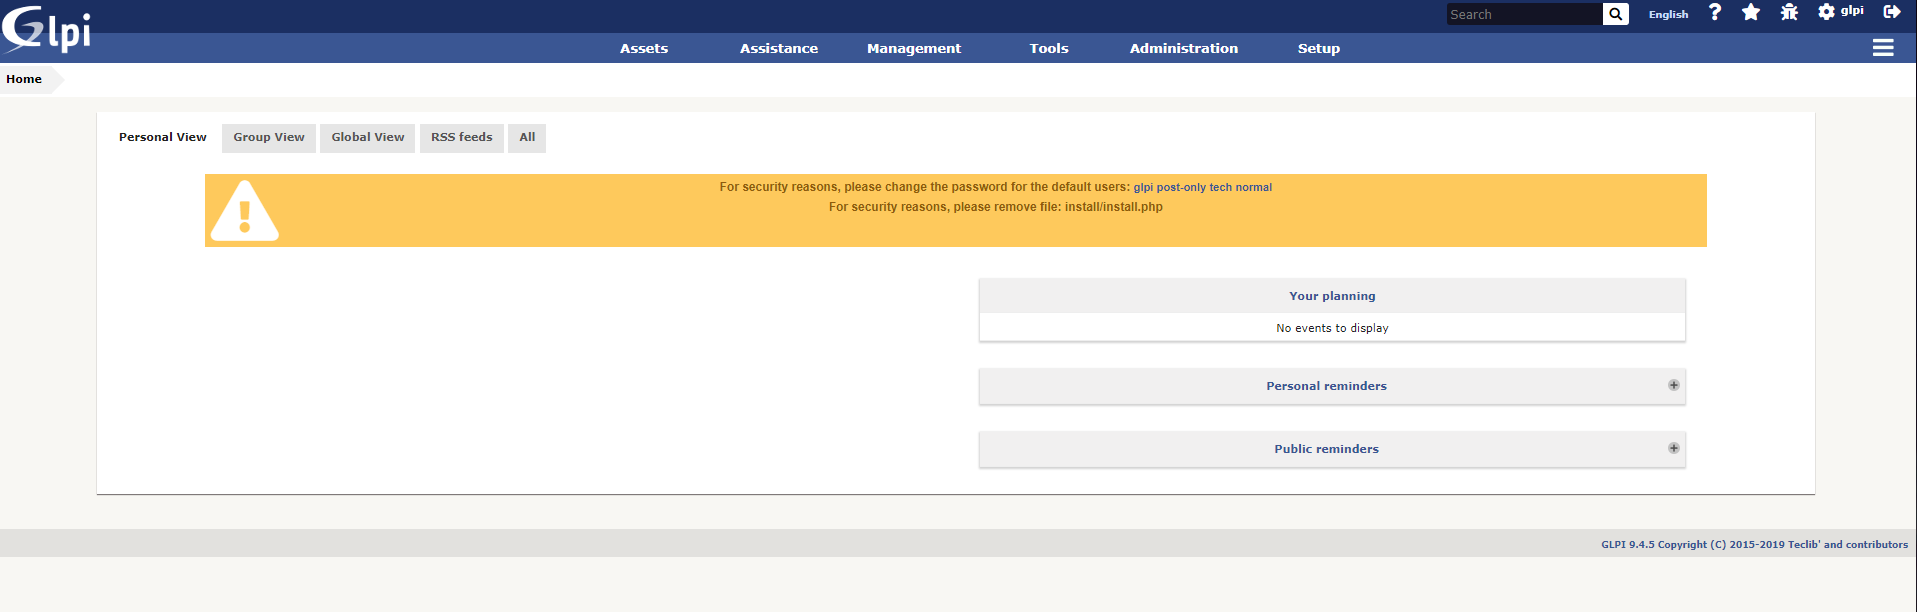
Базовая настройка GLPI
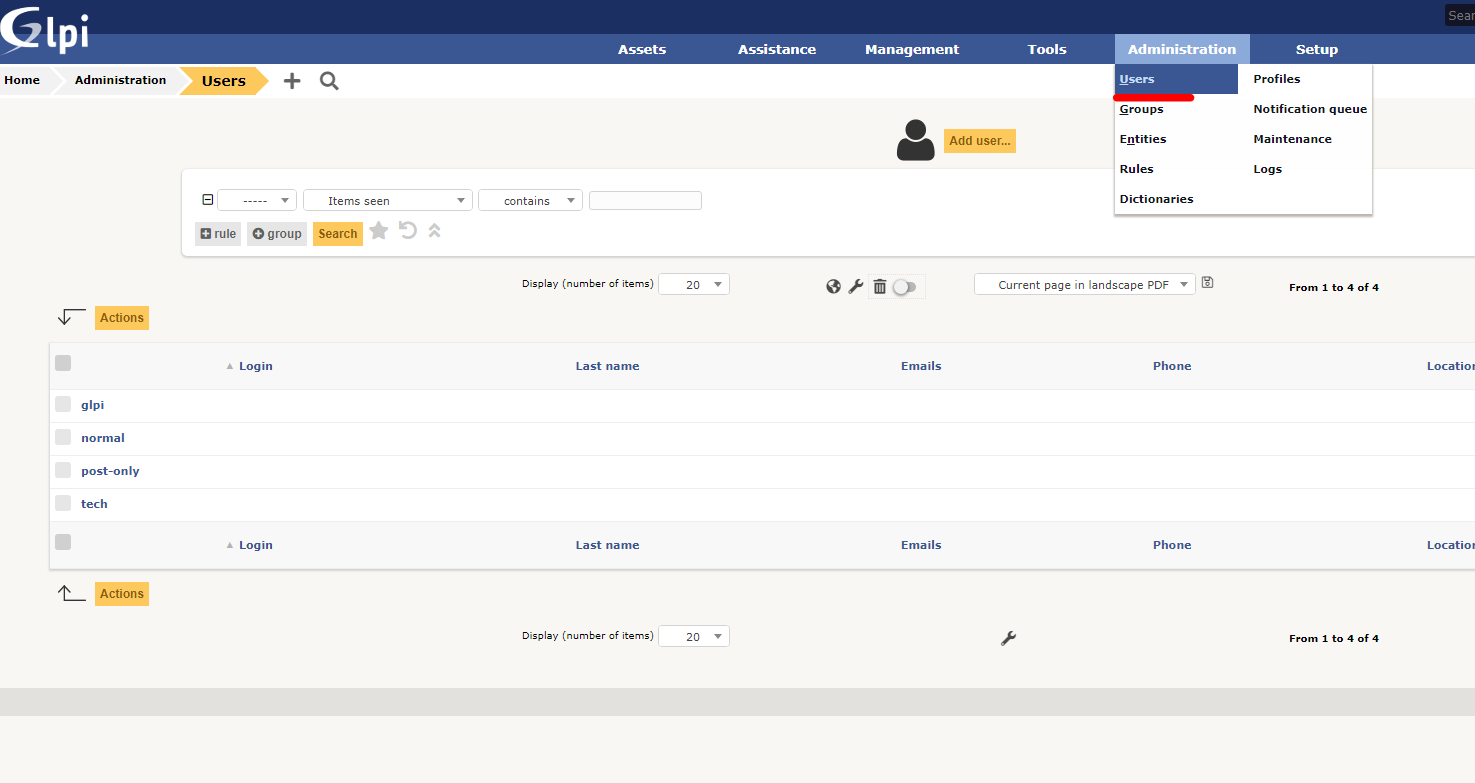
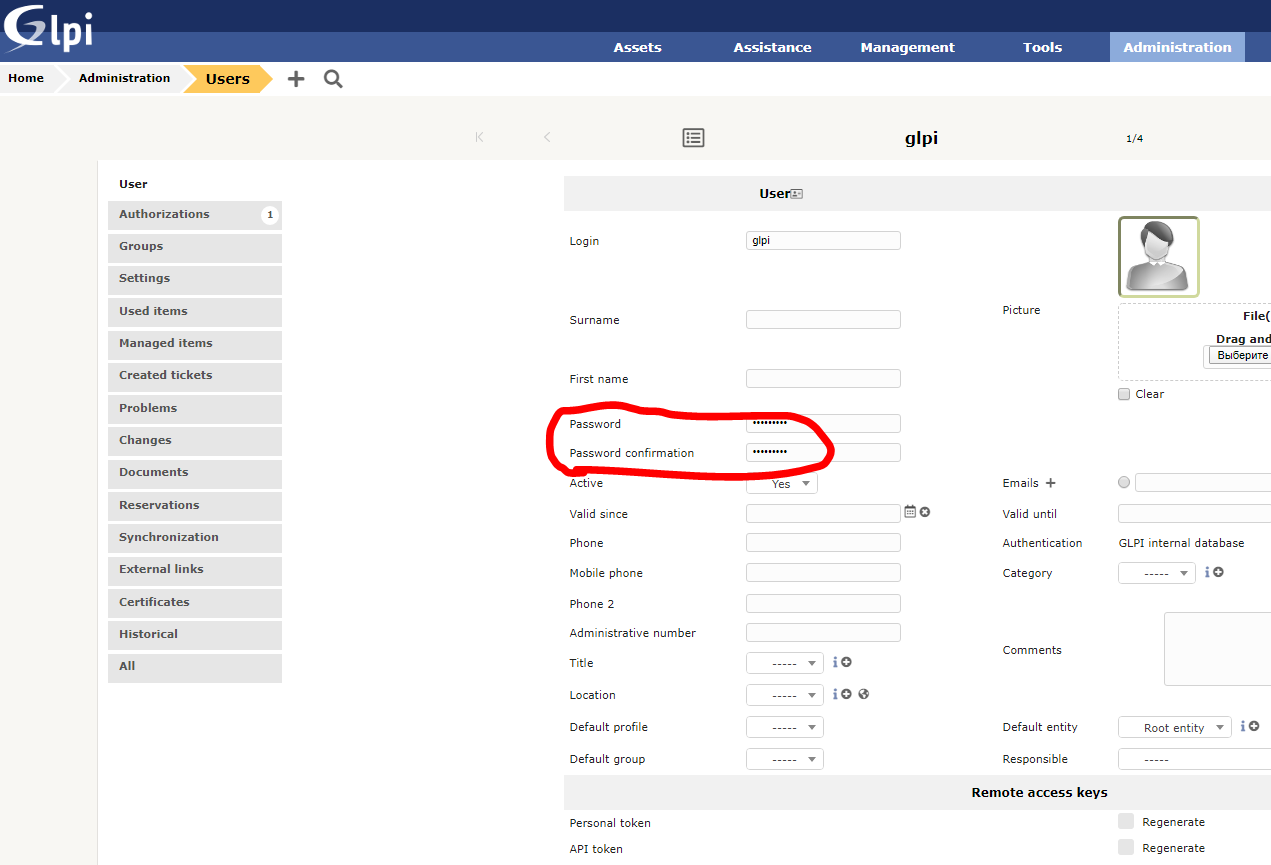
Для начала необходимо изменить пароли для встроенных пользователей, это можно сделать на вкладке Administration -> Users.
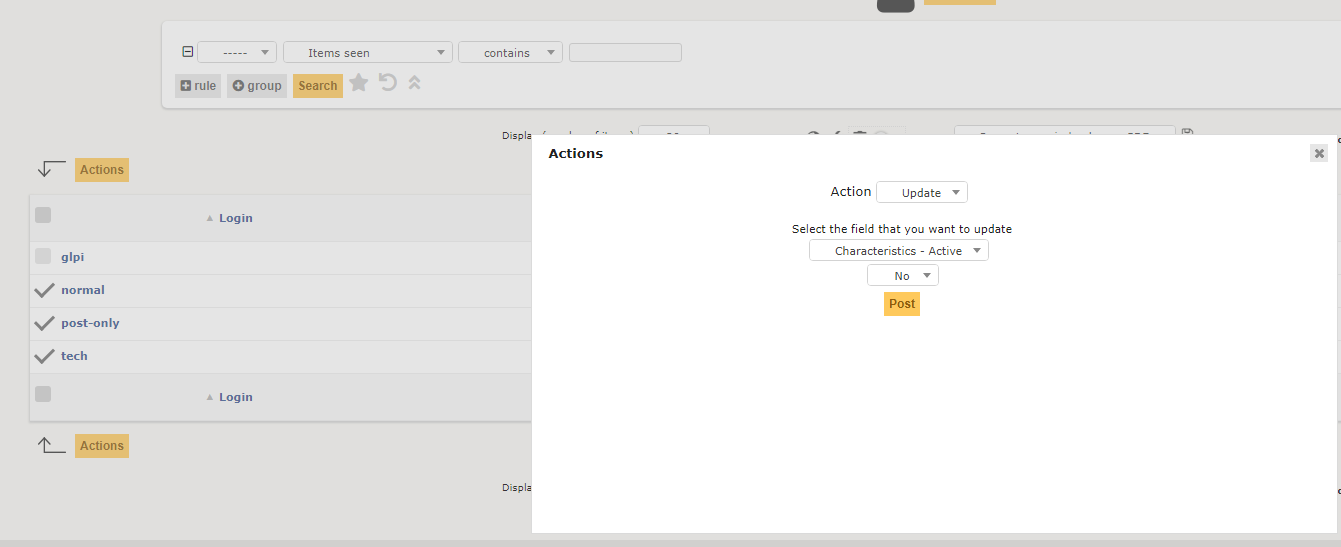
Если вы не хотите использовать встроенных пользователей, можно их разом отключить.
Обзор интерфейса GLPI
Пробежимся по интерфейсу GLPI и рассмотрим некоторые из возможностей системы.
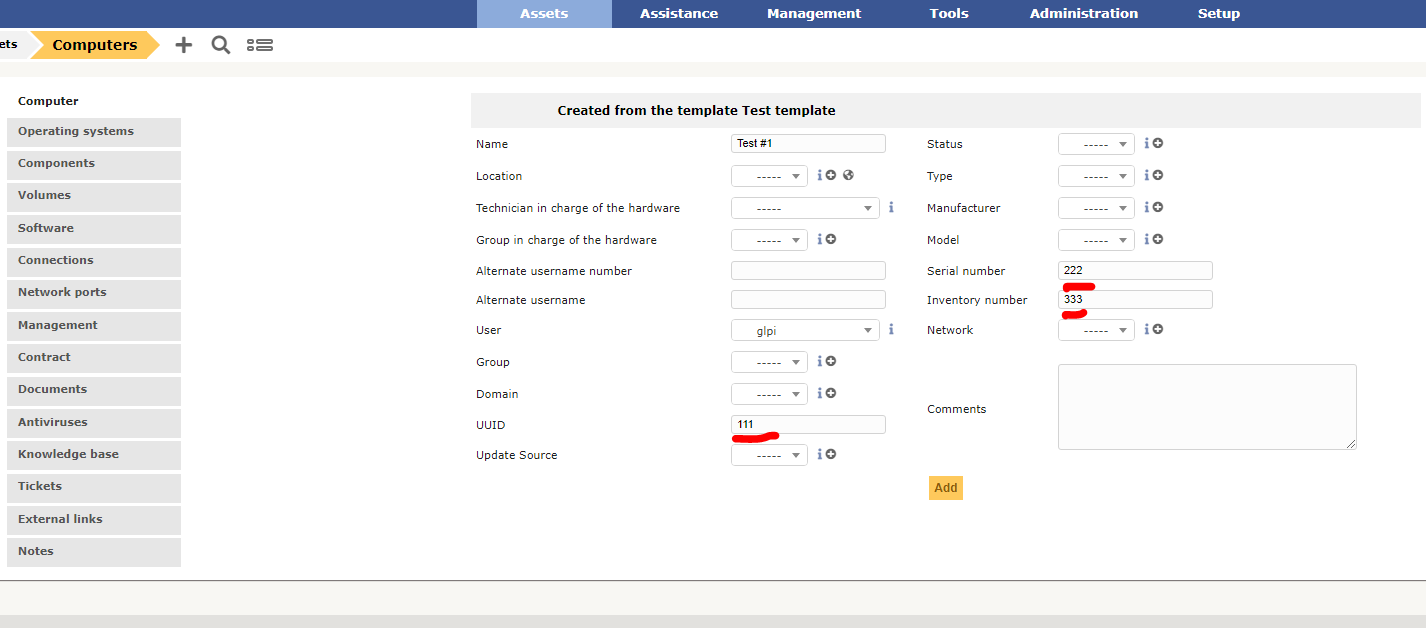
Вкладка Assets
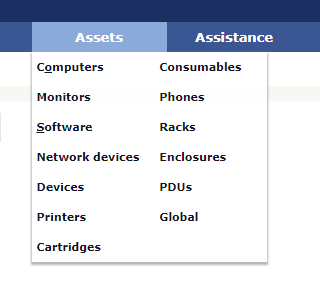
Эта вкладка отвечает за инвентаризацию оборудования и софта. В GLPI есть возможность создавать шаблоны. Вы можете создавать различные шаблоны для разных устройств (компьютеров, роутеров, мониторов и т.д). Удобство в том, что при создании новых объектов вам не нужно заново заполнять статические данные (например, расположение или тип объекта).
Механизм шаблонов поддерживается и другими функциями, не только инвентаризацией. 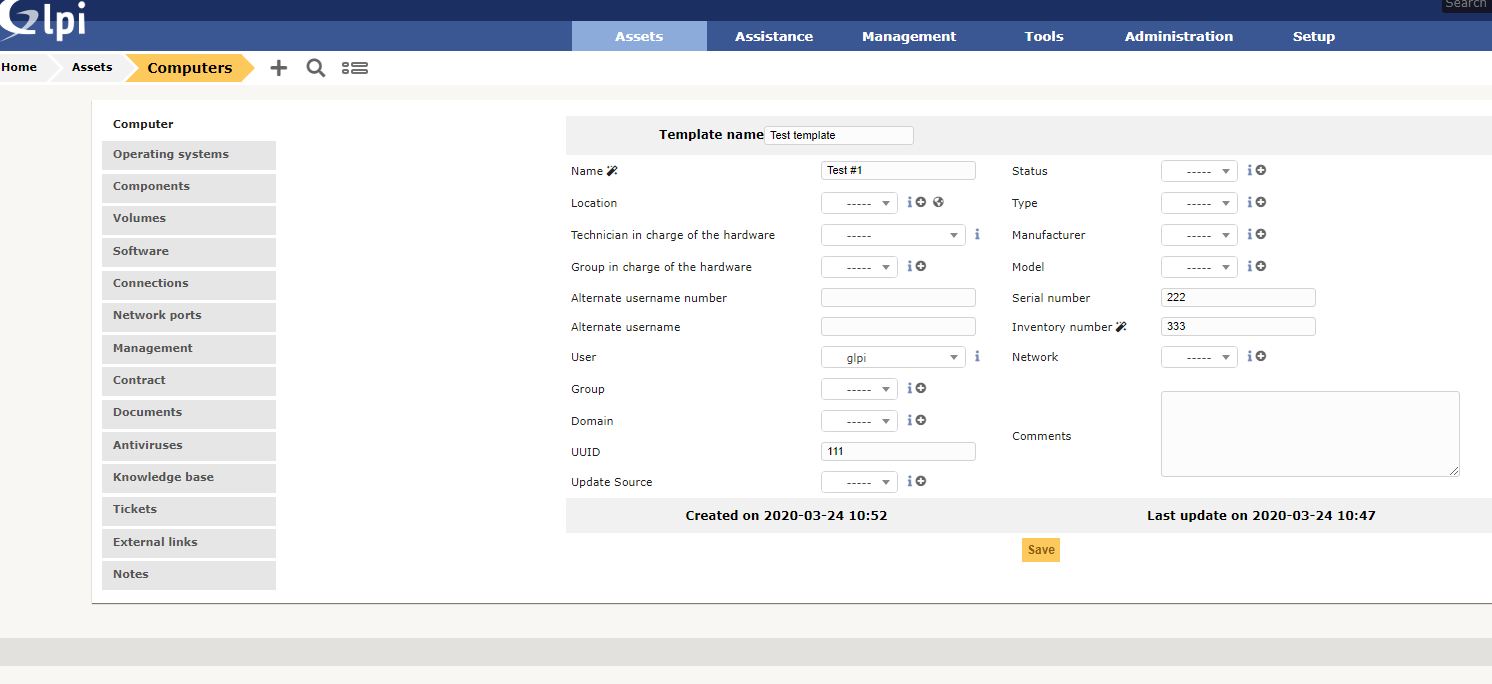

Вкладка Assistance
Вкладка отвечает за управление задачами, инцидентами и проектами. Если вы знакомы с Jira, то здесь такой же принцип.

Есть возможность кастомизировать некоторые поля тикетов и создавать шаблоны для них (в Setup -> Dropdowns).
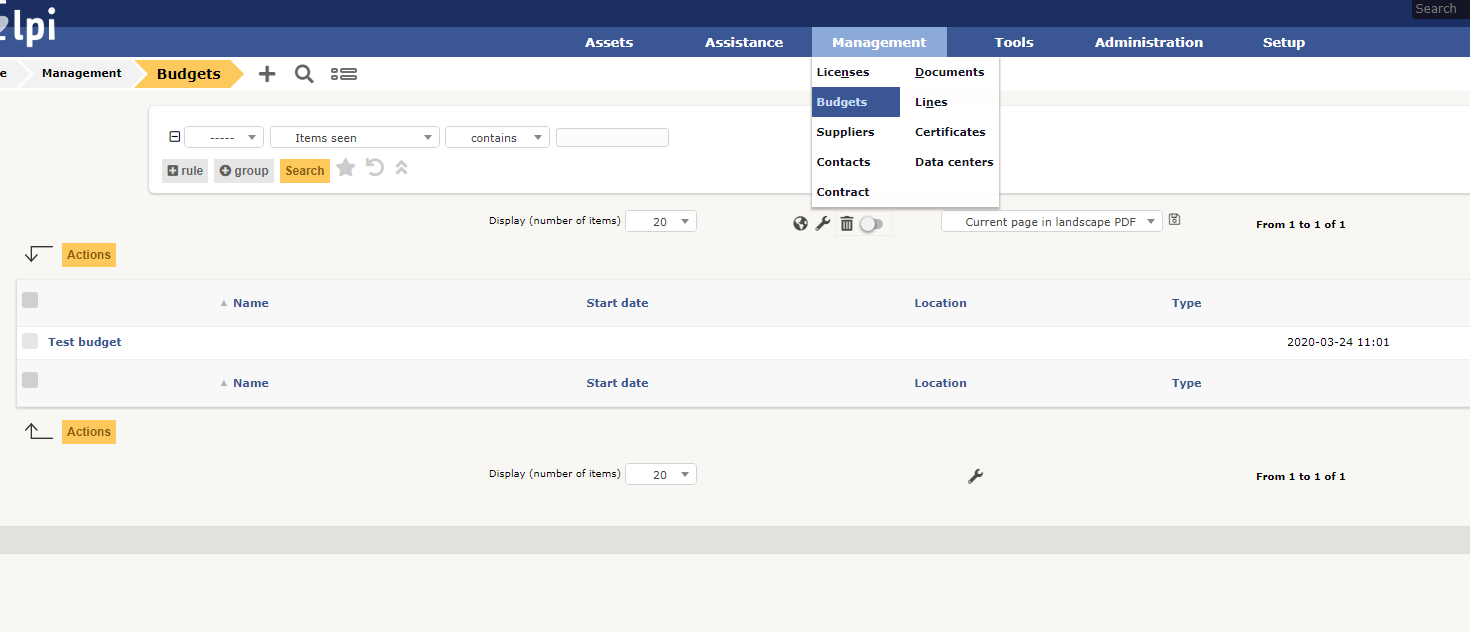
Вкладка Management
Также относится к инвентаризации – можно вести бюджет, учитывать лицензии, поставщиков и т.д.
Вкладка Tools
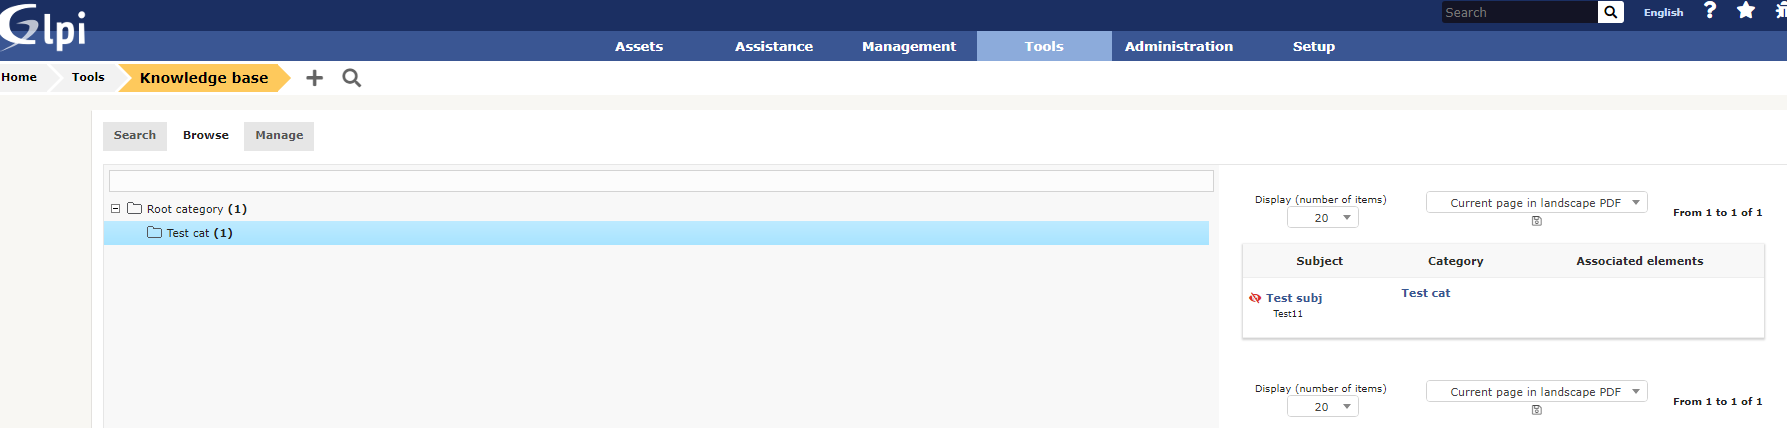
Эта вкладка содержит в себе разные инструменты – проекты, напоминания, отчеты и базу знаний (wiki).
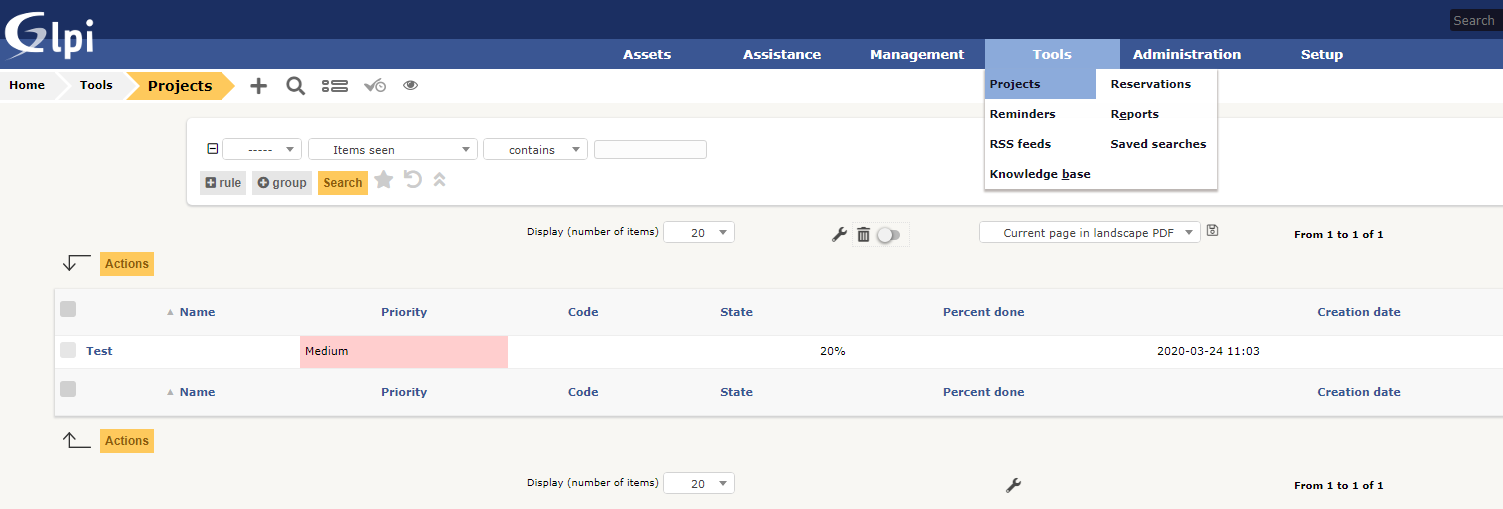
Управление базой знаний:
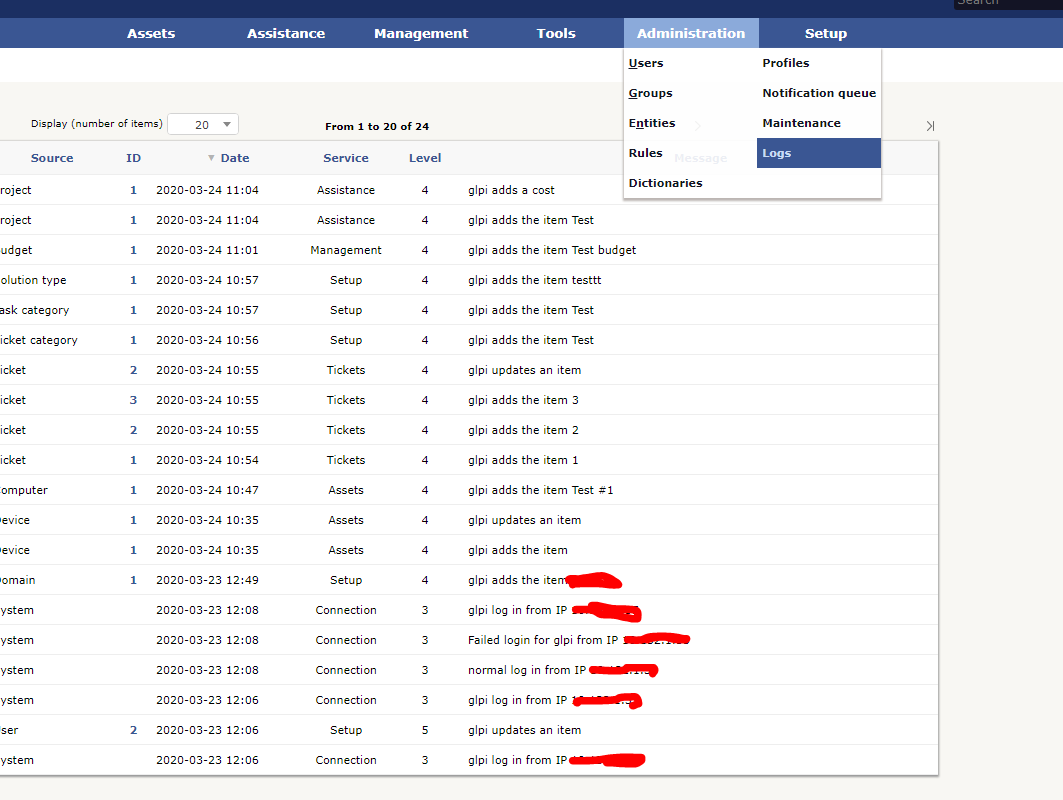
Вкладка Administration
Здесь вы можете управлять пользователями, группами и сущностями GLPI, также есть лог действий пользователей GLPi.
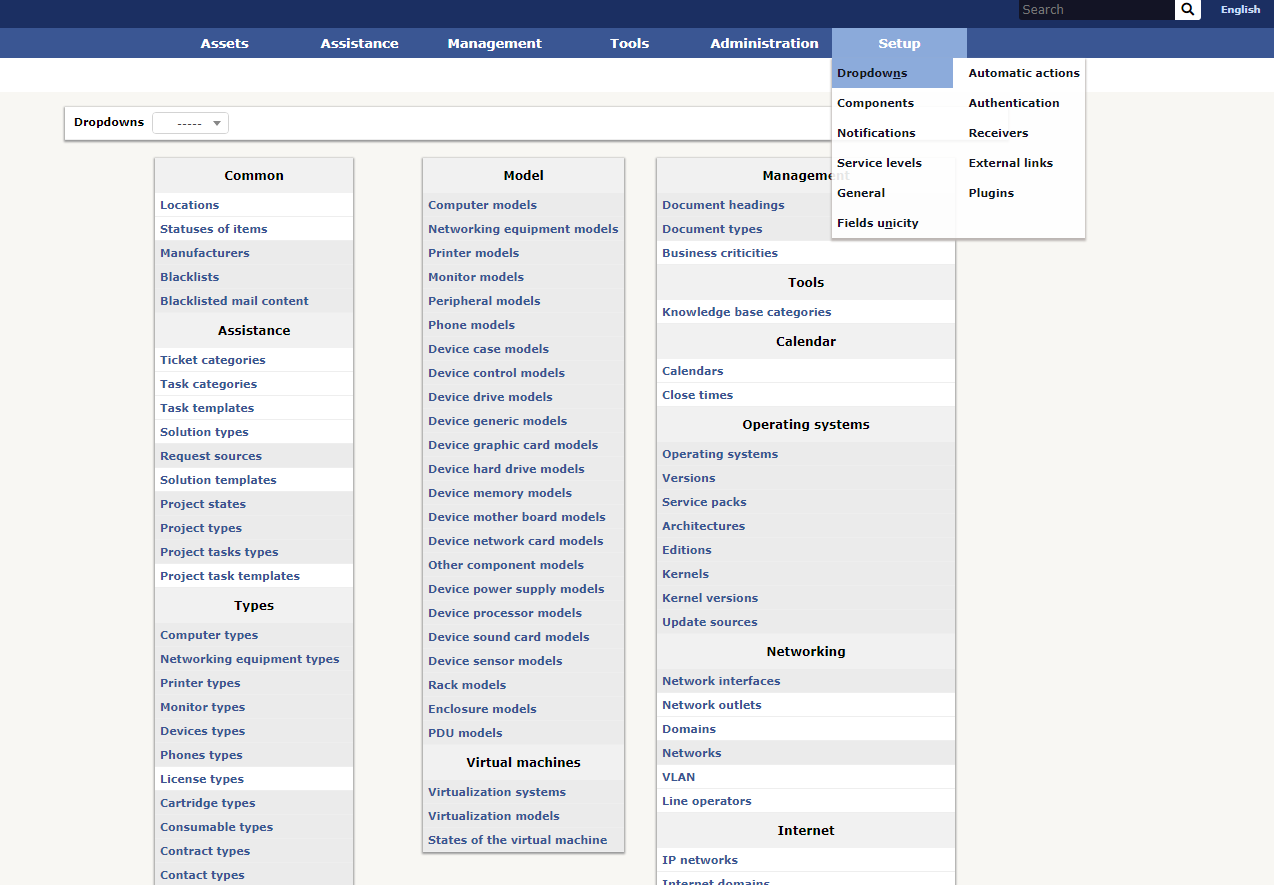
Вкладка Setup
Также отвечает за управление GLPI – настройка пунктов меню, изменение различных форм и полей.
Плагин FusionInventory — автоматическая инвентаризация серверов и компьютеров
Рассмотрим одно из применений GLPI в реальной жизни – обнаружение устройств в сети и автоматическое заполнение инвентаризационных данных по оборудованию и установленным программам.
В GLPI не предусмотрено автоматическое обнаружение, но с этим может помочь плагин FusionInventory.
Установка Fusion Inventory
- Скачайте плагин FusionInventory с GitHub https://github.com/fusioninventory/fusioninventory-for-glpi/releases . В моём случае это последняя версия fusioninventory-9.4+2.4.tar.bz2;
- Распакуйте архив ( tar xvf arch.tar.bz2 ) в директорию plugins (в моём случае это /var/www/glpi/plugins);
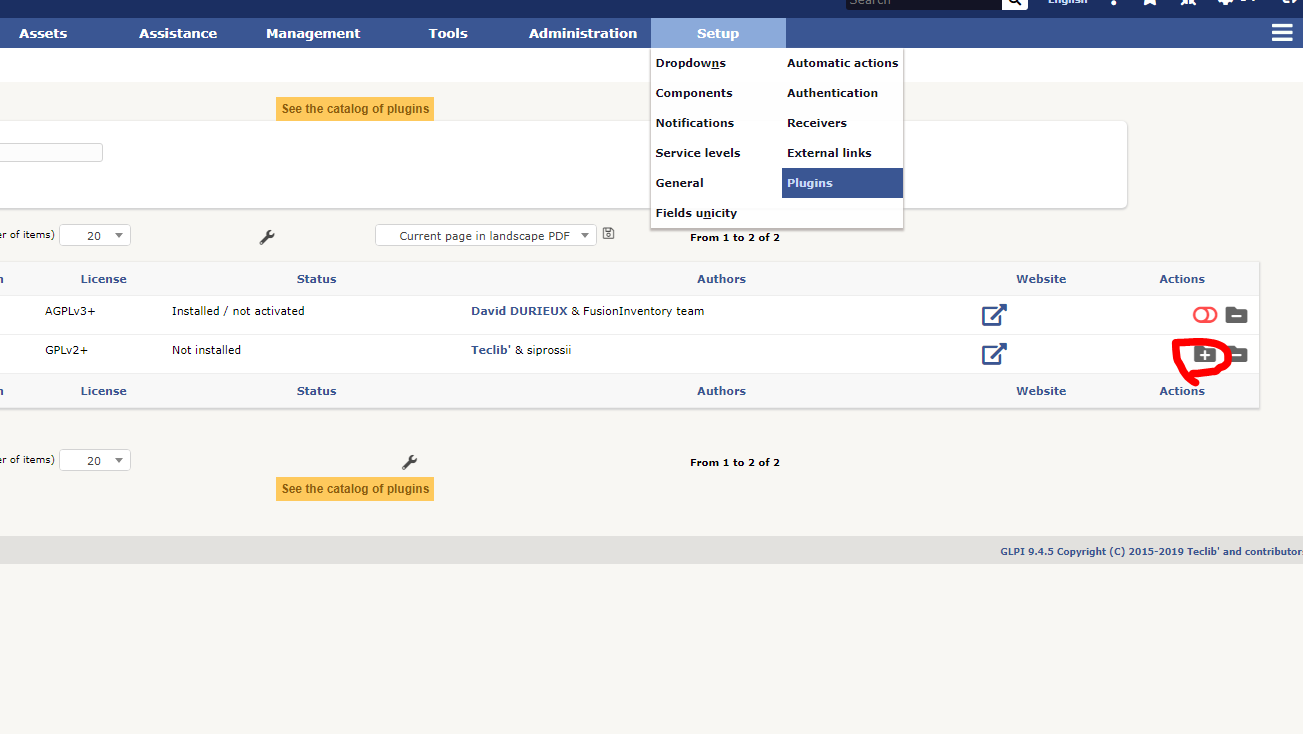
- На сайте GLPI перейдите в Setup -> Plugins и нажмите на иконку установки плагина;
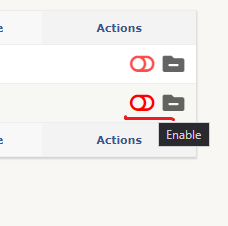
- Активируйте плагин;
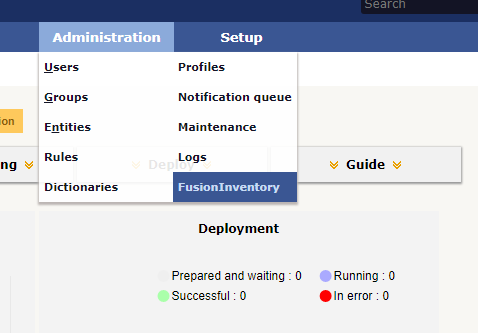
Теперь во вкладке Administration появился пункт FusionInventory.
Перед установкой агентов на компьютеры и сервера нужно сразу включить нужные модули агентов.
Перейдите в Administration -> FusionInventory -> General -> General Configuration
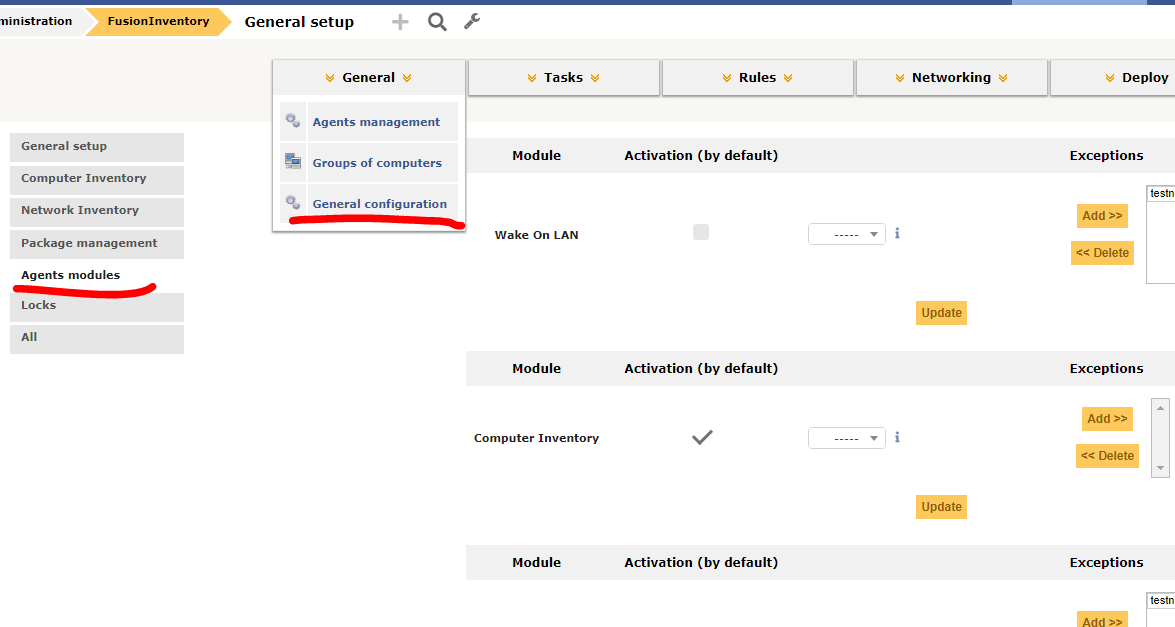
- Computer Inventory
- Network inventory (SNMP)
- Network discovery
- Package deployment
- Collect data
Установка Fusion Agent в Windows
Установить Fusion Agent можно либо через графический интерфейс (инсталлятор), либо через командную строку. Мы будем рассматривать второй вариант, так как он легко масштабируется для разворачивания через групповые политики или SCCM.
- Скачайте агент https://github.com/fusioninventory/fusioninventory-agent/releases. В моём случае я качаю Windows 64-bit OS: fusioninventory-agent_windows-x64_2.5.2.exe (не портейбл);
- Скопируйте установочный .ехе файл fusioninventory на компьютер, с которого вы хотите собирать данные;
- Откройте командную строку с правами администратора и выполните:
fusioninventory-agent_windows-x64_2.5.2.exe /S /acceptlicense /add-firewall-exception /debug=2 /execmode=Service /installtasks=Full /timeout=30 /delaytime=5 /server=»_http://glpi.local/plugins/fusioninventory/» /runnow
Рассмотрим основные параметры уставки
- /S – Silent установка, без графического интерфейса
- /debug=2 – для подробных логов. При боевых развертываниях убирайте этот ключ
- /execmode=Service – ставим агент как службу Windows
- /installtasks=Full – устанавливаем все возможные сборщики
- /delaytime=5 – Задержка перед первым обращения к серверу. Если разворачиваете на большое число компьютеров, ставьте число повыше
- /server – адрес сервера GLPI
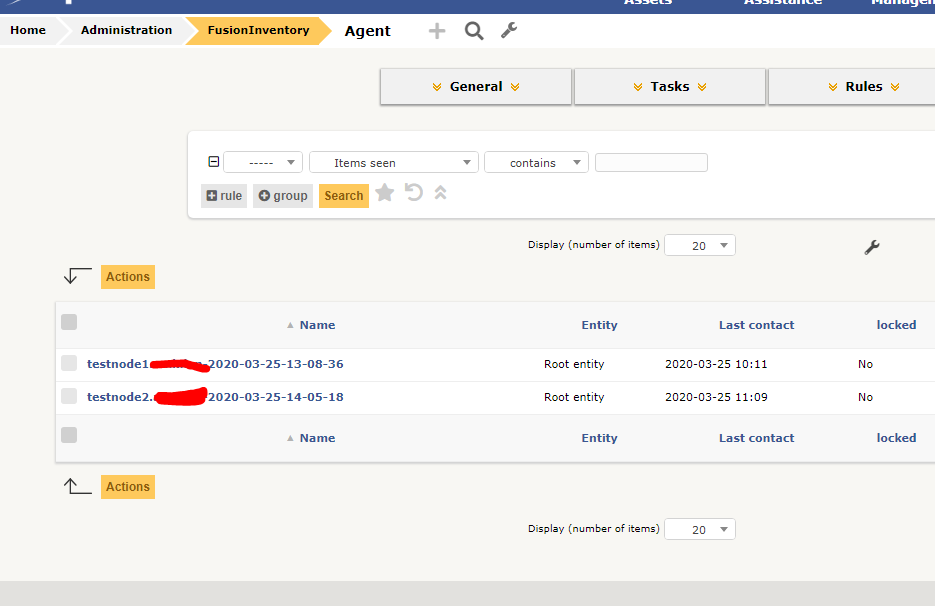
Перейдите в Administration -> FusionInventory -> General -> Agent Management, здесь вы можете управлять агентами
Убедитесь, что данные с данного компьютера появились в GLPI. Перейдите в Assets -> Computers.
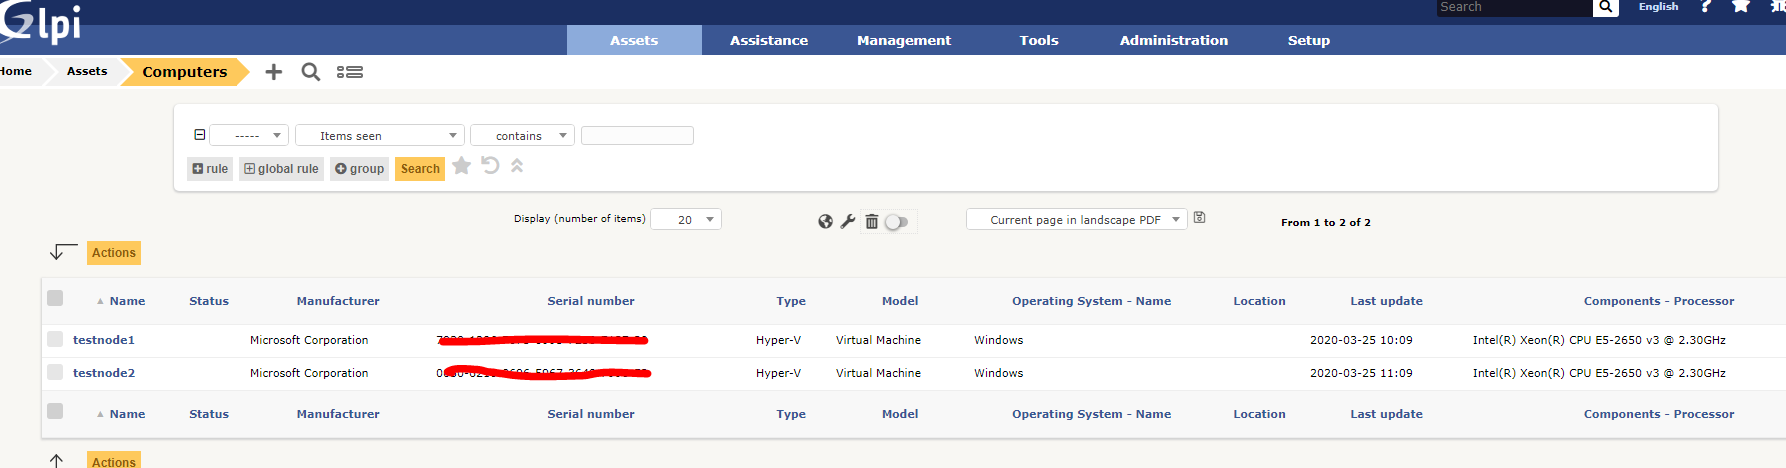
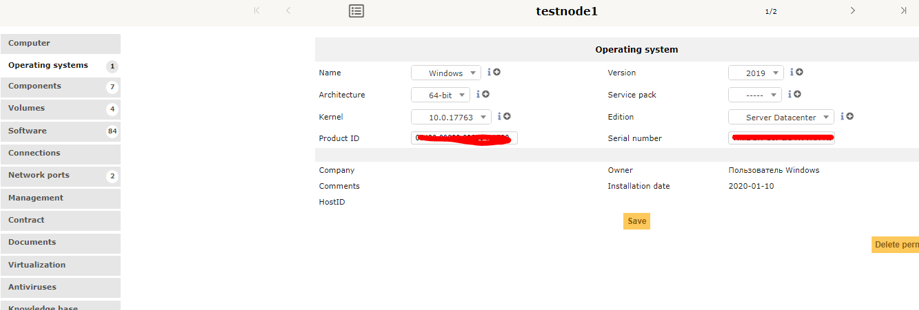
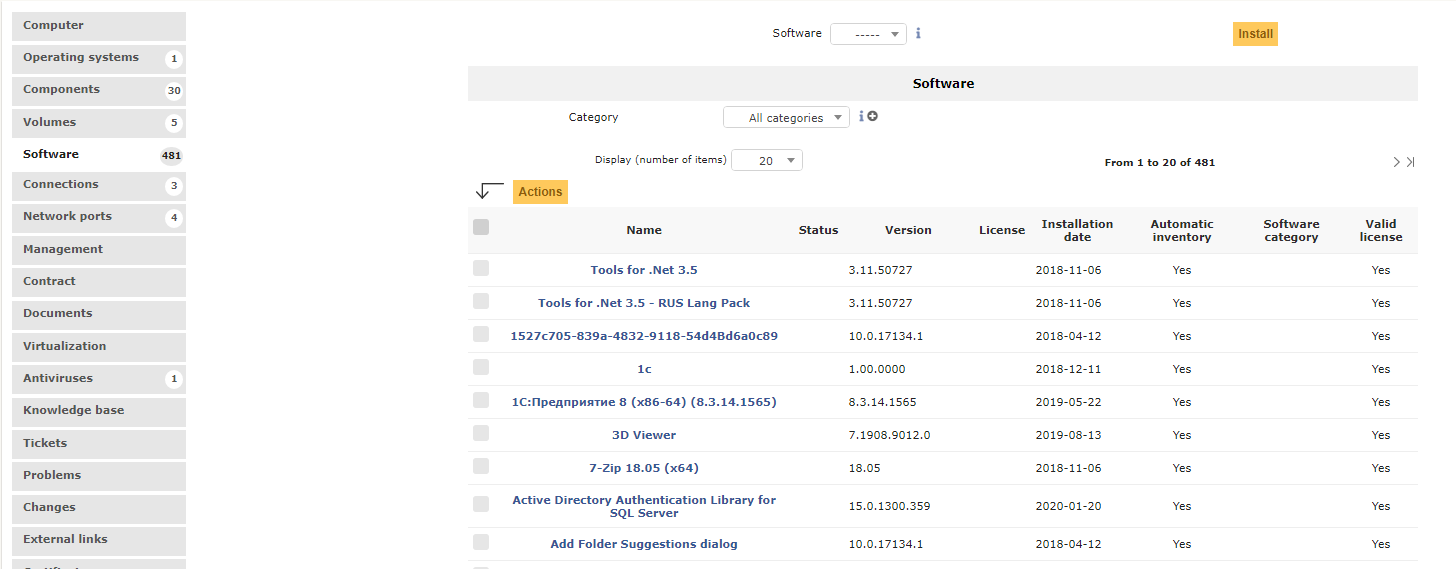
Здесь отображаются все компьютеры, на которые вы установили агенты FusionInventory с модулем Collect Data. Откройте один из компьютеров и посмотрите на собранные данные. Как вы видите, в базе данных GLPI появилась информация об версии и билде Windows с сервера с агентом.
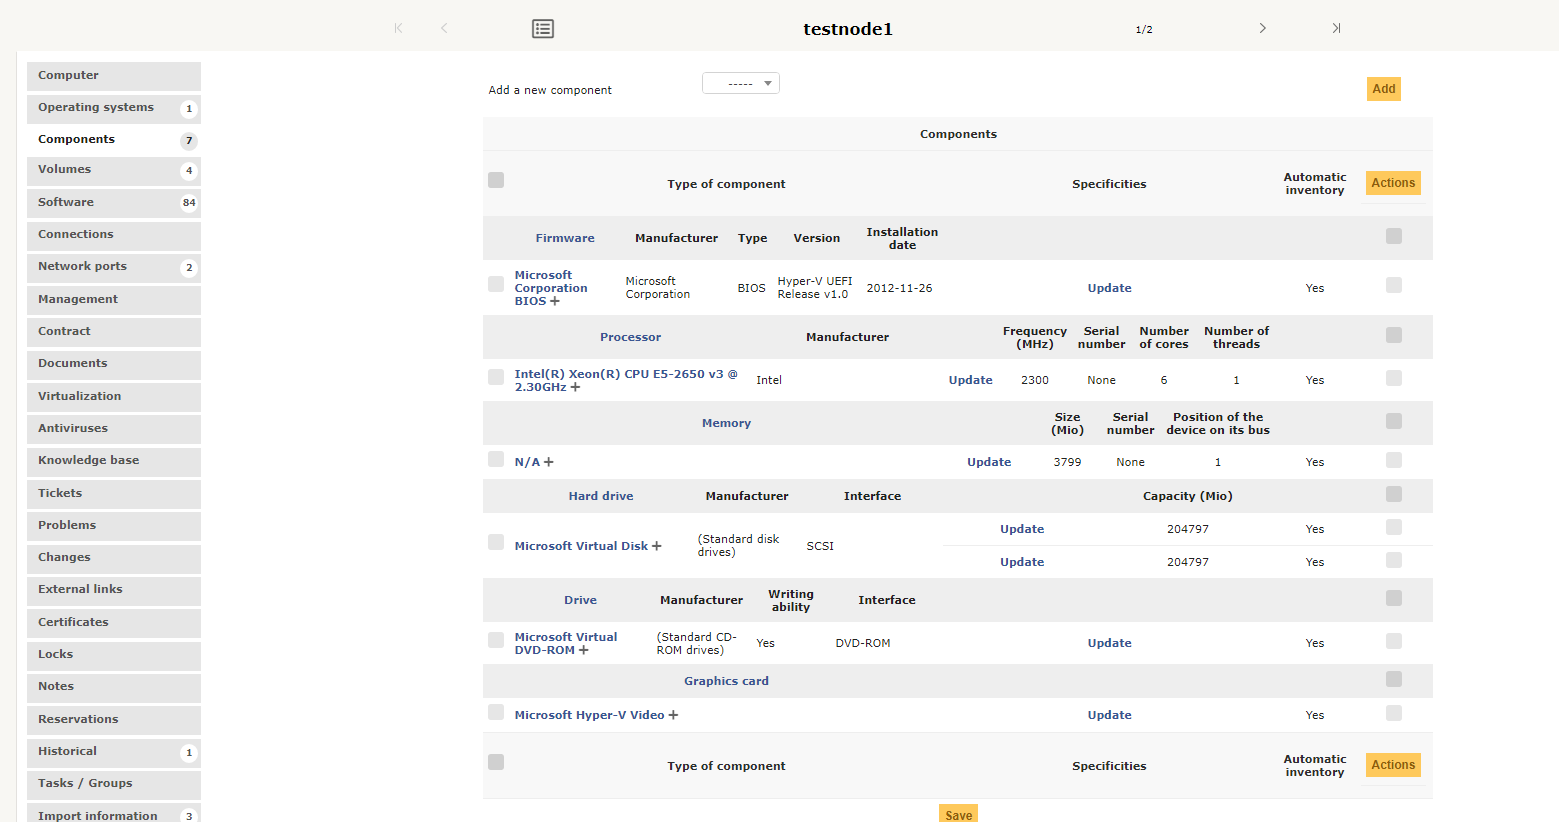
Вся информация заполняется автоматически из данных, которые приходят с агента. Также эта информация сортируется по категориям. Например, при установке агента на обычный ПК, можно получить информацию о периферийных устройствах. На скриншоте ниже информация о мониторах, подключенных к компьютеру где установлен агент.

Также вы видит список установленного на компьютере ПО.
Установка Fusion Agent на Linux
Рассмотрим установку из пакета на Ubuntu Server 18.04. Установите необходимые зависимости
apt install dmidecode hwdata ucf hdparm perl libuniversal-require-perl libwww-perl libparse-edid-perl libproc-daemon-perl libfile-which-perl libhttp-daemon-perl libxml-treepp-perl libyaml-perl libnet-cups-perl libnet-ip-perl libdigest-sha-perl libsocket-getaddrinfo-perl libtext-template-perl libxml-xpath-perl libyaml-tiny-perl libnet-snmp-perl libcrypt-des-perl libnet-nbname-perl libdigest-hmac-perl libfile-copy-recursive-perl libparallel-forkmanager-perl
dpkg -i fusioninventory-agent_2.5.2-1_all.deb
В конфигурационном файле агента (/etc/fusioninventory/agent.cfg) измените следующие параметры:
systemctl restart fusioninventory-agent
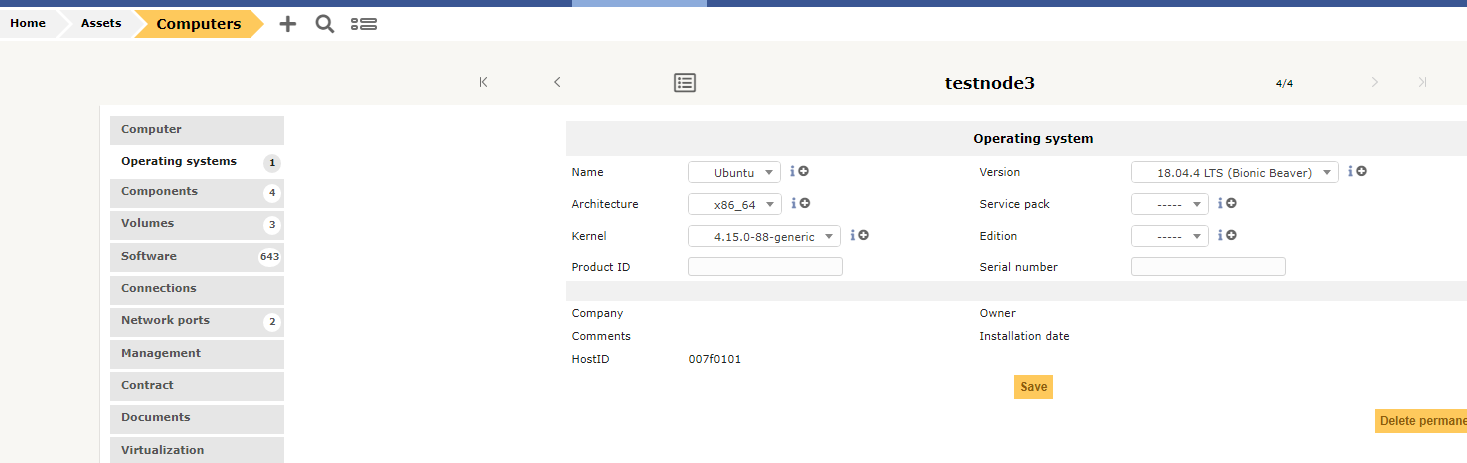
Если всё сделано правильно, вы увидите ваш Ubuntu компьютер/сервер в Assets-> Computers.
Статистика и отчеты в GLPI
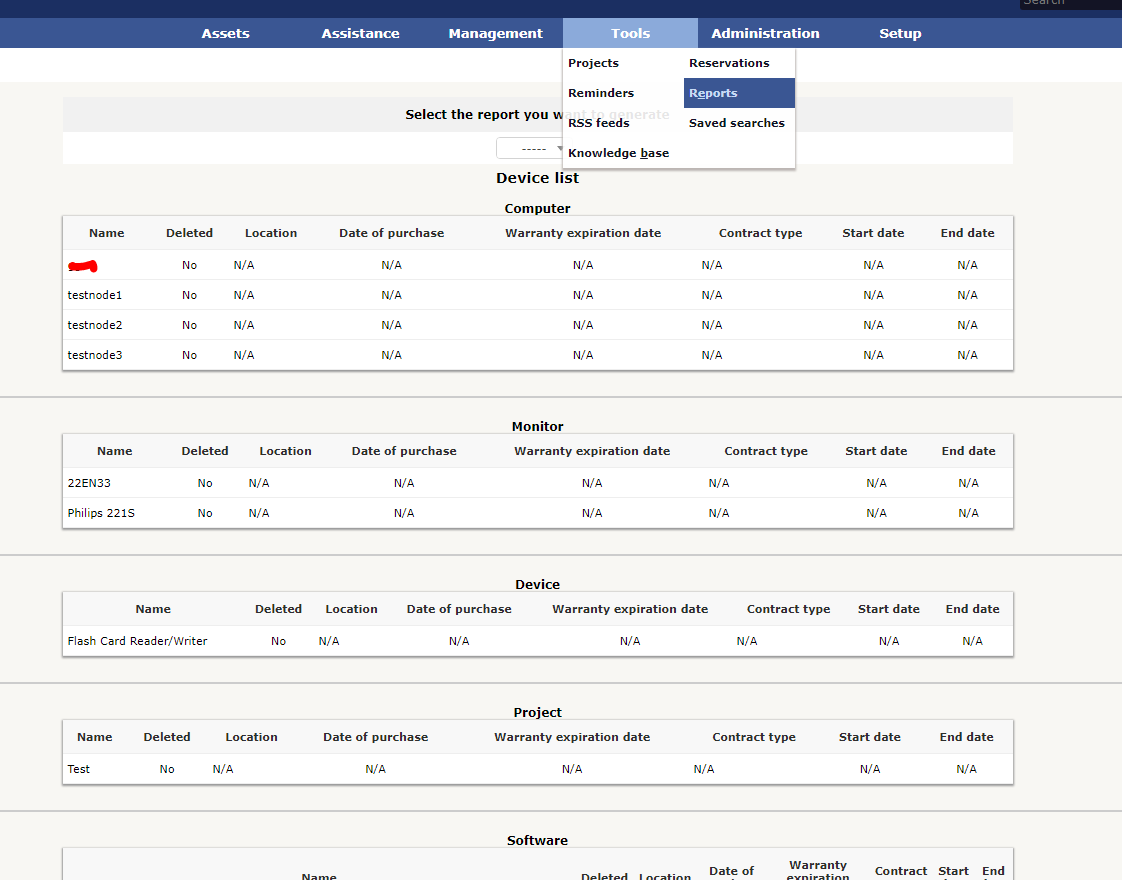
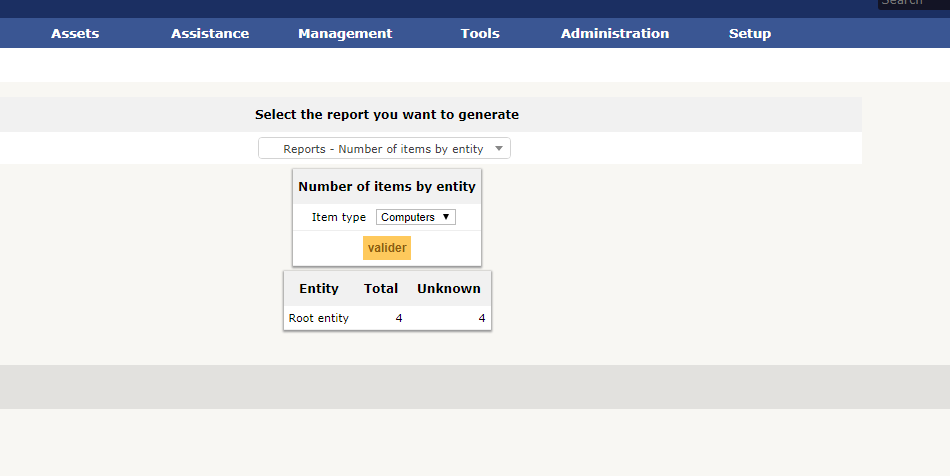
В GLPI есть встроенные отчеты.
Но скорее всего вам потребуются отчеты по собственным параметрам. Для этого в GLPI есть плагины:
Пример встроенного отчета из плагина Reports:
GLPI развивается более 15 лет и содержит в себе огромное количество возможностей для управления ИТ инфраструктуры, а сообщество развивает и поддерживает плагины для различных интеграций и функционала. Система имеет огромные возможности модификации своих элементов, поэтому каждая компания настраивает GLPI под себя.
Источник


