- Кросс-компиляция под Linux
- Введение
- Binutils
- NewLib
- Сборка Toolchain
- Порядок сборки Toolchain
- Создание кросс-компилятора GCC (от «Linux» до «Windows» )
- Preshing on Programming
- Required Packages
- How The Pieces Fit Together
- Build Steps
- 1. Binutils
- 2. Linux Kernel Headers
- 3. C/C++ Compilers
- 4. Standard C Library Headers and Startup Files
- 5. Compiler Support Library
- 6. Standard C Library
- 7. Standard C++ Library
- Dealing with Build Errors
- Automating the Above Steps
- Testing the Cross-Compiler
- Recent Posts
Кросс-компиляция под Linux
Введение
Что же у нас есть для кросс-компиляции? Если не считать коммерческих продуктов и мелких поделок, то для того, чтобы скомпилировать любой проект под любую платформу, понадобится Gnu Compiler Collection, или, кратко, GCC. GCC — это один большой набор исходников, но собирать из него кросс-компилятор на каждую новую целевую платформу придётся отдельно.
Надо сказать, список целевых платформ довольно внушителен.
Вообще, для того, чтобы работать с GGC надо собрать т. н. Toolchain, набор утилит для компиляции. В toolchain входит помимно GCC, ещё Binutils, предназначенные для манипуляций с объектными и бинарными файлами. Для голого железа (если планируется работать не под ОС на целевой платформы, весьма полезной будет также NewLib — сборник стандартных процедур.
Binutils
В Binutils входят:
В составе GCC большой набор разнообразных инструментов, однако, скорее всего иметь дело придётся с frontend, который так и называется, gcc. Он сам определяет тип исходного файла и вызывает соответствующий компилятор, а также, по необходимости, линковщик или библиотекарь.
NewLib
NewLib — специальная подборка стандартных функций для встраиваемых систем. Она включает в себя libc (функци работы со строками, файлами и т. д.), libm (разнообразные математические функции). Также она обладает широкими возможностями конфигурирования под разнообразные требования.
Надо сказать, NewLib далеко не единственный выбор. В принципе, если не пользоваться библиотечными функциями, можно вообще без библиотек обойтись, но этот путь сложен и тернист — стандарт си не требует наличия их в т. н. standalone environment 1) . Вполне возможно, есть другие подходящие варианты
GNU Debugger — стандартное средство отладки программ, и, в принципе, необязательно. Возможно, вы предпочтёте графический отладчик или вовсе пользуетесь исключительно printf-style-debug 2) .
Сборка Toolchain
Также стоит определить путь, куда будет всё установлено. В терминах GCC это называется prefix. По умолчанию этот путь — /usr/local . Однако по ряду различных причин иногда стоит специально указать другой. Первая причина — поставить в собственную домашнюю директорию, например, если нет root-полномочий на машине или просто его поставить только для себя (впрочем, лучше так не делать). Другая причина — бывает нужда с специальных вариантах сборки, и тогда это стоит делать, чтобы не спутать такую сборку с обычной. Стоит отметить, что компиляторы под различные платформы не перепутываются, так как имеют различные имена: gcc для ARM, например, будет именоваться arm-elf-gcc 3) или arm-linux-gcc , и именно его придётся указывать при компиляции (либо указывать target, тогда gcc сам вызовет нужный). Если же оставить путь по-умолчанию, сборка попадёт в стандартный путь поиска исполняемых файлов — /usr/local/bin , и может вызываться без специального указания пути или модификации $path .
Для указания prefix у configure есть соответствующая опция: — -prefix=…
Порядок сборки Toolchain
Сборка тулчейна в описанной конфигурации состоит из следующих этапов:
Создание кросс-компилятора GCC (от «Linux» до «Windows» )
Я хочу построить «gcc cross-compiler» для компиляции приложений «c/С++» в среде «Linux», но для цели «Windows».
Я сделал это до сих пор:
Установлены необходимые инструменты и пакеты для создания GCC, перечисленные на странице Предварительные требования для GCC.
Скачанные искомые источники:
Создана эта иерархия каталогов:
«$
«$
«$
«$
Созданный пакет binutils:
.. /../binutils-2.19.1/configure —prefix = «$
Скопированные заголовки «w32api» и «mingwrt» в каталог установки:
cp -R «$
cp -R «$
И теперь, когда я пытаюсь построить «c (только) кросс-компилятор»:
он строил что-то около 4 минут, а затем дал мне следующие ошибки:
Из этого сообщения об ошибке я действительно не знаю, что делать сейчас: — (((.
Кто-нибудь знает, где проблема?
Это на самом деле ОК: как все идет, вам нужно
- build binutils
установить заголовки
постройте частичный компилятор C: достаточно для создания объектных файлов, но недостаточно для ссылки
постройте runtime win32api и mingw (включая ваш недостающий dllcrt2.o )
построить полный компилятор C (и другие интерфейсы, такие как С++, Fortran, Ada, что угодно, если вы хотите их)
Вы успешно выполнили шаг 3 выше; он не создает библиотеки libgcc (которая является библиотекой поддержки GCC), но это означает, что ядро компилятора C является функциональным (хотя оно не сможет связываться, оно все равно может создавать действительные объектные файлы). Вы можете проверить это, посмотрев файл gcc/xgcc в вашем каталоге сборки GCC.
Итак, вам нужно перейти к следующему шагу, не беспокоясь о вашем текущем сбое.
(Чтобы выполнить установку частичного компилятора C, вы должны запустить make с опцией -k , чтобы он делал это лучше всего, даже перед лицом ошибок. Например, используйте make -k install .)
 Preshing on Programming
 Preshing on Programming
GCC is not just a compiler. It’s an open source project that lets you build all kinds of compilers. Some compilers support multithreading; some support shared libraries; some support multilib. It all depends on how you configure the compiler before building it.
This guide will demonstrate how to build a cross-compiler, which is a compiler that builds programs for another machine. All you need is a Unix-like environment with a recent version of GCC already installed.
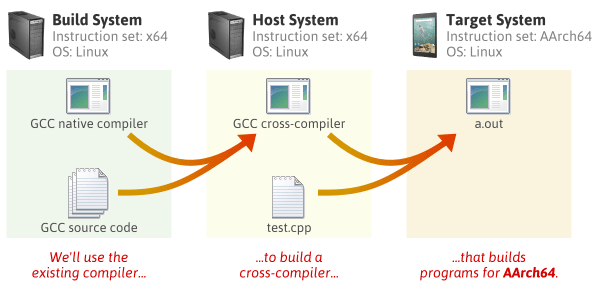
In this guide, I’ll use Debian Linux to build a full C++ cross-compiler for AArch64, a 64-bit instruction set available in the latest ARM processors. I don’t actually own an AArch64 device – I just wanted an AArch64 compiler to verify this bug.
Required Packages
Starting with a clean Debian system, you must first install a few packages:
Everything else will be built from source. Create a new directory somewhere, and download the following source packages. (If you’re following this guide at a later date, there will be more recent releases of each package available. Check for newer releases by pasting each URL into your browser without the filename. For example: http://ftpmirror.gnu.org/binutils/)
The first four packages – Binutils, GCC, the Linux kernel and Glibc – are the main ones. We could have installed the next three packages in binary form using our system’s package manager instead, but that tends to provide older versions. The last two packages, ISL and CLooG, are optional, but they enable a few more optimizations in the compiler we’re about to build.
How The Pieces Fit Together
By the time we’re finished, we will have built each of the following programs and libraries. First, we’ll build the tools on the left, then we’ll use those tools to build the programs and libraries on the right. We won’t actually build the target system’s Linux kernel, but we do need the kernel header files in order to build the target system’s standard C library.
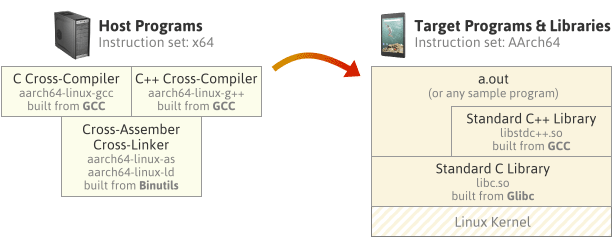
The compilers on the left will invoke the assembler & linker as part of their job. All the other packages we downloaded, such as MPFR, GMP and MPC, will be linked into the compilers themselves.
The diagram on the right represents a sample program, a.out , running on the target OS, built using the cross compiler and linked with the target system’s standard C and C++ libraries. The standard C++ library makes calls to the standard C library, and the C library makes direct system calls to the AArch64 Linux kernel.
Note that instead of using Glibc as the standard C library implementation, we could have used Newlib, an alternative implementation. Newlib is a popular C library implementation for embedded devices. Unlike Glibc, Newlib doesn’t require a complete OS on the target system – just a thin hardware abstraction layer called Libgloss. Newlib doesn’t have regular releases; instead, you’re meant to pull the source directly from the Newlib CVS repository. One limitation of Newlib is that currently, it doesn’t seem to support building multithreaded programs for AArch64. That’s why I chose not to use it here.
Build Steps
Extract all the source packages.
Create symbolic links from the GCC directory to some of the other directories. These five packages are dependencies of GCC, and when the symbolic links are present, GCC’s build script will build them automatically.
Choose an installation directory, and make sure you have write permission to it. In the steps that follow, I’ll install the new toolchain to /opt/cross .
Throughout the entire build process, make sure the installation’s bin subdirectory is in your PATH environment variable. You can remove this directory from your PATH later, but most of the build steps expect to find aarch64-linux-gcc and other host tools via the PATH by default.
Pay particular attention to the stuff that gets installed under /opt/cross/aarch64-linux/ . This directory is considered the system root of an imaginary AArch64 Linux target system. A self-hosted AArch64 Linux compiler could, in theory, use all the headers and libraries placed here. Obviously, none of the programs built for the host system, such as the cross-compiler itself, will be installed to this directory.
1. Binutils
This step builds and installs the cross-assembler, cross-linker, and other tools.
- We’ve specified aarch64-linux as the target system type. Binutils’s configure script will recognize that this target is different from the machine we’re building on, and configure a cross-assembler and cross-linker as a result. The tools will be installed to /opt/cross/bin , their names prefixed by aarch64-linux- .
- —disable-multilib means that we only want our Binutils installation to work with programs and libraries using the AArch64 instruction set, and not any related instruction sets such as AArch32.
2. Linux Kernel Headers
This step installs the Linux kernel header files to /opt/cross/aarch64-linux/include , which will ultimately allow programs built using our new toolchain to make system calls to the AArch64 kernel in the target environment.
- We could even have done this before installing Binutils.
- The Linux kernel header files won’t actually be used until step 6, when we build the standard C library, although the configure script in step 4 expects them to be already installed.
- Because the Linux kernel is a different open-source project from the others, it has a different way of identifying the target CPU architecture: ARCH=arm64
All of the remaining steps involve building GCC and Glibc. The trick is that there are parts of GCC which depend on parts of Glibc already being built, and vice versa. We can’t build either package in a single step; we need to go back and forth between the two packages and build their components in a way that satisfies their dependencies.

3. C/C++ Compilers
This step will build GCC’s C and C++ cross-compilers only, and install them to /opt/cross/bin . It won’t invoke those compilers to build any libraries just yet.
- Because we’ve specified —target=aarch64-linux , the build script looks for the Binutils cross-tools we built in step 1 with names prefixed by aarch64-linux- . Likewise, the C/C++ compiler names will be prefixed by aarch64-linux- .
- —enable-languages=c,c++ prevents other compilers in the GCC suite, such as Fortran, Go or Java, from being built.
4. Standard C Library Headers and Startup Files
In this step, we install Glibc’s standard C library headers to /opt/cross/aarch64-linux/include . We also use the C compiler built in step 3 to compile the library’s startup files and install them to /opt/cross/aarch64-linux/lib . Finally, we create a couple of dummy files, libc.so and stubs.h , which are expected in step 5, but which will be replaced in step 6.
- —prefix=/opt/cross/aarch64-linux tells Glibc’s configure script where it should install its headers and libraries. Note that it’s different from the usual —prefix .
- Despite some contradictory information out there, Glibc’s configure script currently requires us to specify all three —build , —host and —target system types.
- $MACHTYPE is a predefined environment variable which describes the machine running the build script. —build=$MACHTYPE is needed because in step 6, the build script will compile some additional tools which run as part of the build process itself.
- —host has a different meaning here than we’ve been using so far. In Glibc’s configure , both the —host and —target options are meant to describe the system on which Glibc’s libraries will ultimately run.
- We install the C library’s startup files, crt1.o , crti.o and crtn.o , to the installation directory manually. There’s doesn’t seem to a make rule that does this without having other side effects.
5. Compiler Support Library
This step uses the cross-compilers built in step 3 to build the compiler support library. The compiler support library contains some C++ exception handling boilerplate code, among other things. This library depends on the startup files installed in step 4. The library itself is needed in step 6. Unlike some other guides, we don’t need to re-run GCC’s configure . We’re just building additional targets in the same configuration.
- Two static libraries, libgcc.a and libgcc_eh.a , are installed to /opt/cross/lib/gcc/aarch64-linux/4.9.2/ .
- A shared library, libgcc_s.so , is installed to /opt/cross/aarch64-linux/lib64 .
6. Standard C Library
In this step, we finish off the Glibc package, which builds the standard C library and installs its files to /opt/cross/aarch64-linux/lib/ . The static library is named libc.a and the shared library is libc.so .
7. Standard C++ Library
Finally, we finish off the GCC package, which builds the standard C++ library and installs it to /opt/cross/aarch64-linux/lib64/ . It depends on the C library built in step 6. The resulting static library is named libstdc++.a and the shared library is libstdc++.so .
Dealing with Build Errors
If you encounter any errors during the build process, there are three possibilities:
- You’re missing a required package or tool on the build system.
- You’re attempting to perform the build steps in an incorrect order.
- You’ve done everything right, but something is just broken in the configuration you’re attempting to build.
You’ll have to examine the build logs to determine which case applies. GCC supports a lot of configurations, and some of them may not build right away. The less popular a configuration is, the greater the chance of it being broken. GCC, being an open source project, depends on contributions from its users to keep each configuration working.
Automating the Above Steps
I’ve written a small bash script named build_cross_gcc to perform all of the above steps. You can find it on GitHub. On my Core 2 Quad Q9550 Debian machine, it takes 13 minutes from start to finish. Customize it to your liking before running.

build_cross_gcc also supports Newlib configurations. When you build a Newlib-based cross-compiler, steps 4, 5 and 6 above can be combined into a single step. (Indeed, that’s what many existing guides do.) For Newlib support, edit the script options as follows:
Another way to build a GCC cross-compiler is using a combined tree, where the source code for Binutils, GCC and Newlib are merged into a single directory. A combined tree will only work if the intl and libiberty libraries bundled with GCC and Binutils are identical, which is not the case for the versions used in this post. Combined trees don’t support Glibc either, so it wasn’t an option for this configuration.
There are a couple of popular build scripts, namely crosstool-NG and EmbToolkit, which automate the entire process of building cross-compilers. I had mixed results using crosstool-NG, but it helped me make sense of the build process while putting together this guide.
Testing the Cross-Compiler
If everything built successfully, let’s check our cross-compiler for a dial tone:
We can compile the C++14 program from the previous post, then disassemble it:
This was my first foray into building a cross-compiler. I basically wrote this guide to remember what I’ve learned. I think the above steps serve as a pretty good template for building other configurations; I used build_cross_gcc to build TARGET=powerpc-eabi as well. You can browse config.sub from any of the packages to see what other target environments are supported. Comments and corrections are more than welcome!
Check out Plywood, a cross-platform, open source C++ framework:
Recent Posts
Copyright © 2021 Jeff Preshing — Powered by Octopress


