- Generating self-signed certificates on Windows
- 1. PowerShell 4.0
- 2. OpenSSL
- 3. Makecert
- 4. Selfssl7
- 5. IIS
- 6. Pluralsight
- 7. SelfSSL
- 8. SSLChecker
- 9. Hard core
- 10. mkcert
- Generate an Azure Application Gateway self-signed certificate with a custom root CA
- Prerequisites
- Create a root CA certificate
- Create the root key
- Create a Root Certificate and self-sign it
- Create a server certificate
- Create the certificate’s key
- Create the CSR (Certificate Signing Request)
- Generate the certificate with the CSR and the key and sign it with the CA’s root key
- Verify the newly created certificate
- Configure the certificate in your web server’s TLS settings
- Apache
- NGINX
- Access the server to verify the configuration
- Verify the configuration with OpenSSL
- Upload the root certificate to Application Gateway’s HTTP Settings
- Azure portal
- Azure PowerShell
Generating self-signed certificates on Windows
If you do anything with Identity, you’ll know you need certificates — lots of them — and that normally means self-signed to keep the costs down or because you just need it for a short time before you tear down the VM or because you don’t have a PKI infrastructure.
This is for testing, proofs of concept etc. This is definitely not for Production purposes. Use at your own risk.
This self-signed certificate also needs a private key otherwise it’s pretty useless for SSL, token signing etc.
Remember that this won’t be signed by a CA so you need to do this to stop the browser complaining once you’ve generated the certificates.
Note: The “ character displayed by Medium does something funny when you cut and paste and run the command. You need to retype it as a “straight” character.
Just calling out Let’s Encrypt. They provide free CA certificates that support multiple SAN and wildcards. The drawback is that the certificate is only valid for 90 days but they provide an automated renew process. This is a very good option for a quick PoC.
So, what other options do we have?
1. PowerShell 4.0
Running as administrator.
$cert = New-SelfSignedCertificate -certstorelocation cert:\localmachine\my -dnsname company.co.nz
Using “mmc”, we can see the certificate in the local computer store. Although it shows “Client Authentication”, it is valid for “Server Authentication” as well.
Now we can do the normal export function or we can create the pfx file ourselves.
$pwd = ConvertTo-SecureString -String ‘password1234’ -Force -AsPlainText
$path = ‘cert:\localMachine\my\’ + $cert.thumbprint
Export-PfxCertificate -cert $path -FilePath c:\junk\certificate\powershellcert.pfx -Password $pwd
and then double-click the pfx file to import via the “Certificate Import Wizard”. You’ll be asked to input the password you used above.
This certificate is only valid for a year (the default).
If we wanted a three-year certificate, we need:
$date_now = Get-Date
$extended_date = $date_now.AddYears(3)
$cert = New-SelfSignedCertificate -certstorelocation cert:\localmachine\my -dnsname company.co.nz -notafter $extended_date
Now what happens if we need multiple SAN (subject alternative name)?
“-DnsName” specifies one or more DNS names to put into the subject alternative name extension of the certificate. The first DNS name is also saved as the Subject Name.
$cert = New-SelfSignedCertificate -certstorelocation cert:\localmachine\my -dnsname company.co.nz, mycompany.co.nz, minecompany.co.nz -notafter $extended_date -KeyLength 4096
And note the keylength parameter if that’s something you need to change.
2. OpenSSL
Originally for the Linux world but you can get a Windows version from Shining Light. Don’t worry about the Win32 reference and the outdated documentation at the top. Scroll down and you’ll see the latest Win64 stuff.
And help with future work by donating $10 😄. It’s a lot easier than having to compile the binaries!
openssl version -a
gives you the version.
openssl req -x509 -newkey rsa:4096 -sha256 -keyout openssl.key -out openssl.crt -subj “/CN=company.co.nz” -days 600
Generating a 4096 bit RSA private key
…………………………………++
…………………………++
writing new private key to ‘opensll.key’
Enter PEM pass phrase:
Verifying — Enter PEM pass phrase:
The crt file is the same as a cer file. You can use it in Windows e.g. to load a signing key for another claims provider in ADFS.
But it doesn’t contain a private key — that’s in a separate file — and Windows doesn’t like that. See below for steps on combining them.
As far as multiple SAN are concerned, OpenSSL currently doesn’t support a way of doing this via the command line.
I believe this is coming in 1.1.1 via:
extension “subjectAltName = DNS:mycompany.co.nz, DNS:minecompany.co.nz”
At the moment, you need to do this via a configuration file.
[req]
distinguished_name = req_distinguished_name
x509_extensions = v3_req
prompt = no
[req_distinguished_name]
C = NZ
ST = NI
L = Auckland
O = Company
OU = Division
CN = company.co.nz
[v3_req]
keyUsage = critical, digitalSignature, keyAgreement
extendedKeyUsage = serverAuth
subjectAltName = @alt_names
[alt_names]
DNS.1 = company.co.nz
DNS.2 = mycompany.com
DNS.3 = minecompany.co.nz
Save this as “san.cnf”.
openssl req -x509 -newkey rsa:4096 -sha256 -keyout opensll.key -out openssl.crt -days 600 -config san.cnf
To make this available to Windows, you need to combine the private and public keys into one pfx file.
openssl pkcs12 -export -name “company.co.nz” -out openssl.pfx -inkey openssl.key -in openssl.crt
where “company.co.nz” is the friendly name.
3. Makecert
As per the documentation, makecert is deprecated and you should use the PowerShell command as above.
Official documentation is here.
To make a self-signed certificate with a private key, use:
makecert -r -pe -n “CN=company.co.nz” -e 01/01/2019 -sky exchange -sv makecert.pvk makecert.cer
“C:\Program Files (x86)\Microsoft SDKs\Windows\v7.1A\Bin\pvk
2pfx.exe” -pvk makecert.pvk -spc makecert.cer -pfx makecert.pfx
(The path to pvk2pfx is as per my PC. YMMV).
Then install the pfx file.
4. Selfssl7
This used to be my go-to tool for generating self-signed certificates.
The current version runs on .NET 3.5 that is not normally installed on the latest servers and PC’s. You can download the code and rebuild for .NET 4.6 and it will work just fine.
One of the best features for me was that it could do the IIS SSL bindings as well as installing the certificate into the appropriate store.
SelfSSL7 /N cn=company.co.nz /K 2048 /V 3652 /X /F c:cert.pfx
This generates a self-signed certificate using a 2048 bit-length key, without a password in .pfx format (including the private key)
5. IIS
This is one of those hidden features that very few people know about.
From the top-level in IIS Manager, select “Server Certificates”.
Then click the “Create” on the right.
This will create a self-signed certificate valid for a year with a private key. It is only for “localhost”.
6. Pluralsight
Yes, they are a training company but they also have some neat utilities.
You can create a PFX file directly or you can save directly to a certificate store of your choice.
7. SelfSSL
This is an old-school utility which is available if you have the Microsoft Internet Information Services (IIS) 6.0 Resource Kit.
selfssl /t /v:200 /n:cn=company.co.nz
The /t option saves you a step by automatically installing the new self-signed SSL certificate into the Web server’s certificate store. The /v option specifies the number of days the certificate will be valid.
8. SSLChecker
This is an online utility.
This will generate a self-signed certificate and a private key in the format:
Save the two texts; call the certificate file “something.crt” and call the private key file “something.key” then use the openssl command above to combine both into a .pfx file that you can then import.
9. Hard core
If you are a developer and insist on rolling your own, there are a number of examples around. .NET doesn’t have the required support so you need to use Bouncy Castle.
10. mkcert
mkcert is a simple tool for making locally-trusted development certificates. It requires no configuration.
“mkcert is written in Go, and you can run it with a Go run command”.
If you have another utility you recommend, note it in a comment and I’ll add it.
The traditional way to look at certificates is to “Run mmc”.
Generate an Azure Application Gateway self-signed certificate with a custom root CA
The Application Gateway v2 SKU introduces the use of Trusted Root Certificates to allow backend servers. This removes authentication certificates that were required in the v1 SKU. The root certificate is a Base-64 encoded X.509(.CER) format root certificate from the backend certificate server. It identifies the root certificate authority (CA) that issued the server certificate and the server certificate is then used for the TLS/SSL communication.
Application Gateway trusts your website’s certificate by default if it’s signed by a well-known CA (for example, GoDaddy or DigiCert). You don’t need to explicitly upload the root certificate in that case. For more information, see Overview of TLS termination and end to end TLS with Application Gateway. However, if you have a dev/test environment and don’t want to purchase a verified CA signed certificate, you can create your own custom CA and create a self-signed certificate with it.
Self-signed certificates are not trusted by default and they can be difficult to maintain. Also, they may use outdated hash and cipher suites that may not be strong. For better security, purchase a certificate signed by a well-known certificate authority.
In this article, you will learn how to:
- Create your own custom Certificate Authority
- Create a self-signed certificate signed by your custom CA
- Upload a self-signed root certificate to an Application Gateway to authenticate the backend server
Prerequisites
OpenSSL on a computer running Windows or Linux
While there could be other tools available for certificate management, this tutorial uses OpenSSL. You can find OpenSSL bundled with many Linux distributions, such as Ubuntu.
A web server
For example, Apache, IIS, or NGINX to test the certificates.
An Application Gateway v2 SKU
Create a root CA certificate
Create your root CA certificate using OpenSSL.
Create the root key
Sign in to your computer where OpenSSL is installed and run the following command. This creates a password protected key.
At the prompt, type a strong password. For example, at least nine characters, using upper case, lower case, numbers, and symbols.
Create a Root Certificate and self-sign it
Use the following commands to generate the csr and the certificate.
The previous commands create the root certificate. You’ll use this to sign your server certificate.
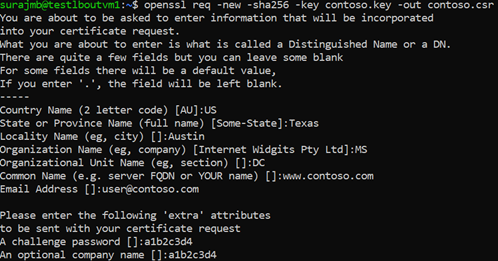
When prompted, type the password for the root key, and the organizational information for the custom CA such as Country/Region, State, Org, OU, and the fully qualified domain name (this is the domain of the issuer).
Create a server certificate
Next, you’ll create a server certificate using OpenSSL.
Create the certificate’s key
Use the following command to generate the key for the server certificate.
Create the CSR (Certificate Signing Request)
The CSR is a public key that is given to a CA when requesting a certificate. The CA issues the certificate for this specific request.
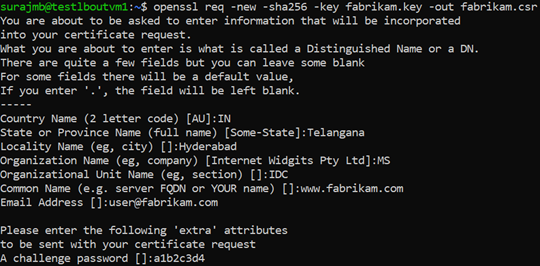
The CN (Common Name) for the server certificate must be different from the issuer’s domain. For example, in this case, the CN for the issuer is www.contoso.com and the server certificate’s CN is www.fabrikam.com .
Use the following command to generate the CSR:
When prompted, type the password for the root key, and the organizational information for the custom CA: Country/Region, State, Org, OU, and the fully qualified domain name. This is the domain of the website and it should be different from the issuer.
Generate the certificate with the CSR and the key and sign it with the CA’s root key
Use the following command to create the certificate:
Verify the newly created certificate
Use the following command to print the output of the CRT file and verify its content:
Verify the files in your directory, and ensure you have the following files:
Configure the certificate in your web server’s TLS settings
In your web server, configure TLS using the fabrikam.crt and fabrikam.key files. If your web server can’t take two files, you can combine them to a single .pem or .pfx file using OpenSSL commands.
For instructions on how to import certificate and upload them as server certificate on IIS, see HOW TO: Install Imported Certificates on a Web Server in Windows Server 2003.
For TLS binding instructions, see How to Set Up SSL on IIS 7.
Apache
The following configuration is an example virtual host configured for SSL in Apache:
NGINX
The following configuration is an example NGINX server block with TLS configuration:
Access the server to verify the configuration
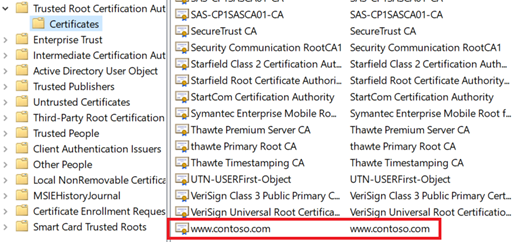
Add the root certificate to your machine’s trusted root store. When you access the website, ensure the entire certificate chain is seen in the browser.
It’s assumed that DNS has been configured to point the web server name (in this example, www.fabrikam.com) to your web server’s IP address. If not, you can edit the hosts file to resolve the name.
Browse to your website, and click the lock icon on your browser’s address box to verify the site and certificate information.
Verify the configuration with OpenSSL
Or, you can use OpenSSL to verify the certificate.
Upload the root certificate to Application Gateway’s HTTP Settings
To upload the certificate in Application Gateway, you must export the .crt certificate into a .cer format Base-64 encoded. Since .crt already contains the public key in the base-64 encoded format, just rename the file extension from .crt to .cer.
Azure portal
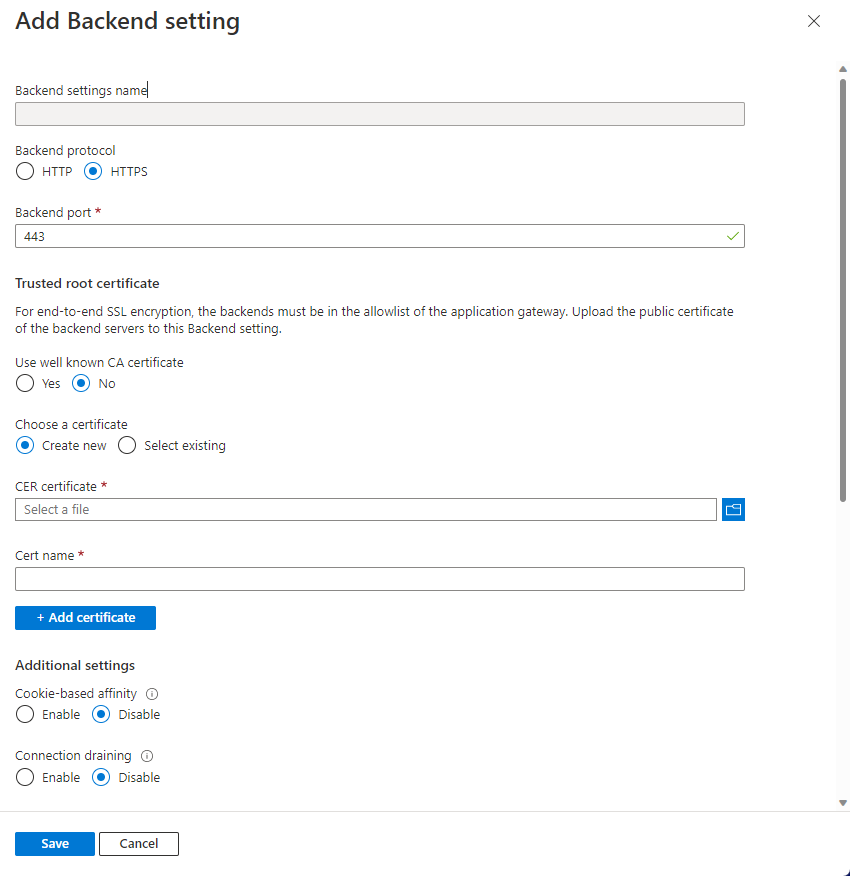
To upload the trusted root certificate from the portal, select the HTTP Settings and choose the HTTPS protocol.
Azure PowerShell
Or, you can use Azure CLI or Azure PowerShell to upload the root certificate. The following code is an Azure PowerShell sample.
The following sample adds a trusted root certificate to the application gateway, creates a new HTTP setting and adds a new rule, assuming the backend pool and the listener exist already.

