- JSON Web Tokens
- Add dependencies
- JWT authorization flow
- Install JWT
- Configure JWT
- Step 1: Configure JWT settings
- Step 2: Generate a token
- Step 3: Configure realm
- Step 4: Configure a token verifier
- Step 5: Validate JWT payload
- Пять простых шагов для понимания JSON Web Tokens (JWT)
- Структура JWT
- Шаг 1. Создаем HEADER
- Шаг 2. Создаем PAYLOAD
- Шаг 3. Создаем SIGNATURE
- Шаг 4. Теперь объединим все три JWT компонента вместе
- Как JWT защищает наши данные?
- Шаг 5. Проверка JWT
- В заключение
- Что дальше?
- Introduction to JSON Web Tokens
- What is JSON Web Token?
- When should you use JSON Web Tokens?
- What is the JSON Web Token structure?
- Header
- Payload
- Signature
- Putting all together
- How do JSON Web Tokens work?
- Why should we use JSON Web Tokens?
JSON Web Tokens
JSON Web Token is an open standard that defines a way for securely transmitting information between parties as a JSON object. This information can be verified and trusted since it is signed using a shared secret (with the HS256 algorithm) or a public/private key pair (for example, RS256 ).
Ktor handles JWTs passed in the Authorization header using the Bearer schema and allows you to:
verify the signature of a JSON web token;
perform additional validations on the JWT payload.
You can get general information about authentication and authorization in Ktor in the Authentication and authorization section.
Add dependencies
To enable JWT authentication, you need to include the ktor-auth and ktor-auth-jwt artifacts in the build script:
JWT authorization flow
The JWT authorization flow in Ktor might look as follows:
A client makes a POST request with the credentials to a specific authentication route in a server application. The example below shows an HTTP client POST request with the credentials passed in JSON:
If the credentials are valid, a server generates a JSON web token and signs it with the specified algorithm. For example, this might be HS256 with a specific shared secret or RS256 with a public/private key pair.
A server sends a generated JWT to a client.
A client can now make a request to a protected resource with a JSON web token passed in the Authorization header using the Bearer schema.
A server receives a request and performs the following validations:
Verifies a token’s signature. Note that a verification way depends on the algorithm used to sign a token.
Perform additional validations on the JWT payload.
After validation, a server responds with the contents of a protected resource.
Install JWT
To install the jwt authentication provider, call the jwt function inside the install block:
You can optionally specify a provider name that can be used to authenticate a specified route.
Configure JWT
In this section, we’ll see how to use JSON web tokens in a server Ktor application. We’ll demonstrate two approaches to signing tokens since they require slightly different ways to verify tokens:
Using HS256 with a specified shared secret.
Using RS256 with a public/private key pair.
You can find full runnable projects here: auth-jwt-hs256, auth-jwt-rs256.
Step 1: Configure JWT settings
To configure JWT-related settings, you can create a custom jwt group in the application.conf configuration file. This file might look as follows:
Note that secret information should not be stored under version control.
You can access these settings in code in the following way:
Step 2: Generate a token
To generate a JSON web token, you can use JWTCreator.Builder. Code snippets below show how to do this for both HS256 and RS256 algorithms:
post(«/login») defines an authentication route for receiving POST requests.
call.receive () receives user credentials sent as a JSON object and converts it to a User class object.
For HS256 , a shared secret is used to sign a token.
For RS256 , a public/private key pair is used.
call.respond sends a token to a client as a JSON object.
Step 3: Configure realm
The realm property allows you to set the realm to be passed in WWW-Authenticate header when accessing a protected route.
Step 4: Configure a token verifier
The verifier function allows you to verify a token format and its signature:
For HS256 , you need to pass a JWTVerifier instance to verify a token.
For RS256 , you need to pass JwkProvider, which specifies a JWKS endpoint for accessing a public key used to verify a token. In our case, an issuer is http://0.0.0.0:8080 , so a JWKS endpoint address will be http://0.0.0.0:8080/.well-known/jwks.json .
Step 5: Validate JWT payload
The validate function allows you to perform additional validations on the JWT payload in the following way:
Check the credential parameter, which represents a JWTCredential object and contains the JWT payload. In the example below, the value of a custom username claim is checked.
In a case of successful authentication, return JWTPrincipal. If authentication fails, return null.
Источник
Пять простых шагов для понимания JSON Web Tokens (JWT)

Представляю вам мой довольно вольный перевод статьи 5 Easy Steps to Understanding JSON Web Tokens (JWT). В этой статье будет рассказано о том, что из себя представляют JSON Web Tokens (JWT) и с чем их едят. То есть какую роль они играют в проверке подлинности пользователя и обеспечении безопасности данных приложения.
Для начала рассмотрим формальное определение.
JSON Web Token (JWT) — это JSON объект, который определен в открытом стандарте RFC 7519. Он считается одним из безопасных способов передачи информации между двумя участниками. Для его создания необходимо определить заголовок (header) с общей информацией по токену, полезные данные (payload), такие как id пользователя, его роль и т.д. и подписи (signature).
Кстати, правильно JWT произносится как /dʒɒt/
Простыми словами, JWT — это лишь строка в следующем формате header.payload.signature .
Предположим, что мы хотим зарегистрироваться на сайте. В нашем случае есть три участника — пользователь user , сервер приложения application server и сервер аутентификации authentication server . Сервер аутентификации будет обеспечивать пользователя токеном, с помощью которого он позднее сможет взаимодействовать с приложением.

Приложение использует JWT для проверки аутентификации пользователя следующим образом:
- Сперва пользователь заходит на сервер аутентификации с помощью аутентификационного ключа (это может быть пара логин/пароль, либо Facebook ключ, либо Google ключ, либо ключ от другой учетки).
- Затем сервер аутентификации создает JWT и отправляет его пользователю.
- Когда пользователь делает запрос к API приложения, он добавляет к нему полученный ранее JWT.
- Когда пользователь делает API запрос, приложение может проверить по переданному с запросом JWT является ли пользователь тем, за кого себя выдает. В этой схеме сервер приложения сконфигурирован так, что сможет проверить, является ли входящий JWT именно тем, что был создан сервером аутентификации (процесс проверки будет объяснен позже более детально).
Структура JWT
JWT состоит из трех частей: заголовок header , полезные данные payload и подпись signature . Давайте пройдемся по каждой из них.
Шаг 1. Создаем HEADER
Хедер JWT содержит информацию о том, как должна вычисляться JWT подпись. Хедер — это тоже JSON объект, который выглядит следующим образом:
Поле typ не говорит нам ничего нового, только то, что это JSON Web Token. Интереснее здесь будет поле alg , которое определяет алгоритм хеширования. Он будет использоваться при создании подписи. HS256 — не что иное, как HMAC-SHA256 , для его вычисления нужен лишь один секретный ключ (более подробно об этом в шаге 3). Еще может использоваться другой алгоритм RS256 — в отличие от предыдущего, он является ассиметричным и создает два ключа: публичный и приватный. С помощью приватного ключа создается подпись, а с помощью публичного только лишь проверяется подлинность подписи, поэтому нам не нужно беспокоиться о его безопасности.
Шаг 2. Создаем PAYLOAD
Payload — это полезные данные, которые хранятся внутри JWT. Эти данные также называют JWT-claims (заявки). В примере, который рассматриваем мы, сервер аутентификации создает JWT с информацией об id пользователя — userId.
Мы положили только одну заявку (claim) в payload. Вы можете положить столько заявок, сколько захотите. Существует список стандартных заявок для JWT payload — вот некоторые из них:
- iss (issuer) — определяет приложение, из которого отправляется токен.
- sub (subject) — определяет тему токена.
- exp (expiration time) — время жизни токена.
Эти поля могут быть полезными при создании JWT, но они не являются обязательными. Если хотите знать весь список доступных полей для JWT, можете заглянуть в Wiki. Но стоит помнить, что чем больше передается информации, тем больший получится в итоге сам JWT. Обычно с этим не бывает проблем, но все-таки это может негативно сказаться на производительности и вызвать задержки во взаимодействии с сервером.
Шаг 3. Создаем SIGNATURE
Подпись вычисляется с использование следующего псевдо-кода:
Алгоритм base64url кодирует хедер и payload, созданные на 1 и 2 шаге. Алгоритм соединяет закодированные строки через точку. Затем полученная строка хешируется алгоритмом, заданным в хедере на основе нашего секретного ключа.
Шаг 4. Теперь объединим все три JWT компонента вместе
Теперь, когда у нас есть все три составляющих, мы можем создать наш JWT. Это довольно просто, мы соединяем все полученные элементы в строку через точку.
Вы можете попробовать создать свой собственный JWT на сайте jwt.io.
Вернемся к нашему примеру. Теперь сервер аутентификации может слать пользователю JWT.
Как JWT защищает наши данные?
Очень важно понимать, что использование JWT НЕ скрывает и не маскирует данные автоматически. Причина, почему JWT используются — это проверка, что отправленные данные были действительно отправлены авторизованным источником. Как было продемонстрировано выше, данные внутри JWT закодированы и подписаны, обратите внимание, это не одно и тоже, что зашифрованы. Цель кодирования данных — преобразование структуры. Подписанные данные позволяют получателю данных проверить аутентификацию источника данных. Таким образом закодирование и подпись данных не защищает их. С другой стороны, главная цель шифрования — это защита данных от неавторизованного доступа. Для более детального объяснения различия между кодированием и шифрованием, а также о том, как работает хеширование, смотрите эту статью. Поскольку JWT только лишь закодирована и подписана, и поскольку JWT не зашифрована, JWT не гарантирует никакой безопасности для чувствительных (sensitive) данных.
Шаг 5. Проверка JWT
В нашем простом примере из 3 участников мы используем JWT, который подписан с помощью HS256 алгоритма и только сервер аутентификации и сервер приложения знают секретный ключ. Сервер приложения получает секретный ключ от сервера аутентификации во время установки аутентификационных процессов. Поскольку приложение знает секретный ключ, когда пользователь делает API-запрос с приложенным к нему токеном, приложение может выполнить тот же алгоритм подписывания к JWT, что в шаге 3. Приложение может потом проверить эту подпись, сравнивая ее со своей собственной, вычисленной хешированием. Если подписи совпадают, значит JWT валидный, т.е. пришел от проверенного источника. Если подписи не совпадают, значит что-то пошло не так — возможно, это является признаком потенциальной атаки. Таким образом, проверяя JWT, приложение добавляет доверительный слой (a layer of trust) между собой и пользователем.
В заключение
Мы прошлись по тому, что такое JWT, как они создаются и как валидируются, каким образом они могут быть использованы для установления доверительных отношений между пользователем и приложением. Но это лишь кусочек пазла большой темы авторизации и обеспечения защиты вашего приложения. Мы рассмотрели лишь основы, но без них невозможно двигаться дальше.
Что дальше?
Подумаем о безопасности и добавим Refresh Token . Смотрите следующую мою статью на эту тему.
Источник
Introduction to JSON Web Tokens
NEW: get the JWT Handbook for free and learn JWTs in depth!
What is JSON Web Token?
JSON Web Token (JWT) is an open standard (RFC 7519) that defines a compact and self-contained way for securely transmitting information between parties as a JSON object. This information can be verified and trusted because it is digitally signed. JWTs can be signed using a secret (with the HMAC algorithm) or a public/private key pair using RSA or ECDSA.
Although JWTs can be encrypted to also provide secrecy between parties, we will focus on signed tokens. Signed tokens can verify the integrity of the claims contained within it, while encrypted tokens hide those claims from other parties. When tokens are signed using public/private key pairs, the signature also certifies that only the party holding the private key is the one that signed it.
When should you use JSON Web Tokens?
Here are some scenarios where JSON Web Tokens are useful:
Authorization: This is the most common scenario for using JWT. Once the user is logged in, each subsequent request will include the JWT, allowing the user to access routes, services, and resources that are permitted with that token. Single Sign On is a feature that widely uses JWT nowadays, because of its small overhead and its ability to be easily used across different domains.
Information Exchange: JSON Web Tokens are a good way of securely transmitting information between parties. Because JWTs can be signed—for example, using public/private key pairs—you can be sure the senders are who they say they are. Additionally, as the signature is calculated using the header and the payload, you can also verify that the content hasn’t been tampered with.
What is the JSON Web Token structure?
In its compact form, JSON Web Tokens consist of three parts separated by dots ( . ), which are:
Therefore, a JWT typically looks like the following.
Let’s break down the different parts.
Header
The header typically consists of two parts: the type of the token, which is JWT, and the signing algorithm being used, such as HMAC SHA256 or RSA.
Then, this JSON is Base64Url encoded to form the first part of the JWT.
Payload
The second part of the token is the payload, which contains the claims. Claims are statements about an entity (typically, the user) and additional data. There are three types of claims: registered, public, and private claims.
Registered claims: These are a set of predefined claims which are not mandatory but recommended, to provide a set of useful, interoperable claims. Some of them are: iss (issuer), exp (expiration time), sub (subject), aud (audience), and others.
Notice that the claim names are only three characters long as JWT is meant to be compact.
Public claims: These can be defined at will by those using JWTs. But to avoid collisions they should be defined in the IANA JSON Web Token Registry or be defined as a URI that contains a collision resistant namespace.
Private claims: These are the custom claims created to share information between parties that agree on using them and are neither registered or public claims.
An example payload could be:
The payload is then Base64Url encoded to form the second part of the JSON Web Token.
Do note that for signed tokens this information, though protected against tampering, is readable by anyone. Do not put secret information in the payload or header elements of a JWT unless it is encrypted.
Signature
To create the signature part you have to take the encoded header, the encoded payload, a secret, the algorithm specified in the header, and sign that.
For example if you want to use the HMAC SHA256 algorithm, the signature will be created in the following way:
The signature is used to verify the message wasn’t changed along the way, and, in the case of tokens signed with a private key, it can also verify that the sender of the JWT is who it says it is.
Putting all together
The output is three Base64-URL strings separated by dots that can be easily passed in HTML and HTTP environments, while being more compact when compared to XML-based standards such as SAML.
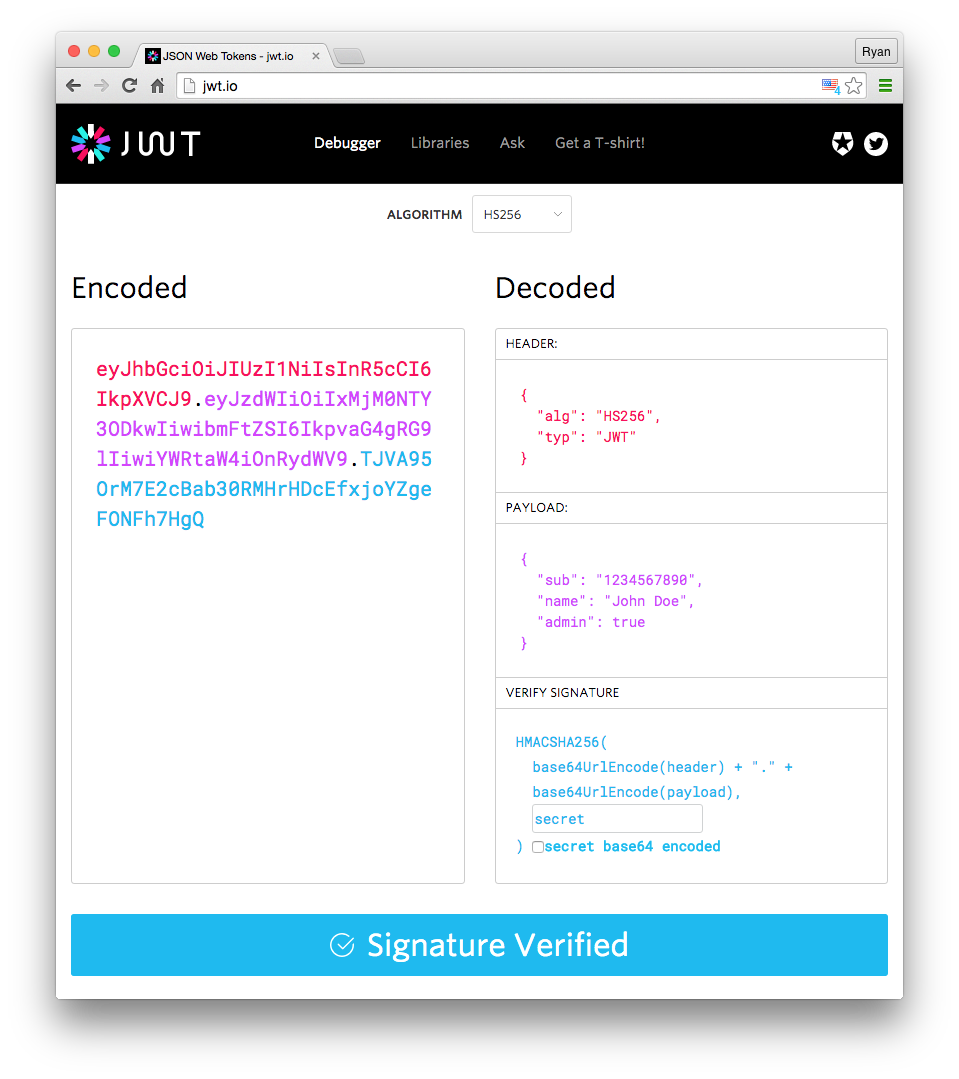
The following shows a JWT that has the previous header and payload encoded, and it is signed with a secret. 
If you want to play with JWT and put these concepts into practice, you can use jwt.io Debugger to decode, verify, and generate JWTs.
How do JSON Web Tokens work?
In authentication, when the user successfully logs in using their credentials, a JSON Web Token will be returned. Since tokens are credentials, great care must be taken to prevent security issues. In general, you should not keep tokens longer than required.
Whenever the user wants to access a protected route or resource, the user agent should send the JWT, typically in the Authorization header using the Bearer schema. The content of the header should look like the following:
This can be, in certain cases, a stateless authorization mechanism. The server’s protected routes will check for a valid JWT in the Authorization header, and if it’s present, the user will be allowed to access protected resources. If the JWT contains the necessary data, the need to query the database for certain operations may be reduced, though this may not always be the case.
If the token is sent in the Authorization header, Cross-Origin Resource Sharing (CORS) won’t be an issue as it doesn’t use cookies.
The following diagram shows how a JWT is obtained and used to access APIs or resources:
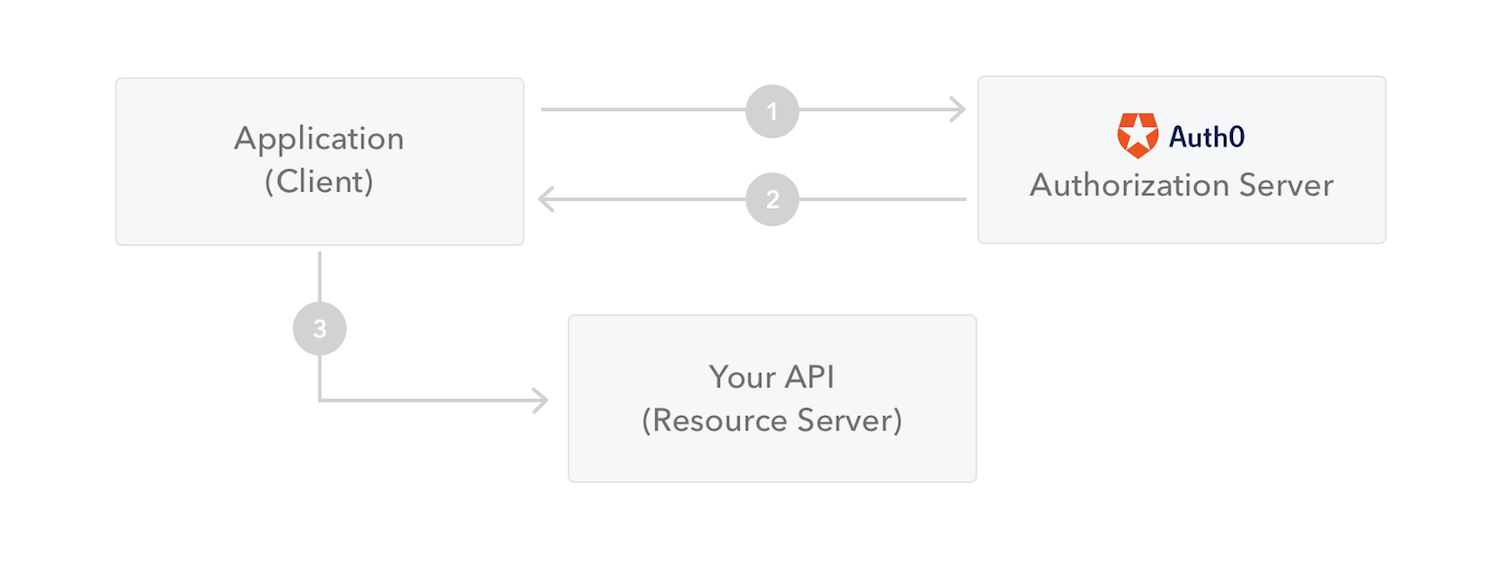
- The application or client requests authorization to the authorization server. This is performed through one of the different authorization flows. For example, a typical OpenID Connect compliant web application will go through the /oauth/authorize endpoint using the authorization code flow.
- When the authorization is granted, the authorization server returns an access token to the application.
- The application uses the access token to access a protected resource (like an API).
Do note that with signed tokens, all the information contained within the token is exposed to users or other parties, even though they are unable to change it. This means you should not put secret information within the token.
Why should we use JSON Web Tokens?
Let’s talk about the benefits of JSON Web Tokens (JWT) when compared to Simple Web Tokens (SWT) and Security Assertion Markup Language Tokens (SAML).
As JSON is less verbose than XML, when it is encoded its size is also smaller, making JWT more compact than SAML. This makes JWT a good choice to be passed in HTML and HTTP environments.
Security-wise, SWT can only be symmetrically signed by a shared secret using the HMAC algorithm. However, JWT and SAML tokens can use a public/private key pair in the form of a X.509 certificate for signing. Signing XML with XML Digital Signature without introducing obscure security holes is very difficult when compared to the simplicity of signing JSON.
JSON parsers are common in most programming languages because they map directly to objects. Conversely, XML doesn’t have a natural document-to-object mapping. This makes it easier to work with JWT than SAML assertions.
Regarding usage, JWT is used at Internet scale. This highlights the ease of client-side processing of the JSON Web token on multiple platforms, especially mobile.
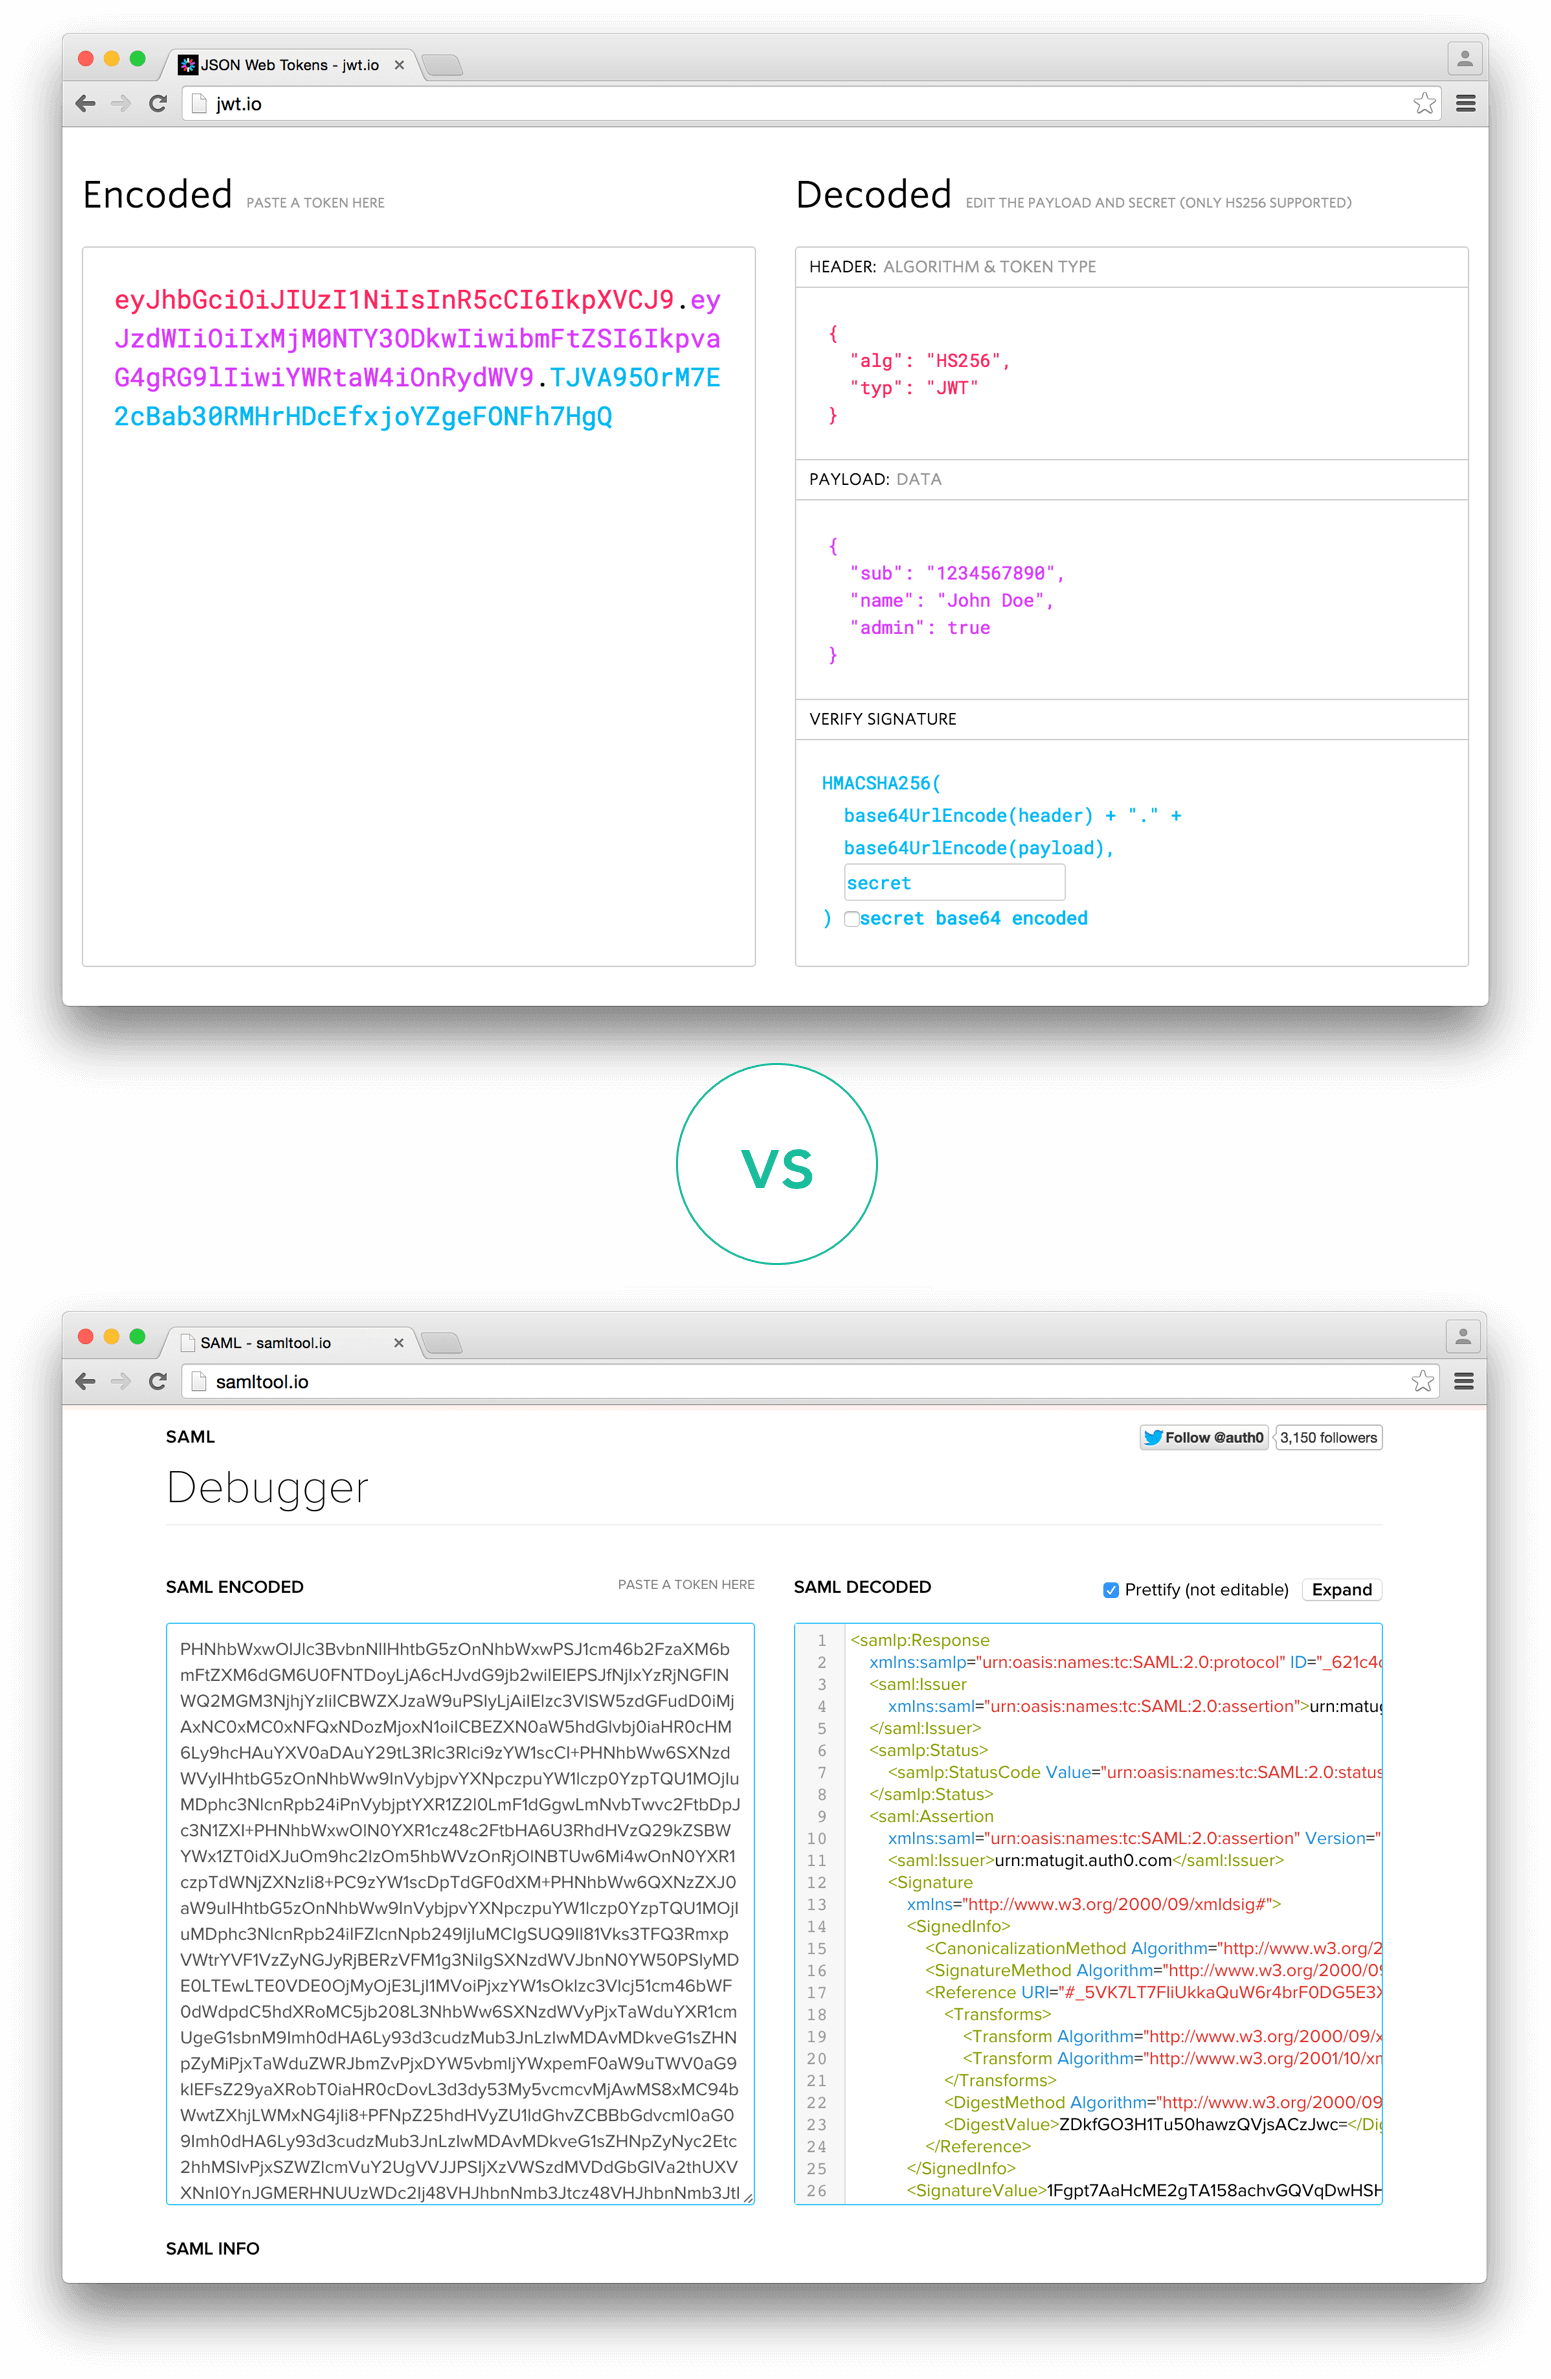 Comparison of the length of an encoded JWT and an encoded SAML
If you want to read more about JSON Web Tokens and even start using them to perform authentication in your own applications, browse to the JSON Web Token landing page at Auth0.
Get started with JWT today
JWT.io is brought to you by Auth0
Securely implement authentication with JWTs using Auth0 on any stack and any device in less than 10 minutes.
Источник


