- Fix: Get help with File Explorer in Windows 10
- Method 1: Investigating the keyboard
- Method 2: Scanning for Malware
- Method 3: Disable helppane.exe
- Method 4: Use Safe Mode or Try Clean Boot Windows
- Tutorial: Get Help with File Explorer in Windows 10
- Navigation
- What is File Explorer?
- How to launch File Explorer in Windows 10?
- How to get Help with File Explorer in Windows 10
- Use the Ribbon
- Quick Access
- Backup files
- Use the OneDrive
- Shortcuts in File Explorer
- How to fix File Explorer not working?
- Method 1: Update your system
- Method 2. Check Corrupted files
- Method 3. Extend the C drive
- Conclusion
Fix: Get help with File Explorer in Windows 10
The Get help with File Explorer in Windows 10 page typically opens when the user hits the F1 key while in a File Explorer window. This is not exclusive to Windows 10 or Microsoft for that matter, as a lot of 3rd party apps (Chrome, Word, Excel, etc.) use this key as a quick help & support button.
Some users have reported that their PC will sometimes automatically open a browser window with a Bing search of ” How do I get help in Windows 10“. Others have complained that their PC ends up opening 15-20 different tabs of the same page – this is not Windows 10 normal behavior. While this can simply be a case of a stuck F1 key, there are browser hijackers that are capable of doing these types of things. However, most of the time this issue will turn out to be a keyboard issue.
Besides the standard behavior, there are cases where this Help hotkey will glitch out and open a browser tab every time F1 is pressed, not just in File Explorer. This can quickly become extremely annoying if you want to use the F1 key for something else.
If you’re sick of getting these annoying help/support pop-ups, turn to our methods below that have successfully helped users eliminate the issue. Start with the first method and work your way down until you find a fix that works for you.
Method 1: Investigating the keyboard
Since most of the time, this issue is caused by a faulty keyboard or a stuck F1 key, you should start by making sure that’s not the case. If you have the means, try switching your keyboard to another one and see if the behavior repeats. If you’re using a laptop, try to connect an external keyboard. This should bypass the stuck F1 key on your password.
Keep in mind that if the connection cables under your keyboard become dislodged, it could end up sending multiple interrupted signals that will end up opening multiple “How to get help in Windows 10” windows.
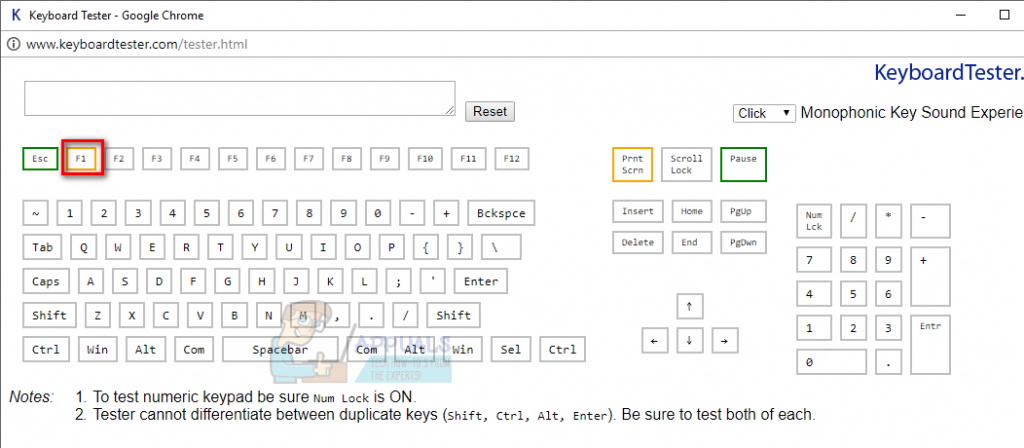
Before you determine that your keyboard isn’t the culprit, use this online tool (here) to check if the F1 key is not pressed automatically by a faulty keyboard. Simply click on Launch the Tester and observe if the F1 key is highlighting without you touching anything.
If that is an issue, you can plug out the current keyboard and plug-in another keyboard to check if the issue is resolved. On a laptop, you can temporarily disable the built-in keyboard.
Method 2: Scanning for Malware
Let’s start by making sure that the pop-ups aren’t caused by a browser hijacker. A browser hijacker is a type of malware that modifies the browser settings without the user’s permission. These are typically used to inject unwanted advertising. Because browser hijackers reside in a grey area (legally speaking), not all of them will get identified by a normal virus scan.
In any case, start by doing a full scan with Windows Defender. To do this, double-click on the Windows Defender icon in your taskbar (bottom-right corner).  In Windows Defender, click on Virus & threat protection and click on Advanced Scan. Then, select the Full scan and hit the Scan now button.
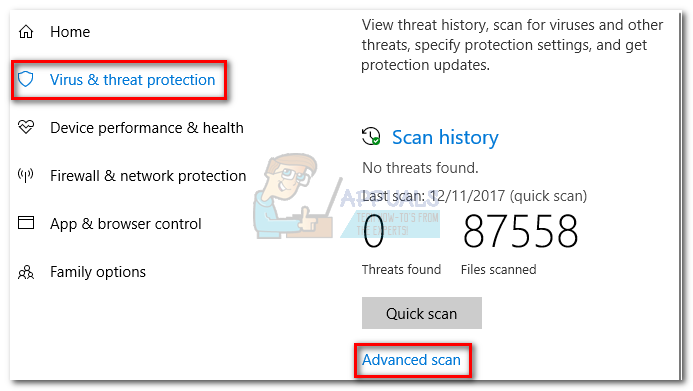
Note: Keep in mind that this process can take over an hour, depending on your hard drive size.
When the process is finished, check to see if any malware has been identified. If Windows Defender successfully identified and removed the malware, reboot your PC and see if the random pop-ups are gone. If you’re having the same issue, you can also try running a scan with Malwarebytes before moving to the next method.
Method 3: Disable helppane.exe
If the methods above haven’t made the unexpected help pop-ups to go away, you can try disabling the helppane executable. This might seem drastic and you will lose the help functionality via the F1 key. But if your system has glitched and is opening the same help tab in every application, this will help in stopping that behavior. Here’s what you need to do:
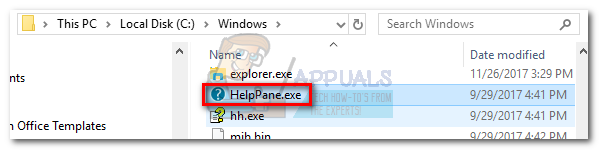
- Go to C:/Windows and locate helppane.exe. Then, right-click on it and hit Properties.

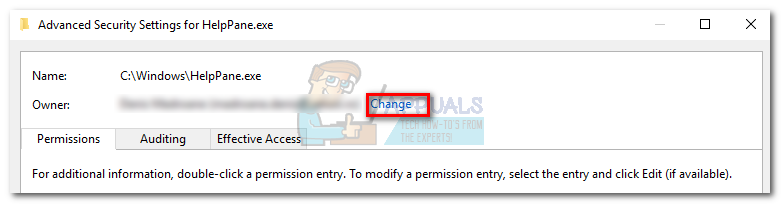
- Select the Security tab and click on the Advanced button.
- Now look at the top of the window and click Change next to where it says, Owner.
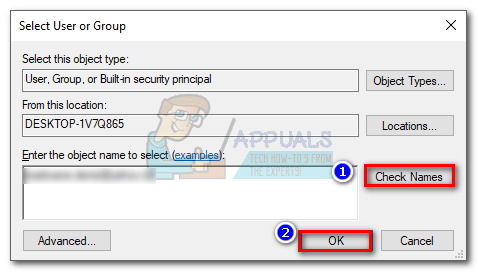
- In the box under Enter the object name to select, type in your Windows username. If you’re using a Microsoft account, type in the email associated with it. Click the Check Names button, then hit Ok to close this window, then hit Apply to close the Advanced Security Settings for HelpPane.exe window.
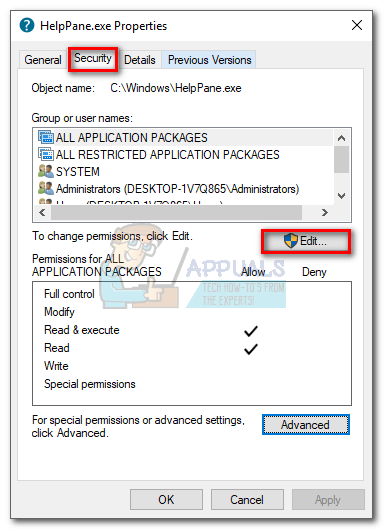
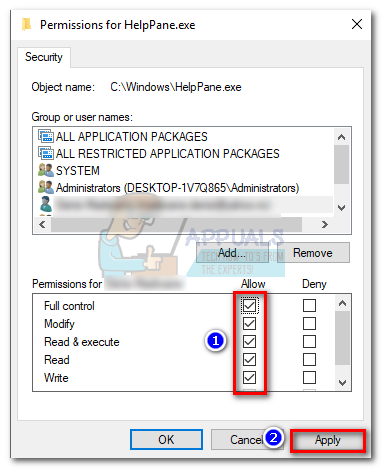
- Go back to HelpPane.exe’s Properties, select the Security tab and click the Edit button next to change permissions, click Edit.
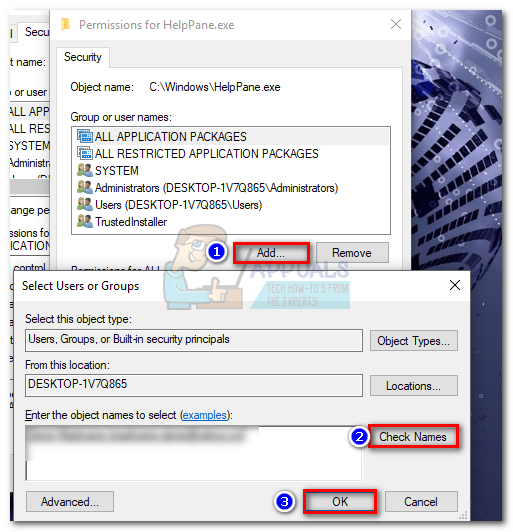
- Click the Add button, then insert your Windows username or email like we previously did in Step 4. Then hit Check Names and Ok to close the window.
- Next, give yourself full control over the HelpPane executable by checking all the boxes under Allow. Hit Apply to confirm.
- Then, right-click on HelpPane.exe and rename it to something else. When prompted to provide administrator privileges, hit Yes to confirm.

That’s it. Now the Help tab triggered by the F1 key will no longer bother you. If for some reason you want the help functionality back, simply rename the HelpPane executable to what it was before.
If for some reason, the methods above have been unsuccessful, or if you’re reluctant to modify the permissions using Method 3, you can also consider using SharpKeys. This software is capable of disabling the F1 button entirely. But doing so will defeat the purpose of using the F1 key for another activity.
Method 4: Use Safe Mode or Try Clean Boot Windows
There can be a 3rd party app that can cause the current behavior of the F1 key. To rule that out, either clean boot windows or use Safe mode. Using Safe mode/Clean boot, you will be able to boot your computer without any third-party applications running. From there, you can start enabling the applications again manually and determine which was causing the problem,
- Use Windows Safe Mode or clean boot Windows.
- Now, check if F1 key functionality is normal. If so, then try to find out the problematic application in your installed applications in the control panel.
- After idenfiying the application, uninstall/disable it for good.
Tutorial: Get Help with File Explorer in Windows 10
File Explorer is a necessary tool in Windows 10 to view and manage your files and folders. This article will teach you how to get the best help with File Explorer in Windows 10.

By Dylan  / Last Updated March 11, 2021
Navigation
What is File Explorer?
File Explorer also called Windows Explorer in the earlier Windows version, is a crucial tool in Windows 10. Usually we use it to view files and folder every day, but actually, Windows inserted various features helping you to well manage your data. Refer to this article, it helps you to access it and illustrate you how to get help with File Explorer in Windows 10.
How to launch File Explorer in Windows 10?
There are many methods to open the File Explorer in Windows. Here we list the most common way.
Keyboard shortcut: By pressing the “Win + E” key, the File Explorer will be opened up.
The PC icon : On the Desktop, double-click the “This PC” icon or right-click it and hit “Open”, and you will see this tool.
The Start menu: Click the “Start” on the left bottom, and click “This PC” or go “Windows System” > “This PC” to open it.
вњЌTip: If you find File Explorer icon missing from Start menu, follow these instructions:
1. Click “Start” > “Setting” > “Personalization”.
2. Click “Start” on the left-side panel, and click “Choose which folders appear on Start”
3. Turn on the File Explorer button. Then you will see the File Explorer icon in the Start menu.
Th e Cortana search : Microsoft build in Cortana virtual asssistant, click the Cortana search box, and type “file explorer” on it, and press Enter. Then File Explorer will be opened.
Power User Task: Press “Win + X” to open Power User Task, and click “File Explorer”.
How to get Help with File Explorer in Windows 10
Now I believe you have known how to open File Explorer. In the next part, we will walk you through main features of File Explorer in Windows 10.
Use the Ribbon
Ribbon is like a guiding box demonstrating some simple operation you can execute in a click or serveral steps. When you open File Explorer, you can see the Ribbob on the top of it. If it is there, Press keys «Ctrl + F1» simultaneously. There are 3 tabs in Ribbon: Home, Share, View. Here are some information about these tabs.
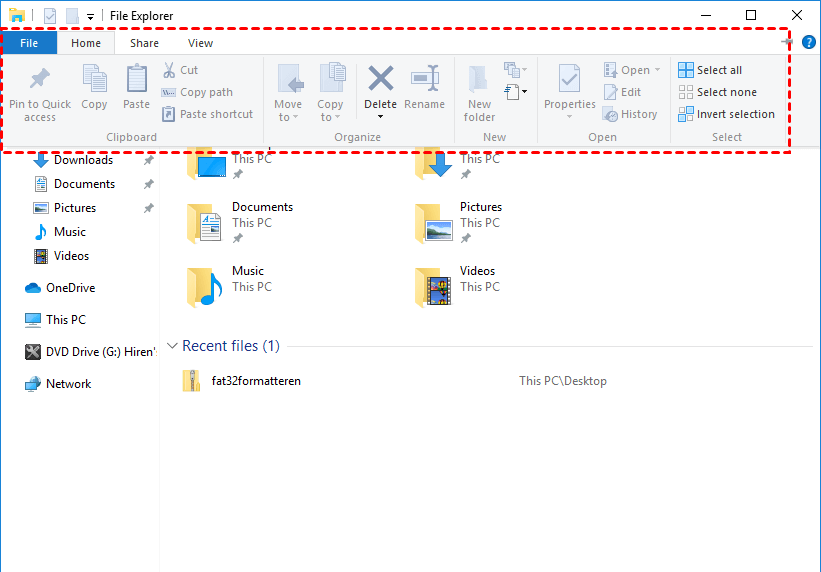
1. “Home” tab provides some basic functions and information for you like pinning to quick access, creating a new folder, copy, delete, select, properties, etc.
For example, you may want to copy or move a file or folder to another place, like you may want to get your files on a USB drive, or move your photos on your computer. You can click the file or folder to choose it, and click the «Move to» or «Copy to«, and choose destination folder to move or duplicate a file or folder.
вњЌNote:
1. you should know that «Move to» will delete the iriginal document, while «Copy to» will make a copy of the seleted file on another place.
2. If you want to copy a file, you can open the destination folder and the original folder simultaneously, and click and drag the file or folder to the folder where you want to put the file.
2. “Share” tab gives the options to share files with your friends. By clicking E-mailing, faxing, printing, cloning icon, you can choose different way to share your data with others. Just choose one of these way, and follow its prompts.
3. With the “View” tab, you can adjust the appearance of the File Explorer. This tab allows you to decide the size of icons and to sort files or folder in different way. And you can also hide selected items if you don’t want it to be viewed by others. Besides, With “view” tab, you can preview pictures, Word files and determine the arrangement of files.
Quick Access
Quick Access is also a great function you can get help with File Explorer in Windows 10. With this function, you can access any folders with just one click. Here is how to use it.
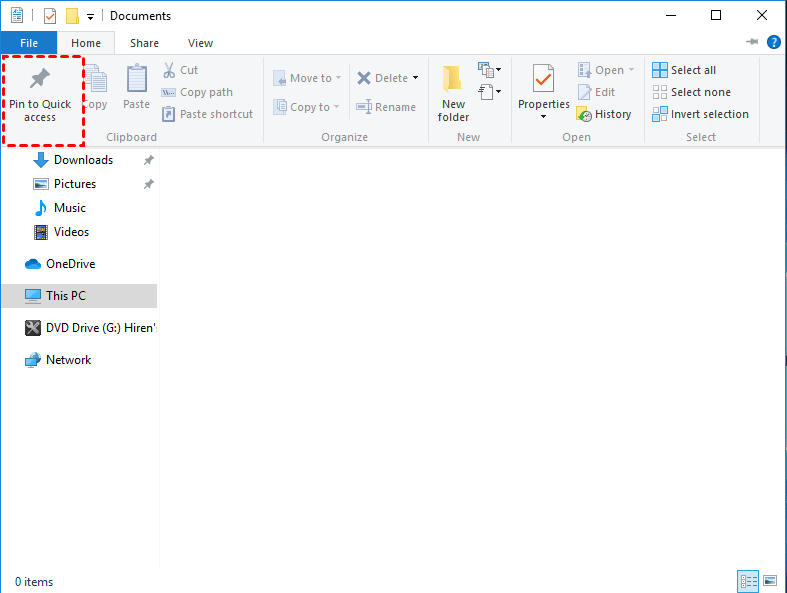
Step 1. Open the File Explorer, and navigate to the folder you want to pin to Quick Access.
Step 2. Right-click the folder or select the “Home” tab, and click “Pin to Quick access”. Then it would be added to Quick Access. Next time, you want to access this folder, you can just click the folder under the Quick access. Then the folder will be opened immediately.
✍Tip: If you want to remove it from Quick access one day, you can right-click the folder under the Quick access and select “Unpin from Quick access”.
Backup files
In Windows 10 system, you can back up or store your files with File History. It will automatically backup your files, and you can restore the file to any previous version as you wish.
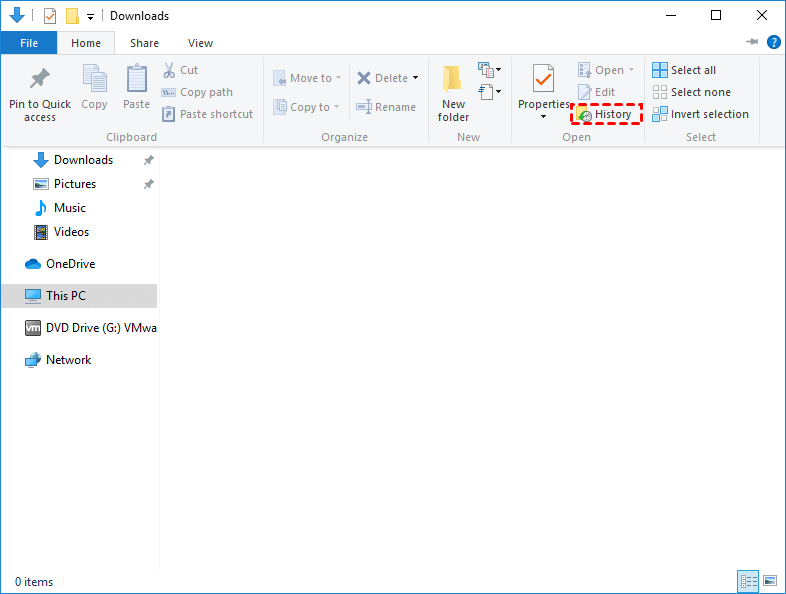
Firstly, you need to go “Setting” > “Update& Security” > “Backup” and enable “Automatically back up my files”.
Then, if you need an old version of any files, you can click the “History” icon to restore previous version of the file as long as it is backup by File History.
Use the OneDrive
OneDrive is an online hosting service provided by Microsoft. Like other cloud drives, Google Drive, Dropbox. Once you upload files and folders to OneDrive, you can access those files and folders from any other devices that installed OneDrive. If you have some data you don’t want to lose, it can also be a backup tool. Then let’s see how to use the OneDrive.
Step 1. Open the File Explorer and drag the files to the OneDrive in the left sidebar.
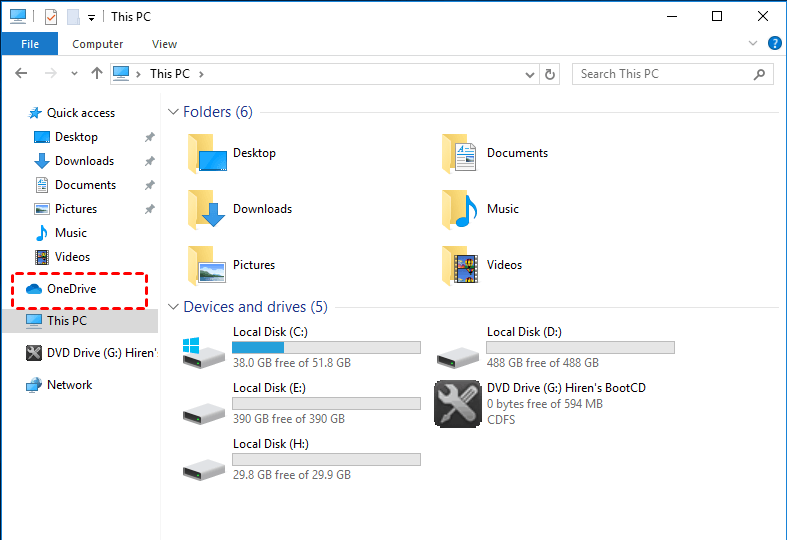
Step 2. Then you will be prompted to get a Microsoft account. After that, the files will be uploaded to OneDrive. When it is finished, you can access any files in the OneDrive with your Microsoft account via OneDrive App or OneDrive website.
вњЌNote: You can right-click the cloud-like OneDrive icon at the bottom right corner of your screen to change specific settings, such as notifications and account settings.
Shortcuts in File Explorer
In addition, in order to work efficiently, here we list some shortcuts to help you better utilize the File Explorer in Windows 10:
Shift + Delete –delete a file or folder
Ctrl + D – delete file or folder to recycle bin
Ctrl + E – go to the search box
Ctrl + N – Open a new File Explorer window
Ctrl + W – Close the current File Explorer window
Alt + P – Show/Hide the preview pane
Alt + Enter – Display the Properties dialog box for the selected file or folder
Alt + Right arrow – View the folders
Alt + D – go to the address bar
Ctrl + middle mouse bottom– change the size of each file in the current window.
Ctrl + Shift + E – Display all folders above the selected folder
Ctrl + Shift + N – Create a new folder
How to fix File Explorer not working?
File Explorer is very helpful for the daily use, but you may encounter the typical issue that the file explorer is not working or not responding. And you can follow the steps to fix this issue.
Method 1: Update your system
Step 1. Go “Start” > “Setting” > “Update & Security” > “Windows Update”, and click “Check for updates”.
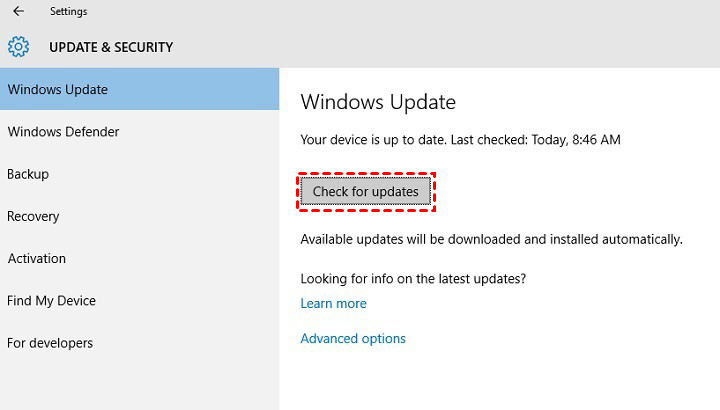
Step 2. Then you will know if your system is the latest version, if it is not, please update it to the latest.
Method 2. Check Corrupted files
The “File Explorer not responding” issue is probably caused by file corruption. You can check if there are some corrupted files with Command Prompt.
Step 1. Press “Win + R”, and type “cmd” on the Run box to open Command Prompt.
Step 2. Type “sfc/scannow” and press Enter.
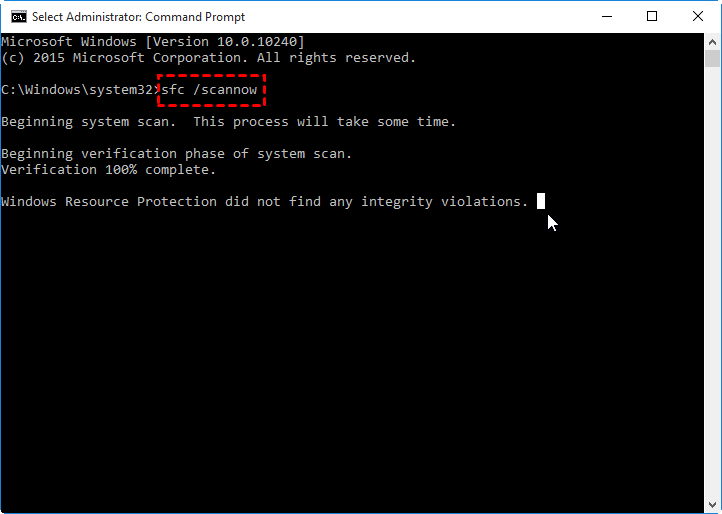
Step 3. After the scan, this command will fix corrupted files automatically. It takes just a few minutes.
Method 3. Extend the C drive
You may not store plenty of files on C drive if you want your computer to run smoothly. However, over time, the C drive is getting full, which would affect the running of the computer, so the File Explorer would become not working or responding. Then you can extend the C drive with third party software to solve it.
AOMEI Partition Assistant Professional is a good measure for you to extend your system drive to improve the performance of your computer. With just a few steps, you can allocate free space from another drive to C drive. Besides, it is also a hard drive manager. If you want to format, wipe, create partition, split partition, which are not supported by File Explorer, this tool can also help you.
Download the Demo version and see how it works.
Step 1. Open the AOMEI Partition Assistant, and right-click the partition that has enough space, and choose “Allocate Free Space”.

Step 2. Here you can set the allocated size as you wish to C drive, and click “OK”.

Step 3. Click the “Apply” in the main interface to start allocating free space to C drive.

Besides, AOMEI Partition Assistant has other functions that can improve computer performance so that the issue probably can be fixed, such as, migrating Windows 10 to SSD and aligning partition.
вњЌNote: If your system is Windows Server, you should download AOMEI Partition Assistant Server Edition .
Conclusion
Now, I believe you have a rough understanding of File Explorer. You can add this webpage to your bookmark so as to you can read it at any time.
If you have any question about File Explorer, you can leave a comment, or if you have other tricks to utilize File Explorer, you can also share to other users.


