- Как связать iPhone с ПК на Windows 10 Fall Creators Update
- Set up and use iCloud for Windows
- Before you begin
- Set up iCloud for Windows
- Download and share your photos
- Share your photos
- See your files and folders with iCloud Drive
- Keep your apps up to date
- On your PC
- Как установить Windows 10 на iPhone
- Windows 10 на iPhone
- Возможно, но с терпением
- Как установить и запустить Windows на iPhone и iPad без джейлбрейка
- Инструкция
- За первую минуту продаж P10 Huawei заработала 14 млн. долларов
- 10 самых технологически развитых стран мира
- If your computer doesn’t recognize your iPhone, iPad, or iPod
- If you use a Mac
- If you use a Windows PC
- If you downloaded iTunes from the Microsoft Store
- If you downloaded iTunes from Apple
- If your device still isn’t recognized
- If you don’t see the Apple Mobile Device USB Driver or you see Unknown Device:
- If you see the Apple Mobile Device USB driver with an error symbol:
Как связать iPhone с ПК на Windows 10 Fall Creators Update
В конце июля Microsoft выпустила новую сборку Fall Creators Update, в которой можно связать свои устройства на Windows с устройствами на Android и iOS. Инструкция, как связать устройство на Android с ПК, уже была написана, теперь поговорим о том, как связать iPhone с ПК.
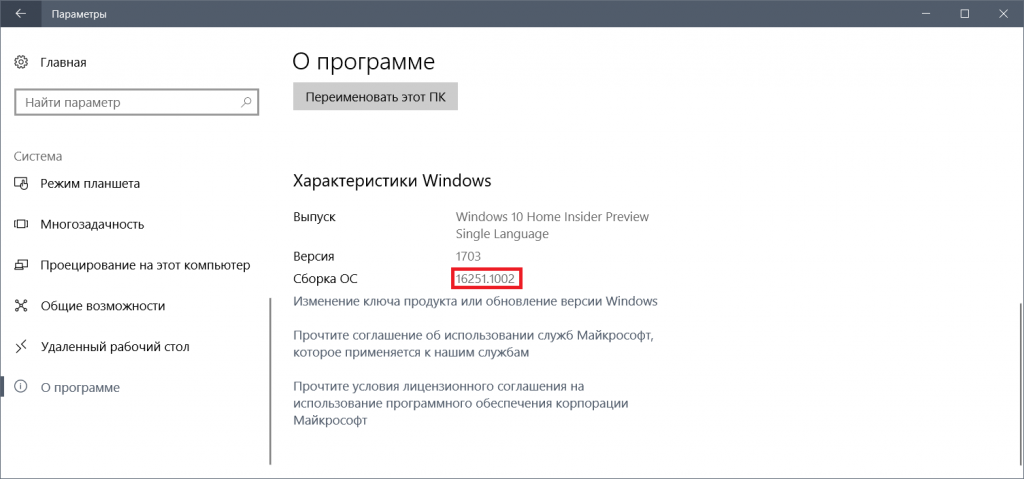
Для этого нужен компьютер, обновленный до сборки 16251 (проверить это можно в Параметры > Система > О программе):
Теперь нужно установить программу, с помощью которой можно передавать ссылки с iPhone на ПК. Она называется Continue on PC и бесплатно доступна в App Store. Установите и запустите ее:
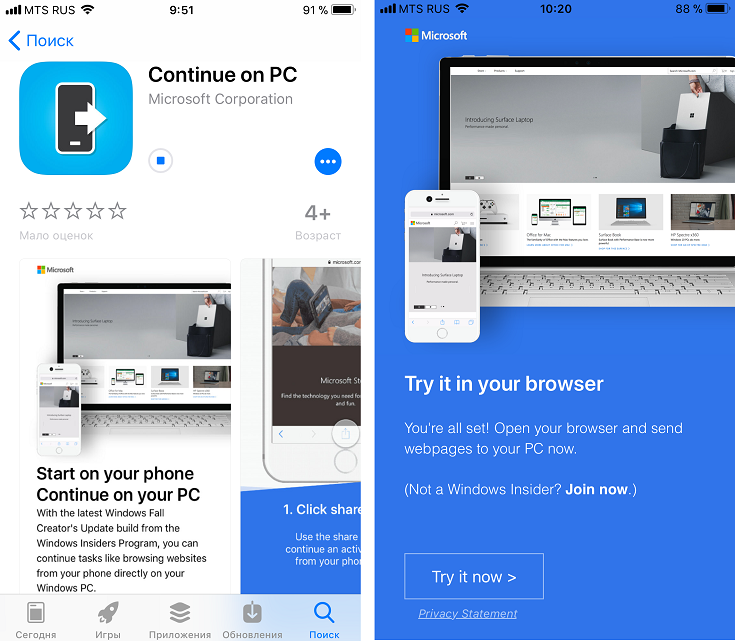
Нажмите на кнопку Try it now, в открывшемся Safari нажмите на кнопку Поделиться > Еще > включите Continue on PC:
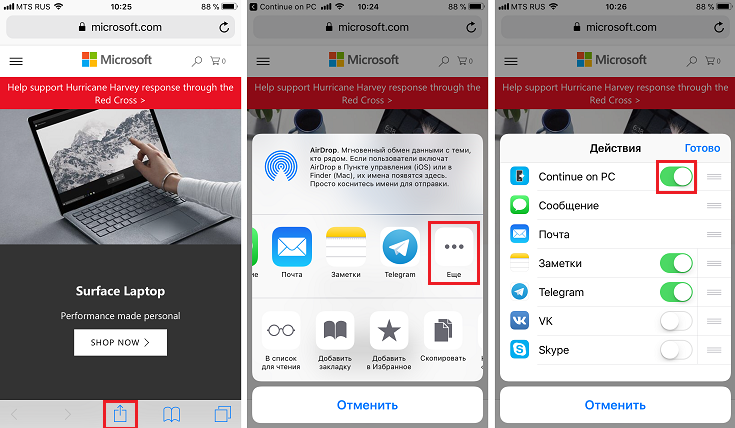
Теперь вернитесь на шаг назад и нажмите на значок программы Continue on PC. При первом запуске вам будет предложено войти в ваш аккаунт Microsoft, после чего можно будет выбрать устройство, на которое отправить ссылку:

Отправленная таким образом ссылка автоматически откроется в Edge на ПК.
Set up and use iCloud for Windows
With iCloud for Windows, the photos, documents, and bookmarks on your PC are updated automatically on your Apple devices.
Before you begin
Make sure that you set up iCloud on your iPhone, iPad, or iPod touch or Mac and that you’re signed in with your Apple ID. Then follow the steps below to download and set up iCloud for Windows.
Want to access iCloud’s latest features? See the recommended system requirements. iCloud requires an Internet connection. iCloud might not be available in all areas and features vary. If you use a Managed Apple ID, iCloud for Windows isn’t supported.

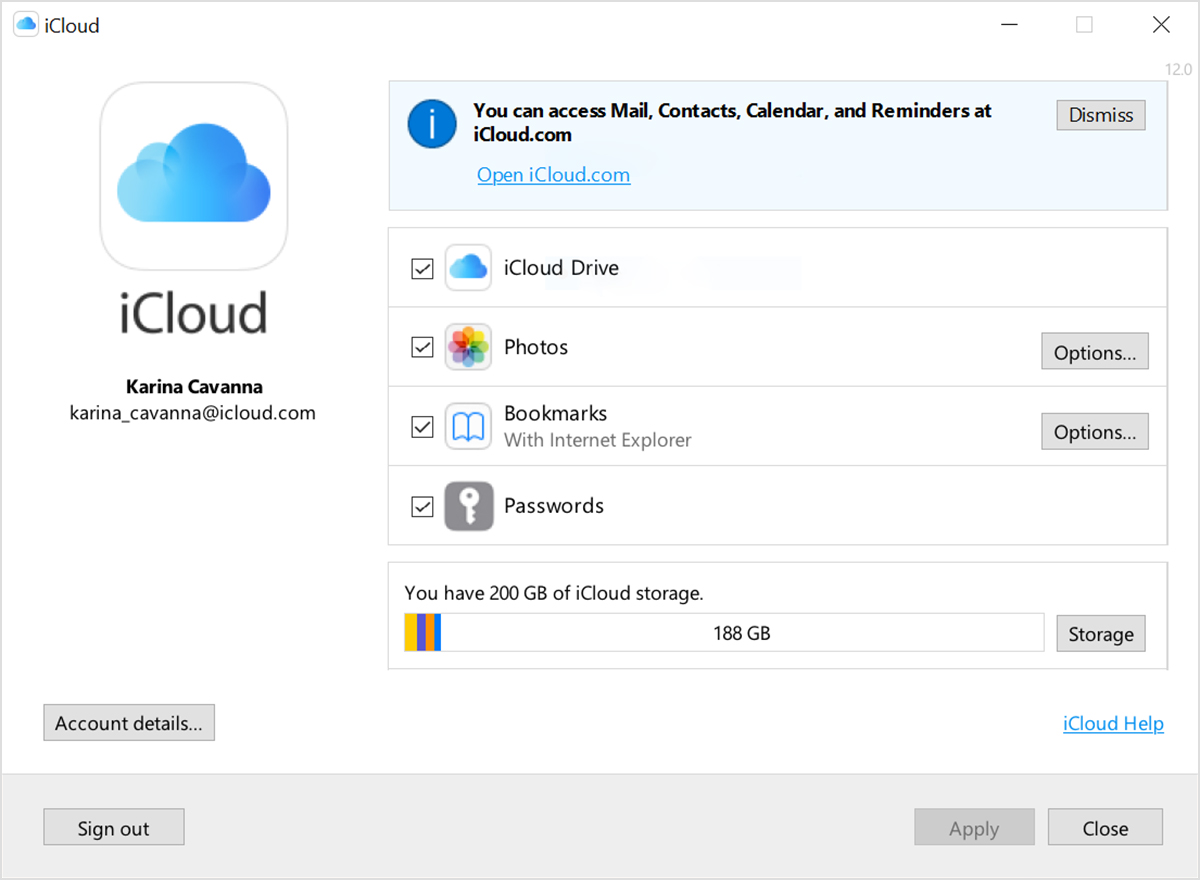
Set up iCloud for Windows
- Download iCloud for Windows on your PC.
- Windows 10: Go to the Microsoft Store to download iCloud for Windows.
- Earlier versions of Windows*: Download iCloud for Windows from apple.com.
- If it doesn’t install automatically, go to File Explorer and open iCloud Setup.
- Restart your computer.
- Make sure iCloud for Windows is open. If it doesn’t open automatically, go to Start, open Apps or Programs, and open iCloud for Windows.
- Enter your Apple ID to sign in to iCloud.
- Choose the features and content that you want to keep up to date across your devices.

- Click Apply.
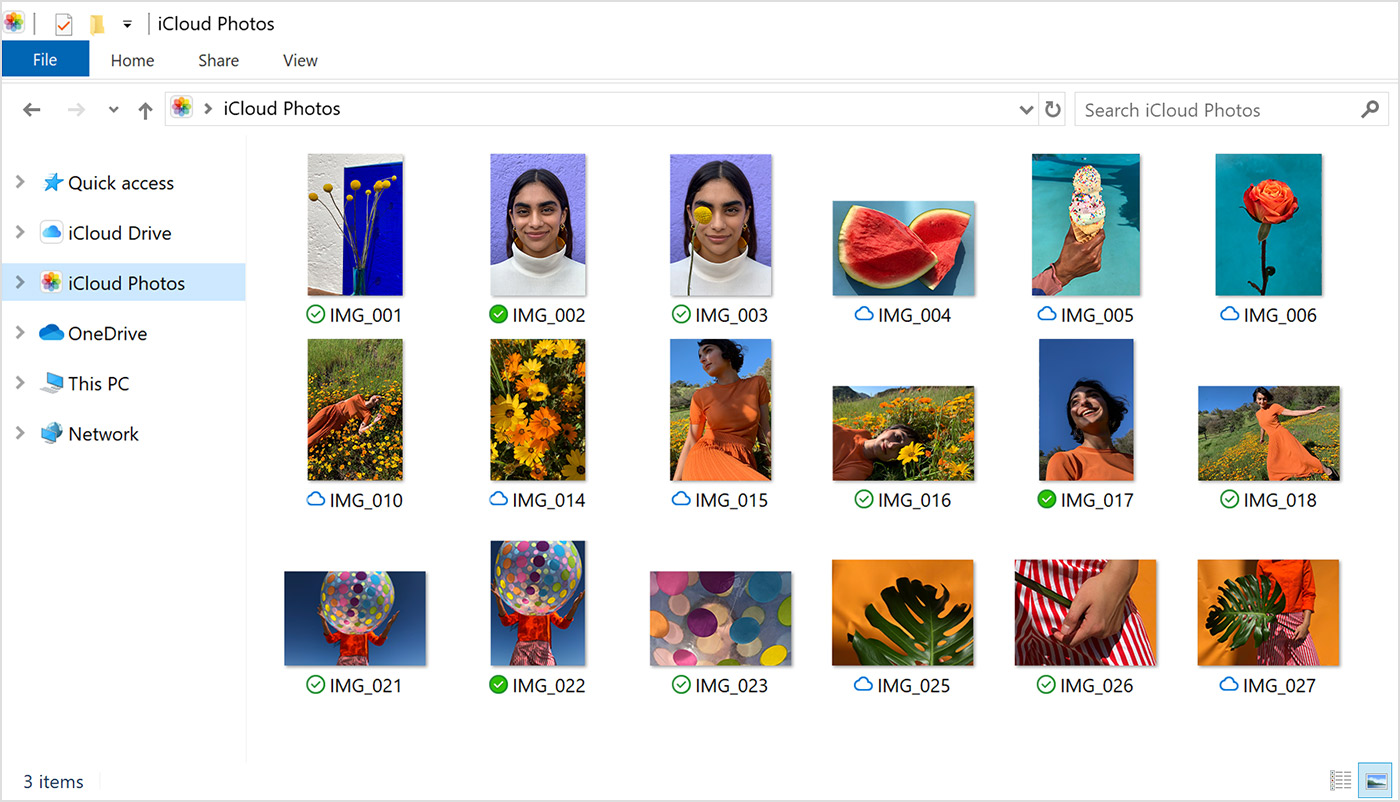
Download and share your photos
When you turn on Photos, iCloud for Windows creates a Photos folder in File Explorer called iCloud Photos. iCloud Photos uploads new photos and videos that you add to the iCloud Photos folder on your PC so you can see them in the Photos app on your iPhone, iPad, iPod touch, and Mac, and on iCloud.com. New photos and videos you take automatically download from iCloud Photos.
Share your photos
You can also share your photos. Shared Albums lets you view, share, and comment on the photos and videos you share with other people. And if you use the latest version of iCloud for Windows, you can pin photos to keep them local to your device. When you unpin them, they upload to iCloud instead.
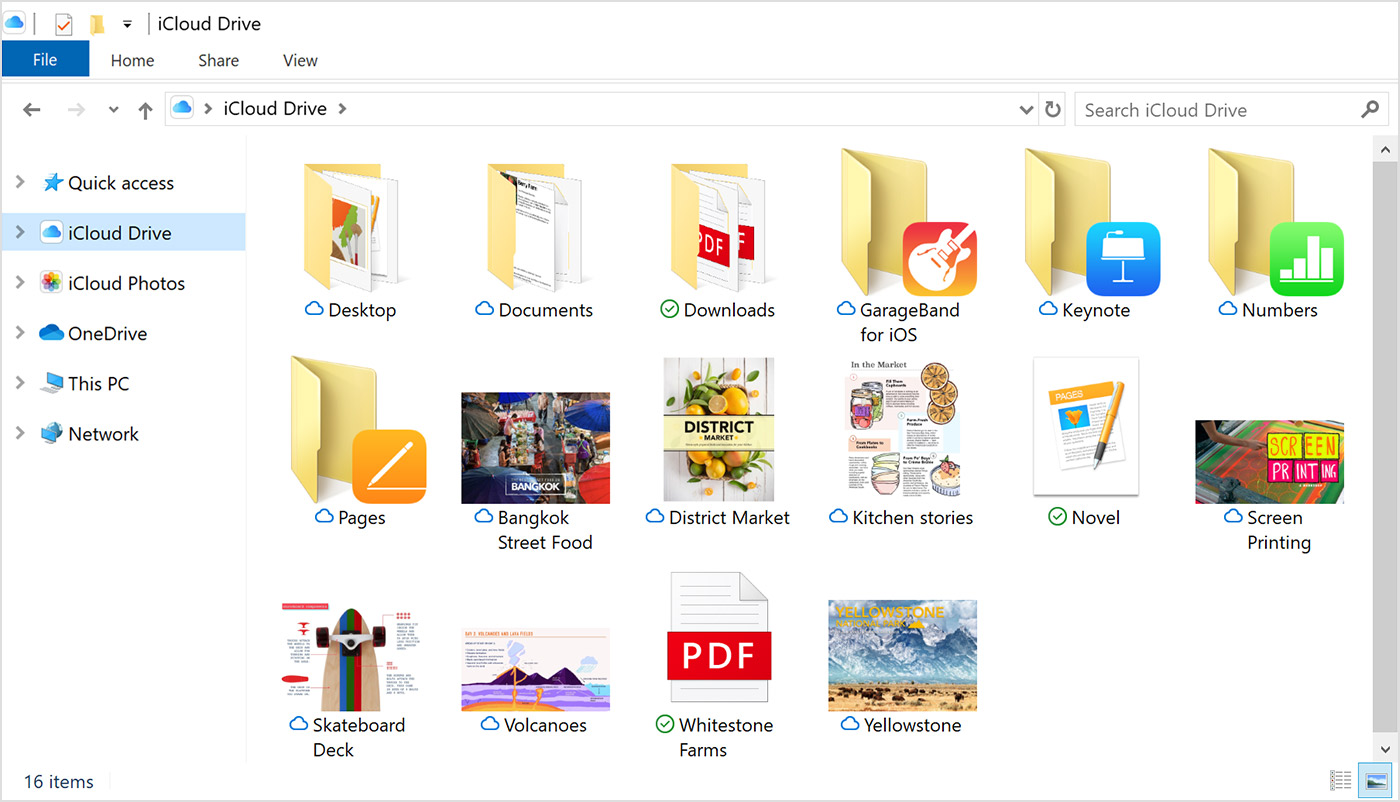
See your files and folders with iCloud Drive
When you turn on iCloud Drive, iCloud for Windows creates an iCloud Drive folder in File Explorer. You can find documents that you’ve stored in iCloud in this folder. When you create a file on your PC and save it to the iCloud Drive folder, it also appears on your other devices.
If you want to work on files with friends or colleagues, you can share individual files or create a shared folder to share a group of files. You can also pin files and folders so you can use them offline, and easily check the status of a download or shared file. In iCloud for Windows 12, you can find and recover files deleted from iCloud Drive in the past 30 days in Recently Deleted in iOS, iPadOS, or iCloud.com, in Trash in macOS, and in Recycle Bin in Windows. If you use Delete or Delete All in Recently Deleted or empty the Trash in macOS, files aren’t recoverable. If you don’t see the files you wish to restore, you can recover files deleted within the last 30 days at iCloud.com.
You can also access your iCloud Drive files and folders at iCloud.com.
If you receive an error when you try to move a file from iCloud for Windows, you might need to download the file to your Windows PC. After you download the file, try moving it again.
Keep your apps up to date
When you use iCloud on all of your devices, you can keep your Mail, Contacts, Calendars, and Tasks* updated no matter which device you’re using. Just make sure iCloud is set up on your PC, iPhone, iPad, iPod touch, or Mac using the steps below.
* On a Mac or iOS device, you see Reminders instead of Tasks.
On your PC
- Open iCloud for Windows.
- Select Mail, Contacts, Calendars, and Tasks then click Apply.
- You’ll see your iCloud Mail account in the folder pane on the left side of Microsoft Outlook 2007 through Outlook 2016.
If you sign in to iCloud using a third-party Mail app outside of iCloud for Windows, learn how to create an app-specific password to keep information up to date on your devices.
Как установить Windows 10 на iPhone
Во многих случаях разработчики удивляют нас работами, которые переворачивают установленные нормы. На этот раз удалось сотворить чудо бега Windows 10 на iPhone, со всеми функциями полностью работоспособный и без необходимости джейлбрейка или другое пиратство. То, что кажется невозможным, было реализовано на iPhone X, хотя способ, которым Microsoft система работает не так, как ожидалось.
Виртуальная машина позволяет вам запустить одну операционную систему на другой, обычно как часть работы по разработке. Однако много раз эта работа выходит далеко за рамки и передается в руки всех пользователей. Эти виртуальные машины обычно работают на виртуальных машинах, позволяя, например, Windows PC тестировать Android приложений.
Windows 10 на iPhone
Теперь UTM родился, приложение, которое запускает Windows и Linux операционная система на iPhone или IPad. Разработчики приложили немало усилий, чтобы, помимо запуска операционной системы, она могла запускать все виды приложений, включая файловый менеджер. Однако, как мы увидим ниже, это нечто более символическое и правильное, чем реальная возможность работы в этой среде внутри iPhone.
Возможно, но с терпением
Созданные указывают, что нет необходимости делать джейлбрейк для запуска Windows 10 на iPhone. Тест был проведен на iPhone X, показывая, что время ожидания все еще нуждается в улучшении. В этом терминале это занимает примерно 20 минут, чтобы запустить операционную систему и для открытия основного приложения требуется несколько секунд. Установка операционной системы заняла около двух часов. Установка на обычном ПК занимает около 20 минут, а система запускается за считанные секунды.
Как установить и запустить Windows на iPhone и iPad без джейлбрейка


Недавно в сети появилось видео, на котором был показан процесс запуска Windows XP на последней версии iPhone. Нам сначала эта видеозапись показалась фейком, однако запустить одну из самых популярных ОС на мобильном устройстве оказалось возможным.
В этой статье мы расскажем, как установить Windows на iPhone. Для данной процедуры не нужен джейлбрейк. Нам понадобится эмулятор iBox, Cydia impactor и сама «винда».
Инструкция
- Скачайте файлы, которые мы перечислили выше
- Разархивируйте файлы с Cydia impactor и с образом Windows
- Подключите iOS-устройство к своему компьютеру и запустите утилиту Cydia impactor
- Загрузите в данную утилиту файл с эмулятором iBox и введите свои данные Apple ID. Информация об учетной записи нужна для того, чтобы получить профиль для приложения. Если вы боитесь вводить свои реальные данные Apple ID, то создайте вторую учетную запись и введите ее данные в утилиту
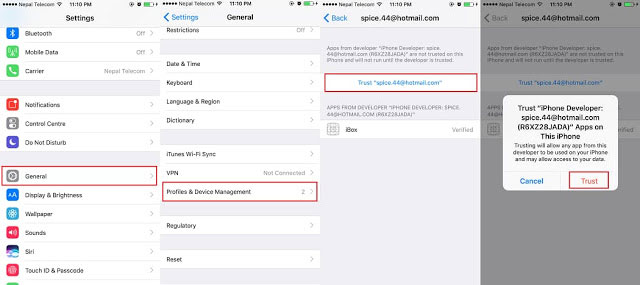
- Разрешите запуск появившегося на устройстве приложение
- Далее необходимо подтвердить профиль. Для этого зайдите в настройки, далее «Основные», «Профиль», «Управление устройством». В данном пункте меню найдите свой профиль и нажмите « Доверять»
- Откройте приложение iTunes на своем Mac или ПК
- Выберите свое устройство в окне приложения
- Перейдите во вкладку «Программы»
- Найдите приложение iBox
- Перекиньте ранее разархивированный образ Window XP в данное приложение
- Запустите iBox на своем iOS-устройстве
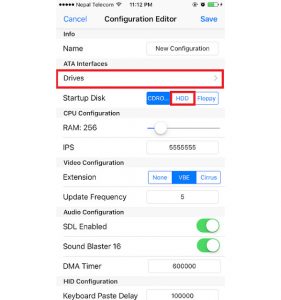
- Нажмите на «плюсик» и в строке «Name» введите «XP»
- Выберите «HDD», далее «Drives» и нажмите на «плюсик»
- Выберите HDD и нажмите Done
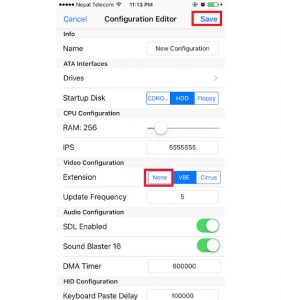
- Перейдите в пункт «Configuration Editor», найдите раздел «Extension» и нажмите на кнопку «None»
- Сохраните все настройки
- Запустите Windows
Естественно, ОС не будет полноценно работать на вашем мобильном устройстве, но все-таки данная процедура и ее результат являются, как минимум, забавными и занимательными.
В данной статье мы рассказали о том, как установить Windows XP на iOS-устройство, однако недавно появилось видео, в котором показывается процесс загрузки Windows Vista на iPhone 7. Возможно, в ближайшее время мы напишем гайд по установке данной ОС.
Подписывайтесь на T4S.TECH в Telegram, «ВКонтакте» и в «Яндекс.Дзен», чтобы оставаться в курсе самых интересных новостей из мира технологий и не только.

За первую минуту продаж P10 Huawei заработала 14 млн. долларов
Компания Huawei является лидером китайского рынка смартфонов и третьим в мире производителем, уступающим по количеству продаж только Samsung и Apple. Новый флагман китайской компании смартфон

10 самых технологически развитых стран мира
Человечество стремительно развивает технологии. Они помогают значительно повысить уровень жизни, влияют на экономики и политику. Доступ к передовым технологиям является одним из самых значительных факторов
If your computer doesn’t recognize your iPhone, iPad, or iPod
If you connect your device to your computer with a USB cable and your computer doesn’t recognize your iPhone, iPad, or iPod, get help.
If your computer doesn’t recognize your connected device, you might see an unknown error or a «0xE» error. If you do, follow these steps and try to connect your device again after each step:
- Make sure that your iOS or iPadOS device is unlocked and on the Home screen.
- Check that you have the latest software on your Mac or Windows PC. If you’re using iTunes, make sure you have the latest version.
- Make sure that your device is turned on.
- If you see a Trust this Computer alert, unlock your device and tap Trust.
- Unplug all USB accessories from your computer except for your device. Try each USB port to see if one works. Then try a different Apple USB cable.*
- Restart your computer.
- Restart your device:
- iPhone
- iPad
- iPod touch
- Try connecting your device to another computer. If you have the same issue on another computer, contact Apple Support.
For more help, follow the steps below for your Mac or Windows PC.
If you use a Mac
- Connect your iOS or iPadOS device and make sure that it’s unlocked and on the Home screen.
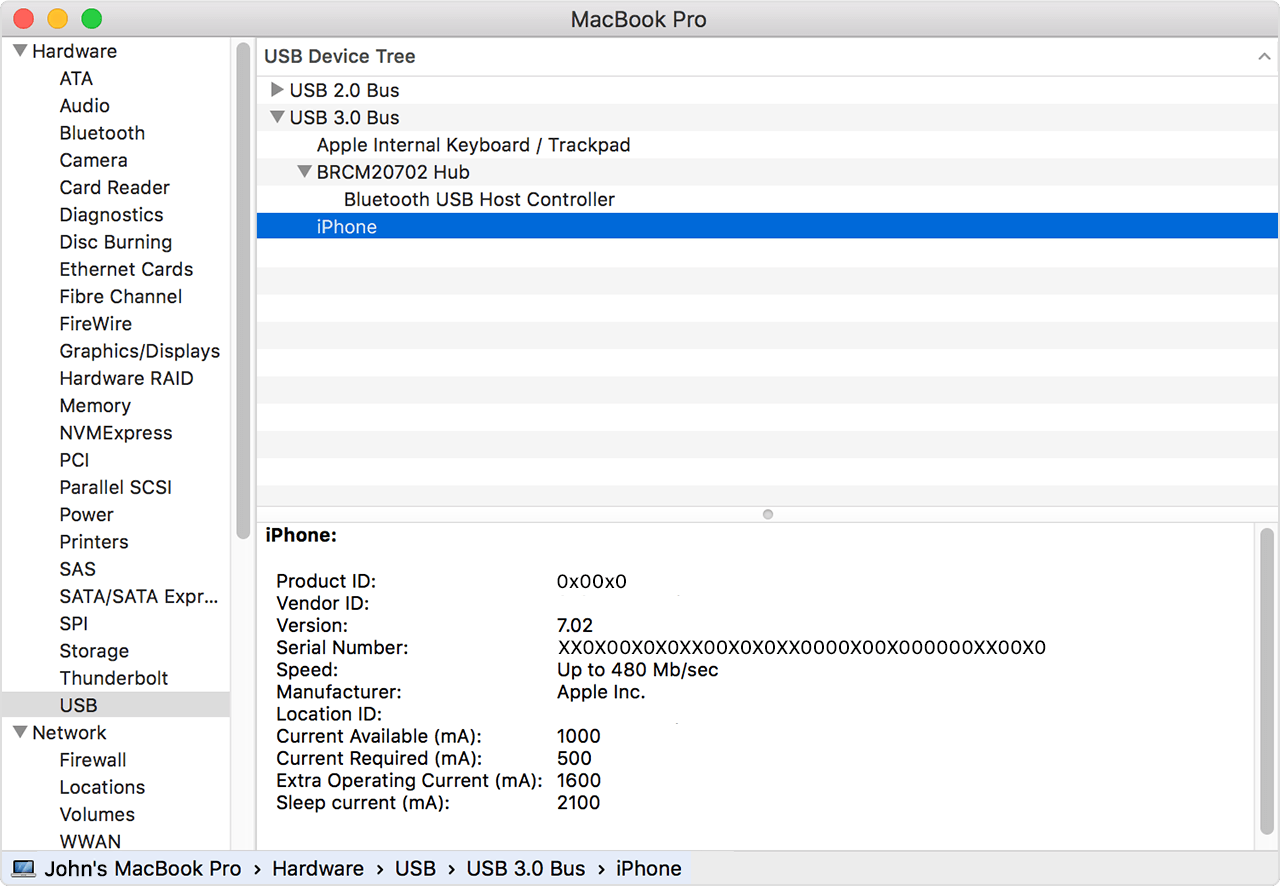
- On your Mac, hold down the Option key, click the Apple menu, and choose System Information or System Report.
- From the list on the left, select USB.
- If you see your iPhone, iPad, or iPod under USB Device Tree, get the latest macOS or install the latest updates. If you don’t see your device or still need help, contact Apple Support.
If you use a Windows PC
The steps differ depending on if you downloaded iTunes from the Microsoft Store or from Apple.
If you downloaded iTunes from the Microsoft Store
Follow these steps to reinstall the Apple Mobile Device USB driver:
- Disconnect your device from your computer.
- Unlock your iOS or iPadOS device and go to the Home screen. Then reconnect your device. If iTunes opens, close it.
- Click and hold (or right-click) the Start button, then choose Device Manager.
- Locate and expand the Portable Devices section.
- Look for your connected device (such as Apple iPhone), then right-click on the device name and choose Update driver.
- Select «Search automatically for updated driver software.»
- After the software installs, go to Settings > Update & Security > Windows Update and verify that no other updates are available.
- Open iTunes.

If you downloaded iTunes from Apple
Follow these steps to reinstall the Apple Mobile Device USB driver:
- Disconnect your device from your computer.
- Unlock your iOS or iPadOS device and go to the Home screen. Then reconnect your device. If iTunes opens, close it.
- Press the Windows and R key on your keyboard to open the Run command.
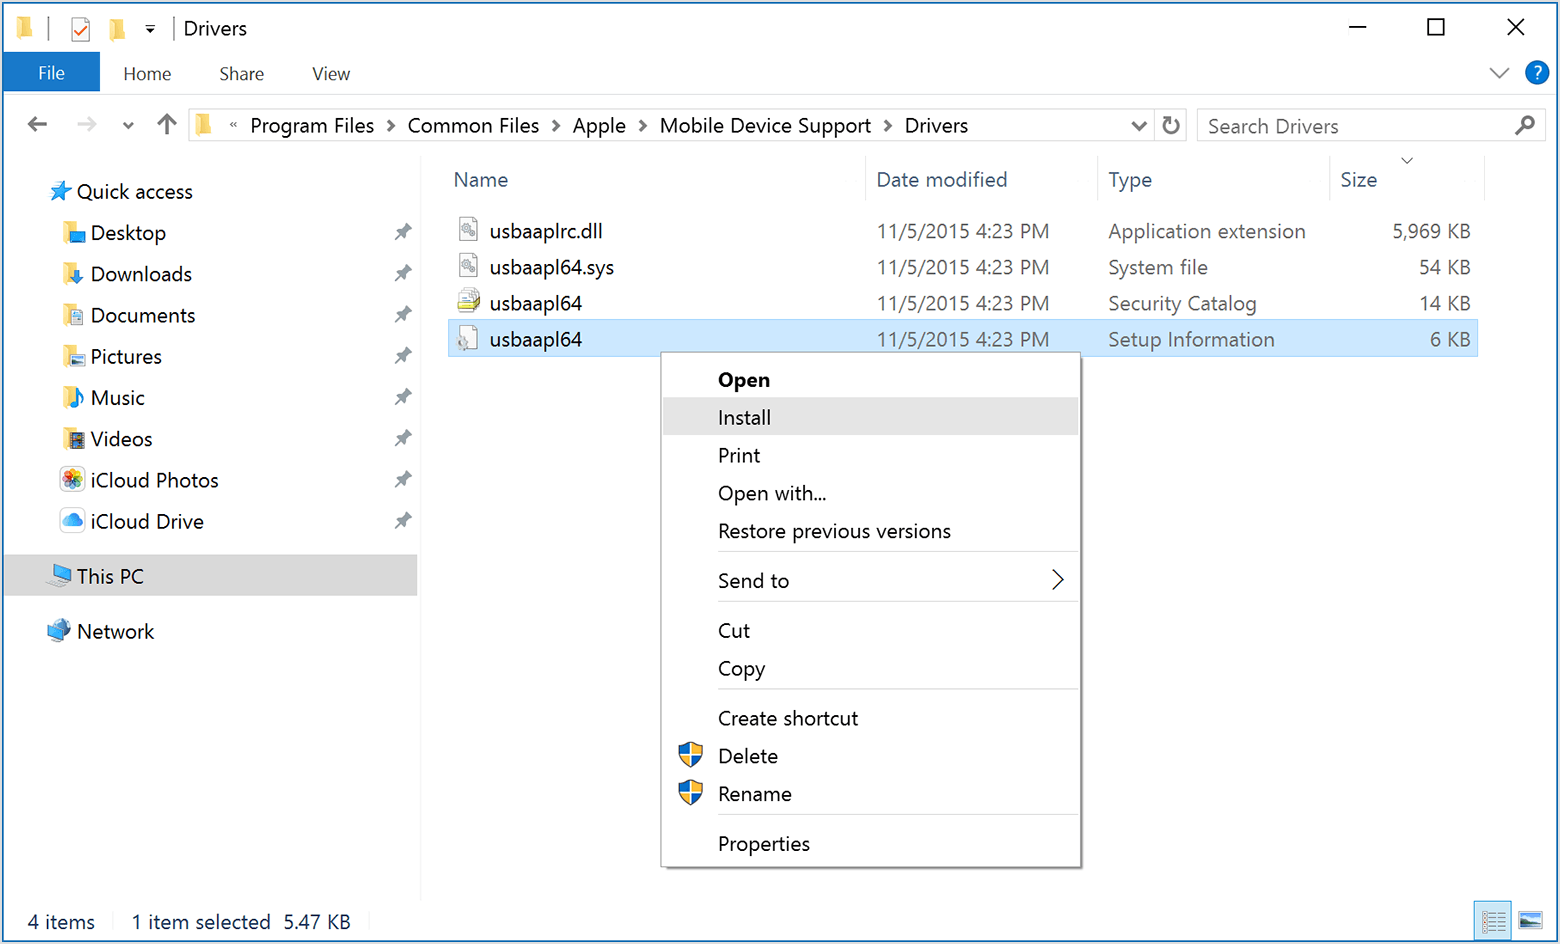
- In the Run window, enter:
%ProgramFiles%\Common Files\Apple\Mobile Device Support\Drivers - Click OK.
- Right-click on the usbaapl64.inf or usbaapl.inf file and choose Install.
You might see other files that start with usbaapl64 or usbaapl . Make sure to install the file that ends in .inf. If you’re not sure which file to install, right-click a blank area in the File Explorer Window, click View, then click Details to find the correct file type. You want to install the Setup Information file. - Disconnect your device from your computer, then restart your computer.
- Reconnect your device and open iTunes.
If your device still isn’t recognized
Check Device Manager to see if the Apple Mobile Device USB driver is installed. Follow these steps to open Device Manager:
- Press the Windows and R key on your keyboard to open the Run command.
- In the Run window, enter devmgmt.msc , then click OK. Device Manager should open.
- Locate and expand the Universal Serial Bus controllers section.
- Look for the Apple Mobile Device USB driver.
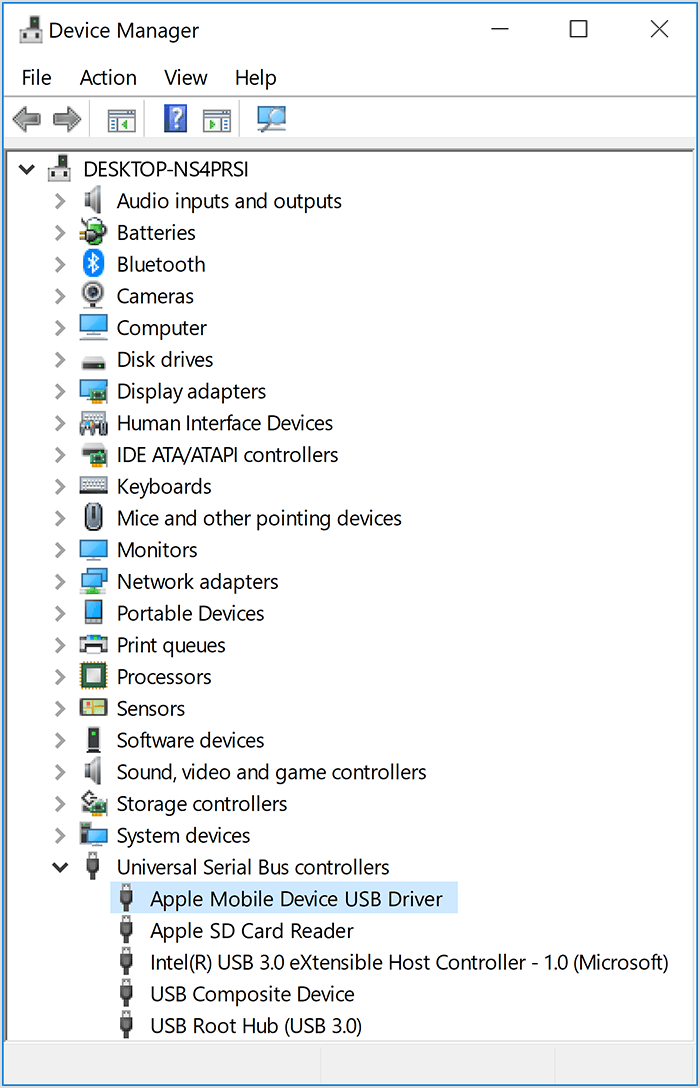
If you don’t see the Apple Mobile Device USB Driver or you see Unknown Device:
- Connect your device to your computer with a different USB cable.
- Connect your device to a different computer. If you have the same issue on another computer, contact Apple Support.
If you see the Apple Mobile Device USB driver with an error symbol:
If you see , , or next to the Apple Mobile Device USB driver, follow these steps:
Information about products not manufactured by Apple, or independent websites not controlled or tested by Apple, is provided without recommendation or endorsement. Apple assumes no responsibility with regard to the selection, performance, or use of third-party websites or products. Apple makes no representations regarding third-party website accuracy or reliability. Contact the vendor for additional information.


