- The 5 Best Voice Changing Softwares to Use in 2020
- 1. Morph VOX
- 2. Voicemod
- 3. Voxal Voice Changer
- 4. Clownfish Voice Changer
- 5. All-in-One Voice Changer
- Why can’t I change my screen brightness with Windows 10?
- Replies (27)
- How to Change Windows 10 Display Language Without Reinstalling the Operating System?
- Introduction
- How to change the default display language in Windows 10?
- Disable language synchronization
- The steps to take if you want to change the display language
- Changing region settings
- Conclusion
The 5 Best Voice Changing Softwares to Use in 2020
Do you remember when the Talking Tom app first came out? I do because I could not stop laughing at how stupidly funny it was. Well, that was voice changing technology in its most basic form. Now imagine being able to do this in real-time and with multiple voice variations. Because that is what voice changing software will help you do. They come with multiple preset voice types like Alien voices, robotic voices, and cartoon voices. They also allow you to manually change your voice by altering the pitch, frequency, tone, and other voice aspects.
The mischievous ones are already thinking about how they can use this software to prank their friends and relatives. I don’t blame you. The voice changing software can also be great in changing your voice during gaming. This could be just for fun but it can also better personalize the character you are playing. If you are playing a commander in Black Ops Unit Commander then you will need a commanding voice that calls for some respect.
So in this post, I will be taking you through some of the finest Voice Changer Software you can use. Depending on your intended use, you can opt for a real-time voice changer or the alternative type that requires that you record your voice before you can alter it. Now let’s dive in.
1. Morph VOX
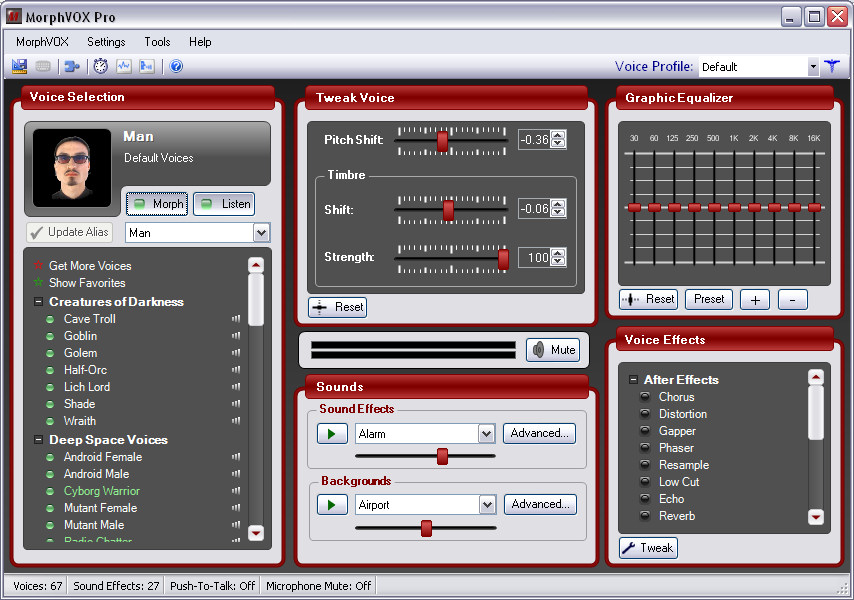
Morph Vox is considerably a popular software that comes with a bunch of cool features. It is available as a free tool, MorphVox Junior, and as a paid version, MorphVox Pro. However, the free version may not be ideal given the set of limitations imposed. For instance, it only comes with 3 voice options. A single male, female, and kid. Therefore, for the best experience, I would recommend that you use the premium version.
 MorphVOX Pro
It changes voice in real-time and is hence well suited for online communication and gaming. MorphVox comes with two operating modes. The skinned mode allows you to quickly select your voice of choice from the already existing options maybe add a few effects and you are good to go. Then there is the Studio Mode that allows you to dig a little deeper. Here you can adjust the voice timbre and pitch.
MorphVox easily integrates with the various games and online chat platforms and includes a background noise filter that will be especially useful if you are using your computer’s built-in microphone. Another interesting feature is the ability to add background noises that can help create a real-life scenario easily from your computer. MorphVox also allows you to alter recorded audios that are in WAV format. This software is only available for Windows.
2. Voicemod
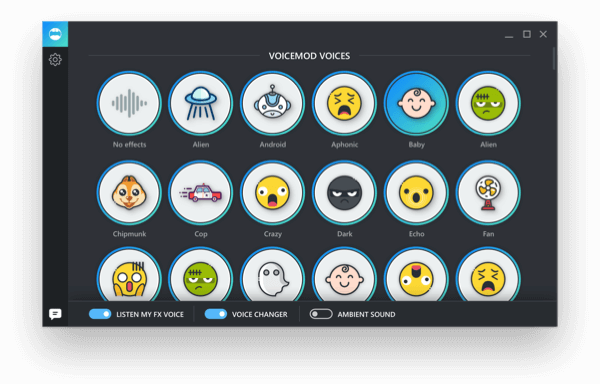
Voice Mod is a voice changer software designed for Windows users. It modifies your voice online and offers support for numerous online games with the most notable being Fortnite, Minecraft, and PUBG. It’s also a great option for streaming and chatting online. Some of the chatting and streaming software that is compatible with Voice Mod include Discord, Twitch, VRChat, Skype, and Stream Deck.
Update: Due to recent updates pushed by developers, the program is now considered malicious. You are recommended not to download this program and proceed with other alternatives mentioned below.
 Voicemod
Voice Mod changes your voice in real-time and has a pretty awesome collection of voice options and effects. From Chipmunk, baby, Android, Alien to police there is no shortage of voice types. There is even a crazy voice. Voice Mod is available for free.
3. Voxal Voice Changer
Voxal Voice Changer is also free software and is available for both Windows and Mac users. It enables you to alter your voice in basically every application that uses a microphone including all your favorite games. And there is no shortage of voice types and effects. There is even the choice to adopt a male or female voice. Yes, there is a very high chance that the female online game partner with an angelic voice might actually be a dude.
Voxal Voice changer also alters your voice in real-time but it also includes the option to change recorded audio. This software comes with an easy to understand UI that makes the process of editing your voice a breeze. It’s also quite lightweight in that it does not affect the performance of your system and other application. A point to note is that if you intend to use this voice changer in a business model then you will have to purchase it. It is only free for home use.
4. Clownfish Voice Changer
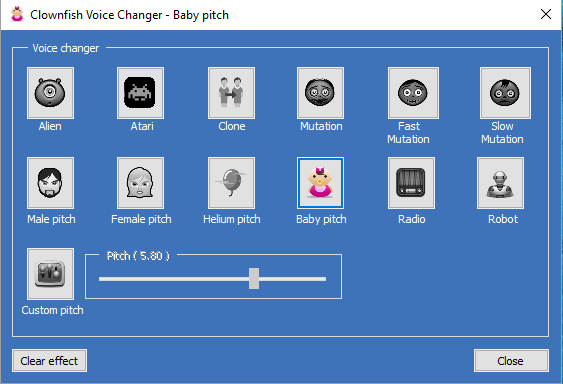
Clownfish is a multi-platform application that can be also used to change your voice in any application in your computer that uses a microphone. The most notable supported applications are Skype, Viber, Discord, and TeamSpeak. It also modifies your voice in steam and will, therefore, work with all your favorite games.
 Clownfish Voice Changer
Clownfish does not support the addition of voice effects by default but it provides guides on where to find and install them. The installation process is straightforward and the software does not put too much load on the CPU performance. There are multiple voice options to choose from and just to mention the most interesting, we have Male pitch, Female Pitch, Baby Pitch, Alien, Robot and Darth Vader. That last one will come as good news to Star Wars fans. Clownfish Voice Changer is only available for Windows.
5. All-in-One Voice Changer
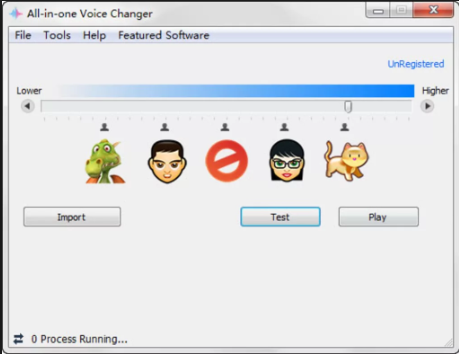
All-in-One Voice Changer is what you would call an upgrade Skype Voice C hanger. It works on the same principle but allows you to link it to other IM tools such as Yahoo Messenger and QQ International. So basically All-in-One tool is a voice changer developed specifically for online chatting.
 All-in-One Voice Changer
It is a great software for making prank calls to your friends and relatives. It even lets you change the voice type in mid-conversation to make things funnier. Changing your voice has never been easier than with All-in-One Voice Changer. It features a slide bar that you either move to the left or right to change the pitch of your voice. You can preview each change until you achieve your preferred choice. You can also import a recorded .wav audio and change it within the software.
Unfortunately, this software is not free. They do provide a free trial but only in a Cat voice which is a bit underwhelming. On the upside, once you upgrade you will get access to a video modification feature that is not available in any of the other software. You can use it to add funny dubs when video chatting.
Why can’t I change my screen brightness with Windows 10?
Replies (27)
* Please try a lower page number.
* Please enter only numbers.
* Please try a lower page number.
* Please enter only numbers.
![]()
Thank you for your interest in Windows 10.
I suggest you to try updating the Display Adapter drivers and check if it works for you.
Follow the steps to update the Display driver:
- Press Windows Key + X key and click Device Manager.
- Expand ‘Display Adapters’.
- Right-click on the Display Adapter listed and click on ‘Update Driver Software’.
- Select the option to automatically search for the updated driver software.
- Restart the computer after its updated and verify.
Also try to access the computer manufacturer website and download and install the latest display and chipset drivers.
Hope this information is helpful. Please do let us know if you need further assistance, we’ll be glad to assist you.
1308 people found this reply helpful
Was this reply helpful?
Sorry this didn’t help.
Great! Thanks for your feedback.
How satisfied are you with this reply?
Thanks for your feedback, it helps us improve the site.
How satisfied are you with this reply?
Thanks for your feedback.
328 people found this reply helpful
Was this reply helpful?
Sorry this didn’t help.
Great! Thanks for your feedback.
How satisfied are you with this reply?
Thanks for your feedback, it helps us improve the site.
How satisfied are you with this reply?
Thanks for your feedback.
![]()
Thank you for keeping us updated.
Install the same driver in compatibility mode for previous version of Windows.
a. Right click the driver installation file and select Properties then tap or click the Compatibility tab.
b. Place a check in the Run this program in compatibility mode for: box.
c. Tap or click the drop down box and select a previous operating system, then tap or click OK.
d. Try installing the driver and check.
Hope this information is helpful. Please feel free to reply in case you face any other issues with Windows in future.
73 people found this reply helpful
Was this reply helpful?
Sorry this didn’t help.
Great! Thanks for your feedback.
How satisfied are you with this reply?
Thanks for your feedback, it helps us improve the site.
How satisfied are you with this reply?
Thanks for your feedback.
Kudos and thankou very much, Giridhar J
I followed your instructions and let the driver update as you said and the screen brightness came back as the driver finished updating. Main thing, it works again! 😀 Thanks
26 people found this reply helpful
Was this reply helpful?
Sorry this didn’t help.
Great! Thanks for your feedback.
How satisfied are you with this reply?
Thanks for your feedback, it helps us improve the site.
How satisfied are you with this reply?
Thanks for your feedback.
231 people found this reply helpful
Was this reply helpful?
Sorry this didn’t help.
Great! Thanks for your feedback.
How satisfied are you with this reply?
Thanks for your feedback, it helps us improve the site.
How satisfied are you with this reply?
Thanks for your feedback.
This is a little ridiculous. I’m trying to change my brightness, which used to be a press of Fn + F2 and now I have to go into settings restart my computer run as compatibility which doesn’t even show up for me. My eyes are hurting and I just want windows 8 back. Oh wait, that also used to be at the touch of a few buttons and it would take me back. Now I have to apparently have a recovery drive on a flash drive. Why do you make everything so hard for us? Why cant it be as easy as before? What is the purpose, even, of changing it to be more difficult. I’d like to say I’m quite adept with computers, but if you ask people to do these basic tasks when even I can’t I’m surprised you aren’t flooded with complaints.
Go to settings — display. Scroll down and move the brightness bar. If the brightness bar is missing, go to control panel, device manager, monitor, PNP monitor, driver tab and click enable.
Then go back to settings — dispay and look for the brightness bar and adjust.
281 people found this reply helpful
Was this reply helpful?
Sorry this didn’t help.
Great! Thanks for your feedback.
How satisfied are you with this reply?
Thanks for your feedback, it helps us improve the site.
How to Change Windows 10 Display Language Without Reinstalling the Operating System?
Read this article to find out how to change the language of Windows 10 interface without having to reinstall it, what system languages can be installed and what settings should be modified for that purpose.
Introduction
In Windows 10, people usually choose the preferred language for the entire operating system when they install it. However, if the language settings were wrong, or people have to use computing devices with certain language preferences, there are some settings to be modified in order to bring them in line with your personal likings.
So if you ever need to change language preferences in Windows 10, this can be done in a quick and easy way with the help of the Settings app and without having to reinstall the operating system.
In today’s article, we will show you how to change the default display language into any other, including doing it for new and existing user accounts.
How to change the default display language in Windows 10?
If you have to move to a different region or you need to use a display language different from the default choice, or the initial language settings for the computing device have been wrong, there is absolutely no point in reinstalling Windows 10. All you need is to modify a couple of system settings to enjoy the experience of using your operating system in the right language.
Disable language synchronization
If you are using a Microsoft account, the language settings will apply to all devices linked to such account. If you plan to change regional and language settings for one computer only, you need to disable synchronization of such settings before you proceed.
This is how you disable language sync in Windows 10.
Open the main system application, Settings. You can do it in any way you prefer. For example, click on the Start button in the lower left corner of your desktop, on the Taskbar, and open the main Windows menu. Use the scroll bar or the mouse wheel to search the list of all programs and applications installed on this computer and find the line Settings, or click on the Settings button in the left side of the user menu, and the application will open.

In the main Settings window, scroll down if necessary and choose the tab Accounts.

In the left panel, go to Sync your settings.
In the right panel, find the section Individual sync settings and the line Language preferences, then set the slider to the Off position (disabled).

When these steps are taken, you can start changing language settings for the copy of Windows 10 installed on this computer, without worrying that this can affect similar settings in other linked devices.
The steps to take if you want to change the display language
To change the display language of your Windows 10, you should close all running applications and do what is described below.
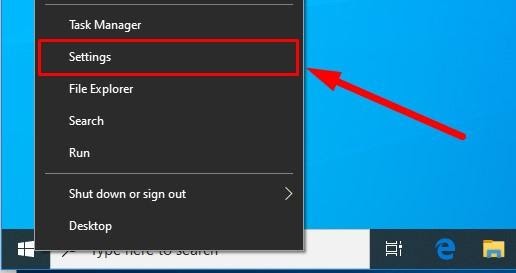
Use any method you prefer to open the Settings application. For example, right-click on the Start button that you can find on the Taskbar, in the left lower corner of the desktop, or press the key sequence Windows + X instead to open the context menu, and select the line Settings. The application will start immediately.
Use the scroll bar or the mouse wheel to navigate the Settings window, and find the tab Time and language.

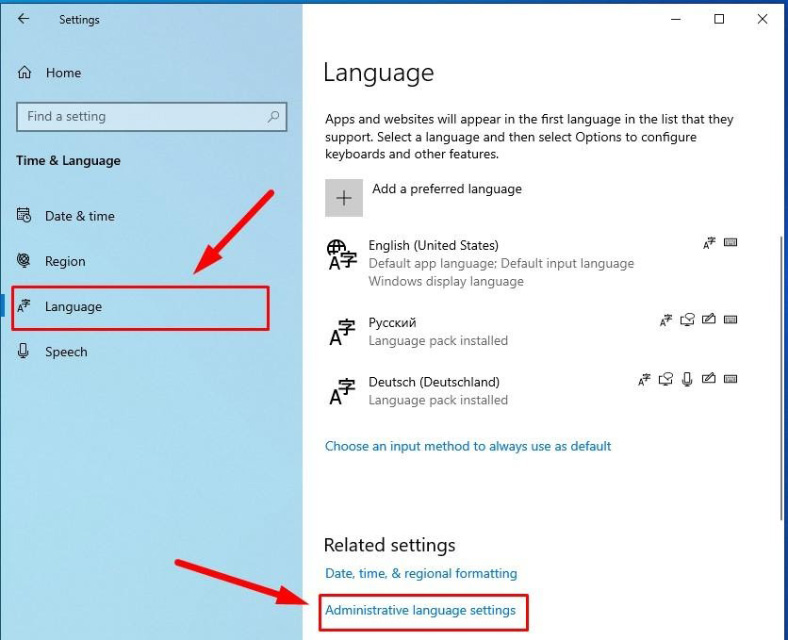
In the left panel, go to Language.
Now look to the right and find the section Preferred languages, where you can prioritize language settings, and click on the button Add a preferred language, with a + (plus) symbol on it.

In the new window Choose a language to install use the scroll bar or the mouse wheel to find the language you need, or start typing its name in the search field above.
Choose the language pack you are planning to use in Windows 10 from the list.

When the language is chosen, hit Next.
In the next page Install language features check the box for Install language pack to confirm your choice (the box with the tick will become blue, i.e. active).

Click Install below.
Changes will take effect after the language package is installed, which usually takes several minutes only. In some cases, restarting your Windows 10 may be required, and then the corresponding language settings will apply to all system elements. The changes will affect the sign-in screen, the Settings app, Windows Explorer, desktop, all applications, preferred browsers and websites you visit. From now on, they will use the new language by default. Besides, Windows 10 may suggest reviewing your current privacy settings.
Changing region settings
If you change the display language for Windows 10 because you move to a different region, then regional settings should be modified too.
Changing them in Windows 10 is easy enough: just follow the steps below.
Open the main system application, Settings, using any way you prefer. For example, press the keyboard shortcut Windows + I to access the app directly.
In the main window of the Settings app, find and select the tab Time and language.
In the left panel, select Region.
In the right panel, find the section Region and use the nested menu Country or region to specify your new location if it differs from the current settings.
In the section Regional format use another nested menu to select proper formats to display date and time in Windows, if these differ for your time and region.

Now look at the left panel and jump to the tab Language again.
Use the scroll bar or the mouse wheel to find the section Related settings and click on the link Administrative language settings.
In the new pop-up Region window, jump to the tab Administrative and in the section Welcome screen and new user accounts hit the button Copy settings.

The new window will show you corresponding screen and account settings. In the section Copy your current settings to check the boxes for each option: Welcome screen and system accounts and New user accounts.

Click ОК one more time, and then restart the computer.
After all these steps, your computer will display proper regional settings specified according to your physical location.
Most of the time, people don’t change or install additional languages regularly for their personal needs. This opportunity to change language packs quickly is more often required in small or large companies that need to deal with customers having various language preferences.
Besides, this option would be useful for people who have to move to a different region and would like their regional settings to comply. Another scenario is buying a computer from another country when the required configuration is not available locally.
Also, you should remember that modifying language settings may disable some functions like Cortana because this service is not supported in certain regions.
Conclusion
Preferred display language is one of the easily customizable things in the operating system. If you ever need to change the language settings, use one of the methods described here to replace the language pack currently used by Windows 10 without having to reinstall it.
See the full article with all additional video tutorials. If you still have any questions, please ask in a comments. Also visit our Youtube channel, there are over 400 video tutorials.


