- Git for Windows 2.21.0
- Информация о программе
- Описание
- Git Guides
- Get started with git and GitHub
- The basic Windows download, installation and configurations for Git bash commands
- Git bash the easy way
- Download Git Bash for Windows
- Git bash Windows installation
- Testing Git bash Windows installation
- Git bash Windows configurations
- Git configurations explained
- Extra optional configurations
- Some useful Windows Git bash commands
- Summary: Git bash installation and configurations on Windows
Git for Windows 2.21.0
Информация о программе
Описание
Система контроля версий или VCS предназначена для облегчения работы программистов, которые производят анализ изменений в программный код. Git – это одна из систем контроля версий, позволяющая отследить изменения, ревизии и обновления значений программного кода. Используется Git в различных операционных системах – Windows, Linux, Android, Swift, Qt, причем процесс установки максимально простой.
Независимо от используемой ОС (Windows или Linux) имеется ряд особенностей, делающих Git востребованной среди разработчиков:
- Работает Git по принципу одноранговой сети, основанной на стандарте peer to peer, чем выгодно отличается от иных систем, работающих на основе модели client-server;
- Использование Git дает возможность программистам получить доступ к независимым веткам программного кода, благодаря чему ветки можно создавать, объединять и удалять, не потратив на это много времени;
- Операции в Git атомарны – любые изменения кода или работают, или нет, при этом действия не затрагивают основной код;
- Метаданные хранятся в соответствующих каталогах с расширением .git, а не в скрытых папках;
- При добавлении новых файлов или их изменении происходит генерация контрольных сумм, благодаря чему происходит шифрование информации;
- Возможность индексации позволяет производить форматирование коммитов и просматривать их до компиляции;
- Наличие подмодулей упрощает процесс управления проектами, зависимостями и структурой.
Git Guides

How to install Git on any OS
Git can be installed on the most common operating systems like Windows, Mac, and Linux. In fact, Git comes installed by default on most Mac and Linux machines!
Checking for Git
To see if you already have Git installed, open up your terminal application.
- If you’re on a Mac, look for a command prompt application called «Terminal».
- If you’re on a Windows machine, open the windows command prompt or «Git Bash».
Once you’ve opened your terminal application, type git version . The output will either tell you which version of Git is installed, or it will alert you that git is an unknown command. If it’s an unknown command, read further and find out how to install Git.
Install Git Using GitHub Desktop
Installing GitHub Desktop will also install the latest version of Git if you don’t already have it. With GitHub Desktop, you get a command line version of Git with a robust GUI. Regardless of if you have Git installed or not, GitHub Desktop offers a simple collaboration tool for Git. You can learn more here.
Install Git on Windows
- Navigate to the latest Git for Windows installer and download the latest version.
- Once the installer has started, follow the instructions as provided in the Git Setup wizard screen until the installation is complete.
- Open the windows command prompt (or Git Bash if you selected not to use the standard Git Windows Command Prompt during the Git installation).
- Type git version to verify Git was installed.
Note: git-scm is a popular and recommended resource for downloading Git for Windows. The advantage of downloading Git from git-scm is that your download automatically starts with the latest version of Git included with the recommended command prompt, Git Bash . The download source is the same Git for Windows installer as referenced in the steps above.
Install Git on Mac
Most versions of MacOS will already have Git installed, and you can activate it through the terminal with git version . However, if you don’t have Git installed for whatever reason, you can install the latest version of Git using one of several popular methods as listed below:
Install Git From an Installer
- Navigate to the latest macOS Git Installer and download the latest version.
- Once the installer has started, follow the instructions as provided until the installation is complete.
- Open the command prompt «terminal» and type git version to verify Git was installed.
Note: git-scm is a popular and recommended resource for downloading Git on a Mac. The advantage of downloading Git from git-scm is that your download automatically starts with the latest version of Git. The download source is the same macOS Git Installer as referenced in the steps above.
Install Git from Homebrew
Homebrew is a popular package manager for macOS. If you already have Homwbrew installed, you can follow the below steps to install Git:
- Open up a terminal window and install Git using the following command: brew install git .
- Once the command output has completed, you can verify the installation by typing: git version .
Install Git on Linux
Fun fact: Git was originally developed to version the Linux operating system! So, it only makes sense that it is easy to configure to run on Linux.
You can install Git on Linux through the package management tool that comes with your distribution.
- Git packages are available using apt .
- It’s a good idea to make sure you’re running the latest version. To do so, Navigate to your command prompt shell and run the following command to make sure everything is up-to-date: sudo apt-get update .
- To install Git, run the following command: sudo apt-get install git-all .
- Once the command output has completed, you can verify the installation by typing: git version .
- Git packages are available using dnf .
- To install Git, navigate to your command prompt shell and run the following command: sudo dnf install git-all .
- Once the command output has completed, you can verify the installation by typing: git version .
Note: You can download the proper Git versions and read more about how to install on specific Linux systems, like installing Git on Ubuntu or Fedora, in git-scm’s documentation.
Other Methods of Installing Git
Looking to install Git via the source code? Learn more here.
Get started with git and GitHub
Review code, manage projects, and build software alongside 40 million developers.
The basic Windows download, installation and configurations for Git bash commands
Git bash the easy way
The best way to define Git bash (for Windows or Linux or Mac) is that it’s a source control management system that you can download and install on your Windows machine where you will be able to type Git commands to make source code management easier through versioning and the commit history.
Git is a distributed version control system that makes tracking changes very easy where you can compare between different versions of the same source code file.
In this post, after you finish Git commands Windows download and installation you will run a simple command to make sure that Git is adequately installed and responding to the commands as expected.
Git bash is not a GUI software.
Instead, it’s a command line prompt where you will only use to write and run commands.
In this first version of this tutorial, we will not cover any Git client GUI software as we will just focus on Git commands and that’s why we will provide the steps of downloading and installing Git bash only and on Windows.
Git GUI is shipped with the same installation package as shown later in this post but we will not cover that as well.
The following steps will install Git commands on Windows, and they represent the post topics:
Download Git Bash for Windows
Let’s get straight to the installation by firstly downloading the Git setup file. To start downloading, follow these steps:
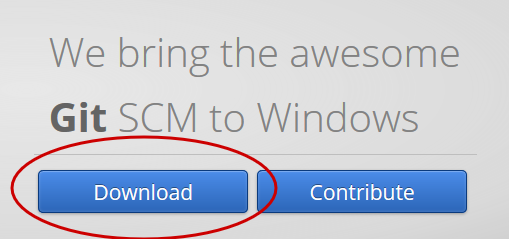
- Open your web browser, and go to https://git-scm.com or https://git-for-windows.github.io/. Both links will download the same setup file.
- By the time of writing this post, you will find the download button on the right side of the Git SCM and at the top of the GitHub link as shown in the screenshots below. Now click the button «Download 2.15.0 for Windows».
- To make it easier, we linked the download link to the below screenshots directly. Note: you might find a more recent Git version than 2.15.0 when you download it below.
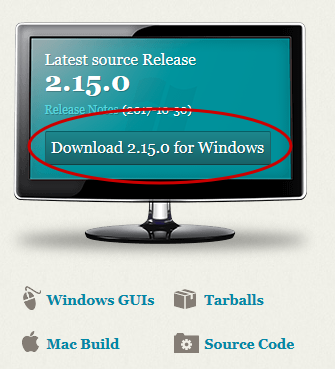
For more information about the different Git downloads for different release versions and platforms like Linux and Mac click here. You can also find Git source code since it’s an open source and available for contributions.
Git bash Windows installation
By following the previous download steps, you should have Git setup files on your Windows machine ready for installation.
We will provide the installation steps on the latest Windows Server 2016 by the time of writing this post, and you can use any Windows version you would prefer, there are no restrictions on that part.
You can start the installation by following these steps:
- Click the setup file «Git-2.15.0-64-bit.exe». (Could be slightly different from yours)
- On the «GNU General Public License» window, click Next.
- On «Select Destination Location» window you can change the installation path, otherwise, click Next.
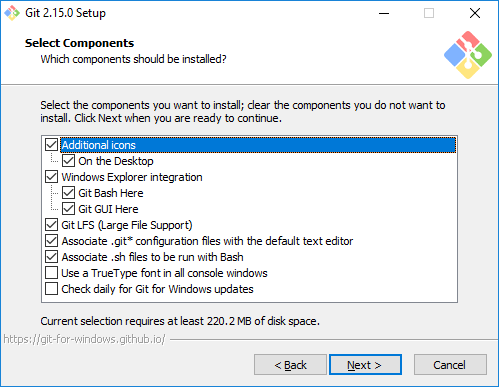
- On «Select Components» window, You can choose:
- Whether or not to add a desktop icon for Git.
- Integrate windows explorer with «Git Bash Here» or «Git GUI Here». We will explain that later in this post but for now it’s recommended to leave both selected.
- Git LFS (Large File Support): Covering Git LFS is out of the scope of this tutorial, however, if you need to know more information about it, click here.
- Associate .git* configuration files with the default text editor: We will explain that later in the next posts of this tutorial but for now leave it selected.
- Associate .sh files to be run with Bash: This option will allow Unix shell files to be run with Git Bash. This post will not cover this choice, and it’s entirely up to you to check/uncheck it.
- You can also leave the last couple of selections unchecked which will use TrueType font in all console windows and the other one that will check for Git daily Windows updates.
- The final selection should be like the screenshot below.

- Once you complete configuring your preferences, click Next.
- On the «Select Start Menu Folder» window, it’s optional to rename the start menu folder or even check «Don’t create a Start Menu folder» at the bottom. Then click Next.
- On the «Adjusting your PATH environment» window, select «Use Git from Git Bash only» because we will be executing Git commands from Git bash only not from the Windows command prompt. It’s also optional to select it, in case you will run Git commands on Windows command prompt, but we recommend picking the safest choice for your environmental variables. Click Next.
- On the «Choosing HTTPS transport backend» window, select «Use the native Windows Secure Channel library» option then click Next.
- On the «Configuring the line ending conversions» window:
- Choose «Checkout Windows-style, commit Unix-style line endings» in case you will be using Windows platform, but your team will be bouncing from working on Windows to Unix machines and vice versa. This option supports cross-platform.
- Choose «Checkout as-is, commit Unix-style line endings» in case you and your team will be using different Windows and Unix platforms. This option supports cross-platform.
- Choose «Checkout as-is, commit as-is» in case you and your team will be using Windows only and cross-platform will not be supported.
- Once you decide your selection, click Next.
- On the «Configuring the terminal emulator to use with Git Bash» window, select «Use MinTTY (the default terminal of MSYS2)» which uses the minimal terminal emulator for bash then click Next.
- On the «Configuring extra options» window:
- Check «Enable file system caching» if you would like to boost Git performance by caching file system data in memory.
- Check «Enable Git Credential Manager» if you’d use Git integrated with Visual Studio Team Services which will require you to have the .Net framework v. 4.5.1 or later installed.
- Leave the «Enable symbolic links» unchecked.
- Once you have made your selection, click Install and you should see the installation progress running after this step.
- Once you finish the installation, uncheck «Launch Git Bash» and «View Release Notes» on «Completing the Git Setup Wizard» window and click Finish.
By following the previous steps, you should now notice the Git bash icon added to your desktop.
Testing Git bash Windows installation
The following steps will check if Git bash has been appropriately installed and responding to Git commands as expected:
- Double click the «Git Bash» desktop icon. Git bash terminal should open up, and this is where you will write your Git commands.
- Type in the following command:
Git should respond by providing the Git version and the platform running Git bash as shown in the next screenshot

Git bash Windows configurations
Now Git has been installed and responds correctly to commands.
However, it’s required to provide Git with two basic configurations to be able to manage repositories.
Those settings are merely your name and your email. To configure Git with that required information follow these steps:
- Make sure your Git bash command prompt is open.
- Apply the following command to configure your name:
- Then apply the next command to configure your email:
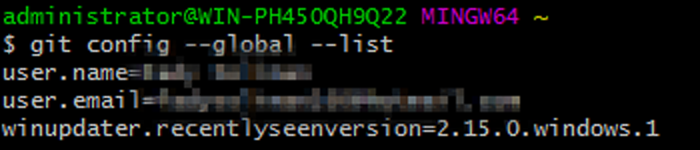
- To make sure that both configurations have been set correctly we can check by typing the following command:
Which will list all the global configurations that have been set for Git so far as shown in the below screenshot
Git configurations explained
If you’re not interested to know how Git worked to configure the username and email you can safely skip this sub-section.
As shown in the previous configuration commands:
- git config is primarily used to set or get any Git configurations.
- After git config , both —global or —system can be used as a parameter to let Git easily find the configuration file to edit and modify the supplied configurations.
- —system tells Git to look for the configuration file placed system-wide /etc/gitconfig which applies to every user on the system.
- —global tells Git to look for the configuration file set at the user level
/.gitconfig which is specific to each user. That’s why it made sense to configure the username and email with the —global for a particular user and not with —system for all users.
Extra optional configurations
At this step, we have successfully configured Git and ready to provide different repository management commands, but if you’d like to know more about other settings, some extra configurations might be of interest.
For example, one of those interesting configurations is controlling Git colors.
Git, by default, displays most of its output on Git bash in a colored format. However, if you do not prefer this feature you can turn it off by applying the following command:
You can also leave the colors running but change them through other configurations. For more information about how you can manage the extra configurations, you can visit Git — Git Configuration.
Some useful Windows Git bash commands
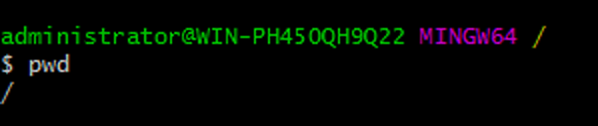
This section will provide two important basic commands that you are going to find frequently throughout this tutorial, so it’s essential to know more about them. Make sure you open Git bash and type in the following command:
This command will respond with the current directory location. For example, in the screenshot below, the command pwd responded with the root location.
Then type in the following command:
This command will basically respond with listing all the files and directories at the current location as shown in the below screenshot.

Apparently, it appears that the default location of the ls command is the same as the path where git-bash.exe is. Which is not desired as a best practice to create projects and files at this location.
So, to change the default location, you can use the traditional cd command, but it’s a little different than the cd command that you type in your Windows command prompt.
Go to your file explorer and open the C drive and create a new folder called «Git_Projects» and while your Git bash terminal is open, write the following command:
Make sure you include the double quotes otherwise Git will not be able to find your location. So the double quotes are mandatory in Git bash which is not the case in Windows command prompt (only if there are spaces in the target location).
Now the result would be something like the screenshot below.
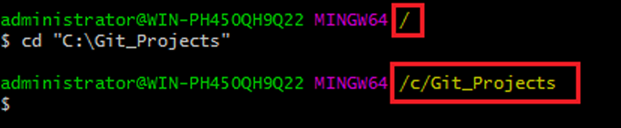
After running the cd command and as shown in the screenshot above, it’s obvious that the command changed the current location.
Now if you rerun the ls command you will get different results.
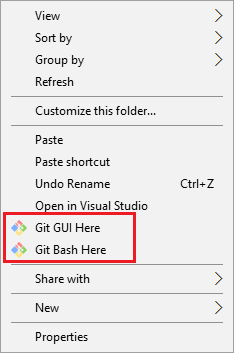
An alternative to running the cd command is while your Git terminal is closed, on your Windows file explorer, go to the created «Git_Projects» folder then right-click anywhere.
You should find two Git options in the Windows file explorer context menu which are «Git GUI Here» and «Git Bash Here» as shown in the screenshot below.
Click «Git Bash Here», and that should open Git bash with your location set to the «Git_Projects» folder precisely the same as running the cd command.
The two new options «Git GUI Here» and «Git Bash Here» are the result of the installation step (4.b.) mentioned in the installation section:
Integrate windows explorer with «Git Bash Here» or «Git GUI Here».
For more details about the different git configurations you can ask Git itself for help through the following command:
The previous help command will open an HTML page on your default browser containing all the bits and pieces you would need to know about Git configurations.
Summary: Git bash installation and configurations on Windows
Git bash installation is super easy on Windows, and it provides us with a considerable amount of configurations and options that the installation wizard can handle which makes it very easy to setup and configure.
Now you are ready to use Git bash as a set source control command terminal to create and manage Git repositories.


