- Git SSH Windows — пошаговое руководство
- Генерация ключа SSH
- Добавление SSH-ключа в ssh-agent
- Добавление ключа SSH в учетную запись GitHub
- Beanstalk Guides
- Table of Contents
- Choosing a Git distribution
- Installing Git
- Installing SSH keys on Windows
- Using OpenSSH and generating SSH keys with ssh-keygen
- Generating a key pair
- Checking your connection
- In case you have installed TortoiseGIT
- Having problems connecting to your Git repository on Windows 7?
- Alternative to OpenSSH — using PuTTY to access your Git repository
- Installing PuTTY
- Adding GIT_SSH variable to environment
- Generating SSH key with puttygen
- Adding your private key to pageant
- Checking your connection
- Setting up Git profile
- Summary
- Now what?
- Как настроить подключение к удаленному Git репозиторию
- 3 ответа 3
- Установка
- Клонирование через SSH
- Создание ssh-ключа.
- Если ключ уже есть
Git SSH Windows — пошаговое руководство
Настроим пошагово Git SSH для Windows 10. Это позволит вам выполнять команды git без ввода пароля от своей учетной записи GitHub.
- Генерация ключа SSH.
- Добавление SSH-ключа в ssh-agent.
- Добавление ключа SSH в учетную запись GitHub.

Генерация ключа SSH
Откройте bash/терминал . Добавьте следующий текст, подставив свой адрес электронной почты GitHub .
Будет создан ключ ssh , используя e-mail в качестве метки.
Когда вам будет предложено «Введите файл, в котором вы хотите сохранить ключ», нажмите Enter . Это установит в местоположение по умолчанию.
Enter a file in which to save the key (/c/Users/you/.ssh/id_rsa):[Press enter]
Далее введите безопасную фразу-пароль дважды или просто нажмите Enter .
Enter passphrase (empty for no passphrase): [Type a passphrase]
Enter same passphrase again: [Type passphrase again]
Добавление SSH-ключа в ssh-agent
Чтобы запустить ssh-агент введите следующую команду.
На экране отобразится похожая строка.
Agent pid 31724
Добавим свой закрытый ключ SSH в ssh-agent . Если вы создали свой ключ с другим именем (или добавляете существующий ключ с другим именем), замените в команде id_rsa на имя вашего файла закрытого (приватного) ключа.
Ключ будет успешно добавлен в ssh-агент .
Добавление ключа SSH в учетную запись GitHub
Мы сгенерировали у себя на компьютере закрытый ключ SSH и добавили его в ssh-агент . Теперь нам необходимо добавить SSH ключ в учетную запись GitHub.
Сейчас нам необходимо скопировать SSH ключ в буфер обмена.
Способов есть несколько, но я же вам предлагаю следующее решения для Windows 10: введите команду ниже.
Прямо в терминале вы увидите содержимое необходимого файла с ключем. Скопируйте его в буфер.
Теперь зайдите на вашу страницу GitHub » Settings .

Перейдите во вкладку SSH and GPG keys и нажмите на кнопку New SSH key для добавления SSH ключа в вашу учетную запись GitHub.

В поле Title добавьте заголок для данного ключа. Например, если вы захотите настроить SSH доступ на нескольких устройствах, то вы будите понимать какой ключ принадлежит какому устройству.
В поле Key добавьте свой ssh-ключ, который вы скопировали в буфер обмена на предыдущем шаге.
Нажмите Add SSH key .

Для подтверждения вам потребуется ввести свой пароль от учетной записи GitHub .
На этом настройка SSH для вашего устройства завершена, теперь вы можете работать с git без ввода пароля от своей учетной записи.
Если вам понравилась данная статья, можете прочитать как настроить моментальную загрузку сайта на хостинг и синхронизацию файлов.
Надеюсь, вам понравилась данная информация. Если вам интересна тема web-разработки, то можете следить за выходом новых статей в Telegram.
Beanstalk Guides
Table of Contents
Setting up Git can be tricky on Windows compared to Linux or Mac, but if you follow the steps in this guide, you should have no problems using Git on Windows. We’ve done the hard work and chosen between the multiple options at key steps to help make things easier for you. This guide will take you through the steps to install and configure Git and connect it to remote repositories to clone, push, and pull. If you don’t have one already, create a Beanstalk account.
Choosing a Git distribution
There are two competing Git packages for Windows: a Cygwin-based Git and a version called msysGit. We will describe how to install the msysGit package. We recommend installing msysGit because we’ve found it’s easier to work with than the Cygwin based installation.
Installing Git
Once you have downloaded the msysGit executable, double click on it to start the installation wizard. Leave the default directory options. When you get to the “Adjusting your Path environment” setting, select the “Run Git from the Windows Command Prompt” option. Choosing this option will make it easy for you to run Git commands from the Windows Command Prompt (command line) if you choose. Command Prompt is a simple tool, where you can run commands, switch through folders, manage files and it can be ran by selecting Run… in Start menu, and executing cmd command.
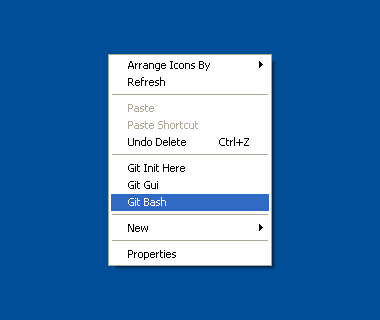
You will notice that for the rest of this article we will use Git Bash for running Git commands. The Git Bash tool works in the same way as the default Windows’ Command Prompt, but has some special features. With Git Bash you’ll be able to use a number of UNIX command line tools along with access to Git, and we recommend it since it’s often simpler to use than the Windows Command Prompt.
You can run it by right clicking your mouse on the desktop, and selecting Git Bash from pop up window.
When you reach the step “Configuring the line ending conversions”, make sure to leave the option “Checkout Windows-style, commit Unix-style line endings” selected. This option makes sure that Git converts LF to CRLF when checking out text files. When committing text files, CRLF will also be converted to LF. This is a compatibility measure to protect newlines in text files, allowing you to easily work with text files on Windows and on Unix-style platforms.
If you use an older version of msysGit, you may encounter a step called “Choosing the SSH executables”. If you encounter that dialog, we recommend that you choose the “Use OpenSSH” option.
After you have successfully installed Git on Windows, you’ll need to provide secure communication with your Git repositories by creating and installing SSH keys.
Installing SSH keys on Windows
To access your Git repositories you will need to create and install SSH keys. You can do this in two ways:
We recommend OpenSSH over PuTTY, and it’s installed with your Git copy. PuTTY is recommended only for advanced users who are already familiar with how Git with SSH keys work.
Using OpenSSH and generating SSH keys with ssh-keygen
To communicate with the remote Git repository in your Beanstalk account from your Windows computer, you will need to generate an SSH key pair for that computer. This process requires only a few steps, but you do first need to install msysGit using the full installer as described above.
Generating a key pair
To do this you need to run Git Bash, which can be found in your Start menu. Run the command:
It will ask for location and pass phrase. Accept the default location (usually C:\Documents and Settings\username\.ssh\ or C:\Users\username\.ssh ) by pressing Enter . After that, make sure to set a strong pass phrase for the key.
Now that the keys are generated, open the file id_rsa.pub (found in the default location from the previous step) with a text editor. The contents of this file is your new public key. If you copy it to your clipboard, you can add it to your Beanstalk profile (under the Profile and Settings → Keys= section).
Checking your connection
Before trying to access your Beanstalk repository, check if the connection to your remote repository works. In order to do that, run Git Bash, and enter this command, replacing accountname with your account name:
In this case, this is the URL to access Git on your Beanstalk account. If you are using another version control hosting service, the URL would be provided by them.
When authenticating or later when trying to connect to Git repository most likely you will encounter a message that looks like this:
You can type yes and press Enter , which will add your account’s hostname accountname.beanstalkapp.com to a known_hosts file. This step won’t need to be repeated later, unless your public key or your account names changes.
If you were authenticated correctly, you will see a message similar to this one:
In case you have installed TortoiseGIT
In our case environment variable looked like this: GIT_SSH=c:\Program Files\Putty\plink.exe . Environment variables can be found here:
- Windows XP: Control Panel → System Properties → Advanced → Environment variables
- Windows 7: Control Panel → System → Advanced system settings → Environment variables
Having problems connecting to your Git repository on Windows 7?
Alternative to OpenSSH — using PuTTY to access your Git repository
Installing Git and using PuTTY to connect to your Git repository can be troublesome, so we recommend that you use the OpenSSH method which we described in the steps above. Using OpenSSH is simple and straightforward, but if OpenSSH is not an option, or for some other reason you prefer to use PuTTY to connect to your repositories, here is a step by step guide on how to do so.
Like OpenSSH, you will generate SSH keys and use them to communicate with your remote Git repositories, only now you will use PuTTY’s tools for generating, storing, and using the keys.
Installing PuTTY
You can download the PuTTY installation package and run it. The latest installation package at the moment of writing this article is putty-0.60-installer.exe which can be found under “A Windows installer for everything except PuTTYtel” heading.
Install PuTTY to the default recommended location, typically c:\Program Files\PuTTY\ . Once installed, navigate to the installation folder where you will find:
You will also find some other files, but for this guide you only need to know about plink, puttygen, pageant and putty.
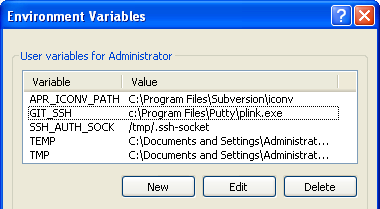
Adding GIT_SSH variable to environment
After you have installed PuTTY package, you’ll need to add a GIT_SSH variable to your environment variables which should point to the plink.exe file (including its entire path). Accepting our defaults from above, this will likely be: GIT_SSH=c:\Program Files\Putty\plink.exe
Environment variables can be found and created/edited here, depending on your version of Windows:
- Windows XP: Control Panel → System Properties → Advanced → Environment variables
- Windows 7: Control Panel → System → Advanced system settings → Environment variables
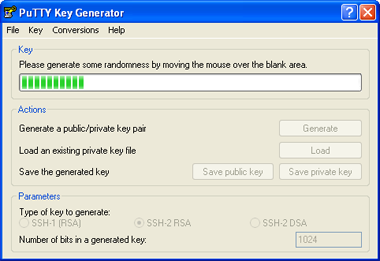
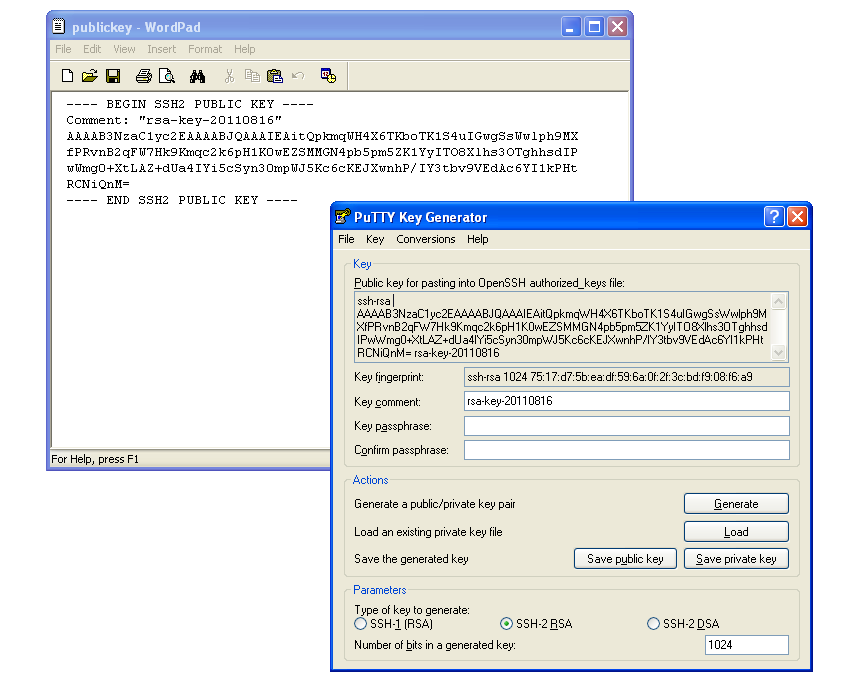
Generating SSH key with puttygen
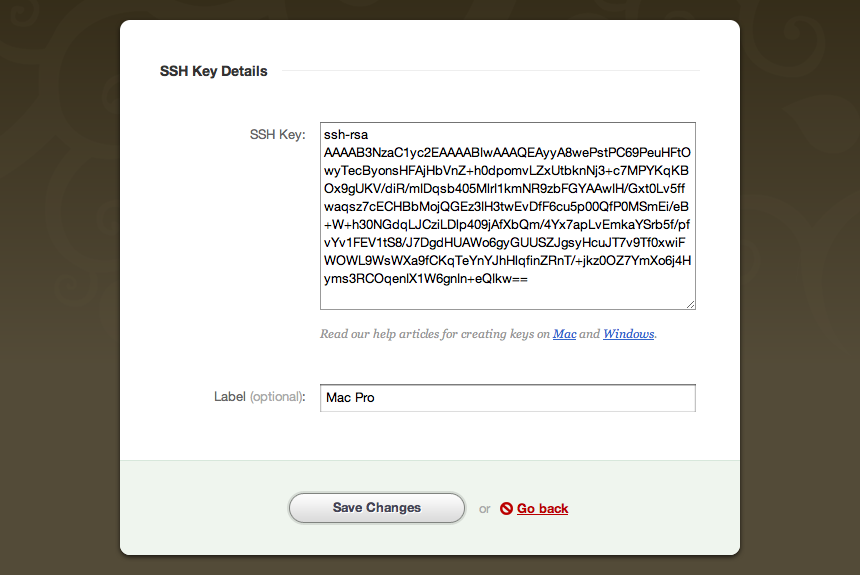
Before leaving puttygen, copy the public key to your clipboard and paste it into your version control hosting account (in Beanstalk, under the Profile and Settings → Keys section).
Please note that when you generate a key with puttygen, the public key that you copy from puttygen and the public key you save to a file for later use are not in the same format. You can see on the picture below that the public key was saved with new lines and without the “ssh-rsa” keyword. In order to copy and paste the public key to Beanstalk, you need to copy it in the same format as it was when it was generated by puttygen. That format should be: “ssh-rsa keycodegenerated”. All you need to do is modify your key in an editor like Notepad, and then add it to Beanstalk.
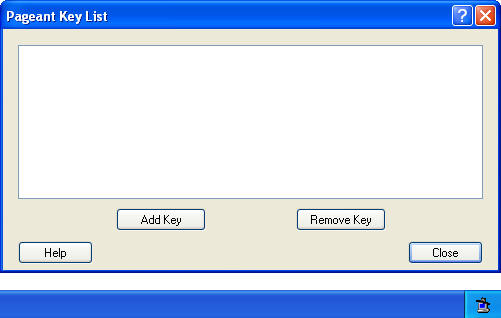
Adding your private key to pageant
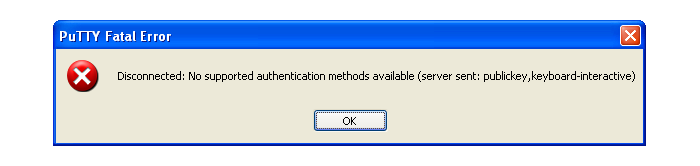
Checking your connection
Once you have finished setting up PuTTY, all you need to do is check if the connection to your remote hosted Git repository works if you installed Git.
If you still haven’t installed Git download the msysGit executable, double click on it and the installation wizard should start. Leave the default directory options. When you get to the “Adjusting your Path environment” setting, select the “Use Git Bash only” option. Choosing this option will help you avoid path conflicts.
After you have installed Git run Git Bash and go to the directory where you have installed PuTTY and try to access your repository by typing this:
If you are not authenticated correctly, a message like the following screenshot will pop up:
If you are authenticated correctly, a new window will pop up with message like this:
Pop up window will close shortly after authentication is finished, which means authentication was successful and you should be able to manage your Git repositories from now on.
Setting up Git profile
In case you are using Beanstalk for version control, it would be best if your first name, last name and email address match to the ones you use in your account to avoid any conflicts.
Summary
In order to be able to use your repository you need to:
Now what?
Now that you have Git properly installed and configured, you can use a client of your choice. Whether you choose a terminal or a GUI, it is a good idea to learn the basic concepts and commands for versioning your files before. Here’s some recommended reading to get you started:
- Git Immersion Tutorial – an excellent step-by-step tutorial to using Git
- Pro Git E-book & Printed Edition
- The Git Parable – understand the concepts behind Git with a simple story by Tom Preston-Werner
 Igor BaloЕЎ is a QA engineer from Novi Sad, Serbia .
Как настроить подключение к удаленному Git репозиторию
Как настроить подключение к удаленному Git-репозиторию, через SSH, на компьютере с Windows 7 . И соответственно выкачать содержимое к себе на локальный сервер.
Удаленный репозиторий находится на сервере с git. мне нужно просто склонировать содержимое. никаких пушей обратно. там есть идентификация. сгенерил паблик кей и отослал спец-ту на той стороне. как мне добавить ранее сгенеренный-свой ключ через консоль и подключиться к серверу? какие команды. Windows 7 на моей машине.

3 ответа 3
Установка
Если ещё не установлен, то Git можно взять здесь. Вместе с ним будет unix-like консоль Git Bash.
Клонирование через SSH
Пример команды для клонирования через SSH.
В общем случае команда для клонирования по SSH выглядит так:
Не перепутайте с HTTPS, который потребует авторизации через логин-пароль:
Создание ssh-ключа.
На Windows можно как через cmd, так и Git Bash, на *nix — просто в консоли. Но в cmd я не разбираюсь, поэтому привожу инструкцию только для Git Bash & *nix:
Можно выбрать passphrase, который повышает надёжность, но его нужно будет вводить каждый раз при использовании. Если забудете — ключ бесполезен для дальнейшего использования.
После выполнения команды публичный ключ появляется соответственно в
Именно публичный ключ нужно передавать специалисту на той стороне. (Наверняка вы так и сделали, но всё-таки стоит об этом сказать)
Если всё сделали правильно, то при попытке соединения по ssh ключ будет использоваться автоматически.
Если ключ уже есть
То его надо положить в c:\Users\%username%\.ssh . Если имя ключа отличается от id_rsa , то надо создать файл c:\Users\%username%\.ssh\config со следующим содержимым:
На практике мне когда-то помогла эта статья — лучший пример из всего что я видел: http://habrahabr.ru/sandbox/37865/
В ней полностью показаны клиентские программы для работы с push-ом и pull-ом. У меня лично Windows недолюбливал родной Git клиент, но всегда прекрасно работает с Tortoise (есть в статье).
В ней есть полное руководство по подключению. Не уверен правильная ли это аналогия, но вы можете поставить себе программу Composer и ей подобные, после чего можно через консоль Windows полностью клонировать себе репозиторий с Git-а.
Если же касается более специфичного подключения именно к Git, то эта страница будет полезной: http://webhamster.ru/site/page/index/articles/comp/171
Добавил, как попросили, кратко содержимое статьи:
Идем на официальную страницу Git http://git-scm.com, кликаем на Download for Windows. В открывшемся окне кликаем на Full installer for official Git. Запускаем полученный exe-шник.
Я рекомендую выбрать «Run Git from the Windows Command Prompt». Все остальные опции можно оставлять по-умолчанию. После установки Git нужно перегрузиться или завершить сеанс пользователя и снова войти, чтобы применились изменения в системной переменной PATH.
Далее нужно проверить, доступен ли Git для работы. В любом каталоге даем команду:
Если получаем информацию о версии, то Git установлен и работает. Если получаем информацию что программа git не найдена, разбираемся что сделали не так.
Настройка SSH-ключей в Windows
В операционной системе Windows генератор SSH-ключей включен в комплект поставки Git. Для генерации ключей необходимо запустить на выполнение файл C:\Program Files\Git\Git bash.vbs. Его можно запустить как обычный exe-шник. Откроется программа «Консоль git». В ней надо дать команду:
Будьте внимательны, в этой консоли подглючивает копи-паст, проще ввести команду вручную. В качестве email указываем свой почтовый ящик. На запрос «Enter file in which to save the key» просто нажимаем Enter. При запросе пароля «Enter passphrase» и «Enter same passphrase again» просто нажимаем Enter. В процессе генерации ключей в консоли будет выдаваться примерно следующая информация:
После выполнения этой программы, в каталоге C:\Documents and Settings\username.ssh будут лежать файлы id_rsa и id_rsa.pub, они нам пригодятся в дальнейшем.
Установка SSH-ключа в GitHub
Нас колько я помню, эта часть ответа несколько изменилась в современном дизайне GitHub-а, но интуитивно можо найти.
Сразу после регистрации необходимо прописать в системе GutHub свой публичный ключ шифрования (открытый SSH-ключ). Для добавления ключа, надо в правом верхнем углу нажать «Account Settings».
В открывшемся окне нужно кликнуть на пункт меню «SSH Public Keys», и нажать «Add Another Public Key». Появится два поля — название ключа (Title) и содержимое ключа (Key).
В поле Title можно написать название компьютера, на котором сгенерирован публичный ключ. Можно писать по-русски.
В поле Key надо вставить содержимое файла id_rsa.pub . Помните, в каком каталоге они находятся? Переходим в этот каталог, открываем любым текстовым редактором файл id_rsa.pub (именно с расширением .pub , не перепутайте). Выделяем весь текст, копируем, и вставляем на странице GitHub в поле Key.
После добавления ключа, компьютер может соединяться с GitHub через программу git, и никаких ошибок не должно возникать.
Работа с репозитарием на GitHub через программу Git
Начиная с этого момента, пляски вокруг web-интерфейса GitHub можно считать законченными. Далее можно работать только используя программу git.
Вначале нужно сделать небольшую настройку программы git: указать локальной системе git имя пользователя и email. Это делается следующими командами, которые можно выполнить, находясь в любом каталоге:
где вместо YourFullName нужно написать свое имя, а вместо myemail@mail.ru — свой email. Эти значения используются для логина на GitHub. Поэтому на месте YourFullName нужно указать ваш логин на GitHub-е, а на месте myemail@mail.ru нужно указать email, который вы вводили при генерации ключей шифрования.
После этих настроек, можно заливать свои файлы в репозитарий. Переходим в каталог со своим проектом, и даем команды:
После этих команд на сервере GitHub образуется копии файлов того каталога, в котором были выполнены данные команды. Далее можно уже делать коммиты, заливки на сервер GitHub изменений, считывания изменений с сервера. Но это уже совсем другая история.


