- 3 простых способа установить Git на Mac
- Что такое Git?
- Как установить Git на Mac
- 1) Установщик Git для macOS
- 2) Установка Git через Homebrew
- 3) Установка Git через GitHub
- GitHub Desktop
- Attribute commits with collaborators easily
- Checkout branches with pull requests and view CI statuses
- Syntax highlighted diffs
- Expanded image diff support
- Extensive editor & shell integrations
- Community supported
- Install Git
- Install Git on Mac OS X
- Git for Mac Installer
- Install Git with Homebrew
- Install Git with MacPorts
- Install the git-credential-osxkeychain helper
- Install Git with Atlassian Sourcetree
- Build Git from source on OS X
- Install Git on Windows
- Git for Windows stand-alone installer
- Install Git with Atlassian Sourcetree
- Install Git on Linux
- Debian / Ubuntu (apt-get)
- Fedora (dnf/yum)
- Build Git from source on Linux
- flumono / Правильная установка Git на Mac OS X
- This comment has been minimized.
- dashaderkach commented Apr 9, 2019
- This comment has been minimized.
- kalmahik commented Oct 26, 2019
- This comment has been minimized.
- SuperEuro2000 commented May 7, 2020
- This comment has been minimized.
- Asayo31 commented Jul 30, 2020
- This comment has been minimized.
- maureryakov commented Oct 30, 2020
- This comment has been minimized.
- Asayo31 commented Oct 30, 2020
- This comment has been minimized.
- maureryakov commented Oct 30, 2020
- This comment has been minimized.
- Asayo31 commented Oct 30, 2020
- This comment has been minimized.
- pavelgera commented Nov 3, 2020
- This comment has been minimized.
- Asayo31 commented Nov 3, 2020
- This comment has been minimized.
- maureryakov commented Nov 4, 2020
- This comment has been minimized.
- mihaluch commented Dec 20, 2020
- This comment has been minimized.
- Asayo31 commented Dec 21, 2020 •
- This comment has been minimized.
- pypyshkin commented Jan 23, 2021
- This comment has been minimized.
- Asayo31 commented Feb 1, 2021
3 простых способа установить Git на Mac
Если вы – начинающий программист с новым Mac, который хочет заняться программированием, то вам нужно установить Git на macOS. Git – это распределённая система управления версиями, которая используется программистами и разработчиками. Вы сможете использовать систему Git для совместной работы с другими специалистами, для поиска ошибок и др.

Ниже расскажем, как установить Git на Mac и начать программировать. Для этого у вас должны быть навыки работы в Терминал.
Что такое Git?
Git – это распределённая система управления версиями с открытым исходным кодом, которой пользуются разработчики и программисты по всему миру. Система позволяет совместно работать с другими специалистами над общими проектами и отслеживать разработку. С её помощью также можно находить ошибки.
Большинство проектов загружают на Github, а система Git на компьютере как раз и позволяет отправить код на Github и многое другое. Есть несколько способов установить Git на macOS. Мы рассмотри три самых простых.
Как установить Git на Mac
Если на вашем Mac установлена программа Xcode, то она автоматом установила и Git. Однако чаще всего устанавливается не последнее версия, так что лучше установить самую новую версию вручную. После установки Git вы можете подтвердить её статус в Терминал с помощью команды «git –version».
1) Установщик Git для macOS
Это самый простой способ установить Git на Mac. Есть установщик Git специально для macOS.
- Через свой любимый браузер скачайте установщик.
- Запустите скачанную программу.
- Следуйте шагам инструкции по установке. Настройте все опции как вам нужно.
- Нажмите кнопку установки, а затем проверьте статус Git.
2) Установка Git через Homebrew
Многие разработчики предпочитают использовать Homebrew. Таким способом можно установить Git на M1 Mac. Однако некоторые файлы и утилиты ещё не были оптимизированы под процессор Apple Silicon.
Установите Homebrew с помощью этой инструкции или инструкции для M1 Mac. Делается это с помощью команды в Terminal.
- Запустите Терминал.
- Введите команду«-brew install git» и нажмите
- После завершения установки проверьте статус Git.
3) Установка Git через GitHub
Этот способ не требует установки Homebrew или Xcode. Вам достаточно скачать программу GitHub Desktop на Mac. Вы сможете подключиться к своей учётной записи Git и комментировать проекты. Скачать программу можно с сайта GitHub Desktop.
После установки проверьте статус с помощью команды: git –version.
Это всё! Теперь вы знаете о самых простых способах установить систему Git на Mac. Мы советуем использовать установщик.
Источник
GitHub Desktop
Focus on what matters instead of fighting with Git. Whether you’re new to Git or a seasoned user, GitHub Desktop simplifies your development workflow.
Download the native macOS build for Apple silicon machines. If you don’t know whether your machine has an Apple or Intel chip, see the Apple docs.
By downloading, you agree to the Open Source Applications Terms.


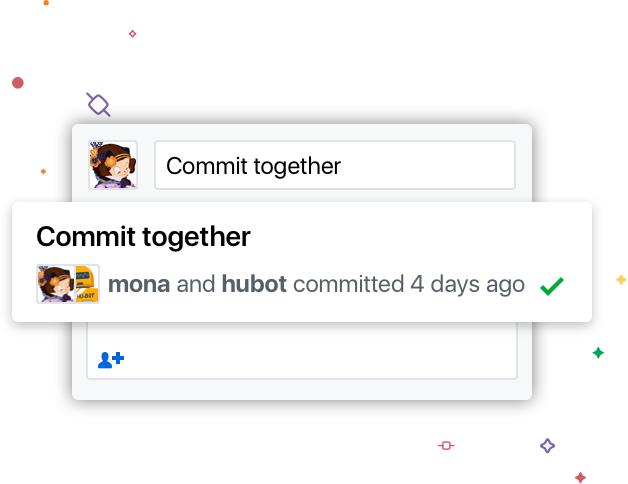
Attribute commits with collaborators easily
Quickly add co-authors to your commit. Great for pairing and excellent for sending a little love/credit to that special someone who helped fix that gnarly bug of yours. See the attribution on the history page, undo an accidental attribution, and see the co-authors on github.com

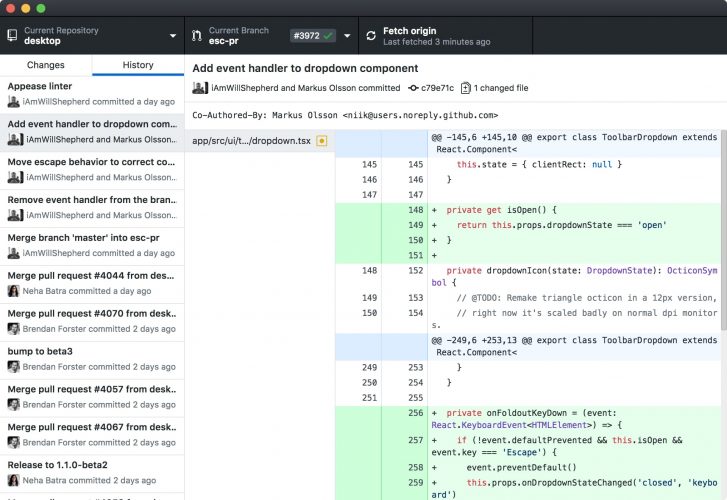
Checkout branches with pull requests and view CI statuses
See all open pull requests for your repositories and check them out as if they were a local branch, even if they’re from upstream branches or forks. See which pull requests pass commit status checks, too!

Syntax highlighted diffs
The new GitHub Desktop supports syntax highlighting when viewing diffs for a variety of different languages.
Expanded image diff support
Easily compare changed images. See the before and after, swipe or fade between the two, or look at just the changed parts.
Extensive editor & shell integrations
Open your favorite editor or shell from the app, or jump back to GitHub Desktop from your shell. GitHub Desktop is your springboard for work.
Community supported
GitHub Desktop is open source now! Check out our roadmap, contribute, and help us make collaboration even easier.
Источник
Install Git
Install Git on Mac OS X
There are several ways to install Git on a Mac. In fact, if you’ve installed XCode (or it’s Command Line Tools), Git may already be installed. To find out, open a terminal and enter git —version .
Apple actually maintain and ship their own fork of Git, but it tends to lag behind mainstream Git by several major versions. You may want to install a newer version of Git using one of the methods below:
Git for Mac Installer
The easiest way to install Git on a Mac is via the stand-alone installer:
Follow the prompts to install Git.
Open a terminal and verify the installation was successful by typing git —version :
Configure your Git username and email using the following commands, replacing Emma’s name with your own. These details will be associated with any commits that you create:
(Optional) To make Git remember your username and password when working with HTTPS repositories, configure the git-credential-osxkeychain helper.
Install Git with Homebrew
If you have installed Homebrew to manage packages on OS X, you can follow these instructions to install Git:
Open your terminal and install Git using Homebrew:
Verify the installation was successful by typing which git —version :
Configure your Git username and email using the following commands, replacing Emma’s name with your own. These details will be associated with any commits that you create:
(Optional) To make Git remember your username and password when working with HTTPS repositories, install the git-credential-osxkeychain helper.
Install Git with MacPorts
If you have installed MacPorts to manage packages on OS X, you can follow these instructions to install Git:
Open your terminal and update MacPorts:
Search for the latest available Git ports and variants:
Install Git with bash completion, the OS X keychain helper, and the docs:
Configure your Git username and email using the following commands, replacing Emma’s name with your own. These details will be associated with any commits that you create:
(Optional) To make Git remember your username and password when working with HTTPS repositories, configure the git-credential-osxkeychain helper.
Install the git-credential-osxkeychain helper
Bitbucket supports pushing and pulling your Git repositories over both SSH and HTTPS. To work with a private repository over HTTPS, you must supply a username and password each time you push or pull. The git-credential-osxkeychain helper allows you to cache your username and password in the OSX keychain, so you don’t have to retype it each time.
If you followed the MacPorts or Homebrew instructions above, the helper should already be installed. Otherwise you’ll need to download and install it. Open a terminal window and check:
If you receive a usage statement, skip to step 4. If the helper is not installed, go to step 2.
Use curl to download git-credential-osxkeychain (or download it via your browser) and move it to /usr/local/bin :
Make the file an executable:
Configure git to use the osxkeychain credential helper.
The next time Git prompts you for a username and password, it will cache them in your keychain for future use.
Install Git with Atlassian Sourcetree
Sourcetree, a free visual Git client for Mac, comes with its own bundled version of Git. You can download Sourcetree here.
To learn how to use Git with Sourcetree (and how to host your Git repositories on Bitbucket) you can follow our comprehensive Git tutorial with Bitbucket and Sourcetree.
Build Git from source on OS X
Building Git can be a little tricky on Mac due to certain libraries moving around between OS X releases. On El Capitan (OS X 10.11), follow these instructions to build Git:
From your terminal install XCode’s Command Line Tools (if you haven’t already):
Using Homebrew, install openssl:
Clone the Git source (or if you don’t yet have a version of Git installed, download and extract it):
To build Git run make with the following flags:
Install Git on Windows
Git for Windows stand-alone installer
When you’ve successfully started the installer, you should see the Git Setup wizard screen. Follow the Next and Finish prompts to complete the installation. The default options are pretty sensible for most users.
Open a Command Prompt (or Git Bash if during installation you elected not to use Git from the Windows Command Prompt).
Run the following commands to configure your Git username and email using the following commands, replacing Emma’s name with your own. These details will be associated with any commits that you create:
Optional: Install the Git credential helper on Windows
Bitbucket supports pushing and pulling over HTTP to your remote Git repositories on Bitbucket. Every time you interact with the remote repository, you must supply a username/password combination. You can store these credentials, instead of supplying the combination every time, with the Git Credential Manager for Windows.
Install Git with Atlassian Sourcetree
Sourcetree, a free visual Git client for Windows, comes with its own bundled version of Git. You can download Sourcetree here.
To learn how to use Git with Sourcetree (and how to host your Git repositories on Bitbucket) you can follow our comprehensive Git tutorial with Bitbucket and Sourcetree.
Install Git on Linux
Debian / Ubuntu (apt-get)
Git packages are available via apt:
From your shell, install Git using apt-get:
Verify the installation was successful by typing git —version :
Configure your Git username and email using the following commands, replacing Emma’s name with your own. These details will be associated with any commits that you create:
Fedora (dnf/yum)
Git packages are available via both yum and dnf:
From your shell, install Git using dnf (or yum, on older versions of Fedora):
Verify the installation was successful by typing git —version :
Configure your Git username and email using the following commands, replacing Emma’s name with your own. These details will be associated with any commits that you create
Build Git from source on Linux
Git requires the several dependencies to build on Linux. These are available via apt:
From your shell, install the necessary dependencies using apt-get:
Clone the Git source (or if you don’t yet have a version of Git installed, download and extract it):
To build Git and install it under /usr , run make :
Git requires the several dependencies to build on Linux. These are available via both yum and dnf:
From your shell, install the necessary build dependencies using dnf (or yum, on older versions of Fedora):
or using yum. For yum, you may need to install the Extra Packages for Enterprise Linux (EPEL) repository first:
Symlink docbook2X to the filename that the Git build expects:
Clone the Git source (or if you don’t yet have a version of Git installed, download and extract it):
To build Git and install it under /usr , run make :
Источник
flumono / Правильная установка Git на Mac OS X
| Дайте команду в терминале |
| $ git —version |
| И если вы увидите что то вроде этого |
| git version 1.9.3 (Apple Git-50) |
| то это статья для вас. Если вы видите версию 2.3.1 (на момент написания статьи) последняя была такая, то тогда у вас все хорошо. |
| И так сперва устанавливаем Homebrew, если он у вас еще не стоит. |
| Просто скопируйте и вставьте эту строку в терминал и запустите ее. |
| ruby -e «$(curl -fsSL https://raw.githubusercontent.com/Homebrew/install/master/install)» |
| После того как Homebrew установиться дайте в терминале команду |
| brew install git |
| После того как Git установится дайте команду |
| export PATH=/usr/local/bin:$PATH |
| чтобы прописать путь к новой установке Git. |
| И далее смотрим версию Git |
| $ git —verrsion |
| Должны увидеть что то типа этого |
| Git_Mac_OS_X |
| git version 2.3.1 |
| Все! Далее чтобы обновлять Git достаточно дать команду |
| brew upgrade git |
| Просто не правда ли!? |
| Пример обновления Git в Mac OS X 10.10.2 через Homebrew |
| brewGitUpgrade |
| Вот и получили самую свежую версию Git на Mac OS X |
This comment has been minimized.
Copy link Quote reply
dashaderkach commented Apr 9, 2019
This comment has been minimized.
Copy link Quote reply
kalmahik commented Oct 26, 2019
git —verrsion — тут очепятка)
This comment has been minimized.
Copy link Quote reply
SuperEuro2000 commented May 7, 2020
brew upgrade git
Error: git not installed
выходит такая ошибка
This comment has been minimized.
Copy link Quote reply
Asayo31 commented Jul 30, 2020
попробуйте команду $ git —version сразу запустить (у меня началась установка) или как вариант $xcode-select—install команда также активирует установку
This comment has been minimized.
Copy link Quote reply
maureryakov commented Oct 30, 2020
command not found
This comment has been minimized.
Copy link Quote reply
Asayo31 commented Oct 30, 2020
А версия мак ос какая? Если например стоит бета биг сюр то работать не будет
This comment has been minimized.
Copy link Quote reply
maureryakov commented Oct 30, 2020
А версия мак ос какая? Если например стоит бета биг сюр то работать не будет
This comment has been minimized.
Copy link Quote reply
Asayo31 commented Oct 30, 2020
А версия мак ос какая? Если например стоит бета биг сюр то работать не будет
Тогда должно работать, а в терминале сверху bash или zsh?
This comment has been minimized.
Copy link Quote reply
pavelgera commented Nov 3, 2020
This comment has been minimized.
Copy link Quote reply
Asayo31 commented Nov 3, 2020
У меня честно говоря не получилось bash для git завести перешла на zsh.
Если оболочка терминала для вас не принципиальна попробуйте с помощью
chsh -s /bin/zsh
Перейти в оболочку zsh, а после уже команду $ git —version которая должна сразу запустить установку или как вариант $xcode-select—install команда также активирует установку
This comment has been minimized.
Copy link Quote reply
maureryakov commented Nov 4, 2020
У меня честно говоря не получилось bash для git завести перешла на zsh.
Если оболочка терминала для вас не принципиальна попробуйте с помощью
chsh -s /bin/zsh
Перейти в оболочку zsh, а после уже команду $ git —version которая должна сразу запустить установку или как вариант $xcode-select—install команда также активирует установку
Все получилось ребят. Спасибо .
This comment has been minimized.
Copy link Quote reply
mihaluch commented Dec 20, 2020
я все так и делаю, но пишет что не может обновить с сервера ПО. каталина
This comment has been minimized.
Copy link Quote reply
Asayo31 commented Dec 21, 2020 •
я все так и делаю, но пишет что не может обновить с сервера ПО. каталина
Скорее всего тут вам нужно смотреть почему каталина не подтягивает инфу с сервера — мб обновиться до бигсюр, его сейчас официально выкатили и все работает.
Возможно также что ранее ставили отдельный патч с гитом hewbrew или что-то такое, он может в последствии фейлить стандартную установку
This comment has been minimized.
Copy link Quote reply
pypyshkin commented Jan 23, 2021
Приветствую, не случалось ли сталкиваться с таким предупреждением: warning: unable to access ‘/Users/Username/.config/git/attributes’: Permission denied
Не подскажете как это исправить? Не получается синхронизировать локальную папку с сервером (если я правильно вообще диагностирую). Перелопатил кучу ссылок, но понимание так и не пришло откуда ноги растут. Заранее спасибо
This comment has been minimized.
Copy link Quote reply
Asayo31 commented Feb 1, 2021
Приветствую, не случалось ли сталкиваться с таким предупреждением: warning: unable to access ‘/Users/Username/.config/git/attributes’: Permission denied
Не подскажете как это исправить? Не получается синхронизировать локальную папку с сервером (если я правильно вообще диагностирую). Перелопатил кучу ссылок, но понимание так и не пришло откуда ноги растут. Заранее спасибо
Добрый день, вероятно у вас проблема состоит в том, что по умолчанию папка
/.config/ создалась с root доступа, и теперь обычному юзеру недоступна. Можно попробовать сменить папку на папку пользователя. (Лично не сталкивалась поэтому не знаю где искать)
Также на просторах предлагают следующее — «The -R option with chown is to modify the permissions recursively. This will help if you have subfolders under
/.config»
Заменить права и таким образом разлочить папку. Попробуйте
You can’t perform that action at this time.
You signed in with another tab or window. Reload to refresh your session. You signed out in another tab or window. Reload to refresh your session.
Источник


