- 4 Лучших GIT-клиента для Mac OS X
- OS X Tips & Tricks
- Getting Started
- Installation
- Installation (Linux) (2.5x only)
- Installation (macOS) (2.5x only)
- Troubleshooting Mac Installation
- Settings
- Start Page
- Clone repository
- Clone SVN repository
- Clone Github repository
- Create new repository
- Git extensions mac os
- About
4 Лучших GIT-клиента для Mac OS X

На данный момент существует много GIT клиентов под разные платформы, буть то Mac, Linux или Windows. Справедливости ради многие могут сказать, а зачем вообще нужны GIT клиенты если есть Терминал? Хороший вопрос, но тут дело вкуса и привычки, каждому свое.
Спешу поделится с вами самыми лучшими GIT приложениями под Mac, по моему мнению.
1 GitHub Desktop — от создателей GitHub’a. Они попытались сделать его максимально простым, но в то же время функциональным и понятным пользователю. Наследует Git Flow, позволяет в 2 клика сделать Pull request, что очень удобно если вы активный участник open source комьюнити. А так же удобный и приятный интерфейс не может не радовать.
Цена: бесплатно
Ссылка: скачать

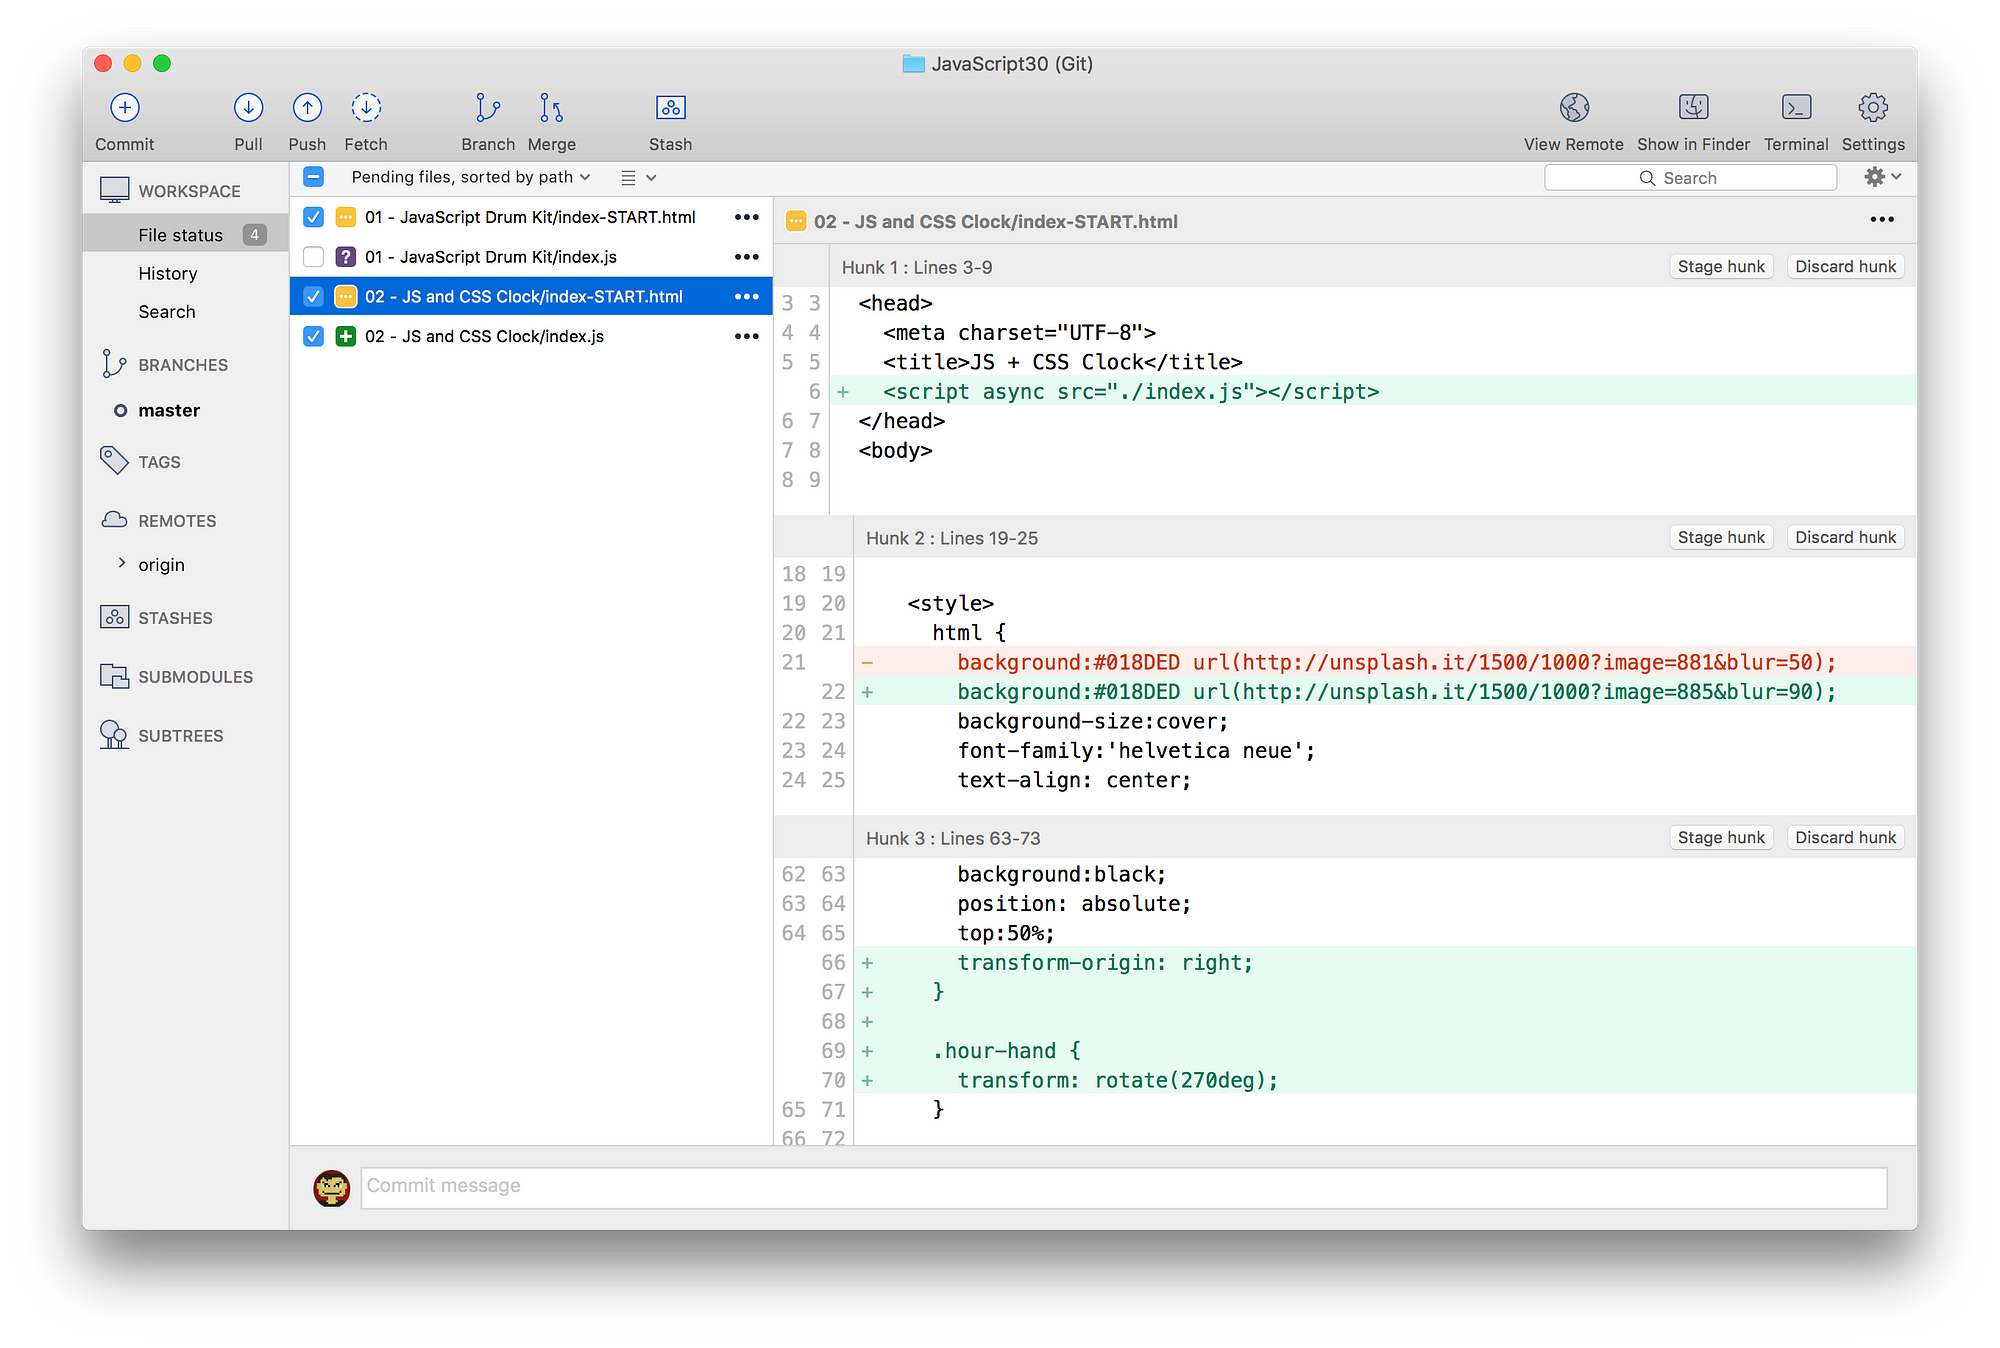
2 Tower — лучший Git клиент под Mac. Приятный интерфейс, интеграция с многими популярными сервисами. Позволяет не выходя с приложения создать, склонировать уже существующий репозиторий. И многое другое. Рекомендую.
Цена: 69.00$ / 30-дней триал
Ссылка: скачать
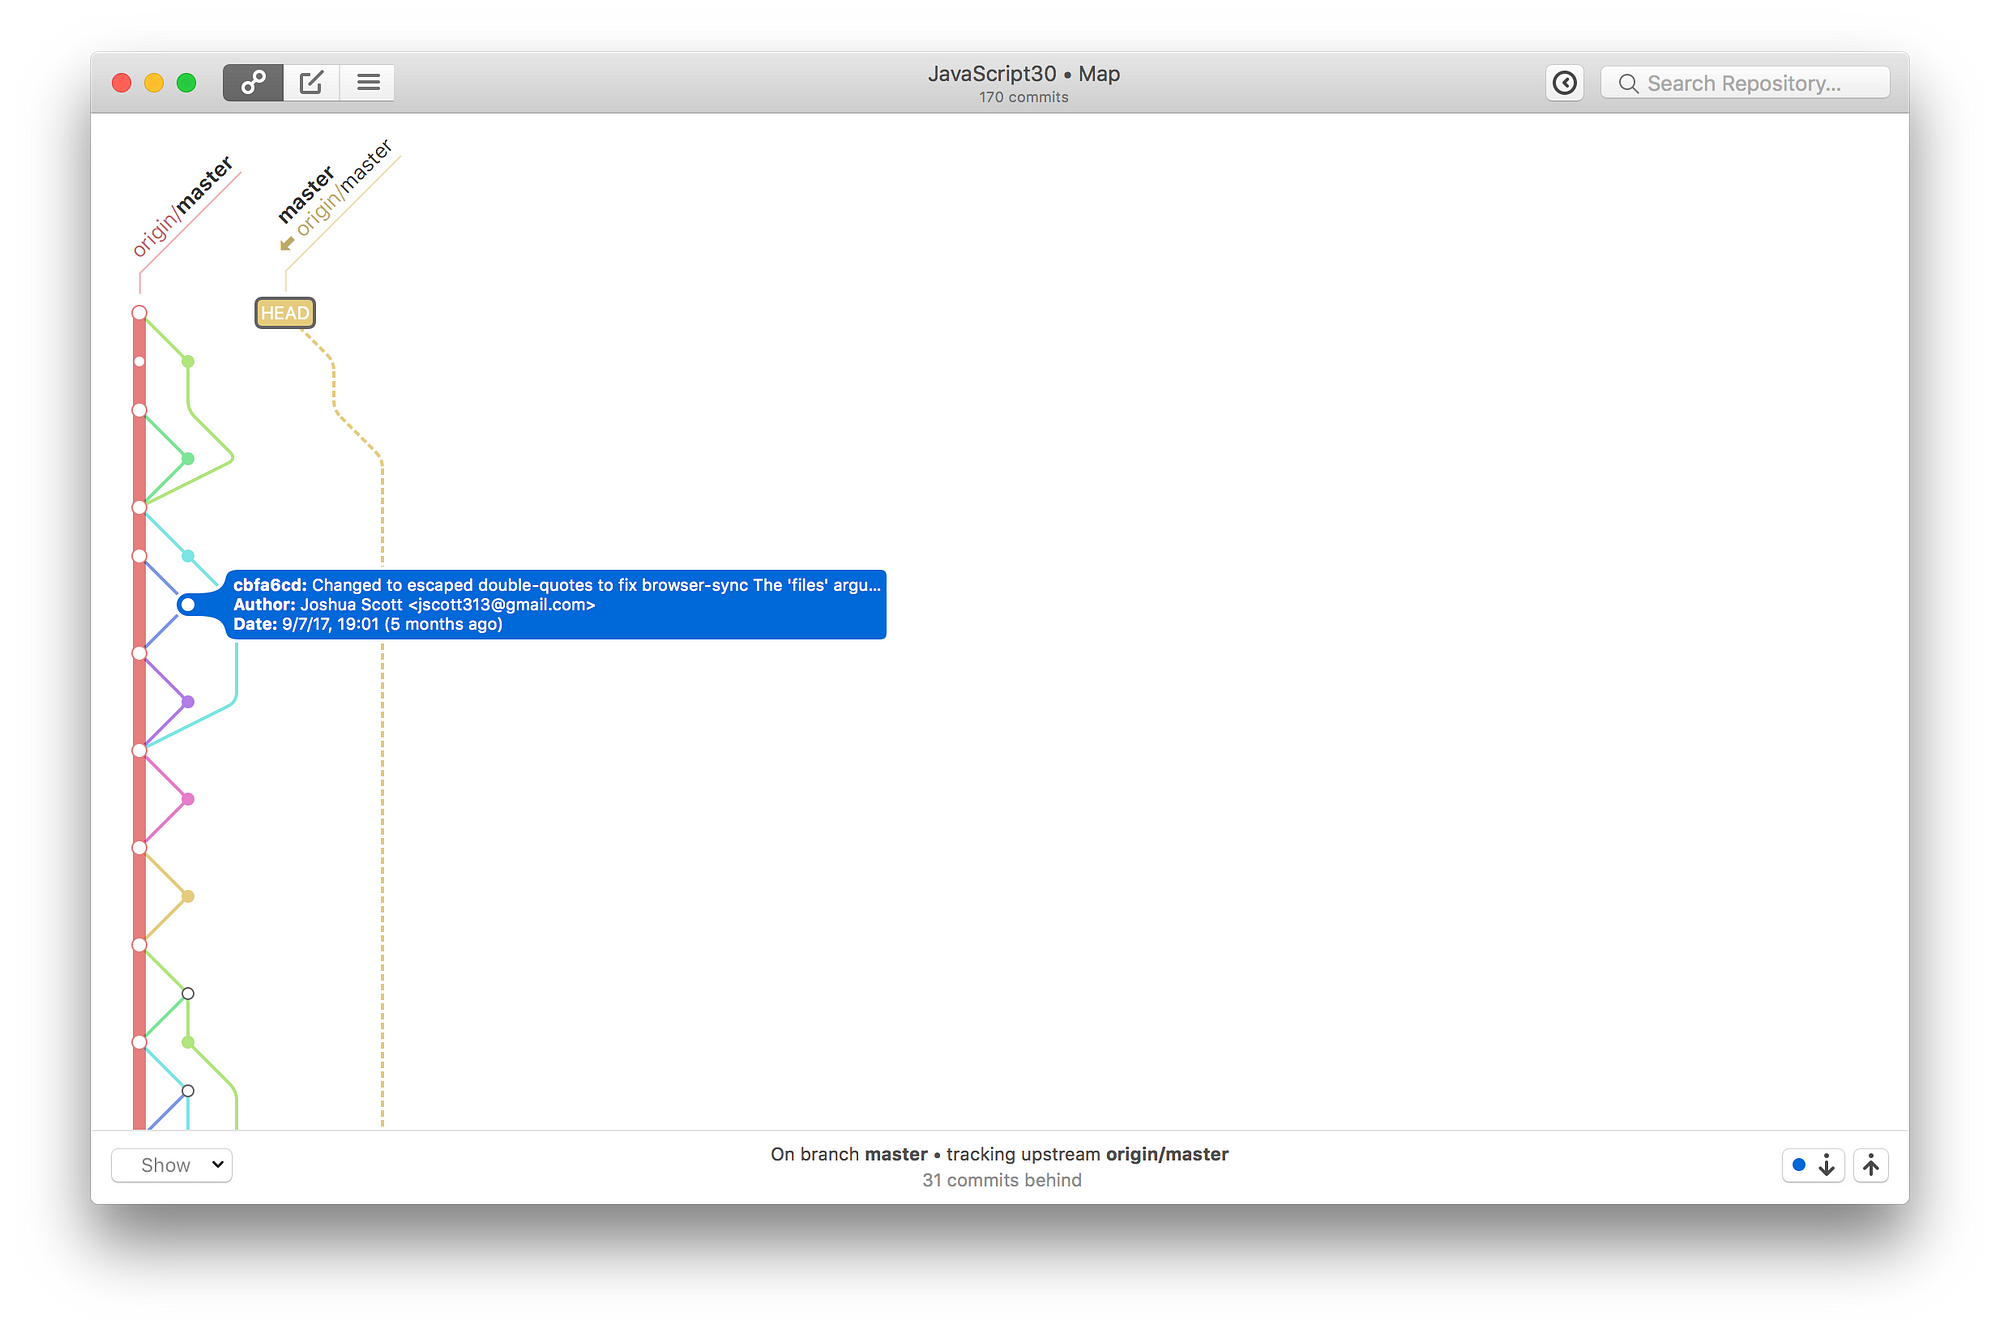
3 GitUp — многообещающий проект, который не так давно появился. Полностью open source , что само собой хорошо. Из ключевых особенностей:
- отменить/повторить последнее действие (так же просто как нажать ctrl+z);
- снэпшоты — дает вернуться в любую точку сделанного вами изменения;
- быстрое изменение commit-message. Подробнее о всех возможностях можно прочитать на сайте.
Цена: б есплатно / open source
Ссылка:скачать
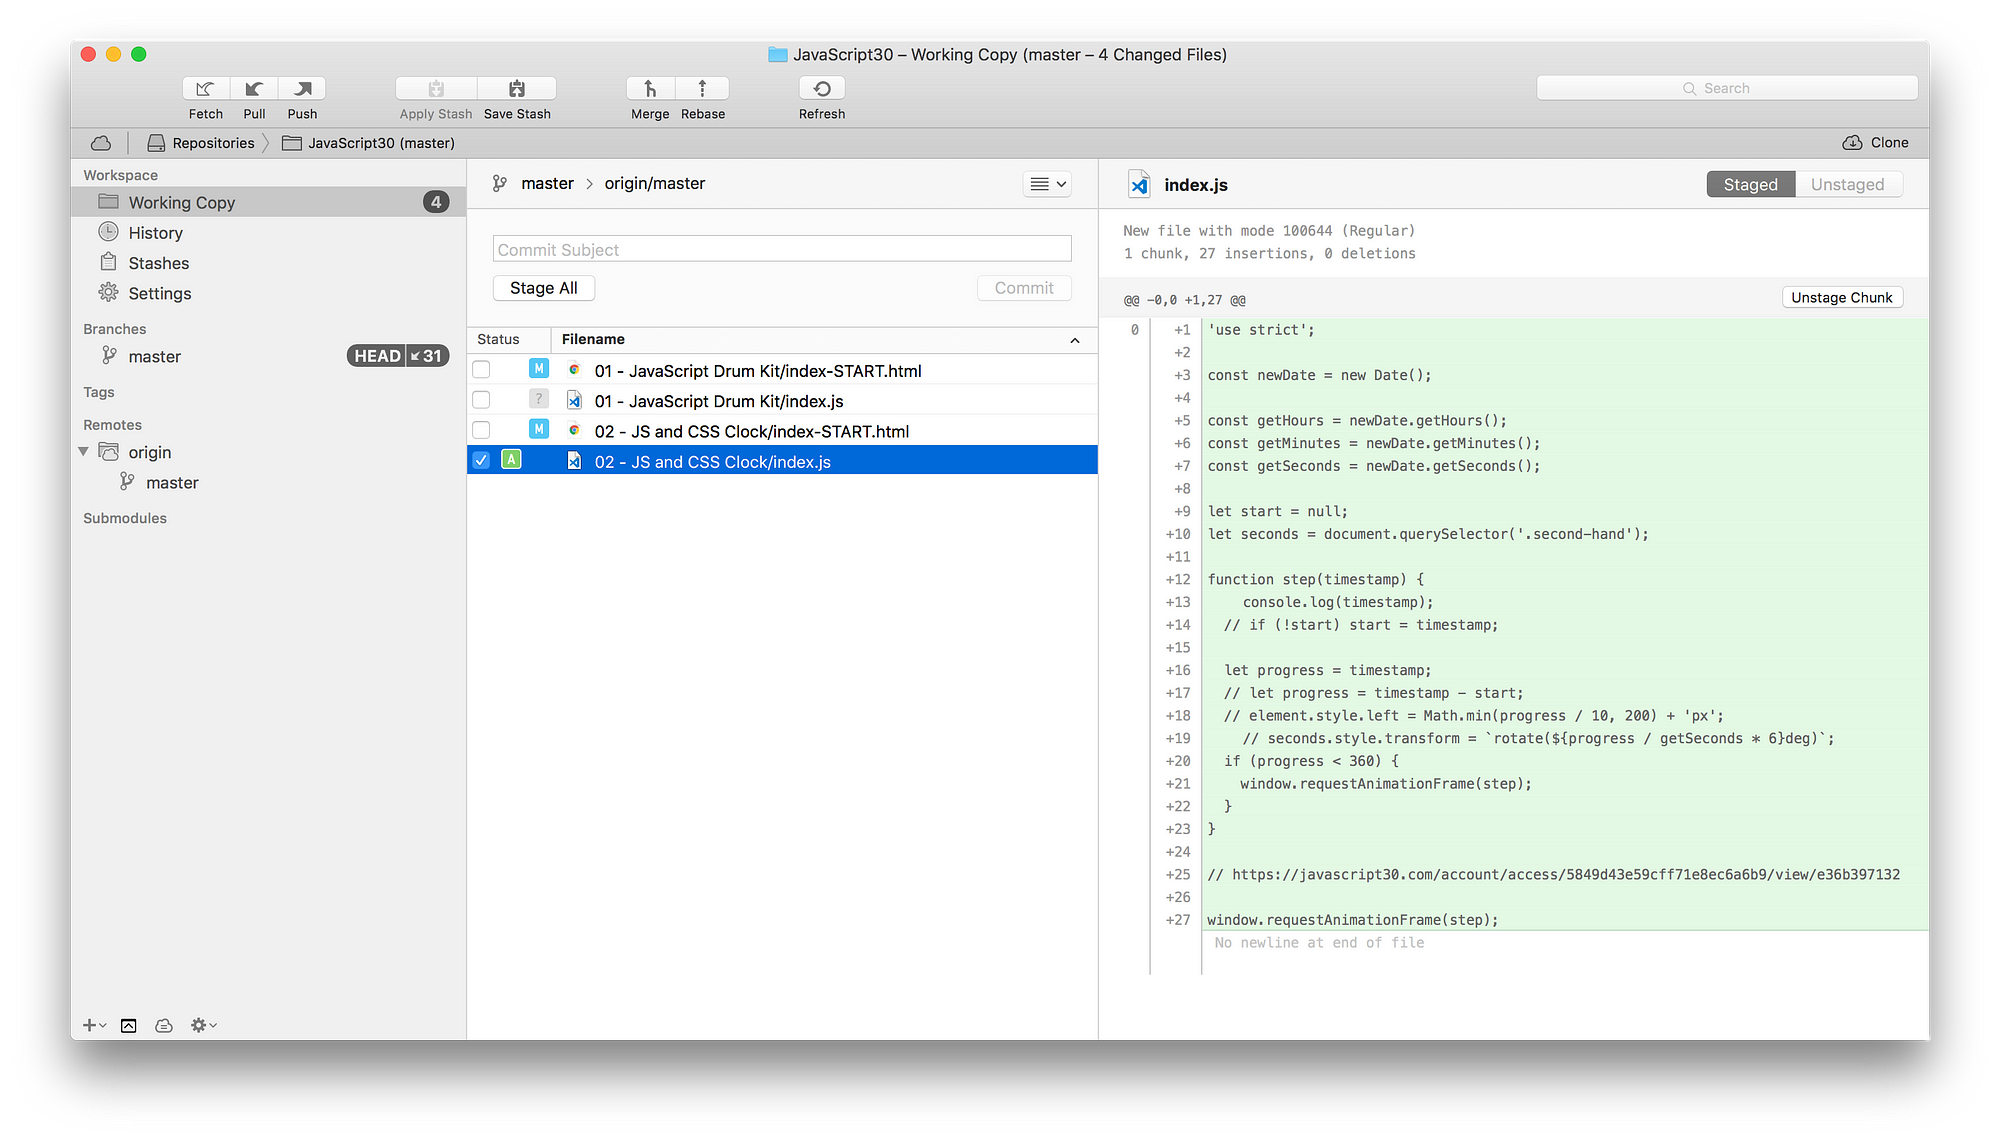
4 Sourcetree — отличный бесплатный клиент, от компании Атласиан. Очень похож на Tower, о котором я писал выше. Имеет ряд достоинств, среди которых приятный внешний вид и большой набор фич, как для новичка, так и для продвинутых пользователей. Из ключевых особенностей:
- поддержка git-flow из коробки — это модель ведения git проекта, которая несет в себе определенные правила к созданию бранчей. Очень удобно при работе в команде ;
- интерактивный ребейз — предоставляет инструмент, который визуально помогает решить проблемы, что возникают при ребейзе;
- Подробнее о всех возможностях можно прочитать на сайте.
Цена: б есплатно
Ссылка:скачать
Подписывайтесь на меня в Twitter и Instagram.
Если понравилось, жми “Рекомендую”, это поможет мне поделиться полезным с другими.
OS X Tips & Tricks
Кастомизация, трюки, приложения и много другое
Источник
Getting Started
Installation
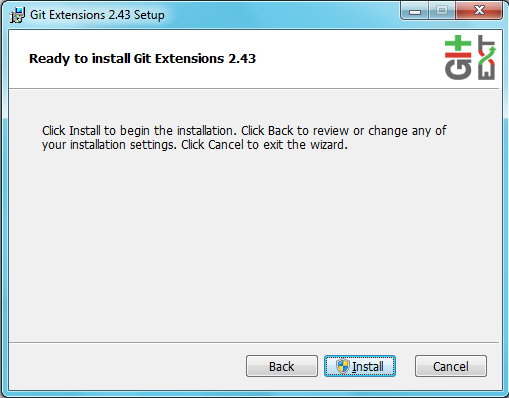
The single click Git Extensions installer can be found here.

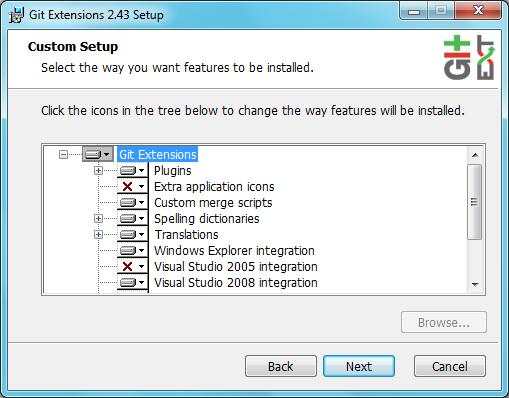
Choose the options to install.
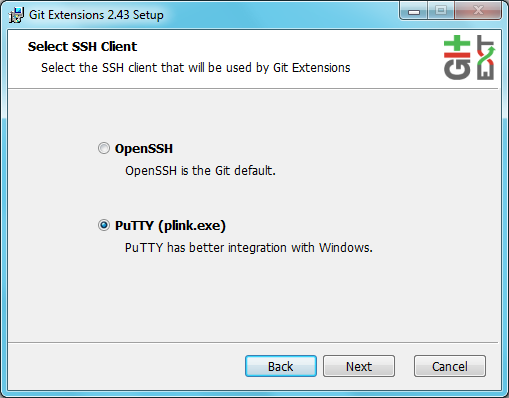
Choose the SSH client to use. PuTTY is the default because it has better Windows integration.
Installation (Linux) (2.5x only)
You can watch this video as a starting point: Install Git Extensions on Ubuntu 11.04
This section only covers mono installation, you should have git installed in your Linux at this point. Please refer to https://git-scm.com/download/linux
First, make sure you have the latest mono version on your Linux. This section will cover installation of Mono 4.6 on a Linux.
Install mono latest version. You can always check for this here: http://www.mono-project.com/download/#download-lin
If everything went okay, you should open your terminal and check mono version:
Now download Git Extensions latest version from https://github.com/gitextensions/gitextensions/releases/latest. Remember to select the appropriate package otherwise you could have problems.
Browse into the folder where you extracted the package and just run mono command, like the example below:
Installation (macOS) (2.5x only)
This section only covers mono installation, you should have git installed in your Mac at this point. Please refer to https://git-scm.com/download/mac
First, make sure you have the latest 32-bit mono version on your Mac. This section will cover installation of Mono 4.6 on a Mac.
Download mono latest version. You can always check for this here: http://www.mono-project.com/download/#download-mac
After you have completed the download, you will see a .dmg file. Double click it to open the package.
Inside the .dmg file you will have MonoFramework-
Follow the wizard until it’s completion.
If everything went okay, you should open your terminal and check mono version:
Now download Git Extensions latest version from https://github.com/gitextensions/gitextensions/releases/latest. Remember to select the appropriate package otherwise you could have problems.
Browse into the folder where you extracted the package and just run mono command, like the example below:
This is the minimal setup you need in order to run Git Extensions.
Troubleshooting Mac Installation
- If your Git Extensions crashes with an exception that a font is missing (generic sans serif), you probably can fix this by installing Xquartz. This is a version of the X.Org X Windows System that runs on OS X. I am not sure what the side effects are. This can be installed from here: http://xquartz.macosforge.org/landing/
- If Git Extensions still crashes because it is unable to load a plugin, empty the plugins folder.
Settings
All settings will be verified when Git Extensions is started for the first time. If Git Extensions requires any settings to be changed, the Settings dialog will be shown. All incorrect settings will be marked in red. You can ask Git Extensions to try to fix the setting for you by clicking on it. When installing Git Extensions for the first time (and you do not have Git already installed on your system), you will normally be required to configure your username and email address.
The settings dialog can be invoked at any time by selecting Settings from the Tools menu option.
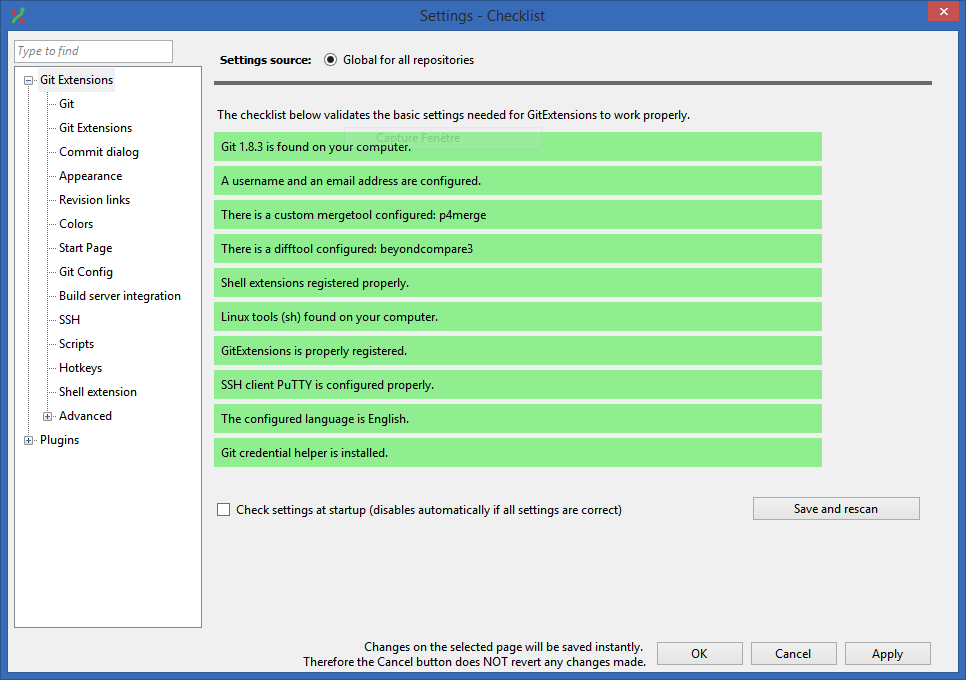
For further information see Settings .
Start Page
The start page contains the most common tasks, recently opened repositories and favourites. The left side of the start page (Common Actions and Recent Repositories) is static. The right side of the page is where favourite repositories can be added, grouped under Category headings.
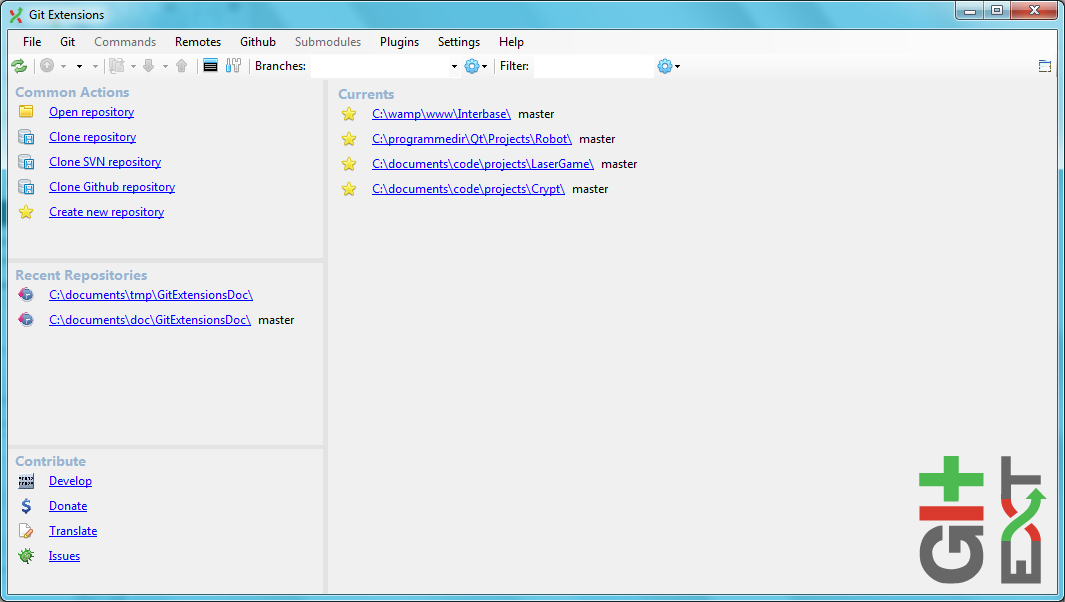
Recent Repositories can be moved to favourites using the repository context menu. Choose Move to category / New category to create a new category and add the repository to it, or you can add the repository to an existing category (e.g. ‘Currents’ as shown below).
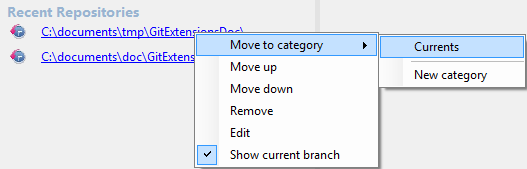
A context menu is available for both the category and the repositories listed underneath it.
Entries on Category context menu
| Move Up | Move the category (and any repositories under it) higher on the page. |
| Move Down | Move the category (and any repositories under it) lower on the page. |
| Remove | Remove the category (and any repositories under it) from the page. Note: Git repositories are not physically removed either locally or remotely. |
| Edit | Shows the Start Page settings window where both category and repository details can be modified. |
Entries on repository context menu
| Move to category | Move the repository to a new or existing category. |
| Move up | Move the repository higher (within the category). |
| Move down | Move the repository lower (within the category). |
| Remove | Remove the repository from the category. Note: the repository is not physically removed either locally or remotely. |
| Edit | Shows the Start Page settings window where both category and repository details can be modified. |
| Show current branch | Toggles the display of the branch name next to the repository name. This identifies the currently checked out branch for the repository. |
To open an existing repository, simply click the link to the repository under Recent Repositories or within the Categories that you have set up, or select Open repository (from where you can select a repository to open from your local file system).
To create a new repository, one of the following options under Common Actions can be selected.
Clone repository
You can clone an existing repository using this option. It displays the following dialog.
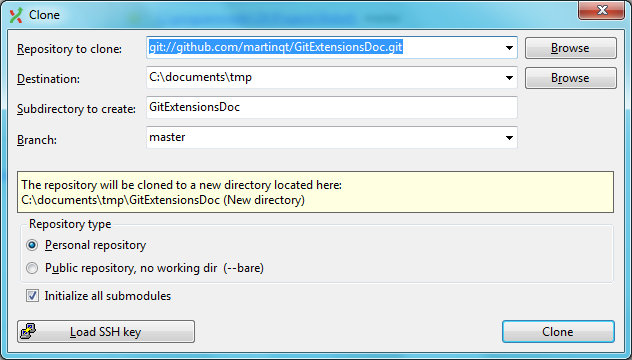
The repository you want to clone could be on a network share or could be a repository that is accessed through an internet or intranet connection. Depending on the protocol (http or ssh) you might need to load a SSH key into PuTTY. You also need to specify where the cloned repository will be created and the initial branch that is checked out. If the cloned repository contains submodules, then these can be initialised using their default settings if required.
There are two different types of repositories you can create when making a clone. A personal repository contains the complete history and also contains a working copy of the source tree. A central repository is used as a public repository where developers push the changes they want to share with others to. A central repository contains the complete history but does not have a working directory like personal repositories.
Clone SVN repository
You can clone an existing SVN repository using this option, which creates a Git repository from the SVN repository you specify. For further information refer to the Pro Git book.
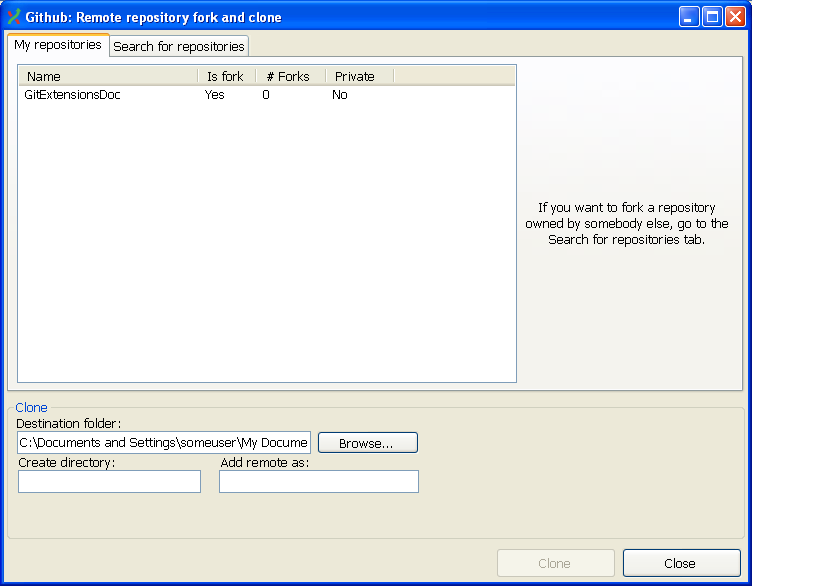
Clone Github repository
This option allows you to
- Fork a repository on GitHub so it is created in your personal space on GitHub.
- Clone any repositories on your personal space on GitHub so that it becomes a local repository on your machine.
You can see your own personal repositories on GitHub, and also search for repositories using the Search for repositories tab.
Create new repository
When you do not want to work on an existing project, you can create your own repository using this option.
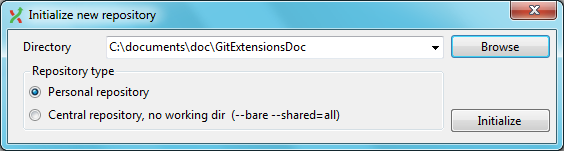
Select a directory where the repository is to be created. You can choose to create a Personal repository or a Central repository.
A personal repository looks the same as a normal working directory but has a directory named .git at the root level containing the version history. This is the most common repository.
Central repositories only contain the version history. Because a central repository has no working directory you cannot checkout a revision in a central repository. It is also impossible to merge or pull changes in a central repository. This repository type can be used as a public repository where developers can push changes to or pull changes from.
Источник
Git extensions mac os

Git Extensions is a standalone UI tool for managing git repositories. It also integrates with Windows Explorer and Microsoft Visual Studio (2015/2017/2019).
Have a question? Come and talk to us:  or send us a tweet
![]()
![]()
| Windows only | |
|---|---|
| Runtime environment | MS Windows 7SP1+ // MS .NET 5.0 |
| Development | MS VS 2019 (v16.9+), C# 9 // VC++ (inc. ATL for x86/x64 for installer) |
| Current dev status |  |
| Translations |
| Windows only | |
|---|---|
| Runtime environment | MS Windows 7SP1+ // MS .NET Framework 4.6.1+ |
| Development | MS VS 2019 (v16.8+), C# 9 // VC++ (inc. ATL for x86/x64 for installer) |
| Current dev status | |
For more details please refer to versions comparison.
| Windows | Linux/Mac | |
|---|---|---|
| Runtime environment | MS Windows 7SP1+ MS .NET Framework 4.6.1+ | Linux / Mac (possible) Mono 5.0+ (Recommended 5.14.0 or later) |
| Development | MS VS 2015/2017, C#6 | MonoDevelop / JetBrains Rider / MS VS for Mac |
| Current dev status | | |
| Translations | ||


Download it now or install it with Chocolatey or AppGet.
If you want to update a portable version, you should delete all the files and the subfolders from the existing folder except:
- GitExtensions.settings
- WindowPositions.xml
- User defined themes in folder Themes
| v3.5.3 | [ Download ]  |
| Current dev stream NB: expect 🦄 🦄 🐉 🐉 and 🐛 🐛 | [ Download ] |
| Visual Studio VSIX (2015/2017/2019) | [ Download ] or install from Visual Studio via Extensions |
| Visual Studio addin (2010/2012/2013) | Included with installer for the 2.x branch. Download and run setup.exe
|
| Visual Studio Code VSIX Kudos to @pmiossec | [ Download ] or install via VSCode NB: Please direct all discussions about the VSIX to its own repo. |
| IntelliJ platform IDEs Kudos to @DmitryZhelnin | [ Download ] or install via IDE Plugins settings NB: Please direct all discussions about this plugin to its own repo. |
| Git Extensions for VS Code Kudos to @Carl-Hugo |


