- Generating a new SSH key and adding it to the ssh-agent
- In this article
- Generating a new SSH key
- Adding your SSH key to the ssh-agent
- Git SSH Windows — пошаговое руководство
- Генерация ключа SSH
- Добавление SSH-ключа в ssh-agent
- Добавление ключа SSH в учетную запись GitHub
- 4.3 Git on the Server — Generating Your SSH Public Key
- Generating Your SSH Public Key
- How to generate SSH keys for Git authorization
- Windows
- Linux (Ubuntu)
- Additional info
- Conclusion
- How to generate ssh keys (for github)
- 3 Answers 3
Generating a new SSH key and adding it to the ssh-agent
After you’ve checked for existing SSH keys, you can generate a new SSH key to use for authentication, then add it to the ssh-agent.
In this article
If you don’t already have an SSH key, you must generate a new SSH key. If you’re unsure whether you already have an SSH key, check for existing keys.
If you don’t want to reenter your passphrase every time you use your SSH key, you can add your key to the SSH agent, which manages your SSH keys and remembers your passphrase.
Generating a new SSH key
Open Terminal Terminal Git Bash .
Paste the text below, substituting in your GitHub email address.
Note: If you are using a legacy system that doesn’t support the Ed25519 algorithm, use:
When you’re prompted to «Enter a file in which to save the key,» press Enter. This accepts the default file location.
At the prompt, type a secure passphrase. For more information, see «Working with SSH key passphrases».
Adding your SSH key to the ssh-agent
Before adding a new SSH key to the ssh-agent to manage your keys, you should have checked for existing SSH keys and generated a new SSH key. When adding your SSH key to the agent, use the default macOS ssh-add command, and not an application installed by macports, homebrew, or some other external source.
Start the ssh-agent in the background.
If you’re using macOS Sierra 10.12.2 or later, you will need to modify your
/.ssh/config file to automatically load keys into the ssh-agent and store passphrases in your keychain.
First, check to see if your
/.ssh/config file exists in the default location.
If the file doesn’t exist, create the file.
/.ssh/config file, then modify the file, replacing
/.ssh/id_ed25519 if you are not using the default location and name for your id_ed25519 key.
Note: If you chose not to add a passphrase to your key, you should omit the UseKeychain line.
Add your SSH private key to the ssh-agent and store your passphrase in the keychain. If you created your key with a different name, or if you are adding an existing key that has a different name, replace id_ed25519 in the command with the name of your private key file.
Note: The -K option is Apple’s standard version of ssh-add , which stores the passphrase in your keychain for you when you add an ssh key to the ssh-agent. If you chose not to add a passphrase to your key, run the command without the -K option.
If you don’t have Apple’s standard version installed, you may receive an error. For more information on resolving this error, see «Error: ssh-add: illegal option — K.»
If you have GitHub Desktop installed, you can use it to clone repositories and not deal with SSH keys.
Ensure the ssh-agent is running. You can use the «Auto-launching the ssh-agent» instructions in «Working with SSH key passphrases», or start it manually:
Add your SSH private key to the ssh-agent. If you created your key with a different name, or if you are adding an existing key that has a different name, replace id_ed25519 in the command with the name of your private key file.
Start the ssh-agent in the background.
Add your SSH private key to the ssh-agent. If you created your key with a different name, or if you are adding an existing key that has a different name, replace id_ed25519 in the command with the name of your private key file.
Git SSH Windows — пошаговое руководство
Настроим пошагово Git SSH для Windows 10. Это позволит вам выполнять команды git без ввода пароля от своей учетной записи GitHub.
- Генерация ключа SSH.
- Добавление SSH-ключа в ssh-agent.
- Добавление ключа SSH в учетную запись GitHub.

Генерация ключа SSH
Откройте bash/терминал . Добавьте следующий текст, подставив свой адрес электронной почты GitHub .
Будет создан ключ ssh , используя e-mail в качестве метки.
Когда вам будет предложено «Введите файл, в котором вы хотите сохранить ключ», нажмите Enter . Это установит в местоположение по умолчанию.
Enter a file in which to save the key (/c/Users/you/.ssh/id_rsa):[Press enter]
Далее введите безопасную фразу-пароль дважды или просто нажмите Enter .
Enter passphrase (empty for no passphrase): [Type a passphrase]
Enter same passphrase again: [Type passphrase again]
Добавление SSH-ключа в ssh-agent
Чтобы запустить ssh-агент введите следующую команду.
На экране отобразится похожая строка.
Agent pid 31724
Добавим свой закрытый ключ SSH в ssh-agent . Если вы создали свой ключ с другим именем (или добавляете существующий ключ с другим именем), замените в команде id_rsa на имя вашего файла закрытого (приватного) ключа.
Ключ будет успешно добавлен в ssh-агент .
Добавление ключа SSH в учетную запись GitHub
Мы сгенерировали у себя на компьютере закрытый ключ SSH и добавили его в ssh-агент . Теперь нам необходимо добавить SSH ключ в учетную запись GitHub.
Сейчас нам необходимо скопировать SSH ключ в буфер обмена.
Способов есть несколько, но я же вам предлагаю следующее решения для Windows 10: введите команду ниже.
Прямо в терминале вы увидите содержимое необходимого файла с ключем. Скопируйте его в буфер.
Теперь зайдите на вашу страницу GitHub » Settings .

Перейдите во вкладку SSH and GPG keys и нажмите на кнопку New SSH key для добавления SSH ключа в вашу учетную запись GitHub.

В поле Title добавьте заголок для данного ключа. Например, если вы захотите настроить SSH доступ на нескольких устройствах, то вы будите понимать какой ключ принадлежит какому устройству.
В поле Key добавьте свой ssh-ключ, который вы скопировали в буфер обмена на предыдущем шаге.
Нажмите Add SSH key .

Для подтверждения вам потребуется ввести свой пароль от учетной записи GitHub .
На этом настройка SSH для вашего устройства завершена, теперь вы можете работать с git без ввода пароля от своей учетной записи.
Если вам понравилась данная статья, можете прочитать как настроить моментальную загрузку сайта на хостинг и синхронизацию файлов.
Надеюсь, вам понравилась данная информация. Если вам интересна тема web-разработки, то можете следить за выходом новых статей в Telegram.
4.3 Git on the Server — Generating Your SSH Public Key
Generating Your SSH Public Key
Many Git servers authenticate using SSH public keys. In order to provide a public key, each user in your system must generate one if they don’t already have one. This process is similar across all operating systems. First, you should check to make sure you don’t already have a key. By default, a user’s SSH keys are stored in that user’s
/.ssh directory. You can easily check to see if you have a key already by going to that directory and listing the contents:
You’re looking for a pair of files named something like id_dsa or id_rsa and a matching file with a .pub extension. The .pub file is your public key, and the other file is the corresponding private key. If you don’t have these files (or you don’t even have a .ssh directory), you can create them by running a program called ssh-keygen , which is provided with the SSH package on Linux/macOS systems and comes with Git for Windows:
First it confirms where you want to save the key ( .ssh/id_rsa ), and then it asks twice for a passphrase, which you can leave empty if you don’t want to type a password when you use the key. However, if you do use a password, make sure to add the -o option; it saves the private key in a format that is more resistant to brute-force password cracking than is the default format. You can also use the ssh-agent tool to prevent having to enter the password each time.
Now, each user that does this has to send their public key to you or whoever is administrating the Git server (assuming you’re using an SSH server setup that requires public keys). All they have to do is copy the contents of the .pub file and email it. The public keys look something like this:
How to generate SSH keys for Git authorization
Hi there! This post will be pretty straightforward and will cover Windows, Mac, and Linux, so if you don’t know how to do it already, read on.
Windows
Just follow these 5 steps:
- Go to this address, and download Git for Windows, after the download install it with default settings
- Open Git Bash that you just installed (Start->All Programs->Git->Git Bash)
- Type in the following: ssh-keygen -t rsa (when prompted, enter password, key name can stay the same)
- Open file your_home_directory/.ssh/id_rsa.pub with your favorite text editor, and copy contents to your Git repository’s keys field (GitHub, beanstalk, or any other repository provider), under your account.
- Be sure that you don’t copy any whitespace while copying public key’s content (id_rsa.pub)
Note: your_home_directory is either C:\Users\your_username (on Windows Vista / 7 / 8 / 10), or C:\Documents and Settings\your_username (on Windows XP)
Follow these 5 steps:
- Start the terminal
- Navigate to your home directory by typing: cd
/
/.ssh/id_rsa.pub with your favorite text editor, and copy contents to your Git repository’s keys field (GitHub, beanstalk, or any other repository provider), under your account.
Linux (Ubuntu)
Follow these 5 steps:
Additional info
When you create private/public SSH keys on your machine (that’s what you did in the above steps), it’s not enough. You need to give your public key to the repository in order to pair the Git server with your local machine (that’d be steps 4. and 5. above).
Most of the popular repositories will give you web interface access to the application, and here’s how it looks like on Github: 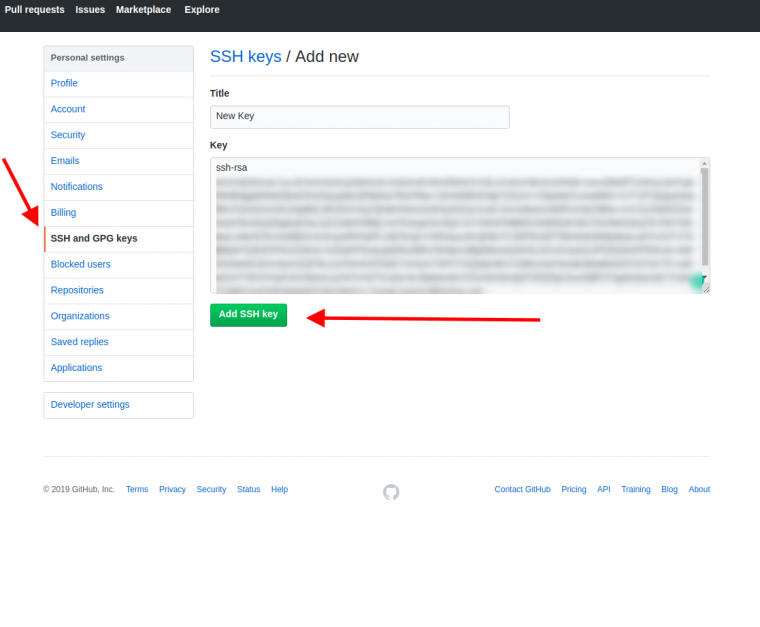
After this step, you’re ready to start using Git.
Conclusion
I hope this wasn’t too complicated to follow, and also I hope it was helpful to someone!
Note! This article was revised on Jul 26, 2019. The original article was posted in 2011 by Mladen Lotar.
How to generate ssh keys (for github)
Question: How do I generate ssh private and public keys (to be used in GitHub/GitLab) using command line.
The command below generates the error sh.exe»: syntax error near unexpected token ‘(‘
I am using Windows XP.
3 Answers 3
The command to run is only
All the rest beginning with line 2 of your script is the output of ssh-keygen.
And replace you@example.com with your email address.
Have a look at the manual for ssh-keygen to look for additional options. You should probably use a longer key by adding -b 4096 to the option list.
Here is the command
This will generate a key for you.You have to copy that and insert into your Github’s account (just one time).

Solution: ssh-keygen -t rsa
Explanation : ssh-keygen is a tool for creating new authentication key pairs for SSH. Such key pairs are used for automating logins, single sign-on, and for authenticating hosts
(for example cloning project from your private repo on Github straight to your aws machine).
Options: You can perform more complicated operations and using flags in order to generate a tailor-made key according to your use case, extended functionality are more powerful and secured. The basic flags are: bits (Large integers making the the RSA key be less vulnerable and hard to crack), passphrase (similar to password) , type (dsa/ecdsa/ed25519/rsa) , comment for the specific ssh token (email or user name) and output key (default store on
Synopsis: ssh-keygen [-q] [-b bits] [-t dsa | ecdsa | ed25519 | rsa] [-N new_passphrase] [-C comment] [-f output_keyfile]


