- git-mergetool
- Run merge conflict resolution tools to resolve merge conflicts
- Launch the default merge tool to resolve conflicts
- List valid merge tools
- Launch the merge tool identified by a name
- Don’t prompt before each invocation of the merge tool
- Explicitly use the GUI merge tool (see the merge.guitool config variable)
- Explicitly use the regular merge tool (see the merge.tool config variable)
- SYNOPSIS
- DESCRIPTION
- OPTIONS
- CONFIGURATION
- TEMPORARY FILES
- Программист — это звучит гордо
- Страницы
- четверг, 19 ноября 2015 г.
- Подружить git и meld за 5 минут
- Git Pro Tip: merge and diff made easier with GUI tools Meld and Atom
- Merging and resolving conflicts
- Resolving conflicts with Atom
- Resolving conflicts with Meld
- Comparing file revisions
- Comparing file revisions with Meld
git-mergetool
Run merge conflict resolution tools to resolve merge conflicts
Launch the default merge tool to resolve conflicts
List valid merge tools
Launch the merge tool identified by a name
Don’t prompt before each invocation of the merge tool
Explicitly use the GUI merge tool (see the merge.guitool config variable)
Explicitly use the regular merge tool (see the merge.tool config variable)
SYNOPSIS
DESCRIPTION
Use git mergetool to run one of several merge utilities to resolve merge conflicts. It is typically run after git merge.
If one or more parameters are given, the merge tool program will be run to resolve differences on each file (skipping those without conflicts). Specifying a directory will include all unresolved files in that path. If no names are specified, git mergetool will run the merge tool program on every file with merge conflicts.
OPTIONS
Use the merge resolution program specified by . Valid values include emerge, gvimdiff, kdiff3, meld, vimdiff, and tortoisemerge. Run git mergetool —tool-help for the list of valid settings.
If a merge resolution program is not specified, git mergetool will use the configuration variable merge.tool. If the configuration variable merge.tool is not set, git mergetool will pick a suitable default.
You can explicitly provide a full path to the tool by setting the configuration variable mergetool. .path. For example, you can configure the absolute path to kdiff3 by setting mergetool.kdiff3.path. Otherwise, git mergetool assumes the tool is available in PATH.
Instead of running one of the known merge tool programs, git mergetool can be customized to run an alternative program by specifying the command line to invoke in a configuration variable mergetool. .cmd.
When git mergetool is invoked with this tool (either through the -t or —tool option or the merge.tool configuration variable) the configured command line will be invoked with $BASE set to the name of a temporary file containing the common base for the merge, if available; $LOCAL set to the name of a temporary file containing the contents of the file on the current branch; $REMOTE set to the name of a temporary file containing the contents of the file to be merged, and $MERGED set to the name of the file to which the merge tool should write the result of the merge resolution.
If the custom merge tool correctly indicates the success of a merge resolution with its exit code, then the configuration variable mergetool. .trustExitCode can be set to true. Otherwise, git mergetool will prompt the user to indicate the success of the resolution after the custom tool has exited.
Print a list of merge tools that may be used with —tool.
Don’t prompt before each invocation of the merge resolution program. This is the default if the merge resolution program is explicitly specified with the —tool option or with the merge.tool configuration variable.
Prompt before each invocation of the merge resolution program to give the user a chance to skip the path.
When git-mergetool is invoked with the -g or —gui option the default merge tool will be read from the configured merge.guitool variable instead of merge.tool. If merge.guitool is not set, we will fallback to the tool configured under merge.tool.
This overrides a previous -g or —gui setting and reads the default merge tool will be read from the configured merge.tool variable.
Process files in the order specified in the , which has one shell glob pattern per line. This overrides the diff.orderFile configuration variable (see git-config(1)). To cancel diff.orderFile, use -O/dev/null.
CONFIGURATION
Override the path for the given tool. This is useful in case your tool is not in the PATH.
Specify the command to invoke the specified merge tool. The specified command is evaluated in shell with the following variables available: BASE is the name of a temporary file containing the common base of the files to be merged, if available; LOCAL is the name of a temporary file containing the contents of the file on the current branch; REMOTE is the name of a temporary file containing the contents of the file from the branch being merged; MERGED contains the name of the file to which the merge tool should write the results of a successful merge.
Allows the user to override the global mergetool.hideResolved value for a specific tool. See mergetool.hideResolved for the full description.
For a custom merge command, specify whether the exit code of the merge command can be used to determine whether the merge was successful. If this is not set to true then the merge target file timestamp is checked and the merge assumed to have been successful if the file has been updated, otherwise the user is prompted to indicate the success of the merge.
Older versions of meld do not support the —output option. Git will attempt to detect whether meld supports —output by inspecting the output of meld —help. Configuring mergetool.meld.hasOutput will make Git skip these checks and use the configured value instead. Setting mergetool.meld.hasOutput to true tells Git to unconditionally use the —output option, and false avoids using —output.
When the —auto-merge is given, meld will merge all non-conflicting parts automatically, highlight the conflicting parts and wait for user decision. Setting mergetool.meld.useAutoMerge to true tells Git to unconditionally use the —auto-merge option with meld. Setting this value to auto makes git detect whether —auto-merge is supported and will only use —auto-merge when available. A value of false avoids using —auto-merge altogether, and is the default value.
During a merge Git will automatically resolve as many conflicts as possible and write the MERGED file containing conflict markers around any conflicts that it cannot resolve; LOCAL and REMOTE normally represent the versions of the file from before Git’s conflict resolution. This flag causes LOCAL and REMOTE to be overwriten so that only the unresolved conflicts are presented to the merge tool. Can be configured per-tool via the mergetool. .hideResolved configuration variable. Defaults to false.
After performing a merge, the original file with conflict markers can be saved as a file with a .orig extension. If this variable is set to false then this file is not preserved. Defaults to true (i.e. keep the backup files).
When invoking a custom merge tool, Git uses a set of temporary files to pass to the tool. If the tool returns an error and this variable is set to true, then these temporary files will be preserved, otherwise they will be removed after the tool has exited. Defaults to false.
Git writes temporary BASE, LOCAL, and REMOTE versions of conflicting files in the worktree by default. Git will attempt to use a temporary directory for these files when set true. Defaults to false.
Prompt before each invocation of the merge resolution program.
TEMPORARY FILES
git mergetool creates *.orig backup files while resolving merges. These are safe to remove once a file has been merged and its git mergetool session has completed.
Источник
Программист — это звучит гордо
Знаниями нужно делиться, иначе они протухают.
Страницы
четверг, 19 ноября 2015 г.
Подружить git и meld за 5 минут
Я не то что бы знаток git, но мне искренне больно смотреть, как некоторые люди пользуются встроенными в IDE инструментами для мёржа или просмотра diff-ов. Особенно когда вокруг так много гораздо более удобных утилит для этой задачи, причём когда настроить взаимодействие git с подобными утилитами это дело 5 минут, включая чтение документации.
Я буду приводить примеры для meld: это бесплатная утилита для просмотров diff-ов с весьма приятным отображением разницы в файлах:


В добавок она ещё и кроссплатформенная. На мой вкус это лучший бесплатный инструмент для подобных вещей. С araxis конечно не сравниться, но последний может себе позволить далеко не каждый.
Итак начнём с diff-а. Первое что стоит сделать это посмотреть документацию у meld: «meld –help», из которой узнаём, что достаточно передать ему, в качестве параметров, 2 пути к сравниваемым файлам или директориям.
Теперь разберёмся с git, опять пойдём в документацию и вытащим из неё вот такие пару строк для git config:
Плюс для Windows нужно будет добавить директорию «meld.exe» в PATH.
В секции «difftool», как можно догадаться, определяется команда, для вызова внешнего инструмента. А в «diff» — название используемой секции по умолчанию.
Тут единственная магия это 2 служебных переменных, которые предоставляет git:
- $LOCAL — это путь к временному файлу, в котором храниться текущее (локальное) состояние файла.
- $REMOTE — это тоже путь к временному файлу, в котором храниться содержимое файла с которым мы будем сравнивать, в зависимости от параметров сравнения там может лежать например последняя закомиченная версия файла из ветки master.
Всё, теперь можно посмотреть например разницу между локальными изменениями и версиями файлов в HEAD, запустив:
Теперь meld будет открывать не каждый файл по очереди, а покажет сразу все изменения, которые мы запросили в виде сравнения двух директорий.
Что бы не писать такую большую команду каждый раз, git даёт нам возможность настроить алиасы:
И т.д. думаю все возможные флаги diff команды вы знаете не хуже меня.
Для мержа всё не сильно сложнее, опять смотрим справку по meld, там пишут что нужно в качестве параметров указать 3 файла и в параметре «–output» указать какой из них использовать для сохранения результата.
Для git тоже обратимся к документации и получим вот это:
Из незнакомых опций тут следующие:
- prompt = false — не делать запросов перед мёржем каждого файла.
- keepBackup = true — создавать бекапы исходных файлов, перед объединением, хотя многим может не понравиться, т.к. их придётся потом удалять, но как отключить такое поведение я думаю понятно.
- $MERGED — служебная переменная, в которой храниться файл, в который, как ожидает git мы запишем результат мёржа.
Ну и запуск, с учётом алиасов, выглядит вот так:
Git в ответ будет последовательно открывать meld для каждого конфликта в режиме 3-х стороннего мёржа.
Источник
Git Pro Tip: merge and diff made easier with GUI tools Meld and Atom
Have you seen the ad that should be here?
Here is a tip for developers using Git: have you ever had a hard time merging branches? Did you know that there are GUI tools to resolve conflicts? They can make your job a lot easier. Today we are going to take a look at two of them: the Atom text editor and the Meld diff and merge tool.
Merging and resolving conflicts
Before going to the tip itself, to make sure that everyone is on the same page, let’s see how commonly git merge is used, conflicts happen and are solved.
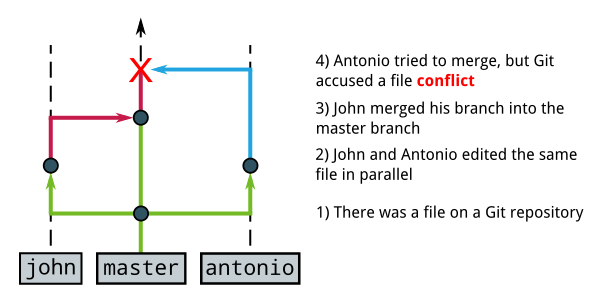
Imagine that you and a coworker are working on a development project and the team use a Git repository to store the source code. In addition to the master branch, each developer has their own branch (e.g. antonio and john ). While you are developing a feature, you commit to your branch. When you are finished, you merge your branch into the master branch.
Imagine also that you and your colleague are working in parallel on the same file, editing the same part of the file (or even the same lines), but your colleague merged his john branch into the master branch before you. When you try to merge your branch, Git accuses a file conflict:
I’ll give you an example that happened to me in real life once, while merging upstream changes to a fork:
In case of a merge conflict, you need to manually edit the conflicting files, comparing the changes you and your colleague made and deciding on the final version of the files, and then run git commit to finalize the merge commit.
Resolving conflicts with Atom
If you don’t know it already, Atom is a text editor made by GitHub, by developers and for developers. In its default configuration, it’s already featureful and quite smart, but you can add features to it by packages. Atom resembles Sublime Text, but Atom is free software (in terms of both liberty and price).
To install Atom on either Linux Kamarada or openSUSE, download and install the RPM package from its official website:
When you open a conflicting file with Atom, it allows you to easily choose between one or the other version of the conflicting lines by simply clicking the Use me button for the desired one:
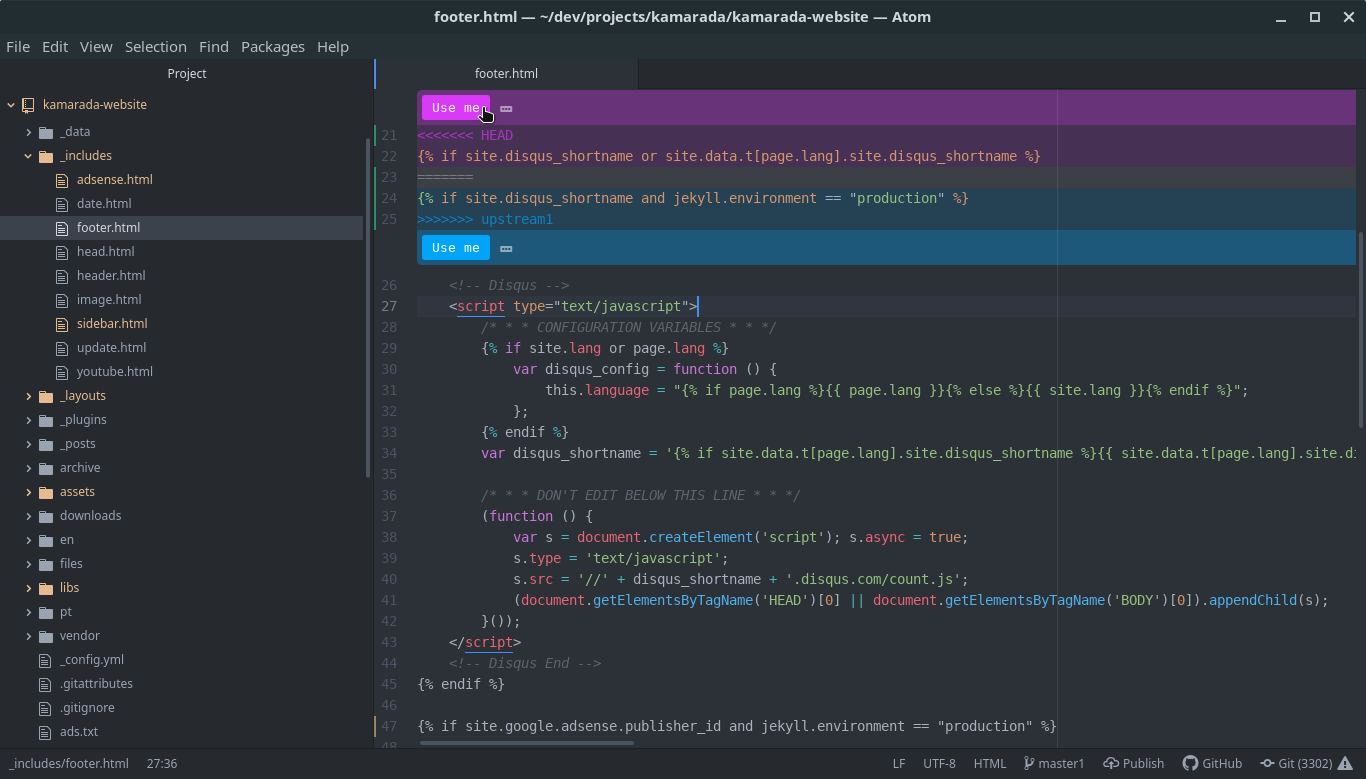
Note that you don’t need to be binary: you can choose one of the versions and edit it to achieve an in-between version. What matters is what ends up in the file when you save it.
Resolving conflicts with Meld
Meld is a visual diff and merge tool targeted at developers. It helps you compare files and folders in two or three ways and supports many popular version control systems, including Git.
To install Meld on either Linux Kamarada or openSUSE, run:
You can use Meld standalone by opening the app and selecting the files or folders you want to compare, but I won’t go into detail about its basic usage, because our goal here is to see how to use Meld integrated with Git.
To resolve merge conflicts using Meld, run git mergetool:
The git mergetool command fires up an appropriate visual merge tool and walks you through the conflicts. It displays that long message on the first run because we have not yet set up a merge tool. Note that it supports several tools, including Meld, which is the first on the list and is also the one it suggests using. Hit Enter to start Meld.
Meld opens the conflicting file in three ways: by the left, the previous version in the current branch (in this example, the master1 branch); in the middle, the merged version (this is the one which is going to be commited); and by the right, the version in the branch being merged ( upstream1 ):
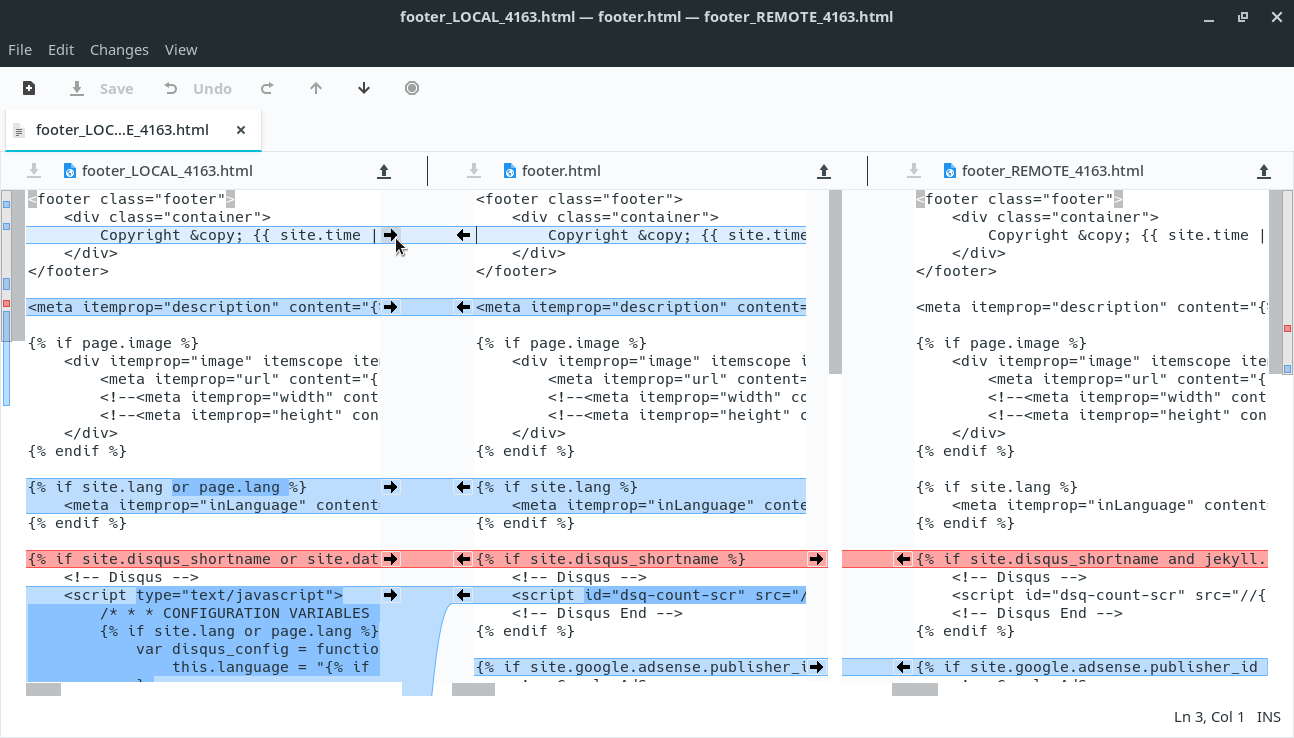
You can use the arrows next to the lines to copy code snippets from one version to the other.
Note that, as Atom, Meld does not impose you take binary decisions: you can simply place the cursor in the middle view and start typing. The final version of the merged file will be anything which is in the middle view, it does not matter if the content came from the left view, the right view, or was typed by hand.
When you are finished resolving the conflict, click Save.
To set up Git to always use Meld to resolve conflicts without asking which tool to use, run the following commands:
With that done, that long message will no longer appear when you run git mergetool: Git will indicate which file you are merging and will already open Meld (you won’t need to hit Enter).
Besides resolving merge conflicts, Meld can be used to compare revisions of files controlled by Git.
Comparing file revisions
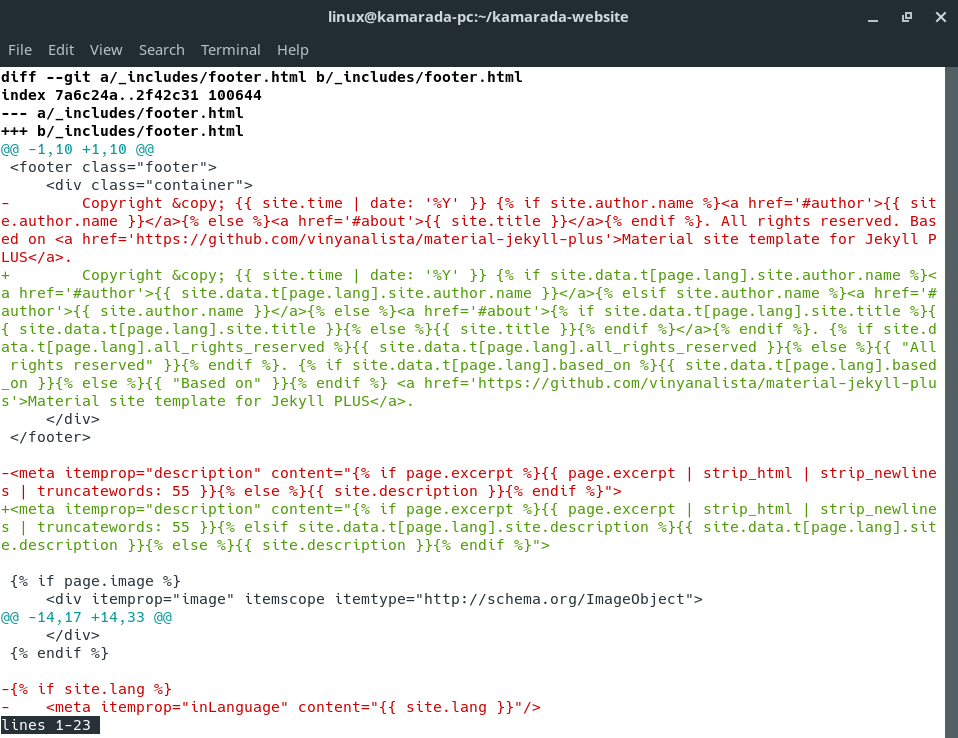
To compare revisions of the same file (i.e. to show the changes between a file in one branch and that same file in another branch, or changes made to a file between two commits), you can use the git diff command:
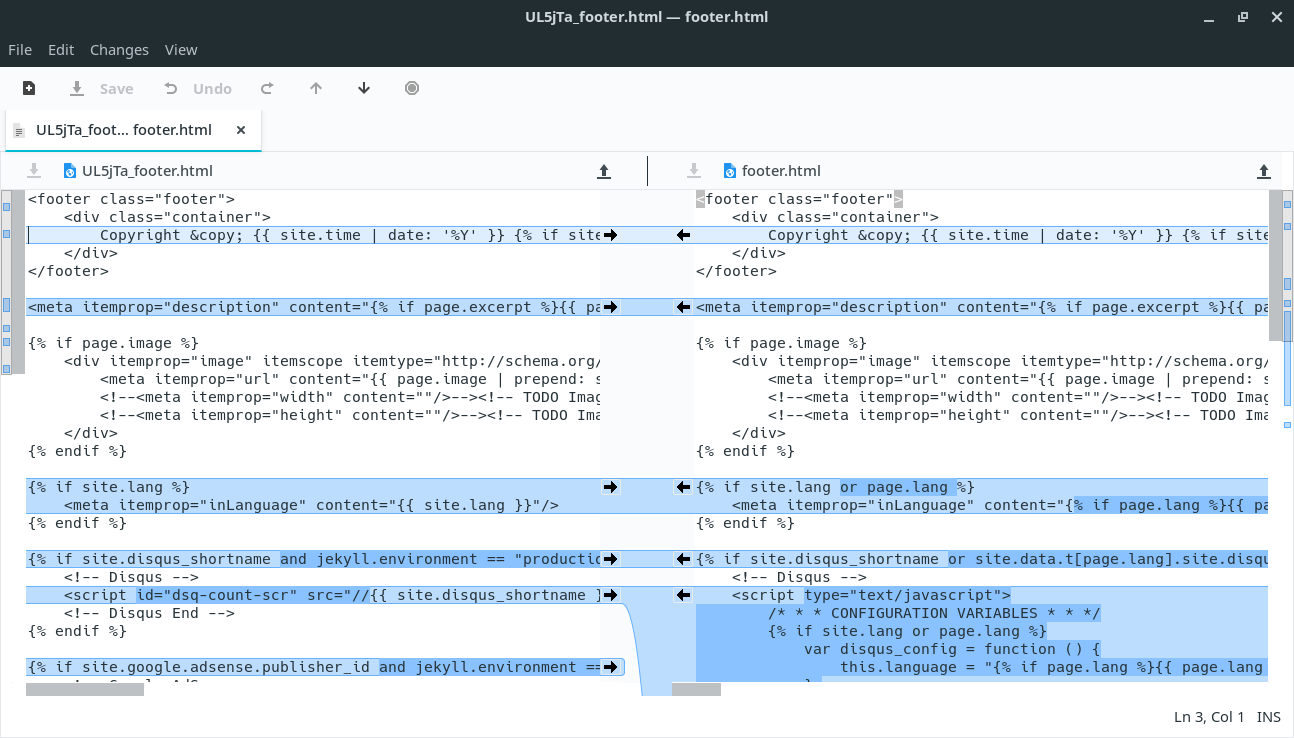
In this example, we want to know what changed in the _includes/footer.html file from the named branch ( upstream1 ) to the current branch ( master1 ):
Maybe using Meld this comparison is going to be shown in a more interesting way. Let’s see.
Comparing file revisions with Meld
Imagine kind of a mix between git diff and git mergetool. That’s the git difftool command:
Similarly, on the first use it alerts it has not been set up yet and asks if you want to start Meld:
Hit Enter to start Meld. This time, it does a two-way comparison: by the left is displayed the revision in the named branch (in this example, the upstream1 branch), and by the right is displayed the revision in the current branch ( master1 ):
Setting up git difftool to always use Meld without asking is also similar:
Источник


