- 4.3 Git на сервере — Генерация открытого SSH ключа
- Генерация открытого SSH ключа
- Generating a new SSH key and adding it to the ssh-agent
- In this article
- Generating a new SSH key
- Adding your SSH key to the ssh-agent
- Git — Как в windows установить ssh ключи для github (пошаговая инструкция)
- Инструкция для github.com
- Подключение к Git по SSH в Windows без PuttyGen на примере BitBucket
- Set up an SSH key
- Set up SSH for Git on Windows
- Step 1. Set up your default identity
- Step 2. Add the key to the ssh-agent
- Step 3. Add the public key to your Account settings
- Set up SSH on macOS/Linux
- Step 1. Set up your default identity
- Step 2. Add the key to the ssh-agent
- Step 3. Add the public key to your Account settings
- Set up SSH with Sourcetree on Windows
- Step 1. Install Sourcetree and add your Bitbucket account
- Step 2. Create an SSH key
- Step 3. Install your private key on Pageant
- Step 4. Add the public key to your Account settings
- Set up SSH with Sourcetree on macOS
- Step 1. Install Sourcetree and add your Bitbucket account
- Step 2. Create an SSH key
- Step 3. Add the public key to your Account settings
4.3 Git на сервере — Генерация открытого SSH ключа
Генерация открытого SSH ключа
Как отмечалось ранее, многие Git-серверы используют аутентификацию по открытым SSH-ключам. Для того чтобы предоставить открытый ключ, каждый пользователь в системе должен его сгенерировать, если только этого уже не было сделано ранее. Этот процесс аналогичен во всех операционных системах. Сначала вам стоит убедиться, что у вас ещё нет ключа. По умолчанию пользовательские SSH ключи сохраняются в каталоге
/.ssh домашнем каталоге пользователя. Вы можете легко проверить наличие ключа перейдя в этот каталог и посмотрев его содержимое:
Ищите файл с именем id_dsa или id_rsa и соответствующий ему файл с расширением .pub . Файл с расширением .pub — это ваш открытый ключ, а второй файл — ваш приватный ключ. Если указанные файлы у вас отсутствуют (или даже нет каталога .ssh ), вы можете создать их используя программу ssh-keygen , которая входит в состав пакета SSH в системах Linux/Mac, а для Windows поставляется вместе с Git:
Сначала программа попросит указать расположение файла для сохранения ключа ( .ssh/id_rsa ), затем дважды ввести пароль для шифрования. Если вы не хотите вводить пароль каждый раз при использовании ключа, то можете оставить его пустым или использовать программу ssh-agent . Если вы решили использовать пароль для приватного ключа, то настоятельно рекомендуется использовать опцию -o , которая позволяет сохранить ключ в формате, более устойчивом ко взлому методом подбора, чем стандартный формат.
Теперь каждый пользователь должен отправить свой открытый ключ вам или тому, кто администрирует Git-сервер (подразумевается, что ваш SSH-сервер уже настроен на работу с открытыми ключами). Для этого достаточно скопировать содержимое файла с расширением .pub и отправить его по электронной почте. Открытый ключ выглядит примерно так:
Generating a new SSH key and adding it to the ssh-agent
After you’ve checked for existing SSH keys, you can generate a new SSH key to use for authentication, then add it to the ssh-agent.
In this article
If you don’t already have an SSH key, you must generate a new SSH key. If you’re unsure whether you already have an SSH key, check for existing keys.
If you don’t want to reenter your passphrase every time you use your SSH key, you can add your key to the SSH agent, which manages your SSH keys and remembers your passphrase.
Generating a new SSH key
Open Terminal Terminal Git Bash .
Paste the text below, substituting in your GitHub email address.
Note: If you are using a legacy system that doesn’t support the Ed25519 algorithm, use:
When you’re prompted to «Enter a file in which to save the key,» press Enter. This accepts the default file location.
At the prompt, type a secure passphrase. For more information, see «Working with SSH key passphrases».
Adding your SSH key to the ssh-agent
Before adding a new SSH key to the ssh-agent to manage your keys, you should have checked for existing SSH keys and generated a new SSH key. When adding your SSH key to the agent, use the default macOS ssh-add command, and not an application installed by macports, homebrew, or some other external source.
Start the ssh-agent in the background.
If you’re using macOS Sierra 10.12.2 or later, you will need to modify your
/.ssh/config file to automatically load keys into the ssh-agent and store passphrases in your keychain.
First, check to see if your
/.ssh/config file exists in the default location.
If the file doesn’t exist, create the file.
/.ssh/config file, then modify the file, replacing
/.ssh/id_ed25519 if you are not using the default location and name for your id_ed25519 key.
Note: If you chose not to add a passphrase to your key, you should omit the UseKeychain line.
Add your SSH private key to the ssh-agent and store your passphrase in the keychain. If you created your key with a different name, or if you are adding an existing key that has a different name, replace id_ed25519 in the command with the name of your private key file.
Note: The -K option is Apple’s standard version of ssh-add , which stores the passphrase in your keychain for you when you add an ssh key to the ssh-agent. If you chose not to add a passphrase to your key, run the command without the -K option.
If you don’t have Apple’s standard version installed, you may receive an error. For more information on resolving this error, see «Error: ssh-add: illegal option — K.»
If you have GitHub Desktop installed, you can use it to clone repositories and not deal with SSH keys.
Ensure the ssh-agent is running. You can use the «Auto-launching the ssh-agent» instructions in «Working with SSH key passphrases», or start it manually:
Add your SSH private key to the ssh-agent. If you created your key with a different name, or if you are adding an existing key that has a different name, replace id_ed25519 in the command with the name of your private key file.
Start the ssh-agent in the background.
Add your SSH private key to the ssh-agent. If you created your key with a different name, or if you are adding an existing key that has a different name, replace id_ed25519 in the command with the name of your private key file.
Git — Как в windows установить ssh ключи для github (пошаговая инструкция)
Сам я не пользуюсь windows для разработки, но мои ученики как правило начинают с windows в качестве основной системы, по этому для них я решил написать эту пошаговую инструкцию.
Инструкция для github.com
Предполагается что вы используете OpenServer
Шаг 1. Сгенерировать ssh-ключи.
Для этого нужно открыть консоль OpenServer (это просто программа conEmu с указанием системных переменных) и набрать как написано в этой инструкции:


Шаг 2. Найти где лежат ключи
При генерации консоль напишет куда упали сгенерированные ключи. Из скриншотов выше видно что они лежат по адресу C:/OpenServer/.ssh вот пусть там и лежат. Находим эту папку и видим там два файла:

Для удобства я их переименовываю id_rsa в github, а id_rsa.pub в github.txt.
Шаг 3. Создать конфигурационный файл
В папке .ssh найденной на шаге 2 создаём файл config (без расширения) с следующим содержанием:
Шаг 4. Добавить публичный ключ в аккаунт github
Заходим по этой ссылке https://github.com/settings/keys и нажимаем кнопку «New SSH key». Указываем Title (любой) а в поле Key копируем содержание файла github.txt полученного на шаге 2, нажимаем «Add SSH key» и ещё раз вводим свой пароль от аккаунта github (меры безопасности)
Вот и всё, теперь можно клонировать из репозиториев с github используя ssh а главное можно пушить в свои репозитории на github без постоянного ввода пароля (как при использовании протокола https)
Подключение к Git по SSH в Windows без PuttyGen на примере BitBucket
Много статей (в том числе и на Хабре) посвящено подключению к Git по SSH-ключам. Почти во всех из них используется один из двух способов: либо с помощью puttygen.exe, либо командами ssh-keygen или ssh-add.
Вчера на одном из компьютеров у меня не получилось сделать это для msysgit ни одним из описанных в интернете способов, и я потратил несколько часов на попытки настроить SSH-доступ, так ни чего и не добившись.
Как я решил эту проблему — под катом.
BitBucket всё время ругался на то, что ему требуется подключение с помощью ключа:
Permission denied (publickey).
fatal: Could not read from remote repository.
Please make sure you have the correct access rights and the repository exists.
Мои попытки сгенерировать ключи, указать пути в переменных среды, привязать ключи к гиту были бесполезны. Либо гит ругался крякозябрами (в случае ssh-agent cmd.exe), либо просто игнорировал всё предложенное.
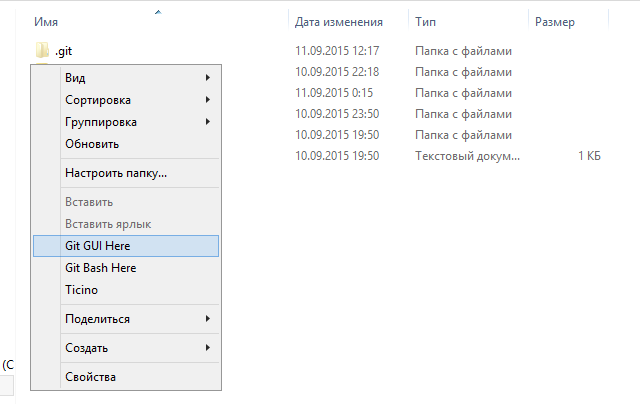
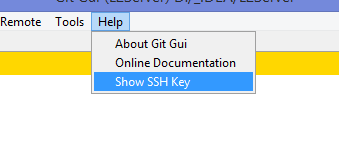
Решение оказалось куда удобнее и проще. Достаточно запустить в локальном репозитории GIT GUI Here, и в меню перейти в
Help -> Show SSH Key:
Если вы столкнулись с такой проблемой, то скорее всего у вас там ни чего не будет:
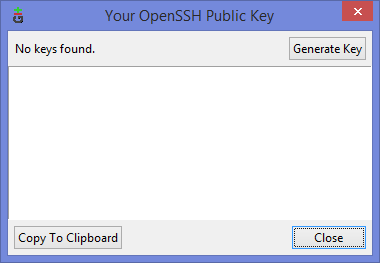
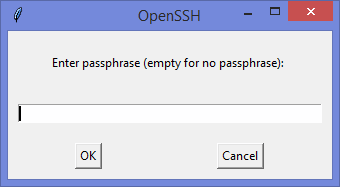
Ну а дальше читать будут, скорее всего, только самые педантичные… Жмём Generate key, видим окно запроса пароля (два раза) для приватного ключа:
И видим сгенерировавшийся публичный ключ:
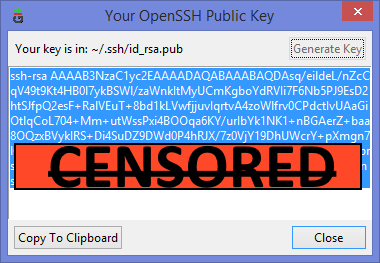
Копируем его, и добавляем вэб-морду ГИТа (в моём случае это BitBucket; ключи там можно добавить в двух местах — в настройках аккаунта и в настройках проекта, нам первый вариант, ибо второй — для деплоя проекта) [Аккаунт] — Управление аккаунтом — SSH-ключи — Добавить ключ:

Ну, а дальше — просто делаем что нужно — или пуш, или клон (предполагается, что git remote add вы уже сделали сами). Git спросит, можно ли добавить хост к доверенным, и запросит passphrase (пароль приватного ключа). Всё, можно работать.
PS: Большое спасибо за наводку на решение моему коллеге Ивану!
Set up an SSH key
When you set up SSH key, you create a key pair that contains a private key (saved to your local computer) and a public key (uploaded to Bitbucket). Bitbucket uses the key pair to authenticate anything the associated account can access. This two-way mechanism prevents man-in-the-middle attacks.
This first key pair is your default SSH identity. If you need more than a default identity, you can set up additional keys.
For security reasons, we recommend that you generate a new SSH key and replace the existing key on your account at least once a year.
You can’t use the same key between accounts. You must create new keys for each individual Bitbucket account.
Set up SSH for Git on Windows
Use this section to create a default identity and SSH key when you’re using Git on Windows. By default, the system adds keys for all identities to the /Users/ /.ssh directory.
Step 1. Set up your default identity
From the command line, enter ssh-keygen .
For Windows 7 or earlier
You can only enter ssh-keygen into the Git Bash window. It won’t work in the Command prompt.
The command prompts you for a file to save the key in:
$ ssh-keygen
Generating public/private rsa key pair.
Enter file in which to save the key (/c/Users/emmap1/.ssh/id_rsa):
2. Press enter to accept the default key and path, /c/Users/ /.ssh/id_rsa .
We recommend keeping the default key name unless you have a reason to change it. To create a key with a non-default name or path, specify the full path to the key. For example, to create a key called my-new-ssh-key , enter the Windows path, shown here:
$ ssh-keygen
Generating public/private rsa key pair.
Enter file in which to save the key (/c/Users/emmap1/.ssh/id_rsa): c:\Users\emmap1\.ssh\my-new-ssh-key
3. Enter and re-enter a passphrase when prompted.
The command creates your default identity with its public and private keys. The whole interaction looks similar to this:
$ ssh-keygen
Generating public/private rsa key pair.
Enter file in which to save the key (/c/Users/emmap1/.ssh/id_rsa):
Created directory ‘/c/Users/emmap1/.ssh’.
Enter passphrase (empty for no passphrase):
Enter same passphrase again:
Your identification has been saved in /c/Users/emmap1/.ssh/id_rsa.
Your public key has been saved in /c/Users/emmap1/.ssh/id_rsa.pub.
The key fingerprint is: e7:94:d1:a3:02:ee:38:6e:a4:5e:26:a3:a9:f4:95:d4 emmap1@EMMA-PC
4. List the contents of .ssh to view the key files.
You should see something like the following:
$ dir .ssh
id_rsa id_rsa.pub
The command displays two files, one for the public key (for example id_rsa.pub ) and one for the private key (for example, id_rsa ).
Step 2. Add the key to the ssh-agent
If you don’t want to type your password each time you use the key, you’ll need to add it to the ssh-agent.
To start the agent, run the following:
$ eval $(ssh-agent)
Agent pid 9700
Enter ssh-add followed by the path to the private key file:
Step 3. Add the public key to your Account settings
From Bitbucket, choose Personal settings from your avatar in the lower left.
Click SSH keys. If you’ve already added keys, you’ll see them on this page.
Open your .ssh/id_rsa.pub file (or whatever you named the public key file) and copy its contents.
You may see an email address on the last line. It doesn’t matter whether or not you include the email address.
From Bitbucket, click Add key.
Enter a Label for your new key, for example, Default public key .
Paste the copied public key into the SSH Key field.
Click Save.
Bitbucket sends you an email to confirm the addition of the key.
Return to the command line and verify your configuration and username by entering the following command:
$ ssh -T git@bitbucket.org
The command message tells you which of your Bitbucket accounts can log in with that key.
If you get an error message with Permission denied (publickey) , check the Troubleshoot SSH issues page for help.
Now that you’ve got an SSH key set up, use the SSH URL the next time you clone a repository. If you already have a repository that you cloned over HTTPS, change the remote URL for your repository to its SSH URL.
Edit an SSH key
After you add a key, you can edit the key’s Label but not the key itself. To change the key’s contents, you need to delete and re-add the key.
Set up SSH on macOS/Linux
Use this section to create a default identity and SSH key on macOS or Linux. By default, the system adds keys to the /Users/ /.ssh directory on macOS and /home/ /.ssh on Linux.
Step 1. Set up your default identity
1. From the terminal, enter ssh-keygen at the command line.
The command prompts you for a file to save the key in:
$ ssh-keygen
Generating public/private rsa key pair.
Enter file in which to save the key (/Users/emmap1/.ssh/id_rsa):
2. Press the Enter or Return key to accept the default location.
We recommend you keep the default key name unless you have a reason to change it.
To create a key with a name or path other than the default, specify the full path to the key. For example, to create a key called my-new-ssh-key , enter a path like the one shown at the prompt:
$ ssh-keygen
Generating public/private rsa key pair.
Enter file in which to save the key (/Users/emmap1/.ssh/id_rsa): /Users/emmap1/.ssh/my-new-ssh-key
3. Enter and re-enter a passphrase when prompted.
The command creates your default identity with its public and private keys. The whole interaction will look similar to the following:
$ ssh-keygen
Generating public/private rsa key pair.
Enter file in which to save the key (/Users/emmap1/.ssh/id_rsa):
Created directory ‘/Users/emmap1/.ssh’.
Enter passphrase (empty for no passphrase):
Enter same passphrase again:
Your identification has been saved in /Users/emmap1/.ssh/id_rsa.
Your public key has been saved in /Users/emmap1/.ssh/id_rsa.pub.
The key fingerprint is:
4c:80:61:2c:00:3f:9d:dc:08:41:2e:c0:cf:b9:17:69 emmap1@myhost.local
The key’s randomart image is:
+—[ RSA 2048]—-+
|*o+ooo. |
|.+.=o+ . |
|. *.* o . |
| . = E o |
| o . S |
| . . |
| . |
| |
| |
+——————+
4. List the contents of
/.ssh to view the key files.
/.ssh
id_rsa id_rsa.pub
The command displays two files, one for the public key (for example id_rsa.pub ) and one for the private key (for example, id_rsa ).
Step 2. Add the key to the ssh-agent
If you don’t want to type your password each time you use the key, you’ll need to add it to the ssh-agent.
To start the agent, run the following:
$ eval `ssh-agent`
Agent pid 9700
Enter ssh-add followed by the path to the private key file:
macOS $ ssh-add -K
(macOS only) So that your computer remembers your password each time it restarts, open (or create) the
/.ssh/config file and add these lines to the file:
Step 3. Add the public key to your Account settings
From Bitbucket, choose Personal settings from your avatar in the lower left.
Click SSH keys.
If you’ve already added keys, you’ll see them on this page.
In your terminal window, copy the contents of your public key file. If you renamed the key, replace id_rsa.pub with the public key file name.
On Linux, you can cat the contents:
On macOS, the following command copies the output to the clipboard:
Select and copy the key output in the clipboard.
If you have problems with copy and paste, you can open the file directly with Notepad. Select the contents of the file (just avoid selecting the end-of-file characters).
From Bitbucket, click Add key.
Enter a Label for your new key, for example, Default public key .
Paste the copied public key into the SSH Key field.
You may see an email address on the last line when you paste. It doesn’t matter whether or not you include the email address in the Key.
Click Save.
Bitbucket sends you an email to confirm the addition of the key.
Return to the terminal window and verify your configuration and username by entering the following command:
$ ssh -T git@bitbucket.org
The command message tells you which of your Bitbucket accounts can log in with that key.
If you get an error message with Permission denied (publickey) , check the Troubleshoot SSH issues page for help.
Now that you’ve got an SSH key set up, use the SSH URL the next time you clone a repository. If you already have a repository that you cloned over HTTPS, change the remote URL for your repository to use its SSH URL.
Edit an SSH key
After you add a key, you can edit the key’s Label but not the key itself. To change the key’s contents, you need to delete and re-add the key.
Set up SSH with Sourcetree on Windows
Use this section to generate an SSH key using Sourcetree. When you create an SSH key with Sourcetree, you can save the public and private key wherever you want locally. You may want to create an SSH directory when you do, so that you can refer to your SSH keys whenever you need them.
Step 1. Install Sourcetree and add your Bitbucket account
If you don’t yet have Sourcetree, go to https://www.sourcetreeapp.com/ and click the Download free button.
Click the .exe file to install Sourcetree. Refer to the Install Sourcetree page for more details.
You may see the Load SSH Key? dialog after installation. Click No if you don’t have one and want to use Sourcetree to create one.
Add your account and select SSH as the Preferred Protocol. If you don’t connect your account during set up, click Remote to open the Remote repositories page and click Add an account.
Step 2. Create an SSH key
From Tools, select Create or Import SSH Keys.
From the PuTTY Key Generator dialog, click the Generate button.
As the SSH key generates, hover your mouse over the blank area in the dialog. It may take a minute or two.
When SSH key generation is complete, you see the public key and a few other fields.
Enter a passphrase for your SSH key in the Key passphrase and Confirm passphrase fields.
Click Save public key. From the save dialog, choose where to save your public key, name the file with the .pub file extension, and click Save.
Click Save private key. From the save dialog, choose where to save your private key, name the file, and click Save.
Close the PuTTY Key Generator dialog.
Step 3. Install your private key on Pageant
Sourcetree comes with an SSH authentication agent called Pageant. Load your private key into Pageant to automatically authenticate so that you don’t need to enter your passphrase.
Double-click the Pageant (PuTTY Authentication Agent) icon in your system tray to open the Pageant Key List dialog.
Click the Add Key button to open the Select Private Key File dialog.
Navigate to the private key file you saved in Step 1 and click Open.
Enter the passphrase for your SSH key and click OK.
Pageant shows your key in the running list.
Click Close.
Step 4. Add the public key to your Account settings
From Sourcetree, open the PuTTY Key Generator dialog by going to Tools > Create or Import SSH Keys.
Click Load, navigate to your SSH folder, and click the private key. Make sure you’re looking at All files if you don’t see your private key.
Enter your passphrase for the SSH key and click OK.
Copy the public key in the first field.
From Bitbucket, choose Personal settings from your avatar in the lower left.
The Account settings page opens.
Click SSH keys.
If you’ve already added keys, you’ll see them on this page.
Click Add key.
Enter a Label for your new key, for example, Default public key .
Paste the copied public key into the SSH Key field.
Click Save.
Bitbucket sends you an email to confirm the addition of the key.
Now that you’ve got an SSH key set up, use the SSH URL the next time you clone a repository. If you already have a repository that you cloned over HTTPS, change the remote URL for your repository to its SSH URL.
Edit an SSH key
After you add a key, you can edit the key’s Label but not the key itself. To change the key’s contents, you need to delete and re-add the key.
Set up SSH with Sourcetree on macOS
When you create an SSH key with Sourcetree on macOS, you can only create one key. You’ll need to use the command line if you want additional keys.
Step 1. Install Sourcetree and add your Bitbucket account
If you don’t yet have Sourcetree, go to https://www.sourcetreeapp.com/ and click the Download free button.
Open the ZIP file to install Sourcetree. Refer to the Install Sourcetree page for more details.
If you don’t connect your account during set up, you can add it from the Accounts tab by selecting Preferences from the Sourcetree menu.
Step 2. Create an SSH key
Follow these steps if you don’t already have an SSH key for an account. If you do have an SSH key and you want to generate another key, you’ll have to use the terminal because you can’t use Sourcetree to create a second key.
Creating an SSH key looks something like this:
From the Sourcetree menu, select Preferences.
Click the Accounts tab, select the account where you want to add the SSH key and click Edit.
Change the Protocol to SSH if it’s not already selected.
Hold down the OPTION key on your keyboard to see the Generate Key button.
If you’ve already generated an SSH key for this account from Sourcetree, the OPTION key won’t do anything. Use your existing key or generate another key from the terminal.
Click Generate Key.
Enter a passphrase for the SSH key in the Passphrase and Confirm Passphrase fields.
Click Create.
Step 3. Add the public key to your Account settings
From Bitbucket, choose Personal settings from your avatar in the lower left.
The Account settings page opens.
Click SSH keys.
If you’ve already added keys, you’ll see them on this page.
Select your account from your Accounts tab in Sourcetree.
Click the Copy to Clipboard button to copy your public SSH key.
From Bitbucket, click Add key.
Enter a Label for your new key, for example, Default public key .
Paste the copied public key into the SSH Key field.
Click Save.
Bitbucket sends you an email to confirm the addition of the key.
Now that you’ve got an SSH key set up, use the SSH URL the next time you clone a repository. If you already have a repository that you cloned over HTTPS, change the remote URL for your repository to its SSH URL.
Edit an SSH key
After you add a key, you can edit the key’s Label but not the key itself. To change the key’s contents, you need to delete and re-add the key.


