Git SSH Windows — пошаговое руководство
Настроим пошагово Git SSH для Windows 10. Это позволит вам выполнять команды git без ввода пароля от своей учетной записи GitHub.
- Генерация ключа SSH.
- Добавление SSH-ключа в ssh-agent.
- Добавление ключа SSH в учетную запись GitHub.

Генерация ключа SSH
Откройте bash/терминал . Добавьте следующий текст, подставив свой адрес электронной почты GitHub .
Будет создан ключ ssh , используя e-mail в качестве метки.
Когда вам будет предложено «Введите файл, в котором вы хотите сохранить ключ», нажмите Enter . Это установит в местоположение по умолчанию.
Enter a file in which to save the key (/c/Users/you/.ssh/id_rsa):[Press enter]
Далее введите безопасную фразу-пароль дважды или просто нажмите Enter .
Enter passphrase (empty for no passphrase): [Type a passphrase]
Enter same passphrase again: [Type passphrase again]
Добавление SSH-ключа в ssh-agent
Чтобы запустить ssh-агент введите следующую команду.
На экране отобразится похожая строка.
Agent pid 31724
Добавим свой закрытый ключ SSH в ssh-agent . Если вы создали свой ключ с другим именем (или добавляете существующий ключ с другим именем), замените в команде id_rsa на имя вашего файла закрытого (приватного) ключа.
Ключ будет успешно добавлен в ssh-агент .
Добавление ключа SSH в учетную запись GitHub
Мы сгенерировали у себя на компьютере закрытый ключ SSH и добавили его в ssh-агент . Теперь нам необходимо добавить SSH ключ в учетную запись GitHub.
Сейчас нам необходимо скопировать SSH ключ в буфер обмена.
Способов есть несколько, но я же вам предлагаю следующее решения для Windows 10: введите команду ниже.
Прямо в терминале вы увидите содержимое необходимого файла с ключем. Скопируйте его в буфер.
Теперь зайдите на вашу страницу GitHub » Settings .

Перейдите во вкладку SSH and GPG keys и нажмите на кнопку New SSH key для добавления SSH ключа в вашу учетную запись GitHub.

В поле Title добавьте заголок для данного ключа. Например, если вы захотите настроить SSH доступ на нескольких устройствах, то вы будите понимать какой ключ принадлежит какому устройству.
В поле Key добавьте свой ssh-ключ, который вы скопировали в буфер обмена на предыдущем шаге.
Нажмите Add SSH key .

Для подтверждения вам потребуется ввести свой пароль от учетной записи GitHub .
На этом настройка SSH для вашего устройства завершена, теперь вы можете работать с git без ввода пароля от своей учетной записи.
Если вам понравилась данная статья, можете прочитать как настроить моментальную загрузку сайта на хостинг и синхронизацию файлов.
Надеюсь, вам понравилась данная информация. Если вам интересна тема web-разработки, то можете следить за выходом новых статей в Telegram.
Git with SSH on Windows
I’ve went through the excellent guide provided by Tim Davis which is about configuring Git to work with SSH under Windows in order to produce a Git Server in order to have a main place for my DVCS.
I am in the process of creating a clone for my project. I’ve went through all the steps till this point, but I keep getting this from TortoiseGit:
and nothing gets cloned.
BTW: The TortoisePLink comes up just before this message appears and asks me: “ login as: ” ( I thought that this info is given in the command, i.e: Administrator@blahblah .
My home variable is set to the correct place: From a Git Bash shell:
I’ve also tried using Putty’s plink instead of TortoisePLink (in both Git’s and TortoiseGit ’s installation). This time the error was narrowed down to:
6 Answers 6
I fought with this problem for a few hours before stumbling on the obvious answer. The problem I had was I was using different ssh implementations between when I generated my keys and when I used git.
I used ssh-keygen from the command prompt to generate my keys and but when I tried «git clone ssh://. » I got the same results as you, a prompt for the password and the message «fatal: The remote end hung up unexpectedly».
Determine which ssh windows is using by executing the Windows «where» command.
The second line tells you which exact program will be executed.
Next you need to determine which ssh that git is using. Find this by:
And now you see the problem.
To correct this simply execute:
To check if changes are applied:
Now git will be able to use the keys that you generated earlier.
This fix is so far only for the current window. To fix it completely you need to change your environment variable.
- Open Windows explorer
- Right-click Computer and select Properties
- Click Advanced System Settings link on the left
- Click the Environment Variables. button
- In the system variables section select the GIT_SSH variable and press the Edit. button
- Update the variable value.
- Press OK to close all windows
Now any future command windows you open will have the correct settings.
dmangiarelli / GitForWindowsSetup.md
How to setup Git for Windows
I know this document seems long, but it shouldn’t be too difficult to follow. This guide is based on Windows, but every program here has Linux/Mac equivalents, and in most cases they’re built-in. So, take a deep breath and go step by step.
The steps below are for GitHub, but the steps are almost idential for Bitbucket, Heroku, etc.
You’ll probably want to make sure Chocolatey is installed, since it streamlines installing this stuff later. If you install via Chocolatey, you don’t need to run the installers from the products’ respective sites.
The first thing you’ll want to do is to download and install Cmder, which is a terminal program that serves as excellent replacement for the built-in cmd.exe . It’s not a shell itself, so it supports running plain old cmd.exe commands and running PowerShell.
As a comment notes below, Cmder is actually a packaged version of ConEmu. If you don’t want the out-of-the-box configuration that Cmder comes with, you can install ConEmu by iteslf and customize it to your needs from there. Both of course have the same features though.
With Chocolatey, run one of the following from an elevated propt:
Git uses a per-user config file located at %USERPROFILE%\.gitconfig . It’s a plain-text file you can edit with your favorite text editor (or Notepad, if you haven’t chosen a favorite yet). Note that git calls this config the «global» config. It’s more general than per-repository config, and more specific than the machine config.
This is optional, but highly recommended. Download and install TortoiseGit. You’ll want some of the tools it installs later. If you have another Tortoise installed (e.g. TortoiseSVN) and you don’t want to have TortoiseGit’s context menu clutter, you don’t have to download it. If you’re not sure, get it. TortoiseGit is nice because it adds overlay icons (that don’t always update properly). Another benefit is that a full PuTTY install, which you’ll also need.
If you really don’t want the extra shell extension (I don’t blame you), you can install TortoiseGit, copy TortoiseGitPlink.exe from TortoiseGit’s bin/ directory, store it somewhere else, and then uninstall TortoiseGit. Then, later on when you set the GIT_SSH environment variable, just use the new path to it.
You can skip this step if you installed TortoiseGit.
If you didn’t install it, download and run the Windows Installer so you get all the apps installed from one package.
There are a few different ways to authenticate with GitHub. The easiest is to use Git Credential Manager for Windows. It supports authenticating with GitHub over HTTPS even with two factor authentication. If you use this, you can skip to the «Install Git» section. If you wan to use SSH, read on.
SSH Setup with PuTTY
If you’re using a service like GitHub or Bitbucket, you have a couple of options when authenticating so you can push your code. This will allow you to share your code with other people. Even if you’re the only person working on a project, those sites can serve as a backup.
Set up SSH keys on Windows:
- Open PuTTYgen by searching for it in the Start menu or Start screen. If you see multiple entries, any will work.
Leave the settings as they are, unless you know what you’re doing. - Click «Generate».
- Wiggle the mouse around in the top part of the window until the progress bar is full, as the program asks you to do.
- Once you’ve provided enough entropy, a bunch of text fields will appear. It’s highly recommended that you provide a passphrase.
- After providing a passphrase, click «Save private key». The usual directory to save these in is %USERPROFILE%\_ssh .
It doesn’t matter what you call the key, but for demonstration purposes, I’m going to call it github.ppk . This file should have an extension of .ppk . - Now, log in to GitHub.com. Don’t close PuTTYgen yet.
- Go to your Account settings and then to SSH keys.
- Click «Add SSH key». Copy the text in the top text box in PuTTYgen, the one labeled «Public key for pasting into OpenSSH authorized_keys file» and paste it into the Key box in GitHub. Give it a title that describes what machine the key is on (e.g. «Work laptop»).
- Click «Add key».
And with that, we’re done setting things up to connect to GitHub.
If you also want a native command-line build of ssh (i.e., ssh.exe or ssh-agent.exe ) to work, you’ll need to also export your key in OpenSSH format. You can do this from PuTTYgen by clicking on Conversions > Export OpenSSH Key. These keys are typically saved in %USERPROFILE%\.ssh or (
/.ssh in *nix-style paths, which also work in Bash environments on Windows). Once you export the key, you should copy it to %USERPROFILE%\.ssh\id_rsa . See the comments for some more information. Source
Now your SSH keys are set up and you can use them to push to and pull from GitHub, but you still need to do one more thing to use those keys. Before you want to push code to GitHub, you’ll need to do this, but once you do it, you won’t have to do it again until you restart your computer.
- Run Pageant (search for it in the Start menu/screen).
- Right-click the Notification Area icon (it looks like a PC with a dark sombrero).
- Click «Add Key».
- Find the .ppk file you created above.
- Enter the passphrase you used before.
If the passphrase prompt goes away, you should be all set.
If you want to confirm, right-click on the Pageant icon again and click on «View Keys».
Now, you can pull from and push to GitHub without being pestered for your password, at least until you log off. You can also double-click on the notification area icon to see what keys have already been added to Pageant.
Git for Windows
Finally, we get to the part where we get to install Git.
- Download the Git installer.
Or, with Chocolatey (which may be a patch or two behind the main site, and will always install the shell extension).
choco install git - When installing, pick the following options:
- Uncheck the box for Windows Explorer integration.
- Choose «Run Git from the Windows Command Prompt».
- Choose «Checkout Windows-style, commit Unix-style line endings».
- Let the installer finish.
You may need to manually add a System Environment Variable (Start > Search for «Edit the system environment variables»). Add a new System (not User) variable. Give it the name GIT_SSH , and a value of the path to a TortoiseGitPlink.exe (e.g. C:\Program Files\TortoiseGit\bin\TortoisePLink.exe ).
Or, the PowerShell way (run from an elevated PowerShell prompt): [Environment]::SetEnvironmentVariable(«GIT_SSH», «C:\Program Files\TortoiseGit\bin\TortoiseGitPLink.exe», «Machine» )
This is mostly optional if you’re using Cmder, but if you want more general support for Git in PowerShell, you can install an awesome package called posh-git. Because PowerShell is awesome, and you should be using it instead of batch scripts and plain old cmd.exe as much as you can. Even without this, you can use Git commands from PowerShell, but posh-git will give you status information right in the prompt.
- Make sure you have PowerShell 5 or later installed.
To check, open PowerShell from your Start menu/screen and type $PSVersionTable . The PSVersion value should be 5.0 or greater.
If you don’t have v5 or later installed, download and run the correct installer for Windows Management Framework 5 (which comes with PowerShell 5) from this page. - Change PowerShell’s script execution policy.
Open an elevated PowerShell prompt and enter:
Set-ExecutionPolicy RemoteSigned - Install Posh-Git.
Install-Module Posh-Git
Now, whenever you’re in a Git workspace directory in your PowerShell prompt, you’ll get a fancy prompt, and you can still use tab completion and standard Windows paths. Hooray! Git will still echo paths with backslashes, but it will recognize forward slashes.
- Git Extensions is another shell extension that also has a Visual Studio extension. It’s very user-friendly.
- GitHub Desktop, not to be confused with Git for Windows, is GitHub’s Windows Git client.
- SourceTree is to Bitbucket as GitHub for Windows is to GitHub: it’s Atlassian’s answer to GitHub for Windows.
A difftool is installed by default with TortoiseGit, but I’m a fan of using SourceGear DiffMerge for diffs and P4Merge for merging. These may be installed via Chocolatey with choco install diffmerge p4merge . Install those programs and add the following to your .gitconfig file:
Подключение к Git по SSH в Windows без PuttyGen на примере BitBucket
Много статей (в том числе и на Хабре) посвящено подключению к Git по SSH-ключам. Почти во всех из них используется один из двух способов: либо с помощью puttygen.exe, либо командами ssh-keygen или ssh-add.
Вчера на одном из компьютеров у меня не получилось сделать это для msysgit ни одним из описанных в интернете способов, и я потратил несколько часов на попытки настроить SSH-доступ, так ни чего и не добившись.
Как я решил эту проблему — под катом.
BitBucket всё время ругался на то, что ему требуется подключение с помощью ключа:
Permission denied (publickey).
fatal: Could not read from remote repository.
Please make sure you have the correct access rights and the repository exists.
Мои попытки сгенерировать ключи, указать пути в переменных среды, привязать ключи к гиту были бесполезны. Либо гит ругался крякозябрами (в случае ssh-agent cmd.exe), либо просто игнорировал всё предложенное.
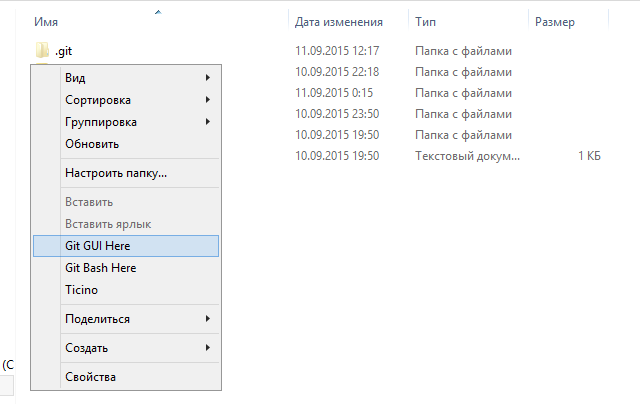
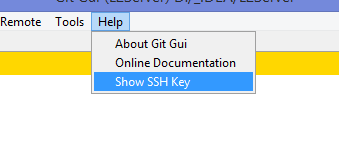
Решение оказалось куда удобнее и проще. Достаточно запустить в локальном репозитории GIT GUI Here, и в меню перейти в
Help -> Show SSH Key:
Если вы столкнулись с такой проблемой, то скорее всего у вас там ни чего не будет:
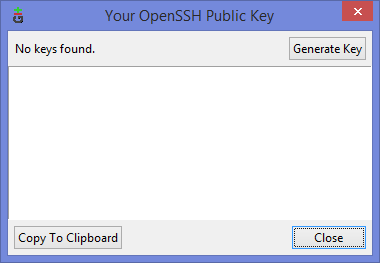
Ну а дальше читать будут, скорее всего, только самые педантичные… Жмём Generate key, видим окно запроса пароля (два раза) для приватного ключа:
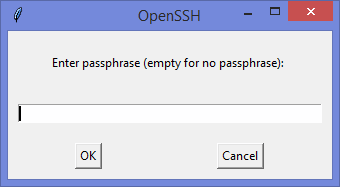
И видим сгенерировавшийся публичный ключ:
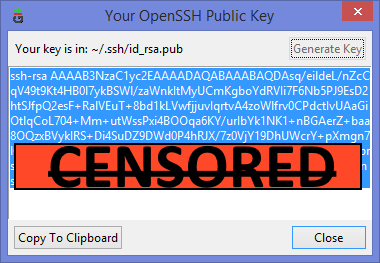
Копируем его, и добавляем вэб-морду ГИТа (в моём случае это BitBucket; ключи там можно добавить в двух местах — в настройках аккаунта и в настройках проекта, нам первый вариант, ибо второй — для деплоя проекта) [Аккаунт] — Управление аккаунтом — SSH-ключи — Добавить ключ:

Ну, а дальше — просто делаем что нужно — или пуш, или клон (предполагается, что git remote add вы уже сделали сами). Git спросит, можно ли добавить хост к доверенным, и запросит passphrase (пароль приватного ключа). Всё, можно работать.
PS: Большое спасибо за наводку на решение моему коллеге Ивану!


