- Git SSH Windows — пошаговое руководство
- Генерация ключа SSH
- Добавление SSH-ключа в ssh-agent
- Добавление ключа SSH в учетную запись GitHub
- Generating a new SSH key and adding it to the ssh-agent
- In this article
- Generating a new SSH key
- Adding your SSH key to the ssh-agent
- Adding ssh-keys in windows for private git
- 1 Answer 1
- Select private key to use with Git
- 9 Answers 9
- Подключение к Git по SSH в Windows без PuttyGen на примере BitBucket
Git SSH Windows — пошаговое руководство
Настроим пошагово Git SSH для Windows 10. Это позволит вам выполнять команды git без ввода пароля от своей учетной записи GitHub.
- Генерация ключа SSH.
- Добавление SSH-ключа в ssh-agent.
- Добавление ключа SSH в учетную запись GitHub.

Генерация ключа SSH
Откройте bash/терминал . Добавьте следующий текст, подставив свой адрес электронной почты GitHub .
Будет создан ключ ssh , используя e-mail в качестве метки.
Когда вам будет предложено «Введите файл, в котором вы хотите сохранить ключ», нажмите Enter . Это установит в местоположение по умолчанию.
Enter a file in which to save the key (/c/Users/you/.ssh/id_rsa):[Press enter]
Далее введите безопасную фразу-пароль дважды или просто нажмите Enter .
Enter passphrase (empty for no passphrase): [Type a passphrase]
Enter same passphrase again: [Type passphrase again]
Добавление SSH-ключа в ssh-agent
Чтобы запустить ssh-агент введите следующую команду.
На экране отобразится похожая строка.
Agent pid 31724
Добавим свой закрытый ключ SSH в ssh-agent . Если вы создали свой ключ с другим именем (или добавляете существующий ключ с другим именем), замените в команде id_rsa на имя вашего файла закрытого (приватного) ключа.
Ключ будет успешно добавлен в ssh-агент .
Добавление ключа SSH в учетную запись GitHub
Мы сгенерировали у себя на компьютере закрытый ключ SSH и добавили его в ssh-агент . Теперь нам необходимо добавить SSH ключ в учетную запись GitHub.
Сейчас нам необходимо скопировать SSH ключ в буфер обмена.
Способов есть несколько, но я же вам предлагаю следующее решения для Windows 10: введите команду ниже.
Прямо в терминале вы увидите содержимое необходимого файла с ключем. Скопируйте его в буфер.
Теперь зайдите на вашу страницу GitHub » Settings .

Перейдите во вкладку SSH and GPG keys и нажмите на кнопку New SSH key для добавления SSH ключа в вашу учетную запись GitHub.

В поле Title добавьте заголок для данного ключа. Например, если вы захотите настроить SSH доступ на нескольких устройствах, то вы будите понимать какой ключ принадлежит какому устройству.
В поле Key добавьте свой ssh-ключ, который вы скопировали в буфер обмена на предыдущем шаге.
Нажмите Add SSH key .

Для подтверждения вам потребуется ввести свой пароль от учетной записи GitHub .
На этом настройка SSH для вашего устройства завершена, теперь вы можете работать с git без ввода пароля от своей учетной записи.
Если вам понравилась данная статья, можете прочитать как настроить моментальную загрузку сайта на хостинг и синхронизацию файлов.
Надеюсь, вам понравилась данная информация. Если вам интересна тема web-разработки, то можете следить за выходом новых статей в Telegram.
Generating a new SSH key and adding it to the ssh-agent
After you’ve checked for existing SSH keys, you can generate a new SSH key to use for authentication, then add it to the ssh-agent.
In this article
If you don’t already have an SSH key, you must generate a new SSH key. If you’re unsure whether you already have an SSH key, check for existing keys.
If you don’t want to reenter your passphrase every time you use your SSH key, you can add your key to the SSH agent, which manages your SSH keys and remembers your passphrase.
Generating a new SSH key
Open Terminal Terminal Git Bash .
Paste the text below, substituting in your GitHub email address.
Note: If you are using a legacy system that doesn’t support the Ed25519 algorithm, use:
When you’re prompted to «Enter a file in which to save the key,» press Enter. This accepts the default file location.
At the prompt, type a secure passphrase. For more information, see «Working with SSH key passphrases».
Adding your SSH key to the ssh-agent
Before adding a new SSH key to the ssh-agent to manage your keys, you should have checked for existing SSH keys and generated a new SSH key. When adding your SSH key to the agent, use the default macOS ssh-add command, and not an application installed by macports, homebrew, or some other external source.
Start the ssh-agent in the background.
If you’re using macOS Sierra 10.12.2 or later, you will need to modify your
/.ssh/config file to automatically load keys into the ssh-agent and store passphrases in your keychain.
First, check to see if your
/.ssh/config file exists in the default location.
If the file doesn’t exist, create the file.
/.ssh/config file, then modify the file, replacing
/.ssh/id_ed25519 if you are not using the default location and name for your id_ed25519 key.
Note: If you chose not to add a passphrase to your key, you should omit the UseKeychain line.
Add your SSH private key to the ssh-agent and store your passphrase in the keychain. If you created your key with a different name, or if you are adding an existing key that has a different name, replace id_ed25519 in the command with the name of your private key file.
Note: The -K option is Apple’s standard version of ssh-add , which stores the passphrase in your keychain for you when you add an ssh key to the ssh-agent. If you chose not to add a passphrase to your key, run the command without the -K option.
If you don’t have Apple’s standard version installed, you may receive an error. For more information on resolving this error, see «Error: ssh-add: illegal option — K.»
If you have GitHub Desktop installed, you can use it to clone repositories and not deal with SSH keys.
Ensure the ssh-agent is running. You can use the «Auto-launching the ssh-agent» instructions in «Working with SSH key passphrases», or start it manually:
Add your SSH private key to the ssh-agent. If you created your key with a different name, or if you are adding an existing key that has a different name, replace id_ed25519 in the command with the name of your private key file.
Start the ssh-agent in the background.
Add your SSH private key to the ssh-agent. If you created your key with a different name, or if you are adding an existing key that has a different name, replace id_ed25519 in the command with the name of your private key file.
Adding ssh-keys in windows for private git
might be a dumb question. but where do we add the ssh keys of the workstation to the git server both being purely on windows 2012 R2. ..Without the use of github
i had created a remote in the git server repo as
git remote add origin edscs-npe\bzky7x@IP:/c/temp/repo.git
In the workstation i am trying to clone the link as ..
Cloning into ‘repo’.
ssh: connect to host «IP» port 22: Connection refused
fatal: Could not read from remote repository.
Please make sure you have the correct access rights
and the repository exists.
Now the problem I think here is on the authentication between both the workstation and the git server. where do I add the ssh keys of the workstation to the git server both being windows machine.
Much help would be appreciated
1 Answer 1
Now the problem i think here is on the authentication between both the workstation and the git server.
To test this, just ssh from the workstation to the server. If it prompts you for a password and you are able to type it in and connect, then yes, you need to set up your ssh keys. If not, then there is more setup you need to do on the server end that is outside the scope of this question.
First, on your workstation you need to set up your public/private keys. You can do this with a command like:
ssh-keygen -t rsa
After hitting enter to accept the defaults, you should get some files in your
Now you need to add your public key to the authorized_keys on the server account you use for your git operations (You will need to enter a password for this operation)
/.ssh/id_rsa.pub | ssh user@server ‘cat >> .ssh/authorized_keys’
You should be able to both interactively ssh into the server and use git to clone from the server.
Select private key to use with Git
I have 2 Git servers that require 2 different SSH keys.
git clone user1@server1:blahblahblah uses
/.ssh/id_rsa , but I need to specify which key to use depending on the server I am connecting to.
What Git command-line parameter does this job? (I am running Linux.)
9 Answers 9
If you are connecting via SSH then the key will be controlled by an SSH parameter, not a git parameter.
SSH looks in the
/.ssh/config file for configuration parameters. Modify that file and add IdentityFile entries for the two Git servers like this:
This article has some more details.
There is another possibility. That’s to set core.sshCommand , e.g.
There’s one particular scenario when this strategy is particularly useful: that’s when you have multiple accounts on Github, as all accounts ssh to Github as git@github.com and it uses the ssh key to determine which Github user you are. In this case neither .ssh/config nor ssh-agent will do what you want.
Update — You cannot run the above until you have a local repository, so if you’re trying to clone a remote repository, you’ll need to specify the key manually as per drewbie18’s answer:
Once you’ve cloned the repository you can use the git config command to set this permanently.
/.ssh/config (and even /etc/hosts, in case of multiple accounts on the GitHub). – mr.b Aug 15 ’17 at 8:21
Generally, you want to use
/.ssh/config for this. Simply pair server addresses with the keys you want to use for them as follows:
Host * denotes any server, so I use it to set
/.ssh/id_rsa as the default key to use.
In my scenario, similar to @Richard Smith scenario (whose solution, BTW, didn’t work for me), I need to use different keys for the same server under different repositories.
The workaround for me was to set up the session correctly with the environment variable GIT_SSH_COMMAND , like so:
Update:
Another thing to note here is that setting the environment variable correctly can be a hustle, so I’m using the command prompt modification facilities provided by things like Liquid Prompt or Fish Shell to hook into the shell and keep updating the environment variables according to the current directory and some rules. For example, all my personal projects that need to my personal SSH key with Gitlab are under
/Documents/Projects/personal so when the shell hook runs pwd and finds that the current directory is under that path, it automatically sets the GIT_SSH_COMMAND variables as needed.
Подключение к Git по SSH в Windows без PuttyGen на примере BitBucket
Много статей (в том числе и на Хабре) посвящено подключению к Git по SSH-ключам. Почти во всех из них используется один из двух способов: либо с помощью puttygen.exe, либо командами ssh-keygen или ssh-add.
Вчера на одном из компьютеров у меня не получилось сделать это для msysgit ни одним из описанных в интернете способов, и я потратил несколько часов на попытки настроить SSH-доступ, так ни чего и не добившись.
Как я решил эту проблему — под катом.
BitBucket всё время ругался на то, что ему требуется подключение с помощью ключа:
Permission denied (publickey).
fatal: Could not read from remote repository.
Please make sure you have the correct access rights and the repository exists.
Мои попытки сгенерировать ключи, указать пути в переменных среды, привязать ключи к гиту были бесполезны. Либо гит ругался крякозябрами (в случае ssh-agent cmd.exe), либо просто игнорировал всё предложенное.
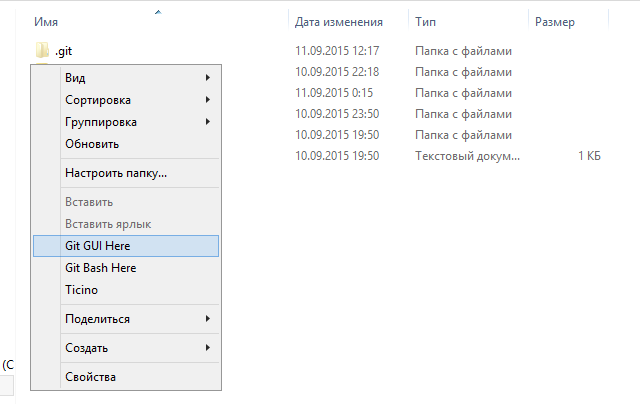
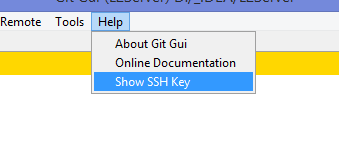
Решение оказалось куда удобнее и проще. Достаточно запустить в локальном репозитории GIT GUI Here, и в меню перейти в
Help -> Show SSH Key:
Если вы столкнулись с такой проблемой, то скорее всего у вас там ни чего не будет:
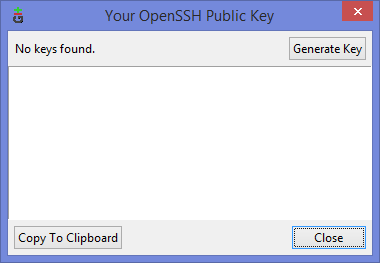
Ну а дальше читать будут, скорее всего, только самые педантичные… Жмём Generate key, видим окно запроса пароля (два раза) для приватного ключа:
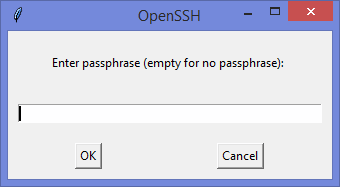
И видим сгенерировавшийся публичный ключ:
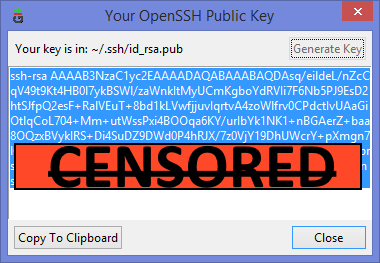
Копируем его, и добавляем вэб-морду ГИТа (в моём случае это BitBucket; ключи там можно добавить в двух местах — в настройках аккаунта и в настройках проекта, нам первый вариант, ибо второй — для деплоя проекта) [Аккаунт] — Управление аккаунтом — SSH-ключи — Добавить ключ:

Ну, а дальше — просто делаем что нужно — или пуш, или клон (предполагается, что git remote add вы уже сделали сами). Git спросит, можно ли добавить хост к доверенным, и запросит passphrase (пароль приватного ключа). Всё, можно работать.
PS: Большое спасибо за наводку на решение моему коллеге Ивану!


