- How To Set Up GitLab SSH Key on macOS
- Prerequisite
- Generate SSH Key
- Register SSH Key
- Insert SSH Key to GitLab Account
- How to Install Git on Mac and Generate SSH Keys
- Amir Ghahrai
- How to Install Git on Mac
- How to generate SSH key for GitHub authorization
- How to access and copy public SSH key
- How to upload your public SSH key to GitHub
- Adding a new SSH key to your GitHub account
- Generating a new SSH key and adding it to the ssh-agent
- Help us make these docs great!
How To Set Up GitLab SSH Key on macOS
Prerequisite
If you want to clone a repository from GitLab, there are 2 ways to do it.
The first choice is using HTTPS , but you need to insert your GitLab username and password every time you clone a repository.
The second choice is using SSH key. By using SSH key, you can clone a repository from GitLab without inserting username and password. Because, SSH key will handle the authentication.
Today, we will learn how to set GitLab SSH Key on macOS.
Generate SSH Key
- Open your terminal, go to .ssh directory
Exit fullscreen mode
- Create your SSH Key. We will use RSA SSH key configuration.
Exit fullscreen mode
- You’ll see a message to insert file name for SSH key. For example, I insert: id_rsa_gitlab_key
Exit fullscreen mode
- Next, you’ll be asked to enter passphrase. Just leave it empty
Exit fullscreen mode
- Congratulations, you just create your own SSH Key. To check SSH key exist or not, run:
Exit fullscreen mode
Exit fullscreen mode
Register SSH Key
To make sure your mac able to authenticate automatically with GitLab, you need to register your SSH key to SSH agent in your mac.
Exit fullscreen mode
Exit fullscreen mode
Exit fullscreen mode
- To make sure your SSH key added automatically to SSH agent after a reboot (or logout/login), we need to set config file.
Exit fullscreen mode
Save config file by using ctrl + x .
Check your SSH key in SSH agent.
Exit fullscreen mode
- You will see your SSH key has been registered to SSH agent.
Insert SSH Key to GitLab Account
- Copy your SSH Key. This key will be copied to your GitLab account.
Exit fullscreen mode
- Go to gitlab.com, then go Profile >> SSH Keys menu ( https://gitlab.com/profile/keys ).
Paste your SSH Key to Key input, and also add the Title.
Press Add Key button.
To test whether your SSH key was added correctly, run:
Exit fullscreen mode
Exit fullscreen mode
Great, now you can clone and push a repository in GitLab, getting work done and have a time with your family 😁 .
Источник
How to Install Git on Mac and Generate SSH Keys

Amir Ghahrai
In this step-by-step Git Tutorial, we will go through how to install Git on a Mac machine, how to generate SSH keys and upload your public SSH key to your GitHub account for authorization.
How to Install Git on Mac
Open a terminal and type
This will install Git on your system. To confirm the installation, type
This will print the version of Git installed on your machine.
How to generate SSH key for GitHub authorization
- Open a terminal
- Go to your home directory by typing cd
Type the following command ssh-keygen -t rsa
- This will prompt you to enter a filename to store the key
- Just press enter to accept the default filename (/Users/you/.ssh/id_rsa)
- Then it will ask you to create a passphrase. This is optional, either create a passphrase or press enter for no passphrase
/.ssh/id_rsa.pub
Your public key is stored in the file ending with .pub, i.e.
How to access and copy public SSH key
In order to authenticate yourself and your device with GitHub, you need to upload your public SSH key which you generated above to your GitHub account.
Copy public SSH key
Open a terminal and type
This will copy the contents of the id_rsa.pub file to your clipboard.
How to upload your public SSH key to GitHub
- Once you have copied your public SSH key, login to your GitHub account and go to
- https://github.com/settings/profile
- On the left-hand side menu, you will see a link “SSH and GPG keys”
- Click on that link which will take you to a page where you can enter your public SSH key that you copied earlier.
- Click the button which says ‘New SSH key’
- Then enter a title name — can be anything, e.g. newMac
- Paste the public SSH key in the key textbox
- Click “Add SSH key”
Test your GitHub authorization:
Open a terminal and type
- It will ask you if you want to continue to connect, type yes
- If you created a passphrase when you were generating the public key, then it will ask you to enter it.
- Enter your passphrase and press enter.
- It will then start to clone the project to your directory.
You are all now set up to use Git and GitHub.
Источник
Adding a new SSH key to your GitHub account
To configure your GitHub account to use your new (or existing) SSH key, you’ll also need to add it to your GitHub account.
Before adding a new SSH key to your GitHub account, you should have:
After adding a new SSH key to your GitHub account, you can reconfigure any local repositories to use SSH. For more information, see «Switching remote URLs from HTTPS to SSH.»
Note: GitHub is improving security by dropping older, insecure key types.
DSA keys ( ssh-dss ) are no longer supported. Existing keys will continue to function through March 15, 2022. You cannot add new DSA keys to your user account on GitHub.
RSA keys ( ssh-rsa ) with a valid_after before November 2, 2021 may continue to use any signature algorithm. RSA keys generated after that date must use a SHA-2 signature algorithm. Some older clients may need to be upgraded in order to use SHA-2 signatures.
Copy the SSH public key to your clipboard.
If your SSH public key file has a different name than the example code, modify the filename to match your current setup. When copying your key, don’t add any newlines or whitespace.
Tip: If pbcopy isn’t working, you can locate the hidden .ssh folder, open the file in your favorite text editor, and copy it to your clipboard.
In the upper-right corner of any page, click your profile photo, then click Settings. 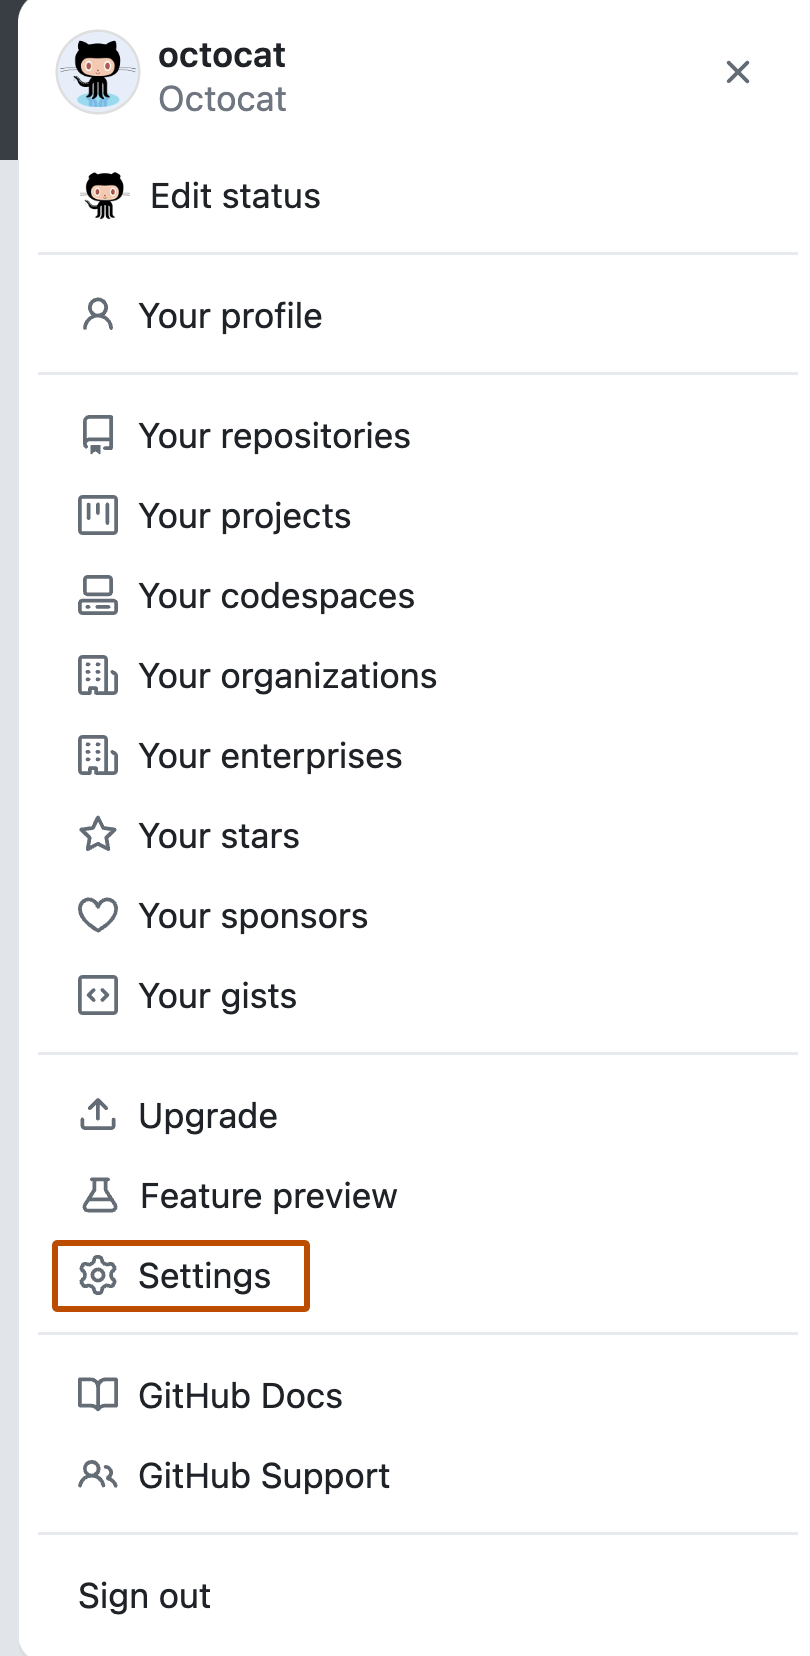
In the user settings sidebar, click SSH and GPG keys. 
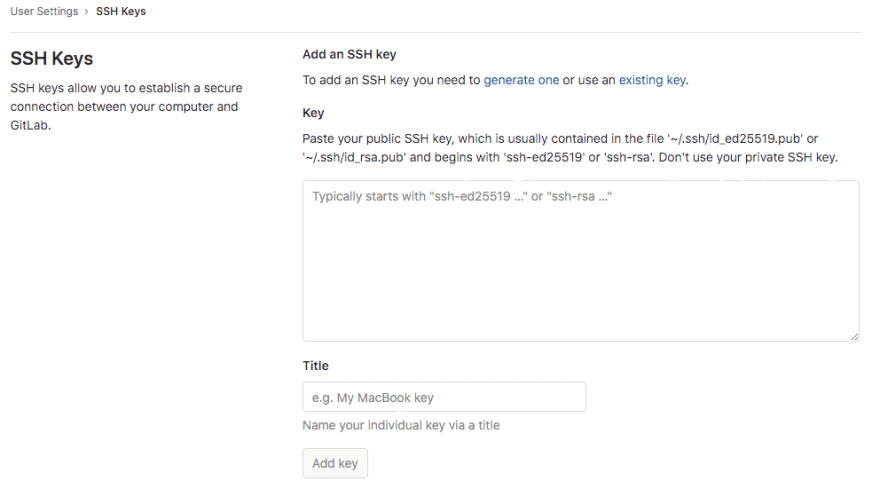
Click New SSH key or Add SSH key. 
In the «Title» field, add a descriptive label for the new key. For example, if you’re using a personal Mac, you might call this key «Personal MacBook Air».
Paste your key into the «Key» field. 
Click Add SSH key. 
If prompted, confirm your GitHub password. 
Copy the SSH public key to your clipboard.
If your SSH public key file has a different name than the example code, modify the filename to match your current setup. When copying your key, don’t add any newlines or whitespace.
Tip: If clip isn’t working, you can locate the hidden .ssh folder, open the file in your favorite text editor, and copy it to your clipboard.
In the upper-right corner of any page, click your profile photo, then click Settings.
In the user settings sidebar, click SSH and GPG keys.
Click New SSH key or Add SSH key.
In the «Title» field, add a descriptive label for the new key. For example, if you’re using a personal Mac, you might call this key «Personal MacBook Air».
Paste your key into the «Key» field.
Click Add SSH key.
If prompted, confirm your GitHub password.
Copy the SSH public key to your clipboard.
If your SSH public key file has a different name than the example code, modify the filename to match your current setup. When copying your key, don’t add any newlines or whitespace.
Tip: Alternatively, you can locate the hidden .ssh folder, open the file in your favorite text editor, and copy it to your clipboard.
In the upper-right corner of any page, click your profile photo, then click Settings.
In the user settings sidebar, click SSH and GPG keys.
Click New SSH key or Add SSH key.
In the «Title» field, add a descriptive label for the new key. For example, if you’re using a personal Mac, you might call this key «Personal MacBook Air».
Paste your key into the «Key» field.
Click Add SSH key.
If prompted, confirm your GitHub password.
To learn more about GitHub CLI, see «About GitHub CLI.»
To add an SSH key to your GitHub account, use the ssh-key add subcommand, specifying your public key.
To include a title for the new key, use the -t or —title flag.
Источник
Generating a new SSH key and adding it to the ssh-agent
After you’ve checked for existing SSH keys, you can generate a new SSH key to use for authentication, then add it to the ssh-agent.
About SSH key generation
If you don’t already have an SSH key, you must generate a new SSH key to use for authentication. If you’re unsure whether you already have an SSH key, you can check for existing keys. For more information, see «Checking for existing SSH keys.»
If you want to use a hardware security key to authenticate to GitHub, you must generate a new SSH key for your hardware security key. You must connect your hardware security key to your computer when you authenticate with the key pair. For more information, see the OpenSSH 8.2 release notes.
If you don’t want to reenter your passphrase every time you use your SSH key, you can add your key to the SSH agent, which manages your SSH keys and remembers your passphrase.
Generating a new SSH key
Open Terminal Terminal Git Bash .
Paste the text below, substituting in your GitHub email address.
Note: If you are using a legacy system that doesn’t support the Ed25519 algorithm, use:
This creates a new SSH key, using the provided email as a label.
When you’re prompted to «Enter a file in which to save the key,» press Enter. This accepts the default file location.
At the prompt, type a secure passphrase. For more information, see «Working with SSH key passphrases.»
Adding your SSH key to the ssh-agent
Before adding a new SSH key to the ssh-agent to manage your keys, you should have checked for existing SSH keys and generated a new SSH key. When adding your SSH key to the agent, use the default macOS ssh-add command, and not an application installed by macports, homebrew, or some other external source.
Start the ssh-agent in the background.
Depending on your environment, you may need to use a different command. For example, you may need to use root access by running sudo -s -H before starting the ssh-agent, or you may need to use exec ssh-agent bash or exec ssh-agent zsh to run the ssh-agent.
If you’re using macOS Sierra 10.12.2 or later, you will need to modify your
/.ssh/config file to automatically load keys into the ssh-agent and store passphrases in your keychain.
First, check to see if your
/.ssh/config file exists in the default location.
If the file doesn’t exist, create the file.
/.ssh/config file, then modify the file to contain the following lines. If your SSH key file has a different name or path than the example code, modify the filename or path to match your current setup.
Note: If you chose not to add a passphrase to your key, you should omit the UseKeychain line.
Note: If you see an error like this
add an additional config line to your Host * section:
Add your SSH private key to the ssh-agent and store your passphrase in the keychain. If you created your key with a different name, or if you are adding an existing key that has a different name, replace id_ed25519 in the command with the name of your private key file.
Note: The -K option is Apple’s standard version of ssh-add , which stores the passphrase in your keychain for you when you add an SSH key to the ssh-agent. If you chose not to add a passphrase to your key, run the command without the -K option.
If you don’t have Apple’s standard version installed, you may receive an error. For more information on resolving this error, see «Error: ssh-add: illegal option — K.»
Add the SSH key to your account on GitHub. For more information, see «Adding a new SSH key to your GitHub account.»
If you have GitHub Desktop installed, you can use it to clone repositories and not deal with SSH keys.
Ensure the ssh-agent is running. You can use the «Auto-launching the ssh-agent» instructions in «Working with SSH key passphrases», or start it manually:
Add your SSH private key to the ssh-agent. If you created your key with a different name, or if you are adding an existing key that has a different name, replace id_ed25519 in the command with the name of your private key file.
Add the SSH key to your account on GitHub. For more information, see «Adding a new SSH key to your GitHub account.»
Start the ssh-agent in the background.
Depending on your environment, you may need to use a different command. For example, you may need to use root access by running sudo -s -H before starting the ssh-agent, or you may need to use exec ssh-agent bash or exec ssh-agent zsh to run the ssh-agent.
Add your SSH private key to the ssh-agent. If you created your key with a different name, or if you are adding an existing key that has a different name, replace id_ed25519 in the command with the name of your private key file.
Add the SSH key to your account on GitHub. For more information, see «Adding a new SSH key to your GitHub account.»
Generating a new SSH key for a hardware security key
If you are using macOS or Linux, you may need to update your SSH client or install a new SSH client prior to generating a new SSH key. For more information, see «Error: Unknown key type.»
Insert your hardware security key into your computer.
Open Terminal Terminal Git Bash .
Paste the text below, substituting in the email address for your account on GitHub.
Note: If the command fails and you receive the error invalid format or feature not supported, you may be using a hardware security key that does not support the Ed25519 algorithm. Enter the following command instead.
When you are prompted, touch the button on your hardware security key.
When you are prompted to «Enter a file in which to save the key,» press Enter to accept the default file location.
When you are prompted to type a passphrase, press Enter.
Add the SSH key to your account on GitHub. For more information, see «Adding a new SSH key to your GitHub account.»
Help us make these docs great!
All GitHub docs are open source. See something that’s wrong or unclear? Submit a pull request.
Источник


