- GitLab CI -Setting up GitLab Runner on Mac
- Step 1 — Create a Project on a GitLab
- Step 2 — Install Gitlab Runner
- Step 3— Register Gitlab Runner
- Step 4 — Create .yml File
- Step 5— Troubleshooting
- How to use GitLab CI and MacStadium to build your macOS or iOS projects
- On this page
- Choosing a Mac mini plan
- Connecting to the Mac mini
- Connecting with VNC
- Connecting with SSH
- Setting up the development environment
- Installing Xcode
- Installing the command line tools
- Installing and configuring the GitLab Runner
- Testing a project with CI
- Conclusion
- 4 Лучших GIT-клиента для Mac OS X
- OS X Tips & Tricks
- Install GitLab Runner on macOS
- Installing
- Manual installation (official)
- Homebrew installation (alternative)
- Limitations on macOS
- Manual update
- Upgrade the service file
- Using codesign with the GitLab Runner Service
- macOS troubleshooting
- «launchctl» failed: exit status 112, Could not find domain for
- Failed to authorize rights (0x1) with status: -60007.
- fatal: unable to access ‘https://path:3000/user/repo.git/’: Failed to connect to path port 3000: Operation timed out error in the job
GitLab CI -Setting up GitLab Runner on Mac

Setting up CI infrastructure is something, what almost every mobile developer has to do. This time I validate GitLab CI. In this article I will walk you through the process of setting up a Gitlab Runner on our Mac.
I had the following initial setup:
- self-hosted GitLab
- MacMini ( macOS Catalina 10.15.4), where the builds are supposed to run
The official documentation is a good starting point, but nevertheless I was rather puzzled sometimes. I will tell you also about the difficulties I had, so you can spare some time 😉
Step 1 — Create a Project on a GitLab
Create an Xcode Project and Push it to GitLab. You need Maintainer or Owner permission to access the project settings in GitLab. Actually for this tutorial you even not necessarily need Xcode project, but we want to work further on it, don’t we?
Step 2 — Install Gitlab Runner
It is possible to install the runner manually or with Homebrew (you can read all the details here). I’ve chosen the manual way .
At first download the binary
Then give it permission to execute
Step 3— Register Gitlab Runner
Now you have to register the runner so that it can communicate with the Gitlab instance. You have to perform the register command and provide the needed input. URL and Token you can found in the settings of your project as shown below.

And now…. it is failing 💔 Anyway it was the case by me. The error message was this:
But stop panicking!
What did help to me was: export site certificate as .pem file (you can do directly from the browser) and attach it to registration command:
The remaining steps are the same. After you successfully performed you will see the runner in your GitLab project, you can explort and make more configuration.

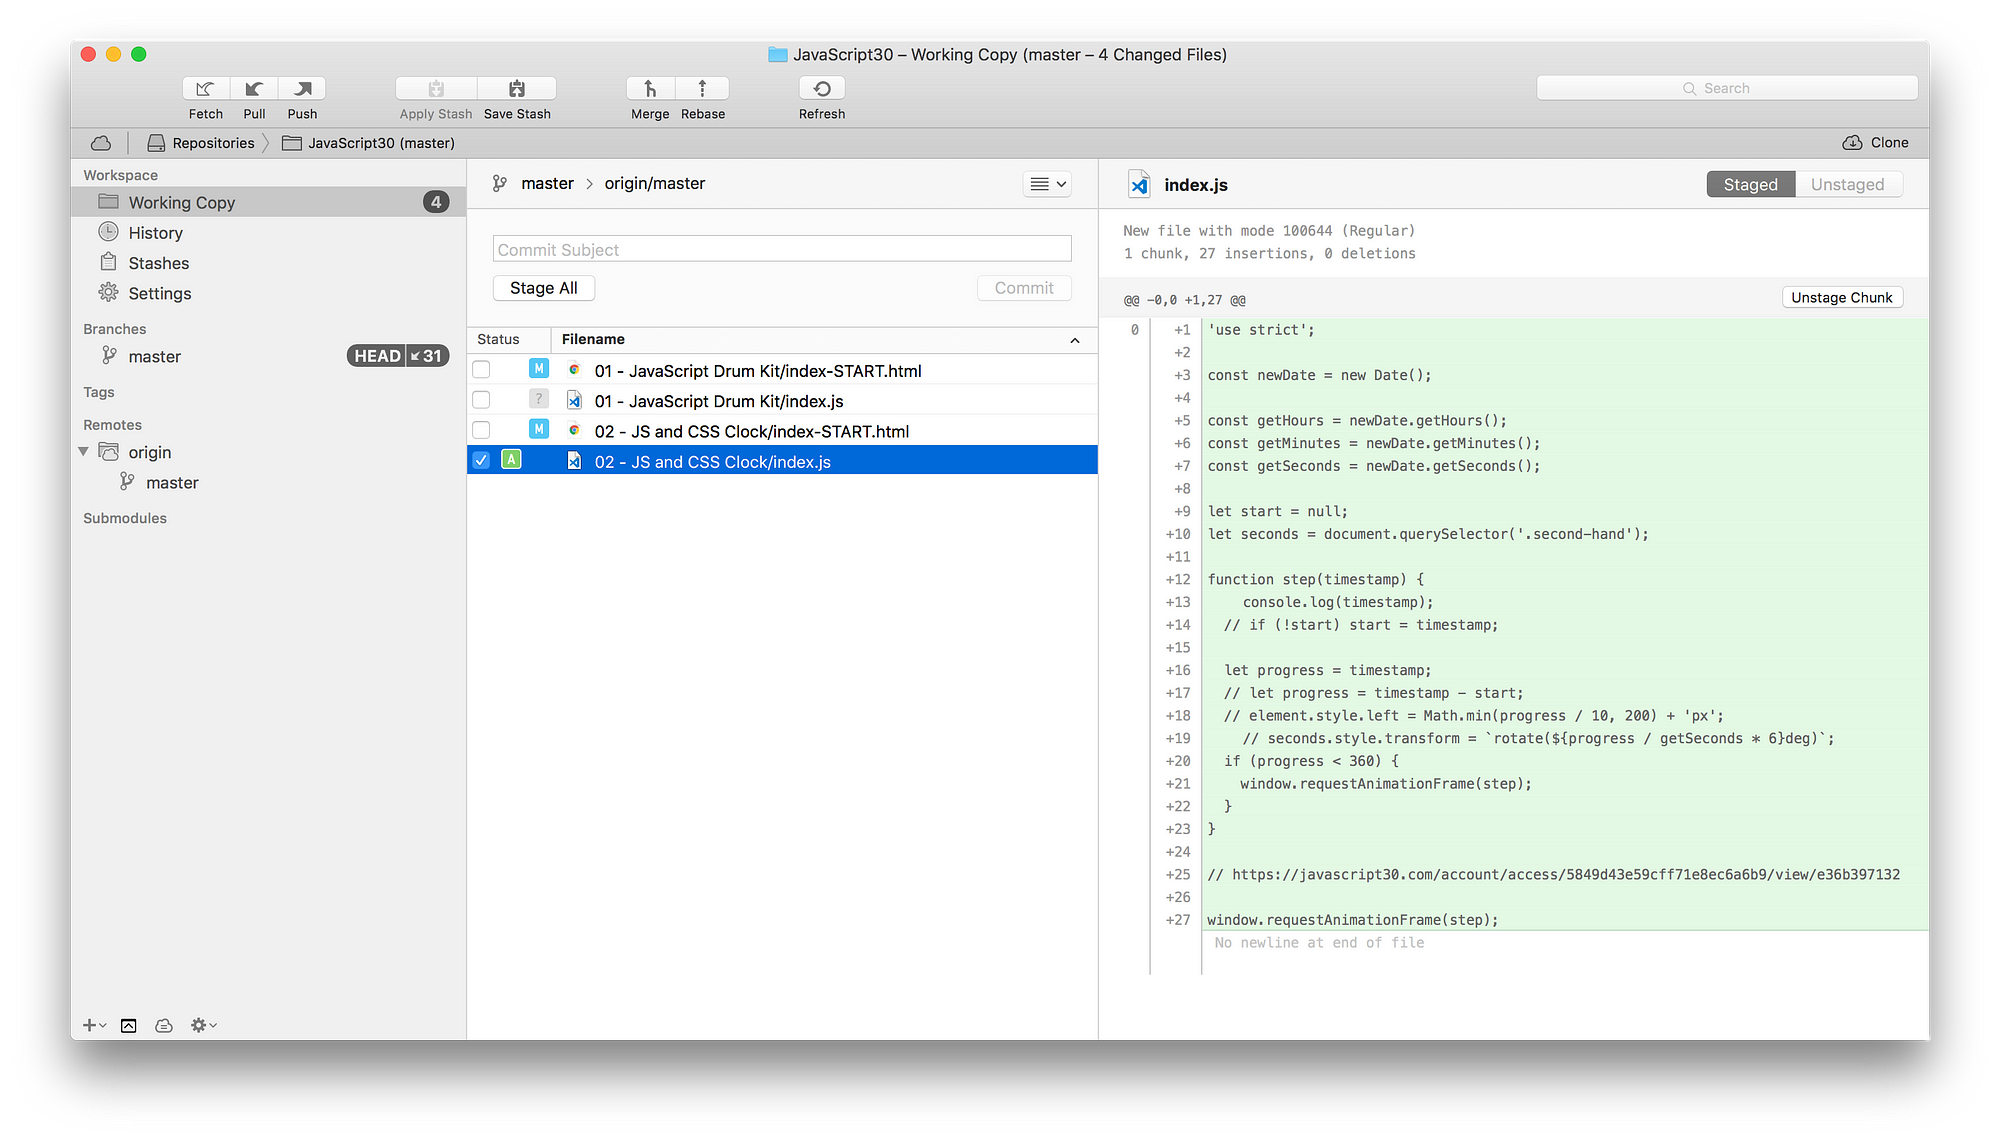
Step 4 — Create .yml File
To tell the runner what it should do, you need to create a .yml in our project. So create a file named ` .gitlab-ci.yml` in the root folder of your project (where the xcproject file is). There are lots of configuration and structuring possibilities for pipeline, but for now we will keep very-very simple. The main configuration element of pipeline is job. I add just one job with a simple “Hello CI” command… ok and perform tests, but this one is optional 😉
There is a listing tool in GitLab in CI/CD section in the menu. You can just check if our script is correct.

After you commited the file, the job will automatically start. Congratulations! You have configured your first GitLabCI pipeline! 😎

Step 5— Troubleshooting
Or it may happen, you see, what I have initially seen — an error.

And the Logs seem to be not very helpful

It turned out, the reason was rvm. Of course you can get rid of it completely, but probably you still need it. I have found the solution here:
- remove rvm initialization from your .bash_profile file
- add this line source «$HOME/.rvm/scripts/rvm» to your .gitlab-ci.yml
Probably it is not yet the perfect one, but it helps.
👆 It may be very helpful to run the gitlab runner in debug mode from the terminal on your machine. The output contains more information as logs in the web-ui. Just open your project and call this command:
gitlab-runner —debug exec shell test_job
So now we managed to set up the Gitlab runner. Next step is further pipeline configuration with fastlane scripts. Yo can find it here.
Источник
How to use GitLab CI and MacStadium to build your macOS or iOS projects


In this article, we will see how to get started with MacStadium, a provider that offers dedicated Mac hardware which you can use with GitLab CI and build your macOS or iOS application.
Continuous Integration and Delivery with GitLab is easier if you are developing your application on Linux. All you need to do is find a provider, spin up a VM, install GitLab Runner on it and configure your project’s .gitlab-ci.yml file. On macOS on the other hand, things may not be that easy. Finding a provider that offers a Mac machine that will be online 24/7 can be hard. MacStadium is here to help achieve that goal and offers a discount to all GitLab users. Let’s see how to make this happen.
On this page
Choosing a Mac mini plan
The first step is to choose a plan. MacStadium offers many options, so you can pick whatever fits your needs. A Mac mini is perfect to test things out and is a good first choice. It should be enough to get you started, but depending on your needs you may have to upgrade to a more beefy machine.
Depending on your location and project needs, you have to:
- Choose the datacenter
- Choose the Mac mini
- Choose the macOS version
- Click Start Trial (24 hours) on the Mac mini of your choice to get going in a few steps
At first you’ll be asked to create a MacStadium account Fill in your information and when in the Secure Checkout page, be sure to check the I want to use a coupon code option and use GITLAB10 for 10% off.
At the time of this writing, the staged machines come with macOS 10.12.2. As new releases com from Apple, MacStadium tests them thoroughly and then update their staged machines. Of course, as a customer you can run the OS update on your own machine anytime.
Connecting to the Mac mini
When you sign up, you’ll receive an email with two important pieces of information:
The static IP address of your Mac. This will allow you to find your Mac mini from anywhere in the world, and you can also point domain names to this IP address so it’s easier to remember.
The username and password to access the machine. The user is standard for all installs, but the password is randomly generated. Upon the first login, you can and are encouraged to change it.
After you have this information, there are two ways of connecting to your Mac mini: VNC and SSH.
Connecting with VNC
If connecting from a Mac, Apple’s Screen Sharing is ideal. It’s installed on every Mac and can you can connect on your MacStadium Mac mini easily with the username and password that was sent to you via email.
If you don’t have a favorite VNC client already, there are a number of options to choose from:
When you connect with VNC, you can use the same password that is set up for the user on the Mac mini.
macOS has that as a separate setting, but MacStadium’s provision scripts enable VNC connections by default.
Connecting with SSH
You can SSH into your machine using the username and password. For example, if the username is administrator and the IP address of your machine 1.2.3.4 :
Enter the password when asked (you won’t be able to see it), hit Enter and you’re in!
Setting up the development environment
The following steps are to be performed to the remote Mac machine. We need to install Xcode and the command line tools that contain the SDKs and UNIX development applications like the LLVM compiler, etc.
Apart from the needed toolset, the screensaver needs to be disabled otherwise the machine will be put to sleep, thus disrupting the workflow of CI. Thankfully, all the machines hosted on MacStadium are set to never sleep by default. It’s just done in System Preferences > Energy Saver.
Installing Xcode
There are two ways to install Xcode. You can either download it from Apple’s developer portal or use the App Store where you might be asked to fill in your credit card information. To avoid that, manually download Xcode:
- Connect via VNC to the remote Mac machine
- Open a browser and go to https://developer.apple.com/download/more
- Login with your existing AppleID or create one
Select the Xcode version you wish to install
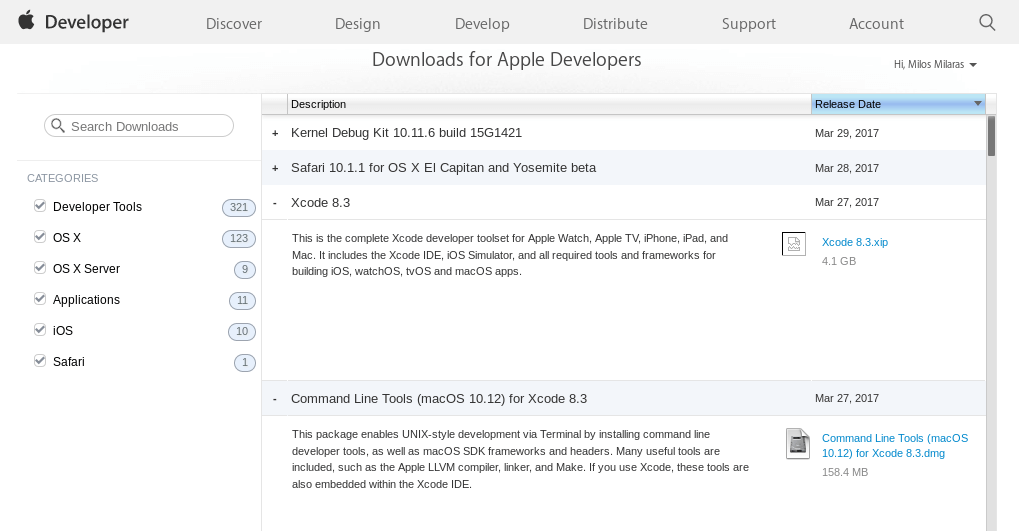
This should download the Xcode package in your Downloads folder and decompress it automatically. After a couple of minutes it should finish.
Open a terminal and move Xcode.app to /Applications so that it can be found by Launchpad:
In the next step we will install the command line developer tools.
Installing the command line tools
The command line tools are a subsection of Xcode, so if you installed Xcode, you may skip this part.
Open the Terminal app or run this command via SSH:
Accept the License Agreement and the installation will begin
Now that all development tools are installed, it’s time to install GitLab Runner.
Installing and configuring the GitLab Runner
GitLab Runner is responsible for running your jobs in macOS and then it reports the results back to GitLab.
Testing a project with CI
The final piece of this puzzle is to set up a project in GitLab (your own CE/EE instance or even GitLab.com) and hook it up with Mac mini. We will not expand on that, but you can follow this nice blog post by Angelo Stavrow on Setting up GitLab CI for iOS projects. It includes comprehensive steps to get you started.
Conclusion
Having a dedicated Mac machine for your development can save you precious time when you follow the Continuous Integration workflow with your team. In this tutorial, you’ve seen how to quickly get a remote Mac mini up and running for your needs. Be sure to add the promo code GITLAB10 on checkout for 10% off!
Get 10% off of all MacStadium plans by using GITLAB10 at checkout. The coupon can only be applied when signing up hardware, but if you are an existing customer who is using Gitlab and makes a change in hardware, you can always apply it again or request the discount in a ticket.
Источник
4 Лучших GIT-клиента для Mac OS X

На данный момент существует много GIT клиентов под разные платформы, буть то Mac, Linux или Windows. Справедливости ради многие могут сказать, а зачем вообще нужны GIT клиенты если есть Терминал? Хороший вопрос, но тут дело вкуса и привычки, каждому свое.
Спешу поделится с вами самыми лучшими GIT приложениями под Mac, по моему мнению.
1 GitHub Desktop — от создателей GitHub’a. Они попытались сделать его максимально простым, но в то же время функциональным и понятным пользователю. Наследует Git Flow, позволяет в 2 клика сделать Pull request, что очень удобно если вы активный участник open source комьюнити. А так же удобный и приятный интерфейс не может не радовать.
Цена: бесплатно
Ссылка: скачать

2 Tower — лучший Git клиент под Mac. Приятный интерфейс, интеграция с многими популярными сервисами. Позволяет не выходя с приложения создать, склонировать уже существующий репозиторий. И многое другое. Рекомендую.
Цена: 69.00$ / 30-дней триал
Ссылка: скачать
3 GitUp — многообещающий проект, который не так давно появился. Полностью open source , что само собой хорошо. Из ключевых особенностей:
- отменить/повторить последнее действие (так же просто как нажать ctrl+z);
- снэпшоты — дает вернуться в любую точку сделанного вами изменения;
- быстрое изменение commit-message. Подробнее о всех возможностях можно прочитать на сайте.
Цена: б есплатно / open source
Ссылка:скачать
4 Sourcetree — отличный бесплатный клиент, от компании Атласиан. Очень похож на Tower, о котором я писал выше. Имеет ряд достоинств, среди которых приятный внешний вид и большой набор фич, как для новичка, так и для продвинутых пользователей. Из ключевых особенностей:
- поддержка git-flow из коробки — это модель ведения git проекта, которая несет в себе определенные правила к созданию бранчей. Очень удобно при работе в команде ;
- интерактивный ребейз — предоставляет инструмент, который визуально помогает решить проблемы, что возникают при ребейзе;
- Подробнее о всех возможностях можно прочитать на сайте.
Цена: б есплатно
Ссылка:скачать
Подписывайтесь на меня в Twitter и Instagram.
Если понравилось, жми “Рекомендую”, это поможет мне поделиться полезным с другими.
OS X Tips & Tricks
Кастомизация, трюки, приложения и много другое
Источник
Install GitLab Runner on macOS
GitLab Runner can be installed and updated on macOS.
Installing
There are two methods for installing GitLab Runner on macOS:
- Manual installation. This method is officially supported and recommended by GitLab.
- Homebrew installation. Install with Homebrew as an alternative to manual installation.
Manual installation (official)
Download the binary for your system:
You can download a binary for every available version as described in Bleeding Edge — download any other tagged release.
Give it permissions to execute:
The rest of the commands should execute as the user who will run the runners.
Open a terminal and switch to the current user.
Install GitLab Runner as a service and start it:
GitLab Runner is installed and will be run after a system reboot.
Homebrew installation (alternative)
A Homebrew formula is available to install GitLab.
To install GitLab Runner using Homebrew:
Install GitLab Runner.
Install GitLab Runner as a service and start it.
GitLab Runner is installed and running.
Limitations on macOS
To sign in as your current user, run the command su — in the terminal. You can obtain your username by running the command ls /users .
Currently, the only proven way for it to work in macOS is by running the service in user-mode.
Since the service will be running only when the user is logged in, you should enable auto-login on your macOS machine.
The service will be launched as a LaunchAgent . By using LaunchAgents , the builds will be able to perform UI interactions, making it possible to run and test in the iOS simulator.
It’s worth noting that macOS also has LaunchDaemons , services running completely in background. LaunchDaemons are run on system startup, but they don’t have the same access to UI interactions as LaunchAgents . You can try to run the Runner’s service as a LaunchDaemon , but this mode of operation is not currently supported.
You can verify that GitLab Runner created the service configuration file after executing the install command, by checking the
If Homebrew was used to install git , it may have added a /usr/local/etc/gitconfig file containing:
This tells Git to cache user credentials in the keychain, which may not be what you want and can cause fetches to hang. You can remove the line from the system gitconfig with:
Alternatively, you can just disable credential.helper for the GitLab user:
You can check the status of the credential.helper with:
Manual update
Stop the service:
Download the binary to replace the GitLab Runner executable:
You can download a binary for every available version as described in Bleeding Edge — download any other tagged release.
Give it permissions to execute:
Start the service:
Make sure that you read the FAQ section which describes some of the most common problems with GitLab Runner.
Upgrade the service file
In order to upgrade the LaunchAgent configuration, you need to uninstall and install the service:
Using codesign with the GitLab Runner Service
If you installed gitlab-runner on macOS with homebrew and your build calls codesign , you may need to set SessionCreate
macOS troubleshooting
The following relate to troubleshooting on macOS.
«launchctl» failed: exit status 112, Could not find domain for
This message may occur when you try to install GitLab Runner on macOS. Make sure that you manage GitLab Runner service from the GUI Terminal application, not the SSH connection.
Failed to authorize rights (0x1) with status: -60007.
If GitLab Runner is stuck on the above message when using macOS, there are two causes to why this happens:
Make sure that your user can perform UI interactions:
The first command enables access to developer tools for your user. The second command allows the user who is member of the developer group to do UI interactions, e.g., run the iOS simulator.
Make sure that your GitLab Runner service doesn’t use SessionCreate = true . Previously, when running GitLab Runner as a service, we were creating LaunchAgents with SessionCreate . At that point (Mavericks), this was the only solution to make Code Signing work. That changed recently with OS X El Capitan which introduced a lot of new security features that altered this behavior. Since GitLab Runner 1.1, when creating a LaunchAgent , we don’t set SessionCreate . However, in order to upgrade, you need to manually reinstall the LaunchAgent script:
Then you can verify that
/Library/LaunchAgents/gitlab-runner.plist has SessionCreate set to false .
fatal: unable to access ‘https://path:3000/user/repo.git/’: Failed to connect to path port 3000: Operation timed out error in the job
If one of the jobs fails with this error, make sure the runner can connect to your GitLab instance. The connection could be blocked by things like:
- firewalls
- proxies
- permissions
- routing configurations
Источник


