- GitLab — Установка
- Установка GitLab на Windows:
- Установка GitLab на Ubuntu
- Install self-managed GitLab
- Try GitLab Ultimate for 30 days!
- Official Linux package (recommended installation)
- Ubuntu
- 1. Install and configure the necessary dependencies
- 2. Add the GitLab package repository and install the package
- 3. Browse to the hostname and login
- 4. Set up your communication preferences
- 5. Recommended next steps
- 1. Install and configure the necessary dependencies
- 2. Add the GitLab package repository and install the package
- 3. Browse to the hostname and login
- 4. Set up your communication preferences
- 5. Recommended next steps
- Debian
- 1. Install and configure the necessary dependencies
- 2. Add the GitLab package repository and install the package
- 3. Browse to the hostname and login
- 4. Set up your communication preferences
- 5. Recommended next steps
- 1. Install and configure the necessary dependencies
- 2. Add the GitLab package repository and install the package
- 3. Browse to the hostname and login
- 4. Set up your communication preferences
- 5. Recommended next steps
- CentOS 8
- 1. Install and configure the necessary dependencies
- 2. Add the GitLab package repository and install the package
- 3. Browse to the hostname and login
- 4. Set up your communication preferences
- 5. Recommended next steps
- 1. Install and configure the necessary dependencies
- 2. Add the GitLab package repository and install the package
- 3. Browse to the hostname and login
- 4. Set up your communication preferences
- 5. Recommended next steps
- CentOS 7
- 1. Install and configure the necessary dependencies
- 2. Add the GitLab package repository and install the package
- 3. Browse to the hostname and login
- 4. Set up your communication preferences
- 5. Recommended next steps
- 1. Install and configure the necessary dependencies
- 2. Add the GitLab package repository and install the package
- 3. Browse to the hostname and login
- 4. Set up your communication preferences
GitLab — Установка
Вы можете установить GitLab Runner в разных операционных системах, установив систему контроля версий Git и создав учетную запись пользователя на сайте GitLab.
Git — система контроля версий, используемая для —
- Обработка исходного кода истории проектов
- Отслеживание изменений, внесенных в файлы
- Быстрая и эффективная работа с небольшими и большими проектами.
- Сотрудничать с другими разработчиками в разных проектах
GitLab — это основанная на Git платформа, предоставляющая удаленный доступ к репозиториям Git и полезная для цикла разработки программного обеспечения, создавая частные и публичные репозитории для управления кодом.
GitLab поддерживает различные типы операционных систем, таких как Windows, Ubuntu, Debian, CentOS, open SUSE и Raspberry Pi 2. В этой главе мы обсудим, как установить GitLab в операционных системах Windows и Ubuntu.
Установка GitLab на Windows:
Шаг 1 — Сначала создайте папку с именем «GitLab-Runner» в вашей системе. Например, вы можете создать на диске C как C: \ GitLab-Runner.
Шаг 2 — Теперь скачайте бинарный файл для x86 или amd64 и скопируйте его в созданную вами папку. Переименуйте загруженный бинарный файл в gitlab-runner.exe .
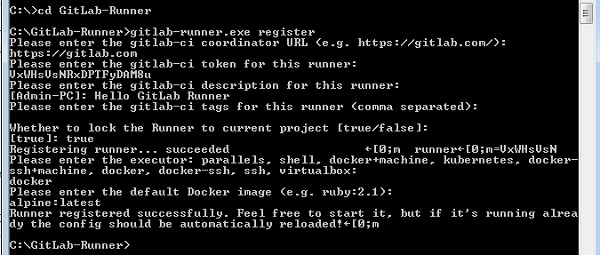
Шаг 3 — Откройте командную строку и перейдите в созданную папку. Теперь введите приведенную ниже команду и нажмите ввод.
Шаг 4 — После выполнения вышеупомянутой команды она попросит ввести URL-адрес координатора gitlab-ci.
Шаг 5 — Введите токен gitlab-ci для бегуна.
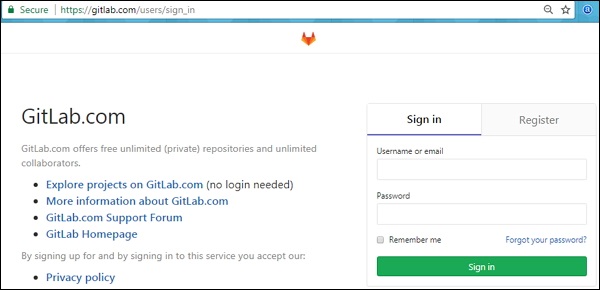
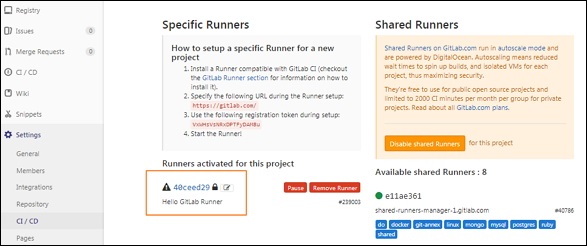
Чтобы получить токен, войдите в свою учетную запись GitLab —
Чтобы получить токен, войдите в свою учетную запись GitLab —
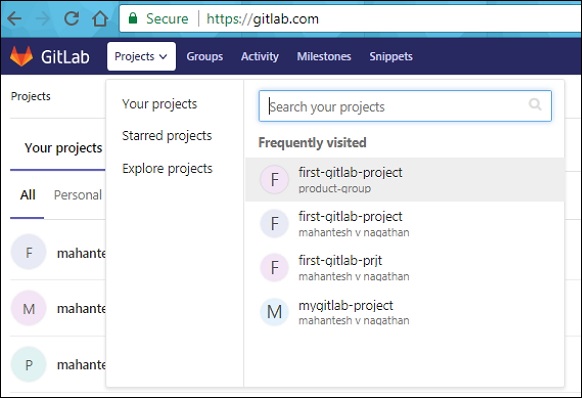
Теперь перейдите к вашему проекту —
Теперь перейдите к вашему проекту —
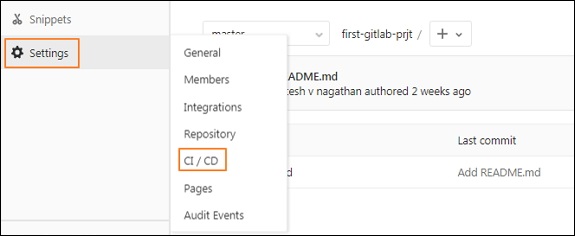
Нажмите на опцию CI / CD на вкладке Настройки и разверните опцию Настройки бегунов .
Нажмите на опцию CI / CD на вкладке Настройки и разверните опцию Настройки бегунов .
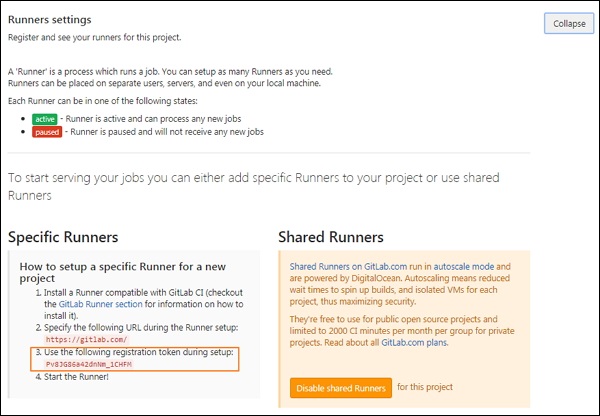
В разделе « Настройки бегунов » вы получите токен, как показано на рисунке ниже —
В разделе « Настройки бегунов » вы получите токен, как показано на рисунке ниже —
Шаг 6 — Введите описание gitlab-ci для бегуна.
Шаг 7 — Он попросит ввести теги gitlab-ci для бегуна.
Вы можете изменить эти теги в пользовательском интерфейсе GitLab позже.
Шаг 8 — Вы можете привязать Runner к текущему проекту, установив для него значение true.
После выполнения описанных выше шагов вы получите сообщение об успешной регистрации: «Регистрация участника … выполнена успешно».
Шаг 9 — Теперь введите Runner executor для построения проекта.
Мы использовали селектор как «докер», который создает среду сборки и легко управляет зависимостями для разработки проекта.
Шаг 10 — Затем он попросит установить изображение по умолчанию для селектора докеров.
Шаг 11 — После выполнения вышеуказанных шагов на экране появится сообщение «Бегун успешно зарегистрирован». На изображении ниже будет описан рабочий процесс вышеуказанных команд —
Шаг 12 — Теперь перейдите к своему проекту, нажмите на опцию CI / CD в разделе « Настройки », и вы увидите активированных бегунов для проекта.
Вы можете увидеть конфигурацию GitLab Runner в файле config.toml в папке GitLab-Runner, как показано ниже —
Установка GitLab на Ubuntu
GitLab может быть установлен в системе Ubuntu с помощью пакета Omnibus , который предоставляет различные сервисы для запуска GitLab. Пакет Omnibus предоставляет необходимые компоненты GitLab, устанавливает конфигурации и метаданные проекта, которые можно использовать в системе пользователя.
Следующие шаги описывают установку GitLab в Ubuntu —
Шаг 1 — Сначала войдите на ваш сервер GitLab с помощью SSH (Secure Shell).
Шаг 2 — Затем загрузите пакет Omnibus —
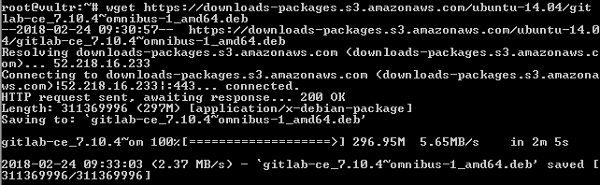
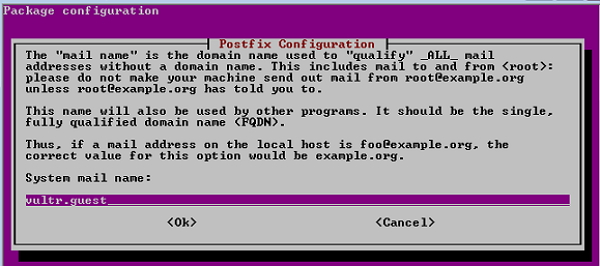
Шаг 3 — Установите постфикс —
Postfix — это агент передачи почты с открытым исходным кодом, используемый для доставки уведомлений по электронной почте.
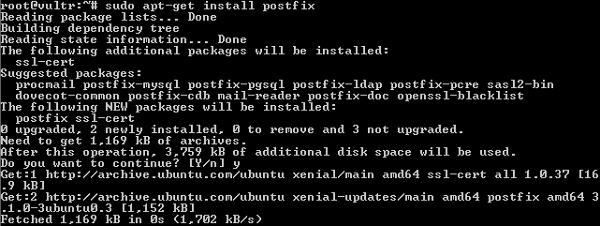
Шаг 4 — При установке Postfix, он спросит тип установки; затем выберите вариант Интернет-сайта . Далее он покажет конфигурацию Postfix вместе с системным почтовым именем, как показано на рисунке —
Шаг 5 — Установите dpkg (менеджер пакетов для системы Debian) для управления установленными пакетами —

Шаг 6 — Чтобы изменения вступили в силу, вам нужно перенастроить GitLab с помощью следующей команды:
Шаг 7 — Проверьте состояние сервисов GitLab с помощью команды ниже —
Если вы хотите установить GitLab из исходного кода, установите некоторые зависимости на сервере и вам необходимо настроить базу данных с помощью PostgreSQL. Это описано в главе Настройка среды . Вы можете установить координатор для создания веб-интерфейса и управления экземплярами сборки. Для получения дополнительной информации вы можете проверить главу Установка координатора .
Install self-managed GitLab
Try GitLab Ultimate for 30 days!
We strongly recommend choosing the official Linux package installation since it is quicker to install, easier to upgrade, and it contains features to enhance reliability not found in other methods. We also strongly recommend at least 4GB of RAM to run GitLab.
Official Linux package (recommended installation)
Install via a single package (also known as Omnibus) that bundles all the different services and tools required to run GitLab
Ubuntu
16.04 LTS, 18.04 LTS, 20.04 LTS
For Ubuntu 20.04, arm64 packages are also available.
1. Install and configure the necessary dependencies
Next, install Postfix to send notification emails. If you want to use another solution to send emails please skip this step and configure an external SMTP server after GitLab has been installed.
During Postfix installation a configuration screen may appear. Select ‘Internet Site’ and press enter. Use your server’s external DNS for ‘mail name’ and press enter. If additional screens appear, continue to press enter to accept the defaults.
2. Add the GitLab package repository and install the package
Add the GitLab package repository.
Next, install the GitLab package. Make sure you have correctly set up your DNS, and change https://gitlab.example.com to the URL at which you want to access your GitLab instance. Installation will automatically configure and start GitLab at that URL.
For https:// URLs GitLab will automatically request a certificate with Let’s Encrypt, which requires inbound HTTP access and a valid hostname. You can also use your own certificate or just use http:// .
3. Browse to the hostname and login
On your first visit, you’ll be redirected to a password reset screen. Provide the password for the initial administrator account and you will be redirected back to the login screen. Use the default account’s username root to login.
4. Set up your communication preferences
Visit our email subscription preference center to let us know when to communicate with you. We have an explicit email opt-in policy so you have complete control over what and how often we send you emails.
Twice a month, we send out the GitLab news you need to know, including new features, integrations, docs, and behind the scenes stories from our dev teams. For critical security updates related to bugs and system performance, sign up for our dedicated security newsletter.
Important note: If you do not opt-in to the security newsletter, you will not receive security alerts.
5. Recommended next steps
Debian
For Debian 10, arm64 packages are also available.
1. Install and configure the necessary dependencies
Next, install Postfix to send notification emails. If you want to use another solution to send emails please skip this step and configure an external SMTP server after GitLab has been installed.
During Postfix installation a configuration screen may appear. Select ‘Internet Site’ and press enter. Use your server’s external DNS for ‘mail name’ and press enter. If additional screens appear, continue to press enter to accept the defaults.
2. Add the GitLab package repository and install the package
Add the GitLab package repository.
Next, install the GitLab package. Make sure you have correctly set up your DNS, and change https://gitlab.example.com to the URL at which you want to access your GitLab instance. Installation will automatically configure and start GitLab at that URL.
For https:// URLs GitLab will automatically request a certificate with Let’s Encrypt, which requires inbound HTTP access and a valid hostname. You can also use your own certificate or just use http:// .
3. Browse to the hostname and login
On your first visit, you’ll be redirected to a password reset screen. Provide the password for the initial administrator account and you will be redirected back to the login screen. Use the default account’s username root to login.
4. Set up your communication preferences
Visit our email subscription preference center to let us know when to communicate with you. We have an explicit email opt-in policy so you have complete control over what and how often we send you emails.
Twice a month, we send out the GitLab news you need to know, including new features, integrations, docs, and behind the scenes stories from our dev teams. For critical security updates related to bugs and system performance, sign up for our dedicated security newsletter.
Important note: If you do not opt-in to the security newsletter, you will not receive security alerts.
5. Recommended next steps
CentOS 8
and RHEL, Oracle, Scientific
For CentOS and RedHat 8, arm64 packages are also available.
1. Install and configure the necessary dependencies
On CentOS 8, the commands below will also open HTTP, HTTPS and SSH access in the system firewall.
Next, install Postfix to send notification emails. If you want to use another solution to send emails please skip this step and configure an external SMTP server after GitLab has been installed.
During Postfix installation a configuration screen may appear. Select ‘Internet Site’ and press enter. Use your server’s external DNS for ‘mail name’ and press enter. If additional screens appear, continue to press enter to accept the defaults.
2. Add the GitLab package repository and install the package
Add the GitLab package repository.
Next, install the GitLab package. Make sure you have correctly set up your DNS, and change https://gitlab.example.com to the URL at which you want to access your GitLab instance. Installation will automatically configure and start GitLab at that URL.
For https:// URLs GitLab will automatically request a certificate with Let’s Encrypt, which requires inbound HTTP access and a valid hostname. You can also use your own certificate or just use http:// .
3. Browse to the hostname and login
On your first visit, you’ll be redirected to a password reset screen. Provide the password for the initial administrator account and you will be redirected back to the login screen. Use the default account’s username root to login.
4. Set up your communication preferences
Visit our email subscription preference center to let us know when to communicate with you. We have an explicit email opt-in policy so you have complete control over what and how often we send you emails.
Twice a month, we send out the GitLab news you need to know, including new features, integrations, docs, and behind the scenes stories from our dev teams. For critical security updates related to bugs and system performance, sign up for our dedicated security newsletter.
Important note: If you do not opt-in to the security newsletter, you will not receive security alerts.
5. Recommended next steps
For CentOS and RedHat 8, arm64 packages are also available.
1. Install and configure the necessary dependencies
On CentOS 8 (and RedHat 8), the commands below will also open HTTP, HTTPS and SSH access in the system firewall.
Next, install Postfix to send notification emails. If you want to use another solution to send emails please skip this step and configure an external SMTP server after GitLab has been installed.
During Postfix installation a configuration screen may appear. Select ‘Internet Site’ and press enter. Use your server’s external DNS for ‘mail name’ and press enter. If additional screens appear, continue to press enter to accept the defaults.
2. Add the GitLab package repository and install the package
Add the GitLab package repository.
Next, install the GitLab package. Make sure you have correctly set up your DNS, and change https://gitlab.example.com to the URL at which you want to access your GitLab instance. Installation will automatically configure and start GitLab at that URL.
For https:// URLs GitLab will automatically request a certificate with Let’s Encrypt, which requires inbound HTTP access and a valid hostname. You can also use your own certificate or just use http:// .
3. Browse to the hostname and login
On your first visit, you’ll be redirected to a password reset screen. Provide the password for the initial administrator account and you will be redirected back to the login screen. Use the default account’s username root to login.
4. Set up your communication preferences
Visit our email subscription preference center to let us know when to communicate with you. We have an explicit email opt-in policy so you have complete control over what and how often we send you emails.
Twice a month, we send out the GitLab news you need to know, including new features, integrations, docs, and behind the scenes stories from our dev teams. For critical security updates related to bugs and system performance, sign up for our dedicated security newsletter.
Important note: If you do not opt-in to the security newsletter, you will not receive security alerts.
5. Recommended next steps
CentOS 7
and RHEL, Oracle, Scientific
1. Install and configure the necessary dependencies
On CentOS 7, the commands below will also open HTTP, HTTPS and SSH access in the system firewall.
Next, install Postfix to send notification emails. If you want to use another solution to send emails please skip this step and configure an external SMTP server after GitLab has been installed.
During Postfix installation a configuration screen may appear. Select ‘Internet Site’ and press enter. Use your server’s external DNS for ‘mail name’ and press enter. If additional screens appear, continue to press enter to accept the defaults.
2. Add the GitLab package repository and install the package
Add the GitLab package repository.
Next, install the GitLab package. Make sure you have correctly set up your DNS, and change https://gitlab.example.com to the URL at which you want to access your GitLab instance. Installation will automatically configure and start GitLab at that URL.
For https:// URLs GitLab will automatically request a certificate with Let’s Encrypt, which requires inbound HTTP access and a valid hostname. You can also use your own certificate or just use http:// .
3. Browse to the hostname and login
On your first visit, you’ll be redirected to a password reset screen. Provide the password for the initial administrator account and you will be redirected back to the login screen. Use the default account’s username root to login.
4. Set up your communication preferences
Visit our email subscription preference center to let us know when to communicate with you. We have an explicit email opt-in policy so you have complete control over what and how often we send you emails.
Twice a month, we send out the GitLab news you need to know, including new features, integrations, docs, and behind the scenes stories from our dev teams. For critical security updates related to bugs and system performance, sign up for our dedicated security newsletter.
Important note: If you do not opt-in to the security newsletter, you will not receive security alerts.
5. Recommended next steps
1. Install and configure the necessary dependencies
On CentOS 7 (and RedHat/Oracle/Scientific Linux 7), the commands below will also open HTTP, HTTPS and SSH access in the system firewall.
Next, install Postfix to send notification emails. If you want to use another solution to send emails please skip this step and configure an external SMTP server after GitLab has been installed.
During Postfix installation a configuration screen may appear. Select ‘Internet Site’ and press enter. Use your server’s external DNS for ‘mail name’ and press enter. If additional screens appear, continue to press enter to accept the defaults.
2. Add the GitLab package repository and install the package
Add the GitLab package repository.
Next, install the GitLab package. Make sure you have correctly set up your DNS, and change https://gitlab.example.com to the URL at which you want to access your GitLab instance. Installation will automatically configure and start GitLab at that URL.
For https:// URLs GitLab will automatically request a certificate with Let’s Encrypt, which requires inbound HTTP access and a valid hostname. You can also use your own certificate or just use http:// .
3. Browse to the hostname and login
On your first visit, you’ll be redirected to a password reset screen. Provide the password for the initial administrator account and you will be redirected back to the login screen. Use the default account’s username root to login.
4. Set up your communication preferences
Visit our email subscription preference center to let us know when to communicate with you. We have an explicit email opt-in policy so you have complete control over what and how often we send you emails.
Twice a month, we send out the GitLab news you need to know, including new features, integrations, docs, and behind the scenes stories from our dev teams. For critical security updates related to bugs and system performance, sign up for our dedicated security newsletter.
Important note: If you do not opt-in to the security newsletter, you will not receive security alerts.


