- linux-notes.org
- Установка GitLab-Runner-а в Unix/Linux
- Установка GitLab-Runner-а в Mac OS X
- Установка GitLab-Runner-а в GNU/Linux
- Установка GitLab-Runner-а в FreeBSD
- Установка GitLab-Runner-а через docker контейнер в Unix/Linux
- Установка GitLab-Runner-а через Kubernetes
- Добавить комментарий Отменить ответ
- GitLab CI -Setting up GitLab Runner on Mac
- Step 1 — Create a Project on a GitLab
- Step 2 — Install Gitlab Runner
- Step 3— Register Gitlab Runner
- Step 4 — Create .yml File
- Step 5— Troubleshooting
- Gitlab runner mac os
linux-notes.org
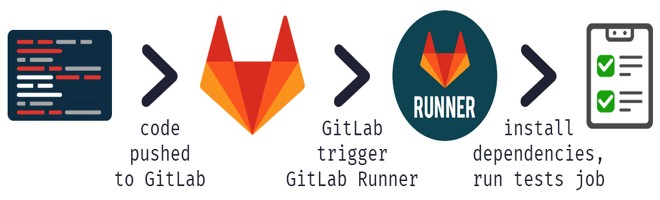
GitLab Runner — это агент, который собственно и занимается выполнением инструкций из специального файла .gitlab-ci.yml
Установка GitLab-Runner-а в Unix/Linux
Сейчас я расскажу как можно настроить gitlab-runner на разные Unix/Linux ОС. Но для начала, запустим сервисы.
Установка GitLab-Runner-а в Mac OS X
Конечно же, выставить права нужно:
После того как выставили права, необходимо зарегестрировать гитлаб-ранер, например, это можно сделать следующим образом:
- gitlab-runner — Утилита.
- register — Опция для регистрации гитлаб-раннера.
- —url=http://gitlab.local — УРЛ где базируется гитлаб-сервер.
- —registration-token=xyLWaXwd15xy6VxU7HUV — Токен для регистрации раннера. Можно найти в админ-панели гитлаб-сервера («Admin Area»-> «Runners»).
- —non-interactive=true — Не выводить вывод на экран.
- —locked=false — Не лочить ранер.
- —name=gitlab-runner-macosx — Собственно имя с которым будет регистрироватся гитлаб-раннер.
- —executor=docker — Выбираем экзекутера (docker или shell). У меня docker.
- —docker-image=docker:stable — Выбираем докер имедж.
- —docker-volumes=/var/run/docker.sock:/var/run/docker.sock — Пробросил докер сокет.
Для помощи есть команда:
Установим Runner как сервис и запустим его:
Для обновления сервиса, нужно выполнить все теже действия что я описывал ранее, но перед этим, стоит остановить службу.
Вот и все использование.
Установка GitLab-Runner-а в GNU/Linux
Скачиваем бинарник в зависимости от разрядности и архитектуры ОС.
Если у вас, Linux x86-64:
Если у вас, Linux x86:
Если у вас, Linux arm:
Конечно же, выставить права нужно:
При желании, если вы хотите использовать Docker, установите Docker с:
Создайте пользователя GitLab CI:
После того как выставили права, необходимо установить Runner как сервис и запустить его:
Потом, зарегестрировать гитлаб-ранер, например, это можно сделать следующим образом:
- gitlab-runner — Утилита.
- register — Опция для регистрации гитлаб-раннера.
- —url=http://gitlab.local — УРЛ где базируется гитлаб-сервер.
- —registration-token=xyLWaXwd15xy6VxU7HUV — Токен для регистрации раннера. Можно найти в админ-панели гитлаб-сервера («Admin Area»-> «Runners»).
- —non-interactive=true — Не выводить вывод на экран.
- —locked=false — Не лочить ранер.
- —name=gitlab-runner-linux — Собственно имя с которым будет регистрироватся гитлаб-раннер.
- —executor=docker — Выбираем экзекутера (docker или shell). У меня docker.
- —docker-image=docker:stable — Выбираем докер имедж.
- —docker-volumes=/var/run/docker.sock:/var/run/docker.sock — Пробросил докер сокет.
Для обновления сервиса, нужно выполнить все теже действия что я описывал ранее, но перед этим, стоит остановить службу.
PS: Конечно если кто-то привык устанавливать программы через пакеты, то можно установить гитлаб-раннер через паркет. Приведу пару примеров:
Для Debian или Ubuntu:
А чтобы установить, можно выполнить:
Для RedHat или CentOS:
PS: Если у вас проблемы с ссылками, попробуйте использовать http/https (В зависимости от того что используете на данный момент).
Вот и все использование.
Установка GitLab-Runner-а в FreeBSD
Не было необходимости!
Установка GitLab-Runner-а через docker контейнер в Unix/Linux
Можно запустить контейнер, например следующим образом:
Но после создания контейнера, стоит на него зайти:
И запустить регистрацию, я ее описывал ранее несколько раз.
Установка GitLab-Runner-а через Kubernetes
Не было обходимости пока еще.
Вот и все, статья «Установка GitLab-Runner-а в Unix/Linux» завершена.
Добавить комментарий Отменить ответ
Этот сайт использует Akismet для борьбы со спамом. Узнайте, как обрабатываются ваши данные комментариев.
Источник
GitLab CI -Setting up GitLab Runner on Mac

Setting up CI infrastructure is something, what almost every mobile developer has to do. This time I validate GitLab CI. In this article I will walk you through the process of setting up a Gitlab Runner on our Mac.
I had the following initial setup:
- self-hosted GitLab
- MacMini ( macOS Catalina 10.15.4), where the builds are supposed to run
The official documentation is a good starting point, but nevertheless I was rather puzzled sometimes. I will tell you also about the difficulties I had, so you can spare some time 😉
Step 1 — Create a Project on a GitLab
Create an Xcode Project and Push it to GitLab. You need Maintainer or Owner permission to access the project settings in GitLab. Actually for this tutorial you even not necessarily need Xcode project, but we want to work further on it, don’t we?
Step 2 — Install Gitlab Runner
It is possible to install the runner manually or with Homebrew (you can read all the details here). I’ve chosen the manual way .
At first download the binary
Then give it permission to execute
Step 3— Register Gitlab Runner
Now you have to register the runner so that it can communicate with the Gitlab instance. You have to perform the register command and provide the needed input. URL and Token you can found in the settings of your project as shown below.

And now…. it is failing 💔 Anyway it was the case by me. The error message was this:
But stop panicking!
What did help to me was: export site certificate as .pem file (you can do directly from the browser) and attach it to registration command:
The remaining steps are the same. After you successfully performed you will see the runner in your GitLab project, you can explort and make more configuration.

Step 4 — Create .yml File
To tell the runner what it should do, you need to create a .yml in our project. So create a file named ` .gitlab-ci.yml` in the root folder of your project (where the xcproject file is). There are lots of configuration and structuring possibilities for pipeline, but for now we will keep very-very simple. The main configuration element of pipeline is job. I add just one job with a simple “Hello CI” command… ok and perform tests, but this one is optional 😉
There is a listing tool in GitLab in CI/CD section in the menu. You can just check if our script is correct.

After you commited the file, the job will automatically start. Congratulations! You have configured your first GitLabCI pipeline! 😎

Step 5— Troubleshooting
Or it may happen, you see, what I have initially seen — an error.

And the Logs seem to be not very helpful

It turned out, the reason was rvm. Of course you can get rid of it completely, but probably you still need it. I have found the solution here:
- remove rvm initialization from your .bash_profile file
- add this line source «$HOME/.rvm/scripts/rvm» to your .gitlab-ci.yml
Probably it is not yet the perfect one, but it helps.
👆 It may be very helpful to run the gitlab runner in debug mode from the terminal on your machine. The output contains more information as logs in the web-ui. Just open your project and call this command:
gitlab-runner —debug exec shell test_job
So now we managed to set up the Gitlab runner. Next step is further pipeline configuration with fastlane scripts. Yo can find it here.
Источник
Gitlab runner mac os
Installation guide for GitLab 10.1 on OS X 10.11
This is WIP version for OS X 10.11. For OS X 10.10 see 10.10 branch.
The GitLab installation consists of setting up the following components:
- Packages / Dependencies
- Ruby
- Go
- Node
- System User
- Database
- Redis
- GitLab
- Nginx
1. Packages / Dependencies
Command line tools
Make sure you have python 2.5+ (gitlab don’t support python 3.x)
Confirm python 2.5+
GitLab looks for python2
On OS X 10.11 it won’t work. You need to disable SIP.
Some more dependices
Install docutils from source.
The use of Ruby version managers such as RVM, rbenv or chruby with GitLab in production frequently leads to hard to diagnose problems. For example, GitLab Shell is called from OpenSSH and having a version manager can prevent pushing and pulling over SSH. Version managers are not supported and we strongly advise everyone to follow the instructions below to use a system Ruby.
On OS X we are forced to use non-system ruby and install it using version manager.
Install rbenv and ruby-build
Make sure rbenv loads in the git user’s shell
If you get the following error on OS X 10.8.5 or lower: ./bin/install:3: undefined method require_relative’ for main:Object (NoMethodError)` Do the following to update to the proper Ruby version
/.bash_profile echo ‘eval «$(rbenv init — —no-rehash)»‘ >>
Install ruby for the git user
Install ruby for your user too (optional)
Since GitLab 8.0, Git HTTP requests are handled by gitlab-git-http-server. This is a small daemon written in Go. To install gitlab-git-http-server we need a Go compiler.
Since GitLab 8.17, GitLab requires the use of node >= v4.3.0 to compile javascript assets, and yarn >= v0.17.0 to manage javascript dependencies. In many distros the versions provided by the official package repositories are out of date, so we’ll need to install through the following commands:
Run the following commands in order to create the group and user git :
Hide the git user from the login screen:
Gitlab recommends using a PostgreSQL database. But you can use MySQL too, see MySQL setup guide.
Login to PostgreSQL
Create a user for GitLab.
Create the GitLab production database & grant all privileges on database
Quit the database session
Try connecting to the new database with the new user
Redis config is located in /usr/local/etc/redis.conf . Make a copy:
Disable Redis listening on TCP by setting ‘port’ to 0
Edit file ( nano /usr/local/etc/redis.conf ) and uncomment:
Clone the Source
Clone GitLab repository
Note: You can change 8-11-stable to master if you want the bleeding edge version, but never install master on a production server!
Go to GitLab installation folder
Copy the example GitLab config
Update GitLab config file, follow the directions at top of file
Copy the example secrets file
Make sure GitLab can write to the log/ and tmp/ directories
Make sure GitLab can write to the tmp/pids/ and tmp/sockets/ directories
Make sure GitLab can write to the public/uploads/ directory
Make sure GitLab can write to the repositories directory
Change the permissions of the directory where CI build traces are stored
Copy the example Unicorn config
Find number of cores
Enable cluster mode if you expect to have a high load instance Ex. change amount of workers to 3 for 2GB RAM server Set the number of workers to at least the number of cores
Copy the example Rack attack config
Configure Git global settings for git user, used when editing via web editor
Disable git gc —auto because GitLab runs git gc for us already.
Configure Git to generate packfile bitmaps (introduced in Git 2.0) on the GitLab server during git gc.
Configure Redis connection settings
Change the Redis socket path to /tmp/redis.sock :
Important Note: Make sure to edit both gitlab.yml and unicorn.rb to match your setup.
Note: If you want to use HTTPS, see Using HTTPS for the additional steps.
Configure GitLab DB Settings
MySQL and remote PostgreSQL only: Update username/password in config/database.yml. You only need to adapt the production settings (first part). If you followed the database guide then please do as follows: Change ‘secure password’ with the value you have given to $password You can keep the double quotes around the password
PostgreSQL and MySQL: Make config/database.yml readable to git only
Note: As of bundler 1.5.2, you can invoke bundle install -jN (where N the number of your processor cores) and enjoy the parallel gems installation with measurable difference in completion time (
60% faster). Check the number of your cores with nproc . For more information check this post. First make sure you have bundler >= 1.5.2 (run bundle -v ) as it addresses some issues that were fixed in 1.5.2.
For PostgreSQL (note, the option says «without . mysql»)
Or if you use MySQL (note, the option says «without . postgres»)
Note: If you want to use Kerberos for user authentication, then omit kerberos in the —without option above.
Install GitLab Shell
GitLab Shell is an SSH access and repository management software developed specially for GitLab.
Run the installation task for gitlab-shell (replace REDIS_URL if needed):
By default, the gitlab-shell config is generated from your main GitLab config. You can review (and modify) the gitlab-shell config as follows:
Note: If you want to use HTTPS, see Using HTTPS for the additional steps.
Note: Make sure your hostname can be resolved on the machine itself by either a proper DNS record or an additional line in /etc/hosts («127.0.0.1 hostname»). This might be necessary for example if you set up gitlab behind a reverse proxy. If the hostname cannot be resolved, the final installation check will fail with «Check GitLab API access: FAILED. code: 401» and pushing commits will be rejected with «[remote rejected] master -> master (hook declined)».
Note: GitLab Shell application startup time can be greatly reduced by disabling RubyGems. This can be done in several manners:
- Export RUBYOPT=—disable-gems environment variable for the processes
- Compile Ruby with configure —disable-rubygems to disable RubyGems by default. Not recommened for system-wide Ruby.
Initialize Database and Activate Advanced Features
Type ‘yes’ to create the database tables. When done you see ‘Administrator account created:
Note: You can set the Administrator/root password by supplying it in environmental variable GITLAB_ROOT_PASSWORD as seen below. If you don’t set the password (and it is set to the default one) please wait with exposing GitLab to the public internet until the installation is done and you’ve logged into the server the first time. During the first login you’ll be forced to change the default password.
The secrets.yml file stores encryption keys for sessions and secure variables. Backup secrets.yml someplace safe, but don’t store it in the same place as your database backups. Otherwise your secrets are exposed if one of your backups is compromised.
Install Init Script
Download the init script (will be /etc/init.d/gitlab ):
Since you are installing to a folder other than default /home/users/git/gitlab , copy and edit the defaults file:
If you installed GitLab in another directory or as a user other than the default you should change these settings in /etc/default/gitlab . Do not edit /etc/init.d/gitlab as it will be changed on upgrade.
You can specify a different Git repository by providing it as an extra paramter:
Next, make sure gitaly configured:
For more information about configuring Gitaly see doc/administration/gitaly.
Check Application Status
Check if GitLab and its environment are configured correctly:
Compile GetText PO files
Start Your GitLab Instance
Note: Nginx is the officially supported web server for GitLab. If you cannot or do not want to use Nginx as your web server, have a look at the GitLab recipes.
Default nginx configuration has an example server on port 8080, same as Gitlab Unicorn instance, which will collide and Gitlab won’t start. Edit nginx configuration and comment out whole example server block for it to work together:
Copy the example site config:
Make sure to edit the config file to match your setup:
Change YOUR_SERVER_FQDN to the fully-qualified domain name of your host serving GitLab.
Note: If you want to use HTTPS, replace the gitlab Nginx config with gitlab-ssl . See Using HTTPS for HTTPS configuration details.
Validate your gitlab or gitlab-ssl Nginx config file with the following command:
You should receive syntax is okay and test is successful messages. If you receive errors check your gitlab or gitlab-ssl Nginx config file for typos, etc. as indicated in the error message given.
Double-check Application Status
To make sure you didn’t miss anything run a more thorough check with:
If all items are green, then congratulations on successfully installing GitLab!
NOTE: Supply SANITIZE=true environment variable to gitlab:check to omit project names from the output of the check command.
Visit YOUR_SERVER in your web browser for your first GitLab login.
If you didn’t provide a root password during setup, you’ll be redirected to a password reset screen to provide the password for the initial administrator account. Enter your desired password and you’ll be redirected back to the login screen.
The default account’s username is root. Provide the password you created earlier and login. After login you can change the username if you wish.
Enjoy!
You can use sudo sh /etc/init.d/gitlab start , sudo sh /etc/init.d/gitlab stop and sudo sh /etc/init.d/gitlab restart to manually start, stop and restart GitLab.
Autostart on boot
Copy Nginx and Gitlab plists and load it:
Advanced Setup Tips
Create log directory, copy in backup plist and load it To enable backup to function you will need to configure the backup options in config/gitlab.yml
Example external HD backup config settings
To use GitLab with HTTPS:
- In gitlab.yml :
- Set the port option in section 1 to 443 .
- Set the https option in section 1 to true .
- In the config.yml of gitlab-shell:
- Set gitlab_url option to the HTTPS endpoint of GitLab (e.g. https://git.example.com ).
- Set the certificates using either the ca_file or ca_path option.
- Use the gitlab-ssl Nginx example config instead of the gitlab config.
- Update YOUR_SERVER_FQDN .
- Update ssl_certificate and ssl_certificate_key .
- Review the configuration file and consider applying other security and performance enhancing features.
Using a self-signed certificate is discouraged but if you must use it follow the normal directions then:
- Generate a self-signed SSL certificate:
- In the config.yml of gitlab-shell set self_signed_cert to true .
If you’re installing from source and use SMTP to deliver mail, you will need to add the following line to config/initializers/smtp_settings.rb:
You can find more tips in official documentation.
Источник


