- How to Install Git on Mac and Generate SSH Keys
- Amir Ghahrai
- How to Install Git on Mac
- How to generate SSH key for GitHub authorization
- How to access and copy public SSH key
- How to upload your public SSH key to GitHub
- How To Set Up GitLab SSH Key on macOS
- Prerequisite
- Generate SSH Key
- Register SSH Key
- Insert SSH Key to GitLab Account
- GitLab wiki Project information Project information Activity Labels Members Issues 11 Issues 11 List Boards Service Desk Milestones Iterations Requirements Monitor Monitor Incidents Packages & Registries Packages & Registries Package Registry Infrastructure Registry Analytics Analytics Insights Issue Repository Value stream Wiki Wiki Activity Create a new issue Issue Boards Collapse sidebar Close sidebar Configuring_SSH_Keys_on_Linux_and_Mac_OS_X Linux and Mac OS X both come with support for SSH and SSH keys out of the box. Launchpad uses SSH keys to authenticate your computer with your Launchpad account. This guide shows you how to get that done. SSH Keys The first thing you need to do is generate your SSH keypair. A keypair, as the name implies, consists of 2 parts: the public key and the private key. Public Key Your public key is placed on remote servers so that they can check back with you to see that you are who you say you are. Private Key Your private key should NEVER leave your computer! This is the main file that authenticates you. It contains the special unique data that identifies you. Generating a Keypair Generating a keypair is very easy. Open a terminal Enter in the following in the terminal: $ ssh-keygen -t rsa -b 4096 Accept the defaults, to save your public and private keys to /.ssh Open your public key ( /.ssh/id_rsa.pub) in a text editor (GEdit or Kate on Linux, TextEdit on Mac OS X)
How to Install Git on Mac and Generate SSH Keys

Amir Ghahrai
In this step-by-step Git Tutorial, we will go through how to install Git on a Mac machine, how to generate SSH keys and upload your public SSH key to your GitHub account for authorization.
How to Install Git on Mac
Open a terminal and type
This will install Git on your system. To confirm the installation, type
This will print the version of Git installed on your machine.
How to generate SSH key for GitHub authorization
- Open a terminal
- Go to your home directory by typing cd
Type the following command ssh-keygen -t rsa
- This will prompt you to enter a filename to store the key
- Just press enter to accept the default filename (/Users/you/.ssh/id_rsa)
- Then it will ask you to create a passphrase. This is optional, either create a passphrase or press enter for no passphrase
/.ssh/id_rsa.pub
Your public key is stored in the file ending with .pub, i.e.
How to access and copy public SSH key
In order to authenticate yourself and your device with GitHub, you need to upload your public SSH key which you generated above to your GitHub account.
Copy public SSH key
Open a terminal and type
This will copy the contents of the id_rsa.pub file to your clipboard.
How to upload your public SSH key to GitHub
- Once you have copied your public SSH key, login to your GitHub account and go to
- https://github.com/settings/profile
- On the left-hand side menu, you will see a link “SSH and GPG keys”
- Click on that link which will take you to a page where you can enter your public SSH key that you copied earlier.
- Click the button which says ‘New SSH key’
- Then enter a title name — can be anything, e.g. newMac
- Paste the public SSH key in the key textbox
- Click “Add SSH key”
Test your GitHub authorization:
Open a terminal and type
- It will ask you if you want to continue to connect, type yes
- If you created a passphrase when you were generating the public key, then it will ask you to enter it.
- Enter your passphrase and press enter.
- It will then start to clone the project to your directory.
You are all now set up to use Git and GitHub.
Источник
How To Set Up GitLab SSH Key on macOS
Prerequisite
If you want to clone a repository from GitLab, there are 2 ways to do it.
The first choice is using HTTPS , but you need to insert your GitLab username and password every time you clone a repository.
The second choice is using SSH key. By using SSH key, you can clone a repository from GitLab without inserting username and password. Because, SSH key will handle the authentication.
Today, we will learn how to set GitLab SSH Key on macOS.
Generate SSH Key
- Open your terminal, go to .ssh directory
Exit fullscreen mode
- Create your SSH Key. We will use RSA SSH key configuration.
Exit fullscreen mode
- You’ll see a message to insert file name for SSH key. For example, I insert: id_rsa_gitlab_key
Exit fullscreen mode
- Next, you’ll be asked to enter passphrase. Just leave it empty
Exit fullscreen mode
- Congratulations, you just create your own SSH Key. To check SSH key exist or not, run:
Exit fullscreen mode
Exit fullscreen mode
Register SSH Key
To make sure your mac able to authenticate automatically with GitLab, you need to register your SSH key to SSH agent in your mac.
Exit fullscreen mode
Exit fullscreen mode
Exit fullscreen mode
- To make sure your SSH key added automatically to SSH agent after a reboot (or logout/login), we need to set config file.
Exit fullscreen mode
Save config file by using ctrl + x .
Check your SSH key in SSH agent.
Exit fullscreen mode
- You will see your SSH key has been registered to SSH agent.
Insert SSH Key to GitLab Account
- Copy your SSH Key. This key will be copied to your GitLab account.
Exit fullscreen mode
- Go to gitlab.com, then go Profile >> SSH Keys menu ( https://gitlab.com/profile/keys ).
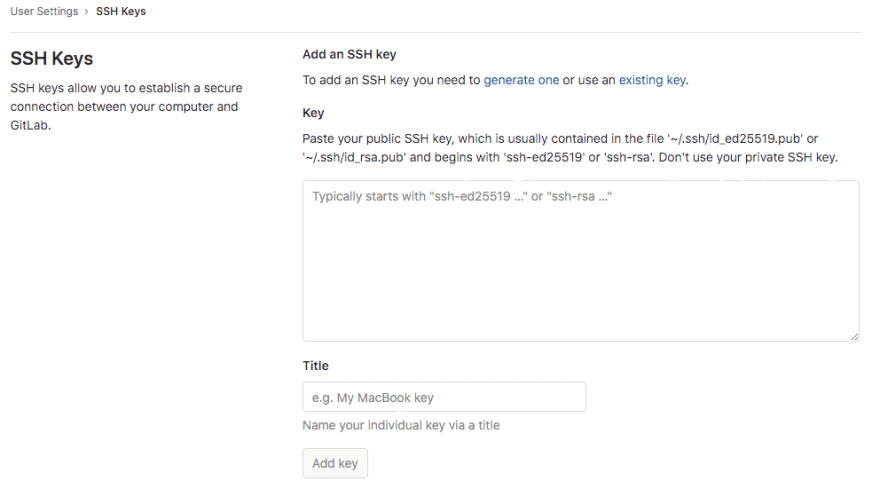
Paste your SSH Key to Key input, and also add the Title.
Press Add Key button.
To test whether your SSH key was added correctly, run:
Exit fullscreen mode
Exit fullscreen mode
Great, now you can clone and push a repository in GitLab, getting work done and have a time with your family 😁 .
Источник
GitLab  wiki
wiki- Project information
- Project information
- Activity
- Labels
- Members
- Issues 11
- Issues 11
- List
- Boards
- Service Desk
- Milestones
- Iterations
- Requirements
- Monitor
- Monitor
- Incidents
- Packages & Registries
- Packages & Registries
- Package Registry
- Infrastructure Registry
- Analytics
- Analytics
- Insights
- Issue
- Repository
- Value stream
- Wiki
- Wiki
- Activity
- Create a new issue
- Issue Boards
 wiki
wiki- Project information
- Activity
- Labels
- Members
- Issues 11
- List
- Boards
- Service Desk
- Milestones
- Iterations
- Requirements
- Monitor
- Incidents
- Packages & Registries
- Package Registry
- Infrastructure Registry
- Analytics
- Insights
- Issue
- Repository
- Value stream
- Wiki
Collapse sidebar Close sidebar
Configuring_SSH_Keys_on_Linux_and_Mac_OS_X
Linux and Mac OS X both come with support for SSH and SSH keys out of the box. Launchpad uses SSH keys to authenticate your computer with your Launchpad account. This guide shows you how to get that done.
SSH Keys
The first thing you need to do is generate your SSH keypair. A keypair, as the name implies, consists of 2 parts: the public key and the private key.
Public Key
Your public key is placed on remote servers so that they can check back with you to see that you are who you say you are.
Private Key
Your private key should NEVER leave your computer! This is the main file that authenticates you. It contains the special unique data that identifies you.
Generating a Keypair
Generating a keypair is very easy.
- Open a terminal
- Enter in the following in the terminal: $ ssh-keygen -t rsa -b 4096
- Accept the defaults, to save your public and private keys to
/.ssh
Open your public key (
/.ssh/id_rsa.pub) in a text editor (GEdit or Kate on Linux, TextEdit on Mac OS X)
Launchpad & SSH
When you use Launchpad and Bazaar, it likes to use the SSH keys to authenticate you. We need to add our public key to Launchpad.
Adding Your Public Key to GitLab
- Open your browser to GitLab and log in
- Go to your home page and click on the »Profile / Settings» link
- Click on the »SSH Keys» tab (Note: not the OpenPGP keys!)
- Paste that public key into the text box at the bottom of the page
- Click the »Add Key» button at the bottom of the page
More In Depth Example
This is specific to Mac OS X 10.6, but should be similar on any Mac or Linux system.
- Open Terminal
- Change to hidden SSH folder $ cd
/.ssh/
- Enter file in which to save the key (/Users/username/.ssh/id_rsa): [Just Hit Enter]
- Enter passphrase (empty for no passphrase): [Enter a unique password]
- Enter same passphrase again: [Renter a unique password]
- Make sure you remember your password you enter
- Now you should have 2 new files in your folder, named id_rsa and id_rsa.pub which are your private and public keys respectively.
- Use your choice of text editor to edit
/.ssh/config
- sudo vi config
- Hit i to enter insert mode
- Add the following text to the bottom, where it says yourlaunchpdusername replace with your gitlab user name. ( to get yourgitlabname visit https://gitlab.com/
and it will redirect to add your username to the url after the
) Host bazaar.launchpad.net IdentityFile
/.ssh/id_rsa User yourgitlabusername
- Hit Escape
- Hit ZZ
Источник
Using SSH keys with GitLab CI/CD
GitLab currently doesn’t have built-in support for managing SSH keys in a build environment (where the GitLab Runner runs).
Use SSH keys when:
- You want to checkout internal submodules
- You want to download private packages using your package manager (for example, Bundler)
- You want to deploy your application to your own server, or, for example, Heroku
- You want to execute SSH commands from the build environment to a remote server
- You want to rsync files from the build environment to a remote server
If anything of the above rings a bell, then you most likely need an SSH key.
The most widely supported method is to inject an SSH key into your build environment by extending your .gitlab-ci.yml , and it’s a solution that works with any type of executor (like Docker or shell, for example).
How it works
- Create a new SSH key pair locally with ssh-keygen
- Add the private key as a variable to your project
- Run the ssh-agent during job to load the private key.
- Copy the public key to the servers you want to have access to (usually in
/.ssh/authorized_keys ) or add it as a deploy key if you are accessing a private GitLab repository.
In the following example, the ssh-add — command does not display the value of $SSH_PRIVATE_KEY in the job log, though it could be exposed if you enable debug logging. You might also want to check the visibility of your pipelines.
SSH keys when using the Docker executor
When your CI/CD jobs run inside Docker containers (meaning the environment is contained) and you want to deploy your code in a private server, you need a way to access it. In this case, you can use an SSH key pair.
You first must create an SSH key pair. For more information, follow the instructions to generate an SSH key. Do not add a passphrase to the SSH key, or the before_script will prompt for it.
Create a new CI/CD variable. As Key enter the name SSH_PRIVATE_KEY and in the Value field paste the content of your private key that you created earlier.
Modify your .gitlab-ci.yml with a before_script action. In the following example, a Debian based image is assumed. Edit to your needs:
The before_script can be set globally or per-job.
Make sure the private server’s SSH host keys are verified.
As a final step, add the public key from the one you created in the first step to the services that you want to have an access to from within the build environment. If you are accessing a private GitLab repository you must add it as a deploy key.
That’s it! You can now have access to private servers or repositories in your build environment.
SSH keys when using the Shell executor
If you are using the Shell executor and not Docker, it is easier to set up an SSH key.
You can generate the SSH key from the machine that GitLab Runner is installed on, and use that key for all projects that are run on this machine.
First, log in to the server that runs your jobs.
Then, from the terminal, log in as the gitlab-runner user:
Generate the SSH key pair as described in the instructions to generate an SSH key. Do not add a passphrase to the SSH key, or the before_script will prompt for it.
As a final step, add the public key from the one you created earlier to the services that you want to have an access to from within the build environment. If you are accessing a private GitLab repository you must add it as a deploy key.
After generating the key, try to sign in to the remote server to accept the fingerprint:
For accessing repositories on GitLab.com, you would use git@gitlab.com .
Verifying the SSH host keys
It is a good practice to check the private server’s own public key to make sure you are not being targeted by a man-in-the-middle attack. If anything suspicious happens, you notice it because the job fails (the SSH connection fails when the public keys don’t match).
To find out the host keys of your server, run the ssh-keyscan command from a trusted network (ideally, from the private server itself):
Create a new CI/CD variable with SSH_KNOWN_HOSTS as “Key”, and as a “Value” add the output of ssh-keyscan .
If you must connect to multiple servers, all the server host keys must be collected in the Value of the variable, one key per line.
Now that the SSH_KNOWN_HOSTS variable is created, in addition to the content of .gitlab-ci.yml above, you must add:
Example project
We have set up an Example SSH Project for your convenience that runs on GitLab.com using our publicly available shared runners.
Want to hack on it? Fork it, commit, and push your changes. In a few moments the changes is picked by a public runner and the job starts.
Help & feedback
Product
Feature availability and product trials
Get Help
If you didn’t find what you were looking for, search the docs.
If you want help with something specific and could use community support, post on the GitLab forum.
For problems setting up or using this feature (depending on your GitLab subscription).
Источник


