- What to do before you sell, give away, or trade in your Mac
- Create a backup
- Sign out of iTunes in macOS Mojave or earlier
- Sign out of iCloud
- Sign out of iMessage
- Reset NVRAM
- Optional: Unpair Bluetooth devices that you’re keeping
- Erase your hard drive and reinstall macOS
- Move your content to a new Mac
- Get ready
- Use Migration Assistant
- On your new Mac
- On your old Mac
- On your new Mac
- On your old Mac
- Telegram 17+
- Telegram Messenger LLP
- Снимки экрана
- Описание
- How to erase an Intel-based Mac
- Before erasing your Mac
- Use Disk Utility to erase your Mac
- If you don’t see Macintosh HD in Disk Utility
- Hex Fiend 4+
- Peter Ammon
- Screenshots
- Description
- What’s New
What to do before you sell, give away, or trade in your Mac
Back up your data, then restore to factory settings by turning off certain features and services, erasing your Mac, and reinstalling macOS.
Moving to a new Mac? Before taking these steps, you can use Migration Assistant to move your files from the old Mac to your new Mac.
Create a backup
Make sure that you have a current backup of your important files. Learn how to back up your Mac.
Sign out of iTunes in macOS Mojave or earlier
If you’re using macOS Mojave or earlier, open iTunes. From the menu bar at the top of the screen or iTunes window, choose Account > Authorizations > Deauthorize This Computer. Then enter your Apple ID and password and click Deauthorize.
Learn more about deauthorizing computers used with your iTunes account.
Sign out of iCloud
If you’re using macOS Catalina or later, choose Apple menu > System Preferences, then click Apple ID. Select Overview in the sidebar, then click Sign Out.
If you’re using macOS Mojave or earlier, choose Apple menu > System Preferences, click iCloud, then click Sign Out.
You will be asked whether to keep a copy of your iCloud data on this Mac. You can click Keep a Copy, because you’re erasing your Mac later. Your iCloud data remains in iCloud and on any other devices that are signed in to iCloud with your Apple ID.
Sign out of iMessage
If you’re using OS X Mountain Lion or later, open the Messages app, then choose Messages > Preferences from the menu bar. Click iMessage, then click Sign Out.
Reset NVRAM
Shut down your Mac, then turn it on and immediately press and hold these four keys together: Option, Command, P, and R. Release the keys after about 20 seconds. This clears user settings from memory and restores certain security features that might have been altered.
Optional: Unpair Bluetooth devices that you’re keeping
If your Mac is paired with a Bluetooth keyboard, mouse, trackpad, or other Bluetooth device that you plan to keep, you can unpair it. This optional step prevents accidental input when the Mac and device have separate owners but remain in Bluetooth range of each other.
If you’re unpairing Bluetooth input devices from a desktop computer such as an iMac, Mac mini, or Mac Pro, you must plug in a USB keyboard and mouse to complete the remaining steps in this article.
To unpair a Bluetooth device, choose Apple menu > System Preferences, then click Bluetooth. Move your pointer over the device that you want to unpair, then click the remove (x) button next to the device name.
Erase your hard drive and reinstall macOS
The best way to restore your Mac to factory settings is to erase your hard drive and reinstall macOS.
After macOS installation is complete, the Mac restarts to a setup assistant that asks you to choose a country or region. To leave the Mac in an out-of-box state, don’t continue setup. Instead, press Command-Q to shut down the Mac. When the new owner turns on the Mac, the setup assistant guides them through the setup process.
No matter the model or condition, we can turn your device into something good for you and good for the planet: Learn how to trade in or recycle your Mac with Apple Trade In.
Источник
Move your content to a new Mac
Use Migration Assistant to copy all of your documents, apps, user accounts, and settings to a new Mac from another computer.
Migration Assistant copies all of your files from your old Mac to your new Mac so that you don’t have to copy them manually.
- If your files are currently on a PC, follow the PC migration steps instead.
- If you’re moving content from a Time Machine backup, follow the steps to restore your Mac from a backup instead.
Get ready
- Install all available software updates on both computers. If your old Mac isn’t using OS X Lion or later, and your new Mac isn’t using OS X Mavericks or later, follow the Mountain Lion migration steps instead.
- If both computers are using macOS Sierra or later, place them near each other with Wi-Fi turned on. If either one is using OS X El Capitan or earlier, make sure that both are on the same network.
- On your old Mac, choose Apple menu > System Preferences, then click Sharing. Make sure that a name appears in the Computer Name field.
Use Migration Assistant
You’re now ready to use Migration Assistant to move your files from the old Mac to the new one.
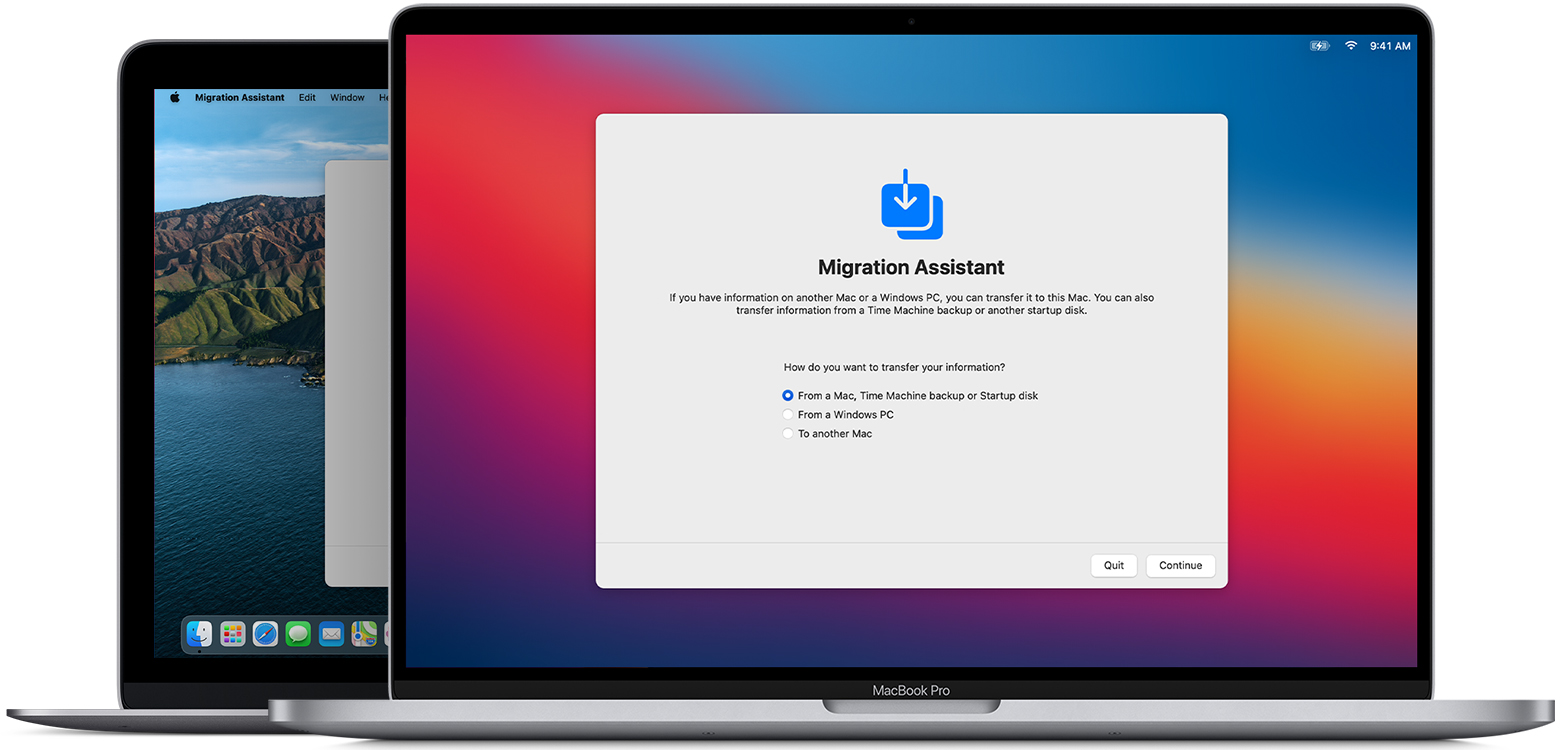
On your new Mac
- Open Migration Assistant, which is in the Utilities folder of your Applications folder. Then click Continue.
- When asked how you want to transfer your information, select the option to transfer from a Mac, Time Machine backup, or startup disk. Then click Continue.

On your old Mac
- Open Migration Assistant, then click Continue.
- When asked how you want to transfer your information, select the option to transfer to another Mac. Then click Continue.
On your new Mac
When asked to select a Mac, Time Machine backup, or other startup disk, select the other Mac. Then click Continue.
![]()
On your old Mac
If you see a security code, make sure that it’s the same code shown on your new Mac. Then click Continue.
Источник
Telegram 17+
Telegram Messenger LLP
-
- 4,2 • Оценок: 1,7 тыс.
-
- Бесплатно
Снимки экрана
![]()
![]()
![]()
![]()
Описание
Pure instant messaging — simple, fast, secure, and synced across all your devices. One of the world’s top 10 most downloaded apps with over 500 million active users.
FAST: Telegram is the fastest messaging app on the market, connecting people via a unique, distributed network of data centers around the globe.
SYNCED: You can access your messages from all your phones, tablets and computers at once. Telegram apps are standalone, so you don’t need to keep your phone connected. Start typing on one device and finish the message from another. Never lose your data again.
UNLIMITED: You can send media and files, without any limits on their type and size. Your entire chat history will require no disk space on your device, and will be securely stored in the Telegram cloud for as long as you need it.
SECURE: We made it our mission to provide the best security combined with ease of use. Everything on Telegram, including chats, groups, media, etc. is encrypted using a combination of 256-bit symmetric AES encryption, 2048-bit RSA encryption, and Diffie–Hellman secure key exchange.
100% FREE & OPEN: Telegram has a fully documented and free API for developers, open source apps and verifiable builds to prove the app you download is built from the exact same source code that is published.
POWERFUL: You can create group chats with up to 200,000 members, share large videos, documents of any type (.DOCX, .MP3, .ZIP, etc.) up to 2 GB each, and even set up bots for specific tasks. Telegram is the perfect tool for hosting online communities and coordinating teamwork.
RELIABLE: Built to deliver your messages using as little data as possible, Telegram is the most reliable messaging system ever made. It works even on the weakest mobile connections.
FUN: Telegram has powerful photo and video editing tools, animated stickers and emoji, fully customizable themes to change the appearance of your app, and an open sticker/GIF platform to cater to all your expressive needs.
SIMPLE: While providing an unprecedented array of features, we take great care to keep the interface clean. Telegram is so simple you already know how to use it.
PRIVATE: We take your privacy seriously and will never give any third parties access to your data. You can delete any message you ever sent or received for both sides, at any time and without a trace. Telegram will never use your data to show you ads.
For those interested in maximum privacy, Telegram offers Secret Chats. Secret Chat messages can be programmed to self-destruct automatically from both participating devices. This way you can send all types of disappearing content — messages, photos, videos, and even files. Secret Chats use End-to-End Encryption to ensure that a message can only be read by its intended recipient.
We keep expanding the boundaries of what you can do with a messaging app. Don’t wait years for older messengers to catch up with Telegram — join the revolution today.
Источник
How to erase an Intel-based Mac
Erase (format) built-in startup disk of an Intel-based Mac.
These steps do not apply to Mac computers with Apple silicon. The steps to erase a Mac with Apple silicon are different.
Before erasing your Mac
- Make a backup of any files that you want to keep. Erasing your Mac permanently deletes its files.
- If you want to restore your Mac to factory settings, such as to prepare it for a new owner, first learn what to do before you sell, give away, or trade in your Mac. Then erase your Mac as the final step.
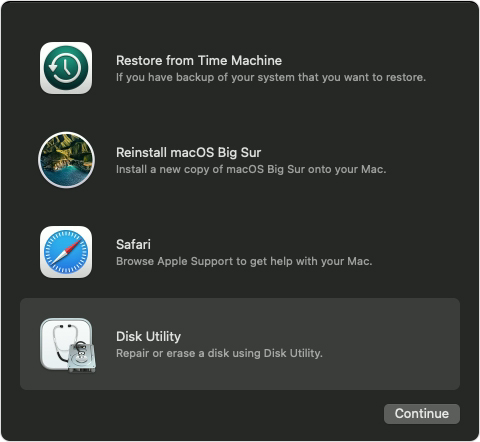
Use Disk Utility to erase your Mac
- Start up from macOS Recovery: Turn on your Mac, then immediately press and hold these two keys until you see an Apple logo or other image: Command (⌘) and R.
- If asked, select a user you know the password for, then enter their administrator password.
- From the utilities window, select Disk Utility and click Continue.
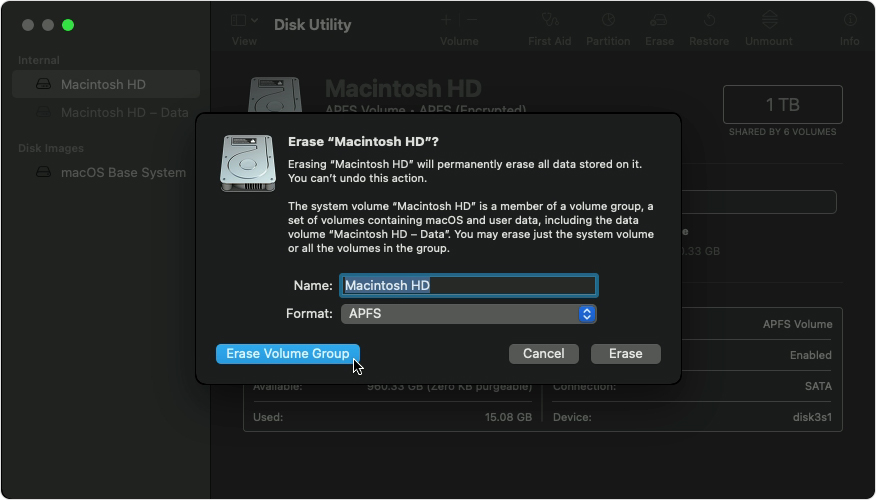
- Select Macintosh HD in the sidebar of Disk Utility. Don’t see Macintosh HD?
- Click the Erase button in the toolbar, then enter the requested details:
- Name: Macintosh HD
- Format: APFS or Mac OS Extended (Journaled), as recommended by Disk Utility
- Click Erase Volume Group. If you don’t see this button, click Erase instead.
- If asked, enter your Apple ID. Forgot your Apple ID?
- After the erase is done, select any other internal volumes in the sidebar, then click the delete volume (–) button in the toolbar to delete that volume.
During this step, disregard any internal volume named Macintosh HD or Macintosh HD — Data, as well as any volumes in the External and Disk Images sections of the sidebar. - Quit Disk Utility to return to the utilities window.
- If you want to start up again from the disk you erased, select Reinstall macOS in the utilities window, then click Continue and follow the onscreen instructions to reinstall macOS.
If you don’t see Macintosh HD in Disk Utility
Your built-in startup disk should be the first item listed in the Disk Utility sidebar. It’s named Macintosh HD, unless you changed its name. If you don’t see it there, choose Apple menu > Shut Down, then unplug all nonessential devices from your Mac and try again.
If your disk still doesn’t appear in Disk Utility, or Disk Utility reports that the erase process failed, your Mac might need service. If you need help, please contact Apple Support.
Источник
Hex Fiend 4+
Peter Ammon
Screenshots
![]()
![]()
Description
A fast and clever hex editor built just for the Mac
Hex Fiend is a fast, lean, and powerful hex editor built just for the Mac.
— Insert, delete, rearrange. Hex Fiend does not limit you to in-place changes like some hex editors.
— Work with huge files. Hex Fiend can handle as big a file as you’re able to create.
— Small footprint. Hex Fiend does not keep your files in memory. You won’t dread launching or working with Hex Fiend even on low-RAM machines.
— Fast. Open a huge file, scroll around, copy and paste, all instantly. Find what you’re looking for with fast searching.
— Binary diff. Hex Fiend can show the differences between files, taking into account insertions or deletions.
— Smart saving. Hex Fiend knows not to waste time overwriting the parts of your files that haven’t changed, and never needs temporary disk space.
What’s New
This integrates all changes since 2.8 release. See https://hexfiend.github.io/HexFiend/ReleaseNotes.html
macOS 10.11 or later is now required
Hex Fiend is built as a universal app for native support on Apple Silicon Macs
Fix the data inspector’s plus and minus buttons not rendering correctly on Big Sur
The default alternating row color in light mode is now the system color, like dark mode
The binary templates view can be resized by holding down the Command key when resizing the window. The manual size field in Preferences has been removed
Add an informative «Welcome» popover when Binary Templates are first shown
Binary template column state is now saved and restored
Allow the Binary data inspector to be editable
Add an experimental read-only Binary view
Improve 4 and 8-bit decimal formatting (thanks @wader)
Add a «Show in Template» feature which selects the deepest template node for a given position (thanks @wader
Источник


