- How to Fix Minecraft GLFW Error 65542 (Driver Does Not Support OpenGL)?
- Method 1: Adding the OpenGL.DLL Manually
- Method 2: Uninstalling DisplayLink (if applicable)
- Method 3: Reinstalling Video Card Drivers
- Fix Minecraft GLFW Error 65542: The Driver doesn’t support OpenGL
- OpenGL
- Update your drivers
- Reboot your computer
- April 2021 Update:
- Add an OpenGL DLL file manually
How to Fix Minecraft GLFW Error 65542 (Driver Does Not Support OpenGL)?
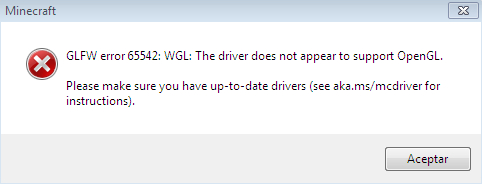
Some Minecraft players end up encountering the GLFW Error 65542 every time they attempt to launch the game. This problem is mostly reported to occur on Windows 10 with the Java-based version of Minecraft.
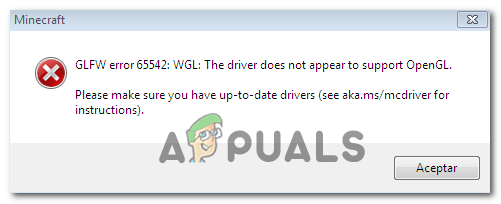 Minecraft GLFW Error 65542
The majority of users that have been struggling with this error code were able to fix the GLFW Error 65542 by copying the missing opengl32.dll file manually into the JRE (Java directory). If that doesn’t work or you want to avoid doing any manual modifications to the JAVA directory, you can also reinstall every GPU driver in order to ensure that the opengl32.dll file gets reinstalled.
However, if you’re encountering this issue with the Java version of Minecraft, this problem can also be facilitated by a conflict with a DisplayLink driver. In this case, you can fix the issue by uninstalling the conflicting driver and re-launching the game.
Method 1: Adding the OpenGL.DLL Manually
Even though every Dynamic Link Library file that is required is typically included by your GPU driver, that’s not always the case. Even more, you might have deleted opengl32.dll or opengl64.dll by mistake, which will end up triggering the GLFW Error 65542.
If this scenario is applicable, one way to fix the problem is to manually copy the missing .DLL file to the Java and JRE folder in order to allow Minecraft to make use of OpenGL. This fix was confirmed to work by a lot of users that are currently encountering the 65542 Error on Minecraft.
To add the OpenGL.dll file manually to the Java path, follow the instructions below:
- Open this link (here) and download the Minecraft_OpenGL.zip file and wait for the download to complete. Once the download is finished, extract the contents of the archive with a utility like 7zip or WinZip.
- Once the contents of this utility have been extracted, copy the file that’s compatible with your OS architecture on your clipboard by right-clicking on it and choosing Copy or Cut.
 Copy the Opengl file to your clipboard
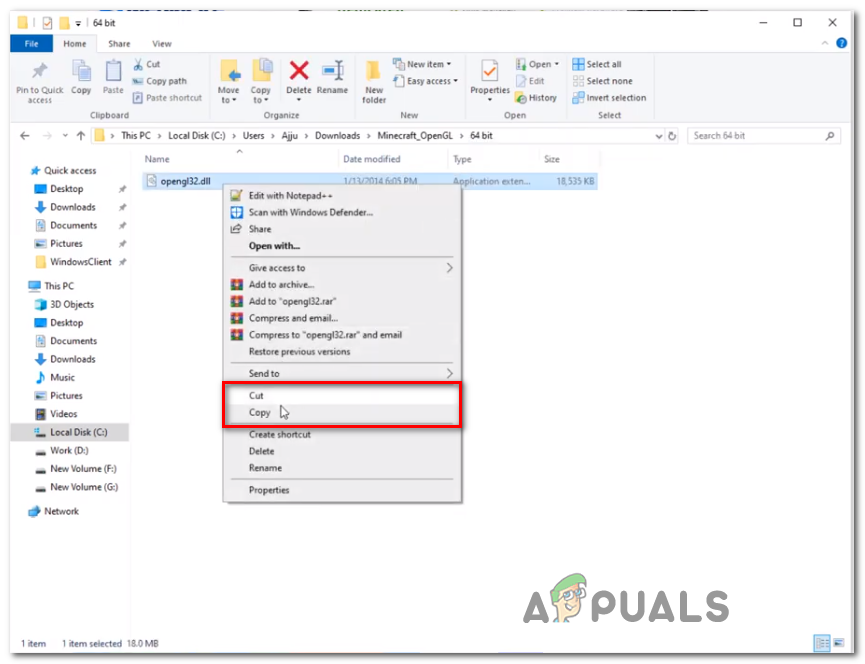 Copy the Opengl file to your clipboard
 Note: If you don’t know which OS architecture you’re using, right-click on My Computer (This PC) and choose Properties from the context menu. Inside the Properties screen, check the listing under System type – that’s your OS architecture.
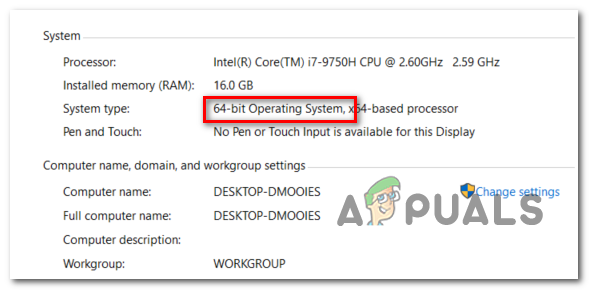 Verifying your OS architecture
Next, navigate to the following location and paste the opengl32.dll file that you previously copied on your clipboard:
Note: Keep in mind that *JRE Version* is simply a placeholder. You will need to replace it with your JRE version. Also, if you installed the Java environment in a custom location, navigate there instead.
In case the same problem is still occurring, move down to the next potential fix below.
Method 2: Uninstalling DisplayLink (if applicable)
If you’re actively using a DisplayLink driver, keep in mind that this technology has the potential of conflicting with the Java-powered version of Minecraft. Some users that we’re encountering the GLFW Error 65542 issue whenever they attempted to launch Minecraft have confirmed that he issue went away for good as soon as they ended up uninstalling DisplayLink USB Graphics Software.
If this scenario is applicable to you, follow the instructions below to uninstall the DisplayLink USB Graphics Software from your computer in order to eliminate the conflict with Minecraft:
- Press Windows key + R to open up a Run dialog box. Next, type ‘appwiz.cpl’ and press Enter to open up the Programs and Features menu. Type appwiz.cpl and Press Enter to Open Installed Programs List
- Once you’re inside the Programs and Files menu, scroll down through the list of installed applications and locate the entry named DisplayLink Graphics Driver.
- When you manage to locate it, right-click on it and choose Uninstall from the context menu to initiate the uninstallation process. Uninstalling DisplayLink Graphics driver
- At the confirmation prompt, click Yes, then follow the on-screen instructions to complete the uninstallation process.
- After the operation is complete, restart your computer and launch Minecraft again once the next startup is complete to see if the conflict has been eliminated.
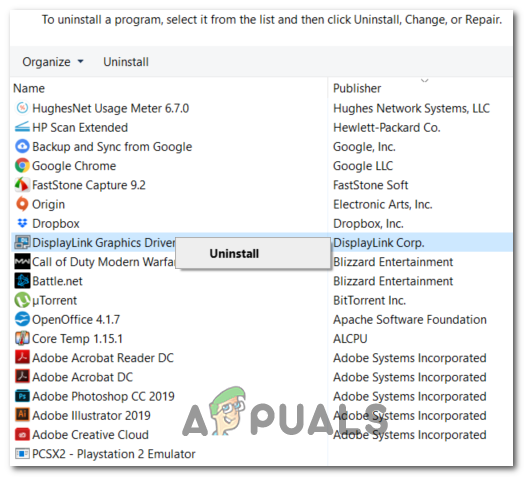 Uninstalling DisplayLink Graphics driver
In case this scenario was not applicable or you already performed this with no success, move to the next potential fix below.
Method 3: Reinstalling Video Card Drivers
As it turns out, you will also encounter the GLFW Error 65542 error if you’re using a selection of outdated graphics drivers that don’t know how to work with the OpenGL version that Minecraft uses. However, if you had malware issues recently, this problem might also by a security scan if the operation ended up quarantining some files that are required to run OpenGL.
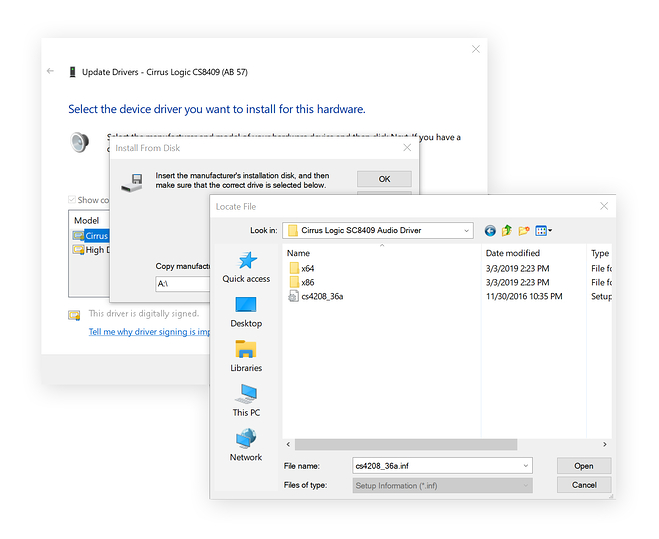
If you haven’t updated your GPU drivers in a while, it’s likely that you will be able to fix the issue by using Device Manager and Programs and Features to uninstall anything related to your GPU and then reinstall them from the official channels.
In the event you’re not exactly sure on how to do this, follow the instructions below:
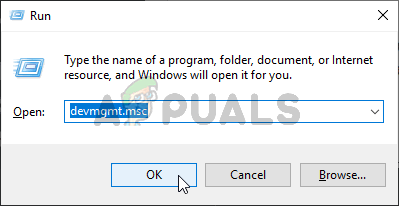
- Press Windows key + R to open up a Run dialog box. Next, type ‘devmgmt.msc’ and press Enter to open up Device Manager. If you are prompted by the UAC, click on Yes to grant admin access. Running Device Manager
- Once you’re inside Device Manager, expand the drop-down menu associated with Display adapters, then go ahead and uninstall every graphics driver by right-clicking on them and clicking on Uninstall – Do this for every entry inside Device Adapters. If you have both an integrated and a dedicated GPU, uninstall both types of drivers. Uninstall every GPU driver
 Running Device Manager
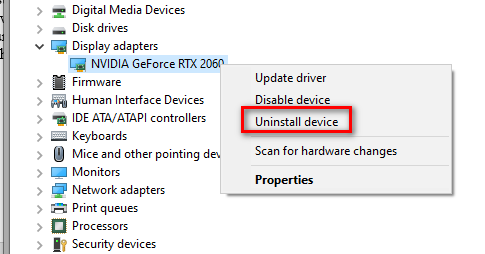 Uninstall every GPU driver
 Note: Your screen might flicker after you do the uninstallation. This happens because your OS will revert back to the generic drivers.
 Type appwiz.cpl and Press Enter to Open Installed Programs List
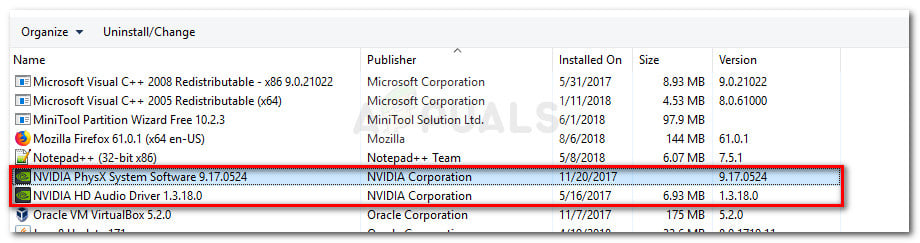 Uninstall all GPU related software
Nvidia’s Download Page
AMD’s Download Page
Intel Graphics Download Page
Fix Minecraft GLFW Error 65542: The Driver doesn’t support OpenGL
Have you encountered the GLFW 65542 error when playing Minecraft games on Windows 10? If yes, it must be due to a missing OpenGL32.dll file in Active Directory. To fix this error, visit the official DLL website, download the file opengl32.dll and place it in your active JRE folder.
Using any DisplayLink software on your computer can also cause this problem due to some compatibility issues. If you remove this driver, you won’t see a GLFW 65542 error when playing Minecraft games. Make sure your video card is up to date. An outdated display driver can also cause similar errors. Let’s take a closer look at the solutions.
OpenGL
First, let’s explain what OpenGL is. OpenGL, short for Open Graphics Library, is a multilingual cross-platform programming interface for 2D and 3D graphics rendering applications. OpenGL is commonly used to communicate with a GPU.
In Minecraft itself, OpenGL is responsible for reducing the rendering load on your system, which tries to make the game on your computer faster and smoother. Essentially, OpenGL tells Minecraft not to display graphics that are not in the player’s field of view.
Update your drivers
Outdated video card drivers in Minecraft have been known to cause a lot of problems. To solve this problem, the first thing to do is to determine what type of video card you have.
- Press the “Windows” and “R” keys at the same time.
- Type “dxdiag” in the startup window and press Enter.
- In the dxdiag window, click on the “View” tab.
- Look for the manufacturer’s name.
Reboot your computer
The first thing to do when games and other programs don’t work properly on your computer is to reboot your computer. Your operating system may not have started all of the resources, such as the OpenGL API, that are causing the problem in Minecraft.
April 2021 Update:
We now recommend using this tool for your error. Additionally, this tool fixes common computer errors, protects you against file loss, malware, hardware failures and optimizes your PC for maximum performance. You can fix your PC problems quickly and prevent others from happening with this software:
- Step 1 : Download PC Repair & Optimizer Tool (Windows 10, 8, 7, XP, Vista – Microsoft Gold Certified).
- Step 2 : Click “Start Scan” to find Windows registry issues that could be causing PC problems.
- Step 3 : Click “Repair All” to fix all issues.

To properly restart your computer, follow these steps:
- Press the Windows key on your keyboard to open the Start menu.
- Then press the power key to bring up the power settings menu.
- Finally, click “Restart” to begin the process.
Wait until your computer finishes rebooting, then try restarting Minecraft to see if the GLFW error message appears on your computer.
If the problem doesn’t go away on your computer after restarting, you can use the following method to solve the problem.
Add an OpenGL DLL file manually

The last method you can try is to manually place the OpenGL DLL file in your Minecraft installation folder. The API may not work correctly because the actual OpenGL DLL file is not in the folder.
Here’s how to insert the OpenGL DLL file into your Minecraft installation folder:
- First of all, you need to download the DLL file to your computer.
- Then find the Minecraft_OpenGL.zip file in your downloads folder and extract it.
- Then right click on opengl32.dll and choose “Cut” or “Copy”.
- Go to C: \ Program Files \ Java \ * JRE VERSION * \ bin and paste opengl32.dll there. (Note that the JRE-VERSION in the folder path is only a placeholder for the JRE-VERSION currently installed on your Windows computer).
- When User Account Control prompts you to confirm your action, click Yes to make changes to your Minecraft installation folder.
Hopefully, these solutions helped you fix the GLFW 65542 error and start playing Minecraft again. If not, you can visit the Minecraft forum for more information.

CCNA, Web Developer, PC Troubleshooter
I am a computer enthusiast and a practicing IT Professional. I have years of experience behind me in computer programming, hardware troubleshooting and repair. I specialise in Web Development and Database Design. I also have a CCNA certification for Network Design and Troubleshooting.


