- Globalprotect vpn client linux
- Installing GlobalProtect VPN – Mac/Linux
- Mac GlobalProtect Client Install
- MFA GlobalProtect VPN Login Steps
- Mac Uninstall
- Linux Install
- Linux Operation
- Linux Uninstall
- Troubleshooting
- IT Knowledge Base
- Download & Install GlobalProtect (the VPN Agent)
- Division of Information Technology
- Installing GlobalProtect VPN Client (Linux)
- Connecting to the Campus VPN
- Disconnecting from the Campus VPN
Globalprotect vpn client linux
A GlobalProtect VPN client (GUI) for Linux based on Openconnect and built with Qt5, supports SAML auth mode, inspired by gp-saml-gui.
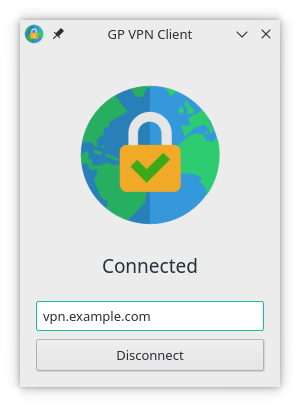
- Similar user experience as the official client in macOS.
- Supports both SAML and non-SAML authentication modes.
- Supports automatically selecting the preferred gateway from the multiple gateways.
- Supports switching gateway from the system tray menu manually.
- Improve the release process
- Process bugs and feature requests
- Support for bypassing the gpclient parameters
- Support the CLI mode
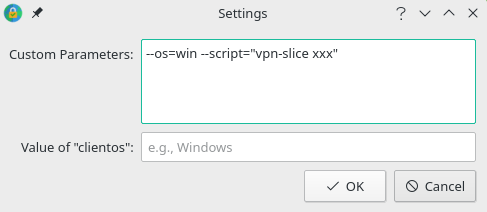
Passing the Custom Parameters to OpenConnect CLI
Custom parameters can be appended to the OpenConnect CLI with the following settings.
Tokens with spaces can be surrounded by double quotes; three consecutive double quotes represent the quote character itself.
Display the system tray icon on Gnome 40
Install the AppIndicator and KStatusNotifierItem Support extension and you will see the system try icon (Restart the system after the installation).
Источник
Installing GlobalProtect VPN – Mac/Linux
Starting in September, ITS will be adding Multi-factor Authentication (MFA) to its general VPN portals. This will change the way that users log in to the VPN. Here is what to expect when the change occurs.
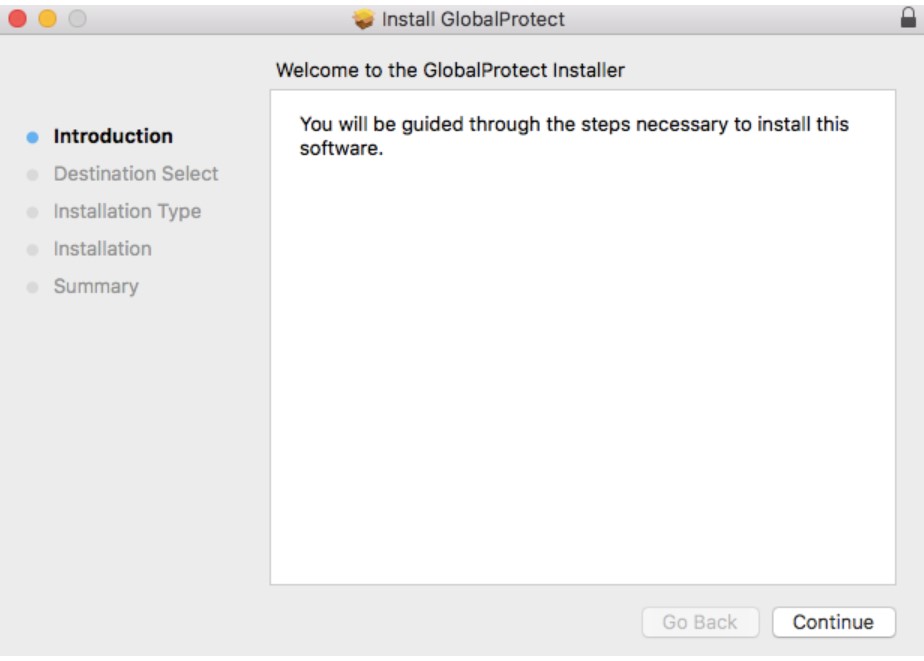
Mac GlobalProtect Client Install
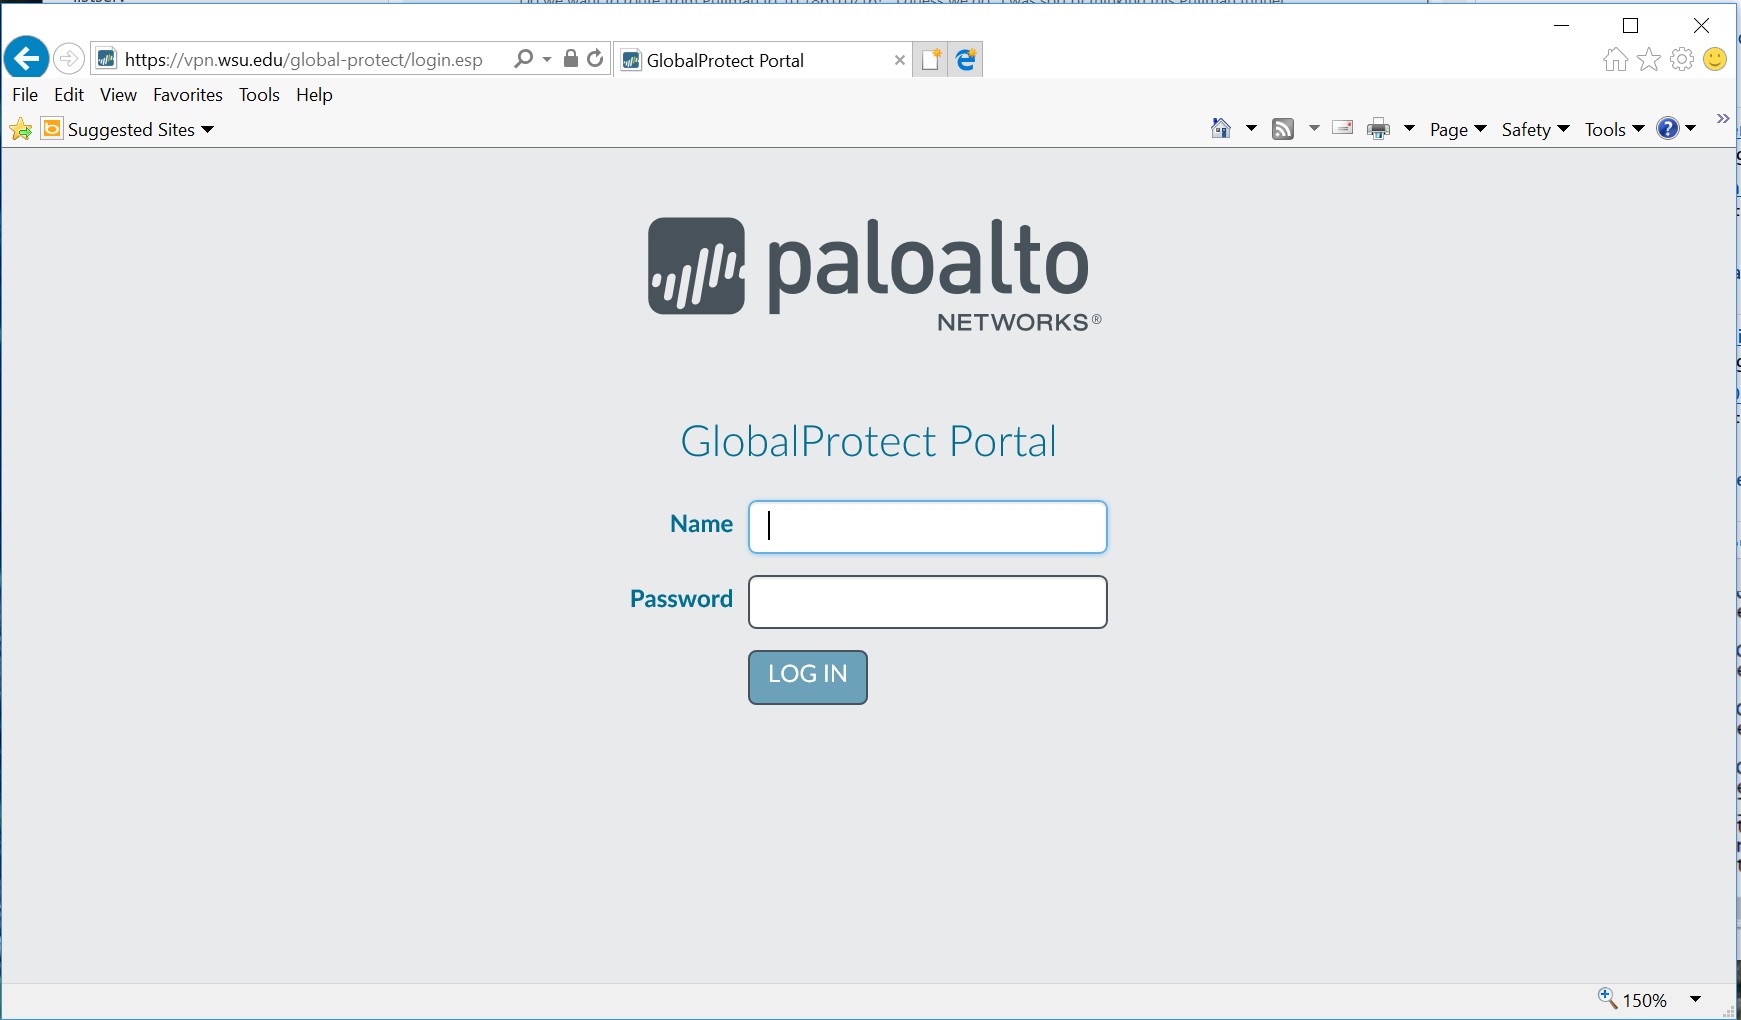
On the Mac, The latest client is available from the VPN portal. Use https with a web browser to connect to https://vpn.wsu.edu.
- Login with WSU AD credentials
- No need for additional prefixes or suffixes
- Example: john.smith@wsu.edu will only need username john.smith
- After logging in, download the Mac OS agent.

- When prompted, run the software.
- When prompted again, run the GlobalProtect Installer.

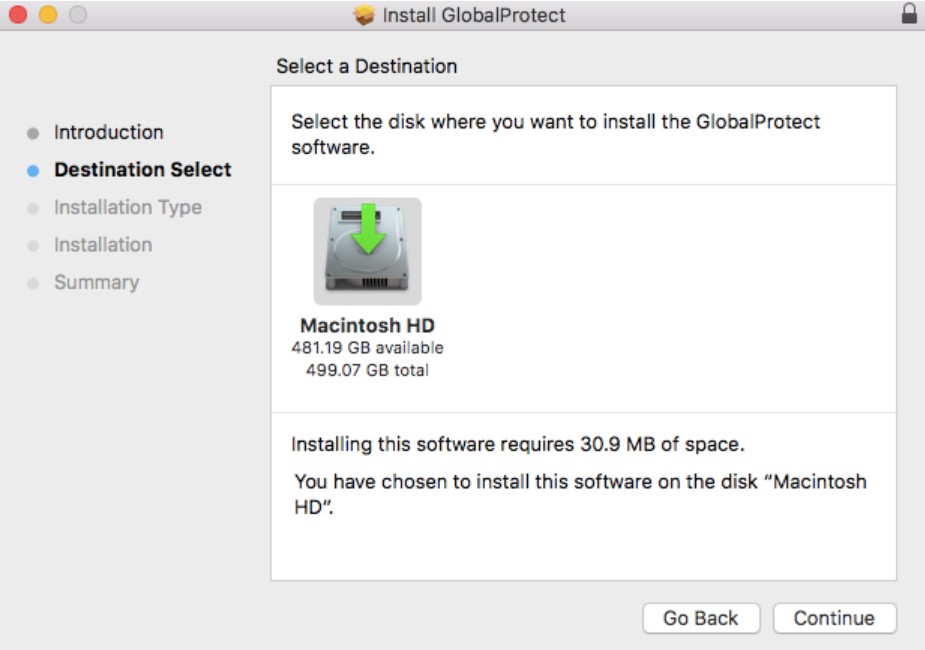
- From the GlobalProtect Installer, click continue.
- On the destination select screen, select the install folder and then click continue.
- On the Installation Type screen, select the GlobalProtect installation package check box, and then click continue.
- Click install to confirm that you want to install GlobalProtect.
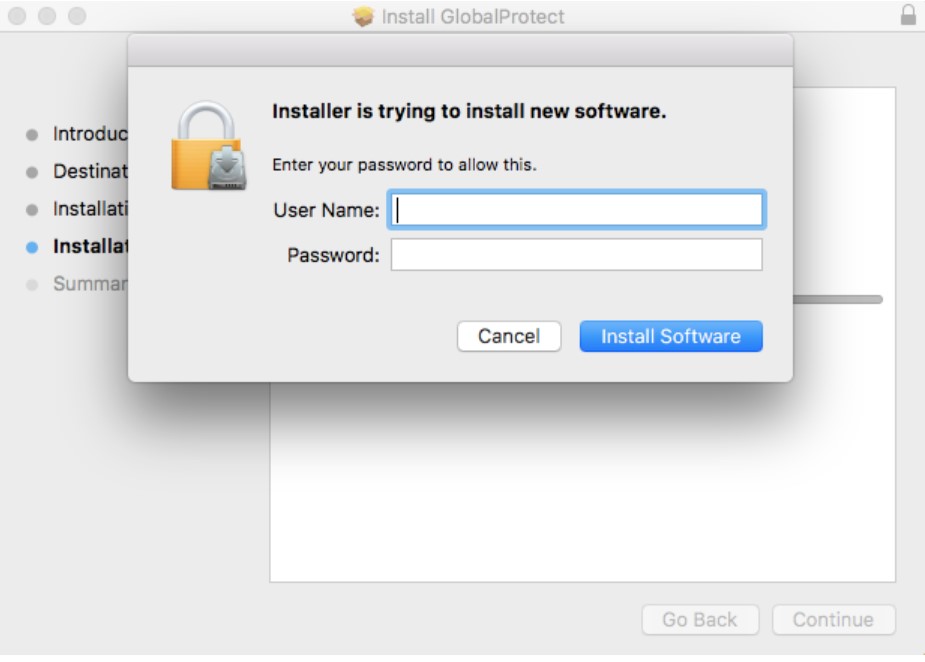
- When prompted, enter your Username and Password, and then click install software to begin the installation.
- When this security box appears, users MUST click the “Open Security Preferences” Button (NOT the OK Button).

- Click the “Allow” button at the bottom of the “Security & Privacy” box to allow the Palo Alto Extension.

- After installation is complete, close the installer.
MFA GlobalProtect VPN Login Steps
Once the VPN portal has been updated to require MFA the user experience will change. When the user connects to the VPN, they will instead receive an Okta login page.


On this page, enter your username and password. If you scroll down on this page, you will see a ‘Remember me’ option. Check this option to have your username saved for future logins. This is recommended.

Once a valid credential pair is entered, you will receive a prompt to choose your MFA option. You can use any MFA option that is supported by Okta, including SMS, App Push, Google Authenticator, Security Key, etc. Push notifications with the Okta Verify App are recommended.


When selecting Okta Verify Push notifications, it is recommended to select the option ‘Send push automatically’

While the option ‘Do not challenge me on this device for the next 24 hours’ option may be checked, this option will not have any effect. You will continue to be prompted for multi-factor authentication for every VPN login.
At this point, you should receive a multifactor prompt on your device or be ready to enter a code from a separate multi-factor app.
IOS Prompt


OKTA MFA Factor Enrollment
To set up your Okta MFA options, visit https://account.wsu.edu.
For technical assistance: Please contact Crimson Service Desk via email, by phone at (509) 335-4357, or online.
Mac Uninstall
Download the installer from the portal page at https://vpn.wsu.edu (same process as the previous Mac GP Client install).
From the GlobalProtect installer, click continue.
On the destination select screen, click continue.
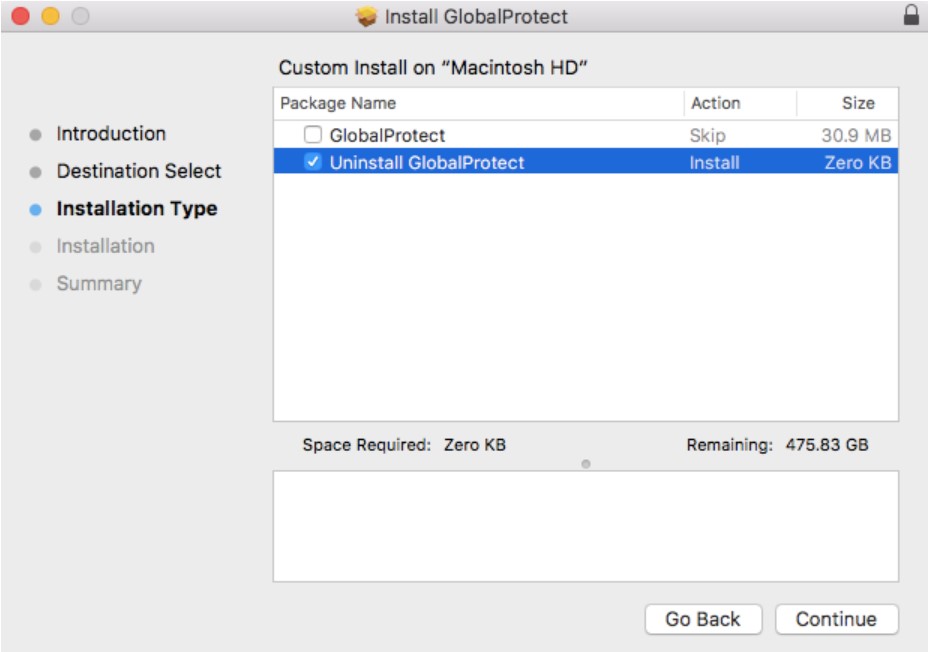
On the Installation Type screen, select the Uninstall GlobalProtect package check box, and then click continue:
Click Install to confirm that you want to remove the GlobalProtect app.
When prompted, enter your Username and Password, and then click Install Software to uninstall GlobalProtect.
A message will pop up that will confirm that the Uninstall GlobalProtect package was successfully installed and that the GlobalProtect app has been removed from the computer.
Linux Install
On Linux, the latest GlobalProtect client can be downloaded from:
There are two clients – download the rpm file for RedHat/CentOS.
For Ubuntu, download the deb file. Open a terminal window to install the client
Ubuntu/Debian –
sudo dpkg – i GlobalProtect_deb-5.0.8.deb
Redhat/CentOS –
sudo yum localinstall GlobalProtect_rpm-5.0.8.rpm
Linux Operation
Using a terminal window, type globalprotect. At the >> prompt, use the connect command to connect to portal vpn.wsu.edu.
$ globalprotect
Current GlobalProtect status: OnDemand mode.
>> connect –portal vpn.wsu.edu
Retrieving configuration…
vpn.wsu.edu – Authentication Failed. Enter login credentials
username(user):user
Password:
Discovering network…
Connecting…
Connected
Other commands of note at the >> prompt include –
>> quit
(exits out of GlobalProtect which continues to run in the background)
>> disconnect
>> show –version
>> show –status
>> show –details
Linux Uninstall
- Uninstall the GlobalProtect app for Linux using dpkg.
$ sudo dpkg -P globalprotect
(Reading database … 209181 files and directories currently installed.)
Removing globalprotect (5.0.8) …
gp service is running and we need to stop it…
Disable service…
Removing gp service…
gp service has been removed successfully
Removing configuration…
Uninstall the GlobalProtect app for Linux using apt-get.
$ sudo apt-get remove GlobalProtect_deb-5.0.8.deb
Reading package lists… Done
Building dependency tree
Reading state information… Done
Troubleshooting
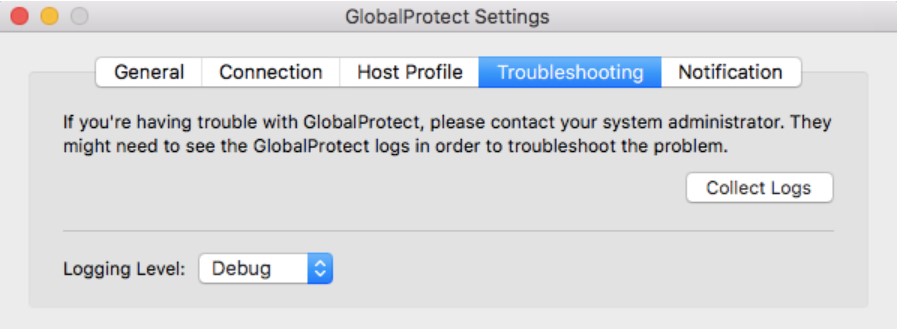
7.1.1. Mac
- Open GlobalProtect and click on the Troubleshooting tab. An option to collect logs will create a support file that can be used for analysis.
7.1.2. Linux
Using the terminal window and in globalprotect mode, run the collect-log command to create the support file.
Источник
IT Knowledge Base
User guides relating to IT access, software, services, security, requests, and training.
Download & Install GlobalProtect (the VPN Agent)
This article will show you how to download and install the campus VPN agent.
For more information on the campus Virtual Private Network (VPN), view the document VPN Overview.
Before you begin:
If you do not currently have VPN privileges, go to http://www.fullerton.edu/it/services/software/ and select VPN. On this site you will fill out and submit the Software Request Form to request VPN access.
- You will need to install and authenticate the Duo Two-Factor Authentication (2FA) tool. View more information on Duo.
- Ensure ALLsecurity and software updates are not older than 7 days. The GlobalProtect Client performs a Health Check to ensure the security of your system when accessing the campus VPN.
GlobalProtect calls health checks Host Information Profiles (HIP). After the user installs the client, it runs an initial health check on the system and then keeps track of the systems health. When a user connects to campus, the client supplies the HIP status to the GlobalProtect Gateway. The HIP status is then used by firewall polices to allow or deny access to resources.
| Item | Status |
|---|---|
| Supported Operating Systems (Windows, Mac, iOS, Android, Chrome) | must be up to date |
| Antivirus | must be installed, running, up to date |
| Anti-Spyware — (i.e. Windows Defender provides an anti-spyware) | must be installed, running, up to date |
| Firewall | must be enabled |
| Patches | must be up to date |
| Patch Management | must be enabled (on devices that have the ability) |
Download the GlobalProtect VPN Client
- iOS client from iTunes:https://itunes.apple.com/us/app/globalprotect/id1400555706?mt=8
- Android client from Google Play:https://play.google.com/store/apps/details?id=com.paloaltonetworks.globalprotect&hl=en_US
1. Press the «Windows» icon + the «Pause» or «Pause Break» buttons simultaneously on the keyboard to access the System properties window.

Or on your Windows 10 machine, right-click on the folder This PC > Computer > My Computer > then select Properties.
2. Under «System», check the «System type» for the bit version of your machine.
The GlobalProtect VPN client is currently supported and available for download for the following:
Install the GlobalProtect Setup Wizard.
This installation is performed on a Windows 10 — 64 bit computer.
1. After double-clicking on the GlobalProtect agent, click Next.
2. Click Next to maintain the default folder.
3. Click Next to confirm the installation.
After you Install the GlobalProtect VPN agent:
- Run the GlobalProtect VPN agent on your local system (workstation or device), then
- Authenticate on the campus VPN network using DUO 2-Factor Authentication
For this purpose of this document we will define local system and remote system as the following:
- a localsystem is typically a system (computer) controlling the connection.
- i.e. your personal (home) workstation, mobile device, or browser can have the GlobalProtect VPN agent installed on it
- a remote system is typically a system (computer) being accessed.
- i.e. your office workstation or campus resources are items that can be accessed through the GlobalProtect VPN agent
4. Congratulations, the GlobalProtect VPN agent has been installed, click Close.
Источник
Division of Information Technology
Audience: Faculty, Researchers and Staff
Follow these intructions to learn how to download and install the VPN client for Linux as well as how to disconnect.
Installing GlobalProtect VPN Client (Linux)
Decompress the TGZ file to extract the installation package using the following command: tar -xvf PanGPLinux-5.0.1-c10.tgz
Install the application package that corresponds to the distribution of Linux that GlobalProtect is being installed on.
For Red Hat Enterprise Linux, CentOS and other derivatives, use the “rpm” file: sudo rpm –ivh ./GlobalProtect_rpm-5.0.1.0-10.rpm
For Debian, Ubuntu and other derivatives, use the “deb” file: sudo apt-get install ./GlobalProtect_deb-5.0.1.0-10.deb
View the help for the GlobalProtect app to confirm installation, and view the command line options: globalprotect help
Connecting to the Campus VPN
- To connect to the VPN, use the following command: globalprotect connect —portal vpn.stonybrook.edu
The client will prompt for your NetID login credentials, followed by a Duo two-factor login push to your default Duo device.
To view the current status of the VPN client, use the following commands:
globalprotect show –status
globalprotect show –details
Disconnecting from the Campus VPN
To disconnect from the VPN, use the following command: globalprotect disconnect
Источник


