- Руководство для начинающих по GNOME Boxes
- Как запустить GNOME Boxs в среде рабочего стола GNOME
- Начало работы с коробками GNOME
- Создание коробок GNOME
- Укажите память и дисковое пространство для ящиков GNOME
- Запуск виртуальной машины с использованием блоков GNOME
- Корректировка настроек отображения внутри ящиков
- Совместное использование USB-устройств с виртуальными машинами с помощью коробок GNOME
- Снимки с помощью коробок GNOME
- Boxes
- Virtualization made simple
- About Boxes
- Browse your machines
- Customize at ease
- Keep it simple
- Rationale
- Installing virtual operating systems with GNOME Boxes
- Installing a virtual operating system from the list of predefined systems
- Manage Remote And Virtual Machines With Gnome Boxes
- Introduction to Gnome Boxes
- Install Gnome Boxes On Linux
- Manage Remote And Virtual Machines With Gnome Boxes
- Gnome boxes Dashboard
- Create a new virtual machine
- Viewing Virtual machine details
- Connect to a remote system
- Create snapshots of Virtual machines
- Clone virtual machines
- View Virtual machine’s logs
- Conclusion
Руководство для начинающих по GNOME Boxes
GNOME Boxes предоставляет простой способ создания и запуска виртуальных машин на вашем компьютере. GNOME Boxes прекрасно интегрируется с рабочим столом GNOME и избавляет вас от необходимости установки Oracle Virtualbox.
Вы можете использовать GNOME Boxes для установки и запуска Windows, Ubuntu, Mint, openSUSE и многих других дистрибутивов Linux в отдельных контейнерах на одном компьютере. Поскольку каждый контейнер независим, вы можете быть уверены, что изменения, внесенные в один контейнер, не окажут никакого влияния на другие контейнеры или хост-систему.
Преимущество использования GNOME Boxes по сравнению с Oracle Virtualbox заключается в том, что, во-первых, проще настраивать контейнеры и их не так много.
Для использования GNOME Boxes вам понадобится операционная система на основе Linux и среда рабочего стола GNOME.
Как запустить GNOME Boxs в среде рабочего стола GNOME
Чтобы запустить GNOME Boxes с помощью среды рабочего стола GNOME, нажмите суперключ и A на своем компьютере и нажмите значок Ящики .
Начало работы с коробками GNOME
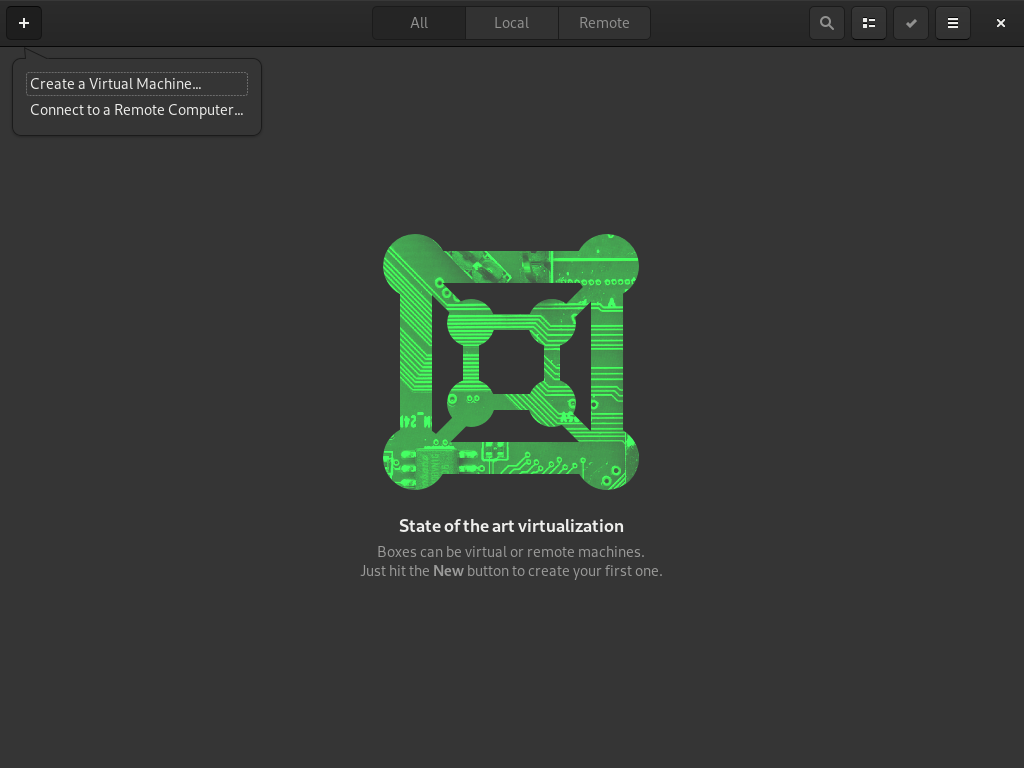
Ящики GNOME начинаются с черного интерфейса, и появляется сообщение о том, что у вас нет настроенных ящиков.
Чтобы создать виртуальную машину, нажмите кнопку Создать в верхнем левом углу.
Создание коробок GNOME
Первый экран, который вы видите, когда создаете свою первую коробку, – это экран приветствия.
Нажмите Продолжить в правом верхнем углу.
Появится экран с вопросом об установочном носителе для операционной системы. Вы можете выбрать образ ISO для дистрибутива Linux или указать URL. Вы можете вставить DVD-диск Windows и также выбрать установку Windows.
Нажмите Продолжить , чтобы перейти к следующему экрану.
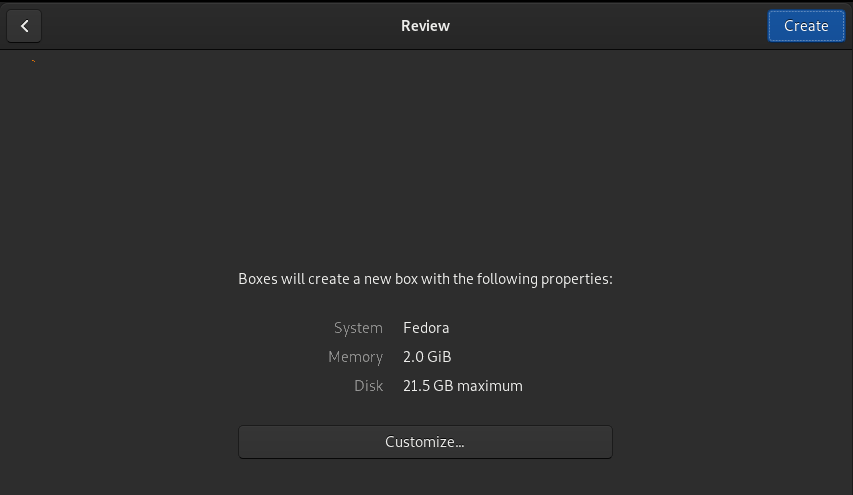
Вы увидите сводную информацию о системе, которая будет создана, выделив систему, которая будет установлена, объем памяти, который будет назначен этой системе, и объем дискового пространства, который будет выделен.
Вероятно, объем выделенной памяти и дискового пространства будет недостаточным. Чтобы изменить эти настройки, нажмите кнопку Настроить .
Укажите память и дисковое пространство для ящиков GNOME
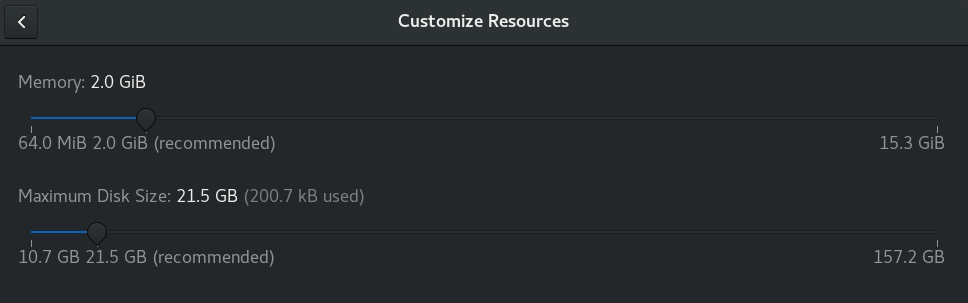
Чтобы выделить необходимый объем памяти и дискового пространства для вашей виртуальной машины, при необходимости используйте ползунки.
Оставьте достаточно памяти и дискового пространства для правильной работы операционной системы хоста.
Запуск виртуальной машины с использованием блоков GNOME
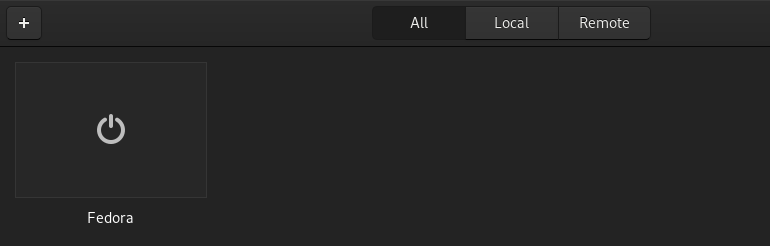
Изучив свои решения, вы увидите свою виртуальную машину в виде небольшого значка на главном экране GNOME Boxes.
Каждая добавленная вами машина появится на этом экране. Вы можете запустить виртуальную машину или переключиться на работающую виртуальную машину, нажав на соответствующее поле.
Теперь вы можете настроить операционную систему на виртуальной машине, выполнив процедуру установки операционной системы, которую вы устанавливаете. Обратите внимание, что ваше интернет-соединение используется совместно с вашим хост-компьютером, и оно действует как сетевое соединение.
Корректировка настроек отображения внутри ящиков
Измените различные настройки во время работы виртуальной машины, щелкнув правой кнопкой мыши в окне основных блоков и выбрав свойства или нажав значок гаечного ключа в верхнем правом углу в работающей виртуальной машине. машина. (Панель инструментов всплывает сверху).
Нажмите параметр отображения с левой стороны, чтобы просмотреть параметры изменения размера гостевой операционной системы и общего доступа к буферу обмена.
Значок с двойной стрелкой в правом верхнем углу переключает между полноэкранным и масштабированным окном. Если гостевая операционная система по-прежнему не отображается в полноэкранном режиме, вам может потребоваться изменить настройки дисплея в самой гостевой операционной системе.
Совместное использование USB-устройств с виртуальными машинами с помощью коробок GNOME
На экране настроек свойств для коробки GNOME есть опция Устройства .
Используйте этот экран, чтобы указать устройство CD/DVD или ISO для работы в качестве CD или DVD. Вы также можете выбрать общий доступ к новым USB-устройствам с гостевой операционной системой по мере их добавления и общий доступ к уже подключенным USB-устройствам. Для этого просто переместите ползунок в положение ON для устройств, которыми вы хотите поделиться.
Снимки с помощью коробок GNOME
Вы можете сделать снимок виртуальной машины в любой момент, выбрав параметр Снимок в окне свойств.
Нажмите символ плюса, чтобы сделать снимок.
Вы можете вернуться к любому снимку, выбрав его и выбрав вернуться в это состояние . Вы также можете выбрать имя снимка.
Этот подход является идеальным способом создания резервных копий гостевых операционных систем.
Источник
Boxes
Virtualization made simple
About Boxes
A simple GNOME application to view, access, and manage remote and virtual systems.
![]()

Browse your machines
Find your local and remote virtual systems.

Customize at ease
Intuitively set your machine preferences and monitor its performance.
Keep it simple
Get things working out of the box with very little input.

Rationale
While virt-manager does a very good job as a virtual machine management software, it’s very much tailored for system administration and virtual machines. Boxes, on the other hand, is targeted towards a typical desktop end-user who wants either a very safe and easy way to try out new operating systems or new (potentially unstable) versions of her/his favorite operating system(s), or needs to connect to a remote machine (home-office connection being a typical use-case). For this reason, Boxes does not provide many of the advanced options to tweak virtual machines provided by virt-manager. Instead, Boxes focuses on getting things working out of the box with very little input from user.
That said, Boxes shares a lot of code with virt-manager project, mainly in the form of libvirt, libosinfo and qemu.
Apps/Boxes (last edited 2021-04-07 08:41:54 by FelipeBorges )
Источник
Installing virtual operating systems with GNOME Boxes
GNOME Boxes is an application in GNOME Desktop Environment, which enables you to virtually access various operating systems.
Installing a virtual operating system from the list of predefined systems
To install a virtual operating system:
Run GNOME Boxes using the Super key and type Boxes . In GNOME Boxes, click the + button and then Create a Virtual Machine.
Download an operating system.
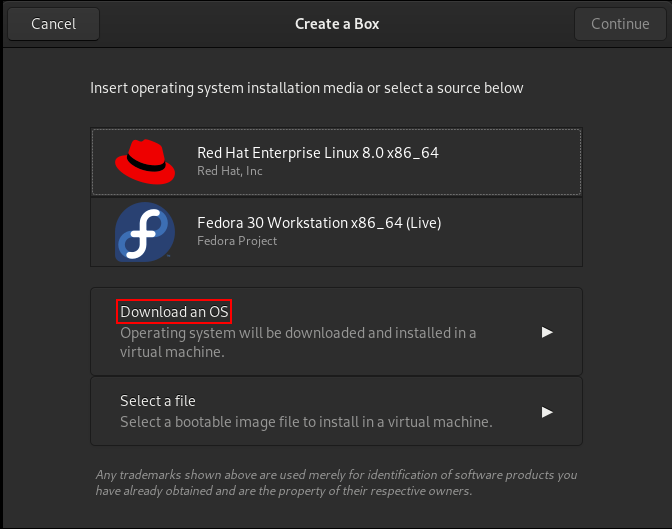
Choose one of the predefined systems from the list.
Alternatively, download an ISO image from the relevant website and select the file as shown in the screen below:
Review your installation.
To modify resources of the installed virtual operating system, such as RAM or disk size, click the Customize button.
To start the installation of the virtual operating system, click the Create button.
The actual installation process may differ based on the selected operating system.
Installed systems are available to run in the main menu of GNOME Boxes.
All Fedora Documentation content available under CC BY-SA 4.0 or, when specifically noted, under another accepted free and open content license.
Источник
Manage Remote And Virtual Machines With Gnome Boxes
This guide explains what is Gnome Boxes and how to install Boxes on various Linux distributions and then how to manage remote and virtual machines with Gnome boxes from a Linux desktop operating system.
Introduction to Gnome Boxes
Boxes is a simple graphical virtual machine management application developed by GNOME. Using Boxes, we can view, access, and manage remote and virtual systems. We can also browse the local or remote virtual machines, set the VMs preferences, and monitor their performances from the Boxes’ dashboard. No need to memorise any commands! Most operations can be easily done with a couple mouse clicks.
Please note that Boxes isn’t a viable alternative to other advanced VM managers, for example Virt-manager. Virt-manager is targeted towards system admins and experienced users who wants to setup a full-fledged virtualised solution. In contrast to Virt-manager, Boxes is specifically designed for typical desktop users who wants a very easy and safe way to try new operating systems.
Under the hood, Boxes shares a lot of code with virt-manager project, mainly in the form of libvirt, libosinfo and qemu. It is written using C and Vala programming languages and released under GPL.
Install Gnome Boxes On Linux
Gnome Boxes has been packaged for many popular Linux distributions and is available in the official repositories.
To install Gnome Boxes on Arch Linux and its variants, run:
Gnome Boxes is also available as flatpak application. If you haven’t installed flatpak command line interface on your Linux system yet, refer the following link.
After installing flatpak, run the following command to install Gnome Boxes:
To run Gnome Boxes, do:
Manage Remote And Virtual Machines With Gnome Boxes
Your Linux system should have at least 8 GB RAM and 20 GB of free disk space to run Boxes efficiently. Also, make sure your processor supports hardware virtualization (VT) to get smoother experience!
To check if your CPU supports VT, run this command:
If you a line that states The CPU is capable of virtualization: yes in the output, you are good to go!
Please note that ff you have installed Boxes using flatpak, the gnome-boxes —checks command may not be available.
Gnome boxes Dashboard
Launch Boxes from the application launcher or menu. The default interface of Boxes will look like below.
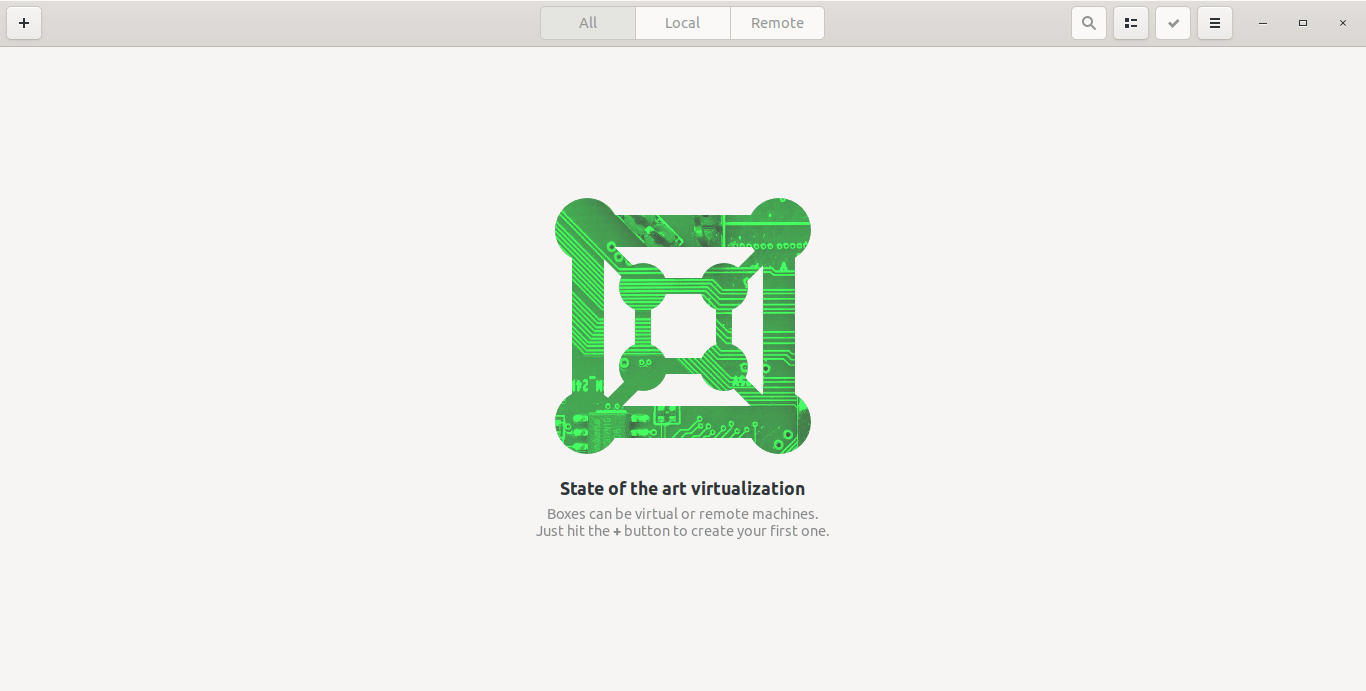
Gnome boxes dashboard
As you can see, the Boxes dashboard is very simple and tidy!
It has a + (plus) sign on the top left, which allows you to create a new virtual machine or connect to a remote VM.
On the center, you will have options to view all machines or local only or remote only machines.
On the right side of the Boxes dashboard, you have a search box to search for a local or remote VMs, toggle view button, and a hamburger menu which lists the Keyboard shortcuts, help section and about section.
Create a new virtual machine
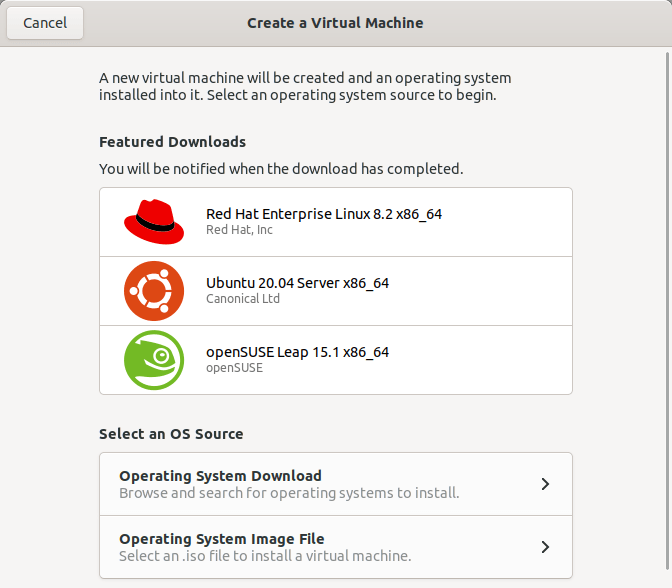
Click on the + (plus) sign on the top left to create a new virtual machine. A new window will open within the Boxes dashboard. You need to select an operating system to begin.
Create a new virtual machine with Gnome Boxes
You will be given two choices under the «Select an OS Source» section. You can either:
- browse and search for a guest operating system to install,
- or select an .iso file from your local drive to install a VM.
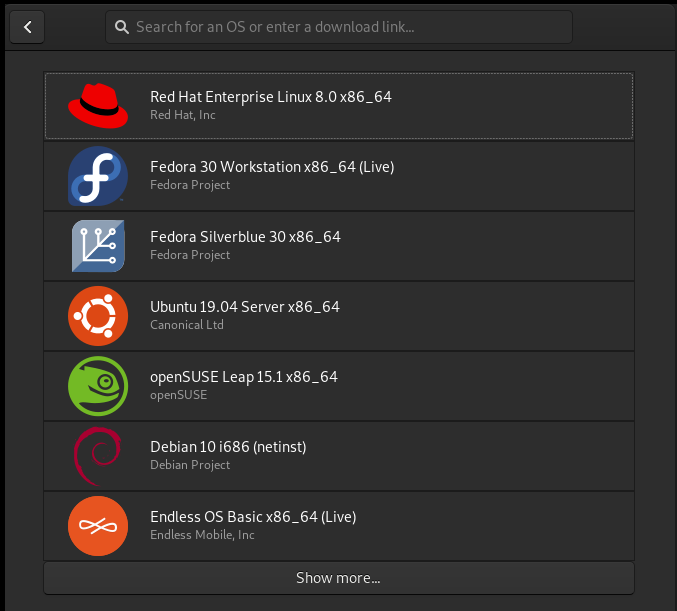
If you choose the first option, you will see list of available OS versions in the next window. Pick any OS listed there and Boxes will automatically download it from the Internet. You will be notified after the download is complete.

Browse and search for OS to install via Boxes
Use the search box provided in the above window to quickly find your preferred OS version.
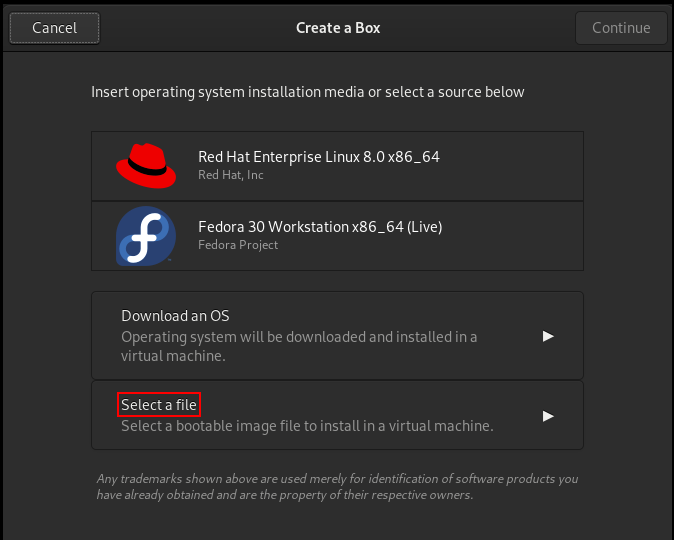
The second option is for those who wants to install the operating system from an ISO file stored in the local drive. Click «Operating System Image File» under the Select an OS Source section in the Boxes home window and choose the ISO file from your local disk.
After choosing the ISO file, Boxes will automatically assign required RAM and disk size based on the OS version. I chose CentOS 8 minimal ISO, and Boxes allocated 2 GB RAM 21.5 GB of disk space.
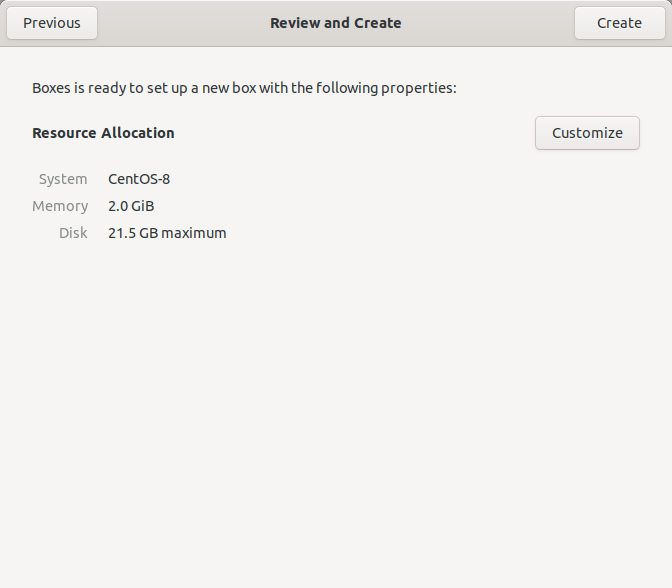
Create CentOS 8 VM from Boxes dashboard
You will also have options to customize the VM as you wish. If you think the default RAM and disk space are not enough, click the Customize option and adjust the size of RAM and disk space. Finally, click Create button to create a new VM.
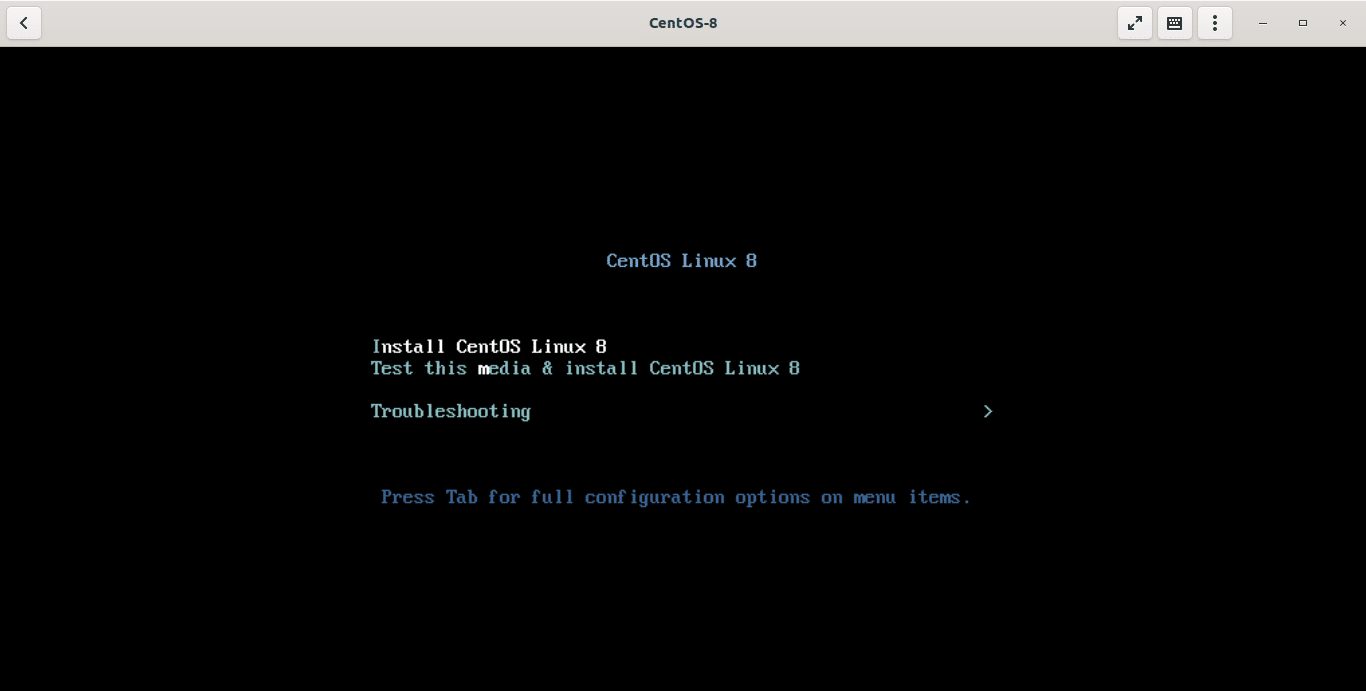
The guest operating system’s installation process will start now! Just continue the installation as usual and complete it.
Install CentOS VM using Gnome Boxes
By default, Boxes stores disk images in
/.local/share/gnome-boxes/images/ directory. If you are using other software that interfaces with libvirt, such as virt-manager, then Boxes will also read from the folder that software uses to store its images.
If you have installed Boxes via flathub, the disk images will be stored in
The configuration files are stored in
Viewing Virtual machine details
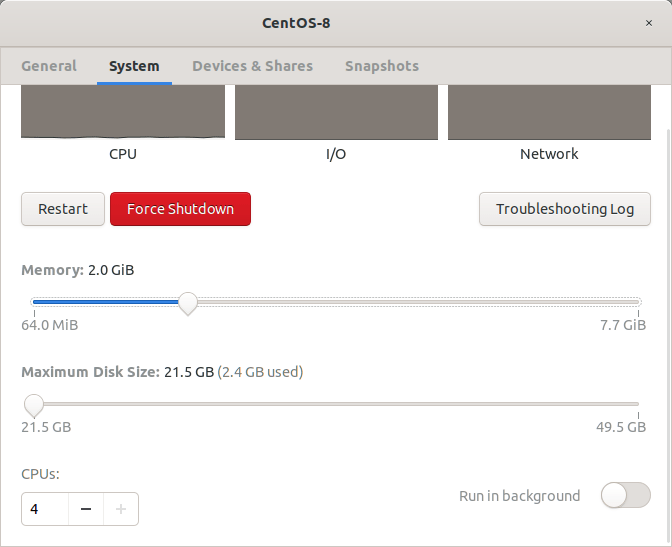
To view the details of a VM, just right click on it and choose «Properties» from the right-click context menu. In the Properties menu, choose «System» option to view its details such as;
- total size of allocated RAM,
- total size allocated disk space,
- total number of CPU cores.
View Virtual machine’s properties in Gnome Boxes
You can change these values as per your liking.
Connect to a remote system
As stated already, Gnome Boxes can be able to connect to a local VM or a remote virtual system running in the same network.
To connect to a remote VM, click the + (plus) sign in the Boxes dashboard and choose «Connect to a Remote Computer» option.
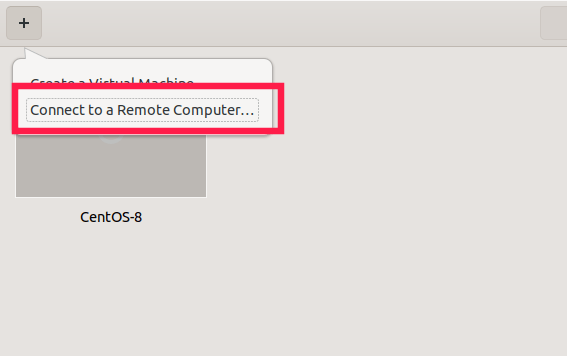
Connect to a remote system with Gnome Boxes
The remote system can be connected using any one of the following methods:
- spice (remote Xspice server)
- rdp (remote desktop protocol)
- ssh (secure shell)
- vnc (VNC server)
For the purpose of this guide, I am going to access my remote VM via SSH. To do so, enter the following URL in the «Connect to Box» window.

Connect to a remote system via SSH with Gnome Boxes
- root — root user of my remote system,
- 192.168.225.52 — IP address of remote system,
- 22 — SSH port number.
Replace these values with your own and click Connect button.
Enter the user name of the root user to access the remote system console.

Access remote systems with Gnome Boxes
Create snapshots of Virtual machines
Snapshots are often used to save the current working state of a VM. They will be useful to restore the VM to earlier state if something goes wrong in future. For instance, you may want to test a software on your VM or update your VM’s OS to newer version. If the VM is broken after installing a specific software or updating the whole system, you can simply switch back to the previous working state.
To create a snapshot of a VM, right click and choose Properties. Go to the Snapshots section and click the + (plus) sign. A new snaphsot will be created with current timestamp in the name, for example 25/09/20, 07:13:16 PM IST.
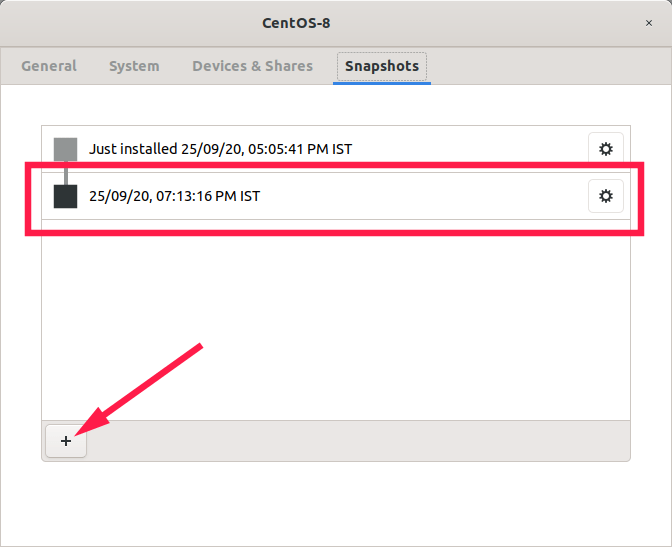
Create snapshot of a VM in Gnome Boxes
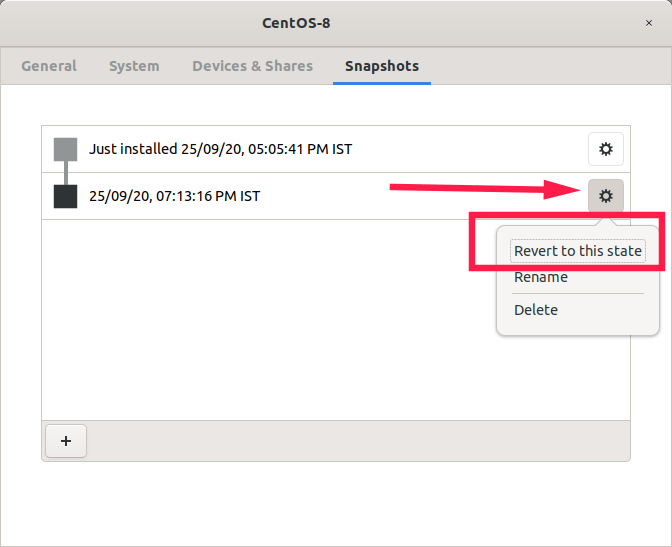
You can also give a meaningful name to the snapshot to easily find and restore a snapshot later. To rename a snapshot, click the gear icon next to each snapshot and choose «Rename» option and change the name to something more meaningful, for example «CentOS 8 with LAMP stack».
To restore a snapshot, just click the gear box again and choose «Revert to this state» option.
Restore snapshot in Gnome Boxes
If you don’t need a snapshot anymore, click the gear button and choose «Delete».
Clone virtual machines
Cloning virtual machines is often useful in many cases. You may want to deploy many identical VMs for testing purposes. Instead of manually creating multiple VMs one by one, we can make copies of an existing VM. Cloning a virtual machine creates a new virtual machine that is configured with the same virtual hardware, installed software, and other properties that were configured for the original virtual machine.
To clone a Virtual machine from Boxes, just right click on it and choose «Clone» from the context menu. A new VM will be created with exact replica of the original machine.
View Virtual machine’s logs
If a VM is not starting up, you can refer the logs to get a clue of what went wrong. To view the log file of a VM, right click on it and choose «Properties». In the Properties window, go to the «System» tab and click «Troubleshooting Log».
The log file displays the virtual machine state, the virtual machine libvirt configuration, and the QEMU hypervisor log.
Conclusion
Boxes doesn’t include any advanced options like its counterparts. It is beginner-friendly, light-wight graphical tool that focuses mostly on simplicity and usability out of the box. If you want to turn your Linux desktop into a simple virtualization environment in couple minutes, Gnome Boxes might be a good choice!
Источник


