- GNOME Commander — мощный файловый менеджер.
- GNOME Commander
- A powerful file manager for the GNOME desktop environment
- Information
- Latest news
- About GCMD
- Bugs
- Mailing lists
- Authors
- Donations
- Gnome Сommander: особенности и установка файлового менеджера
- Основные возможности и свойства Gnome Commander:
- Рекомендации
- Установка Gnome Commander
- Заключение
- GNOME Commander
- Возможности
- GNOME Commander
- A powerful file manager for the GNOME desktop environment
- Documentation
- Index
- Tips and tricks for Gnome Commander
- Tips and tricks:
- Handling MIME types
- Handling archives
- Using removable devices
- Using a nice nautilus icon theme
- Open a full terminal
- Internal file viewer
- Main features include:
- Internal Viewer’s Window
- Using the internal viewer
- Input Modes
- Binary Display Mode
- Hex dump Display Mode
- Image Display Mode
- Metadata in GNOME Commander
- Metadata
- Metadata
GNOME Commander — мощный файловый менеджер.
Автор: admin.
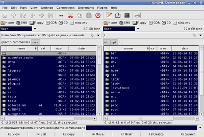
 GNOME Commander — очень классный, мощный, качественный, бесплатный, графический, двух-панельный файловый менеджер, обязанный своим появлением таким аналогичным продуктам как: Midnight Commander и Norton Commander. В принципе, все двух-панельные файловые менеджеры в Linux, как правило очень схожи по своим возможностям и внешнему виду, с Total Commander для Windows и Gnome Commander не является, в этом плане, исключением, хотя кое в чём, он конечно же уступает вышеупомянутому, знаменитому «файловику». Но, как бы там нибыло б, в целом, Gnome Commander хуже от этого не становится, это реально хороший «товар».

Из основного краткого перечня возможностей, можно выделить: наличие собственного FTP-клиента, работа с SAMBA, правый клик для работы с файлами, многовкладочность, система поиска, утилита для сравнения содержимого файлов, также переименование файлов в групповом режиме, командная строка, возможность подключения всевозможных плагинов и мн. другое.
По-поводу установки программы. Вообще, программа имеется в «центре приложений Ubuntu«, поэтому установка очень простая и быстрая, но на сегодняшний день, а это: 13.01.2014 г., произошли какие-то изменения, точное описание которых я дать не могу, за неимением информации. Дело в том, что поменялся официальный сайт программы и центр приложений, просто не даёт её установить, включая там по замкнутому кругу, всё время какое-то предупреждение, избавиться от которого нельзя. Поэтому, нечего не остаётся, как только скачать нужный нам .DEB-пакет и установить из него. Думаю, что в дальнейшем, эти недоразумения обязательно исправят.
Итак, заходим сюда, прокручиваем страницу вниз и скачиваем нужный пакет (имеются пакеты для самых разных дистрибутивов): http://gcmd.github.io/download.html. Нам для Ubuntu нужно выбрать соответсвенно: Ubuntu packages. На открывшейся странице будут вот такие разделы:
1) Package gnome-commander
2) Package gnome-commander-data
3) Package gnome-commander-dbg
В каждом из этих разделов, представленны пакеты для разных версий Ubuntu (нам нужна последняя актуальная версия Ubuntu 13.10 — это saucy). По идее, что бы полностью установить программу, потребуются пакеты (saucy) из всех этих категорий, но можно поступить проще. Скачиваем только пакет из первой категории, кликнув на него, вас перенаправит на страницу, внизу которой будет таблица, под названием: Download gnome-commander и там, нужно выбрать, в зависимости от вашей системы, либо: amd64 (64-bit.), либо: i386 (32-bit.). Далее, через терминал выполняем:
// Заходим в директорию со скачанным пакетом.
После этого, терминал сообщит о неудовлетворённых зависимостях, тут же, не закрывая терминала выполняем команду:
Всё, программа должна установиться полностью. Если захотите удалить Gnome Commander, то выполните в терминале всего лишь одну команду:
sudo apt-get purge gnome-commander
Внимание: ошибочка небольшая вышла, программа нормально устанавливается из «центра приложений», без всяких-яких, просто у меня Ubuntu заглючила, поэтому такие проблемы и возникли.
Положительные характеристики Gnome Commander:
- Просто, очень хороший менеджер файлов.
Отрицательные характеристики Gnome Commander:
Параметры:
Язык интерфейса: русский
Лицензия: GNU GPL
Домашняя страница: http://gcmd.github.io/
Проверялось на «Ubuntu» 13.10 Unity (64-bit.).
GNOME Commander
A powerful file manager for the GNOME desktop environment
Information
17 March ’21: v1.12.1 released
![]()
GNOME Commander is a «two-pane» graphical file manager for the Linux desktop using GNOME libraries. It aims to fulfill the demands of more advanced users who like to focus on file management, their work through special applications and running smart commands.
Latest news
- 17 Apr 2021 » New Release: v1.12.1
- 25 Mar 2021 » New Release: v1.12.0
- 28 Jan 2021 » Installing on Ubuntu 20.04 and Mint 20
- 19 Jun 2020 » New Release: v1.10.3
- 30 May 2019 » Installing Gnome Commander on Debian, Ubuntu and Mint
- 30 May 2019 » Building a Gnome Commander RPM for CentOS 7
- 16 May 2019 » New Release: v1.10.2
- 12 May 2019 » New Release: v1.10.1
About GCMD
Features:
- Support for tabs
- One instance mode
- User defined LS_COLORS colours
- Possibility to select/deselect files only
- GTK-2 GUI with standard mouse interactions.
- FTP using GnomeVFS ftp module.
- SAMBA access.
- Mouse context menu that easily can be extended by entries calling any kind of external application like viewers, editors or custom scripts to work on selected files or directories.
- Quick device access buttons with automatic mounting and unmounting («no-mount» option for just quick access to folders or otherwise automounted devices).
- Latest accessed folder history.
- Folder bookmarks.
- Plugin support under development.
- Fast internal file viewer for text, images and image meta data (Exif and IPTC).
- Tools for searching, quick file name search in current dir, symlinking, comparing directories.
- A tool for advanced renaming of files supporting various types of meta-data.
- Integrated command line.
Bugs
You can report or view GNOME Commander bugs at gitlab.gnome.org.
All users of GNOME Commander are very welcome to help us find, hunt down and kill bugs. 🙂
Mailing lists
There are two mailing lists for GNOME Commander which are hosted and controlled by the Free Software Foundation:
- gcmd-users: for topics about using GCMD
- gcmd-devel: for topics about the development of GCMD
All posts from non-members are beeing held for approval due to spam reasons. Keep in mind that both lists are public and your email address can be seen by anyone!
Authors
Since 2013: Uwe Scholz (maintainer of source code and home page).
- u.scholz83 at gmx.de (GPG-KeyFingerprint )
Former managers and developers were
- Piotr Eljasiak († 2012), Project manager and main developer.
- Assaf Gordon, Developer (The internal viewer).
A special «Thank you» is addressed to Marcus Bjurman who was the original creator and former manager/developer. Marcus initiaded this project publicly in 2001 and developed it up to version 1.1.6 in 2004. Without him there would not have been any GNOME Commander.
 Donations
 Donations
Gnome Commander is open source software and it’s free. If you really want to donate something then let me point you to one of the following organizations:
. or any other of these kind.
And remember to celebrate the «I love free software day» on February, 14th.
Gnome Сommander: особенности и установка файлового менеджера
Gnome Commander – это мощный и резвый файловый менеджер. Софт работает с двумя окнами. Прародитель данного семейства — легендарный Norton Commander.

Основные возможности и свойства Gnome Commander:
- узнаваемый и приветливый интерфейс;
- выбор и его отмена как файлов, так и папок;
- отправление файлов по электронной почте;
- настройка цветов;
- настройка пользовательского контекстного меню;
- основные операции свойственные файловым менеджерам (открытие, переименование, удаление и т.д.);
- поддержка вкладок, закладок на папки;
- поддержка плагинов, под требования пользователя;
- мгновенного просмотра файлов для текста и изображений;
- настройка горячих клавиш клавиатуры;
- интегрированная командная строка Linux.
Официальный сайт Gnome Commander
Познакомиться с альтернативными файловыми менеджерами можно в данной статье.
Рекомендации
- Обработка архивов. GCMD можно настроить так, чтобы работа с архивами стала довольно практичной. Предпочтительный способ — активировать плагин для сборки в Fileroller в меню плагинов. Активируя этот плагин, вы получаете дополнительные записи во всплывающем меню. Щелкните правой кнопкой мыши по выбранным файлам и папкам (убедитесь, что Fileroller установлен в вашей системе). Нажав на архив, всплывающее меню позволяет вам выбрать, куда извлечь архив.
- Использование съемных устройств. Если вы часто используете съемные устройства, такие как компакт-диски, дискеты и камеры, вы можете автоматически настроить GC для их монтажа.
- Значки. В стандартной теме значков, которая поставляется с GC, отсутствуют значки для многих типов файлов. В итоге достойный их вид только при 16 размере. Однако существуют и другие темы, которые являются более полными и выглядят лучше. Unscalable Gorilla от Jimmac — один из примеров, который можно использовать в GC.
- Открытие полного терминала. Иногда вам нужен быстрый способ открыть полное оконечное окно с текущим каталогом в качестве рабочего каталога терминалов. Наберите sh или, bash если хотите, в командной строке GCMD и нажмите SHIFT ENTER. Готово.
Установка Gnome Commander
Вводим в терминале «sudo apt-get install gnome-commander».

Продолжаем установку нажав «Д».


Заключение
Проект развивается более десяти лет. При этом он находится в стадии разработки, что свидетельствует о его зрелости.
В данное время файловый менеджер выглядит многообещающе. Он отлично подойдет как новичкам, так и продвинутым пользователям. Софт показывает себя надежным, быстрым и интуитивно понятным.
GNOME Commander
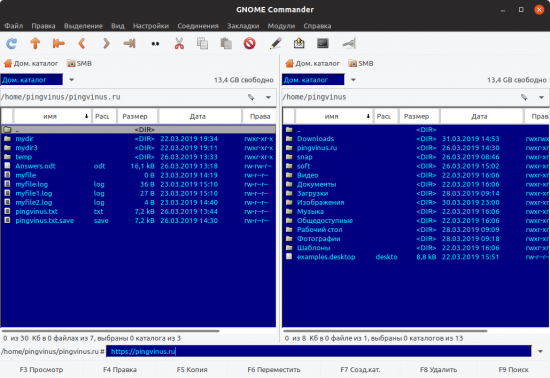
GNOME Commander — двухпанельный файловый менеджер для Linux.
Программа выполнена в стиле традиционных двухпанельных файловых менеджеров, например, таких как Midnight Commander или Total Commander для Windows.
Возможности
Основные возможности GNOME Commander:
- Поддержка вкладок.
- Встроенный FTP клиент (используется модуль GnomeVFS).
- Доступ к SAMBA.
- Возможность добавления пунктов в контекстное меню, открывающееся при клике правой кнопкой мыши по файлам.
- Создание закладок для быстрого доступа к директориям.
- Перемещение по истории посещения директорий.
- Кнопки для быстрого доступа к устройствам (автоматическое монтирование).
- Поддержка плагинов.
- Встроенная утилита для поиска файлов.
- Встроенная утилита для сравнения директорий.
- Встроенная утилита для группового переименования файлов.
- Встроенный текстовый просмотрщик.
- Встроенный просмотрщик изображений и мета-данных файлов изображений (просмотр EXIF, IPTC).
- Встроенная командная строка.
- Поддержка горячих клавиш.
- И другие.
Функционально файловый менеджер GNOME Commander для Linux схож с Total Commander для Windows, хотя уступает ему в функциональности.
GNOME Commander
A powerful file manager for the GNOME desktop environment
Documentation
Index
Here, additional user documentation, FAQ, useful tips and tricks, file management scripts and other stuff connected to GCMD is listed.
If you are looking for the documentation on how to install GCMD manually on a linux terminal, see the Development page, section «Building from source».
Tips and tricks for Gnome Commander
Tips and tricks:
Handling MIME types
Since GNOME has changed to follow the freedesktop.org standard of handling MIME types, the editing of preferred programs in GNOME Commander is currently broken (v 1.1.7). We do have this in our TODO file, but until GCMD can handle edititing of preferred programs, there is another way of managing this manually by setting up some files in
/.local/share/applications . There are three types of files in this folder:
- XXX-usercreated.desktop Where «XXX» stands for the application in question. These files contain information about which MIME types the application can handle, what command will be used for launching it, if it shall run in terminal, and language localization.
Example: - mimeinfo.cache This single file assigns every MIME type a list of applications. These are the entries you will see via «Open with» in GCMD. However, instead of application commands, each entry points to the .desktop files, like the XXX-usercreated.desktop from above. There can be several possible targets for a single MIME type entry, separated by semicolon.
Example: - defaults.list This file controls which application that is the default one, the one that starts when you double click a file.
Example:
Please refer to freedesktop.org or your distribution of choise for further details.
Handling archives
The old way is:
- Open the options dialog and go to the Programs tab.
- Add two favorite apps using the values shown here and here.
You can now right click any file or folder and choose Create archive. to compress it and right click compressed files and choose Extract archive. to extract it.
Using removable devices
If you use removable devices such as cd’s, floppies and cameras a lot you can make GC automaticly take care of mounting them by following this guide:
- Open the options dialog and go to the Devices tab.
- Add the devices that you are using. This is how the program looks with a few added devices. In the last image the red circle shows the available devices, there is also a button, in the green circle, to press if we want to unmount the floppy, which happened to be mounted. The icons that are used for the devices in the example should be available in the $(prefix)/share/pixmaps/gnome-commander/device-icons folder on your computer.
- There is also an option to skip mounting in the option device tab, this can be useful for making shortcuts to directories, or if you have some automounting feature that mounts it at its mountpoint when available, or if you use Supermount that does it on access basis.
Using a nice nautilus icon theme
This is outdated info since Nautilus and later Gnome versions no longer uses these kind of themes.
The default icon theme that comes with GC lacks icons for a lot of file types and only looks good at icon size 16. There are other themes around though, that are more complete and looks better in bigger sizes. Unscalable Gorilla by Jimmac is one example and can be used in GC by following theese steps:
- Download the theme.
- Unpack the theme to whereever you want.
- Start GC and open the options dialog. In the Layout tab set the Theme icon directory to be the folder where you extracted Unscalable Gorilla. Also change Row height and Icon size to 20 or some other size that you like. When you’re done also make sure that the Graphical mode is set to MIME icons.
- When you now close the options dialog the file lisings should refresh and you should see Unscalable Gorilla being used.
This guide should work for all other nautilus icon themes as well.
Open a full terminal
Sometimes you want a quick way of opening a full teminal window with the current directory as the terminals working directory. Well, that is easy, just type sh , or maybe bash if you prefer, in the GCMD command line and hit SHIFT ENTER — there you have it.
Internal file viewer
Main features include:
- Several input modes, including
- ASCII
- UTF-8
- Four display modes:
- Text display, with or without line wrapping.
- Binary file display.
- Hexadecimal.
- Image rendering.
- Text Marking, Copying to Clipboard
- Text Search, Hex Search
- Fast file loading (using MMAP or incremented loading when possible, just like Midnight Commander’s internal viewer
Internal Viewer’s Window
Using the internal viewer
| Menu Item | Keyboard Shortcut | Details |
|---|---|---|
| File|Close | Escape, or CTRL-W | Close the internal viewer window |
| Text|Wrap Lines | W | Toggles line wrapping. (Applicable only in text display modes) |
| Input Modes: | ||
| Text|Encoding | This menu contains all possible character encodings. (If you need an additional encoding, send an email to the developers). | |
| Text|Encoding|ASCII | A | Sets ASCII input mode. |
| Text|Encoding|UTF-8 | U | Sets UTF-8 input mode. |
| Text|Encoding|CP437 | Q | Presing «Q» will quickly set ASCII input mode, with Codepage 437 encoding. (Good for binary and hex mode viewing). |
| Display modes: | ||
| View|Text | 1 | Sets display mode to TEXT |
| View|Binary | 2 | Sets display mode to Binary. Switching to Binary display mode will automatically set ASCII input mode (UTF-8 is not supported with binary display) |
| View|Hex | 3 | Sets display mode to hex dump. Switching to Hex display mode will automatically set ASCII input mode (UTF-8 is not supported with hex dump display) |
| View|Image | 4 | Will try to load the file as an image. Loading is done using GDK, so every GDK-supported format should work. |
| Font Size: | ||
| View|Larger Font | = or + | Increment the font size. |
| View|Smaller Font | — | Decrement the font size. |
| Image Manipulation: | ||
| Image|Rotate Clockwise | CTRL+R | Rotate the image 90 degress. (Applicable only in IMAGE display mode) |
| Image|Rotate Counter Clockwise | Rotate the image 270 degress. (Applicable only in IMAGE display mode) | |
| Image|Rotate 180 | CTRL+SHIFT+R | Rotate the image 180 degress. (Applicable only in IMAGE display mode) |
| Image|Flip Vertically | Vertically Flip the image. (Applicable only in IMAGE display mode) | |
| Image|Flip Horizontally | Horizontally Flip the image. (Applicable only in IMAGE display mode) | |
| Settings: | ||
| Settings|Binary Mode | Set number of bytes to display on each line in Binary display mode. | |
| Settings|Hex Mode|Decimal Offset Display | Display the offset in hexadecimal or decimal numbers. (Only applicable in Hex display mode). | |
| Settings|Save as Default Settings | CTRL+S | Saves the current window size, input mode, and other settings as the default. (Note: the starting Display mode is determined by the file’s content, and is not saved as a user setting) |
Input Modes
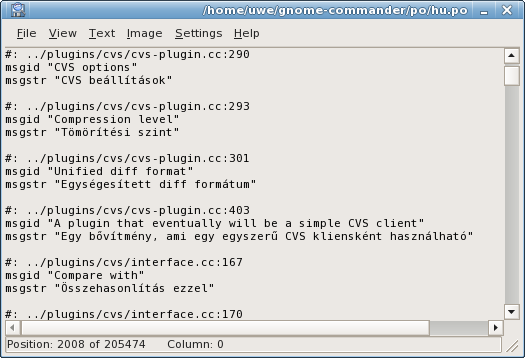
Here’s an example of using different input modes. The displayed file is a UTF-8 file (this is actually the Hungarian translation file from the gnome-commander project).
UTF-8 is an encoding scheme used to encode Unicode characters into a multibyte string. A single UTF-8 character can be composed from up to 6 bytes.
In ASCII mode (without any further chacarater encodings, press «A» to set it), only bytes with ASCII value above 0x20 and below 0x7F are displayed. All other characters are shown as dots:
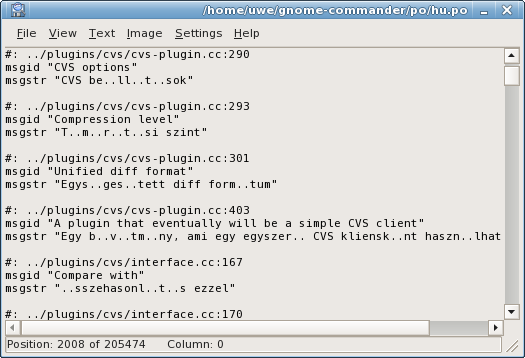
In ASCII mode with Codepage 437 encoding (press «Q» to set it), extended ASCII characters (above ASCII 0x7E) are displayed:
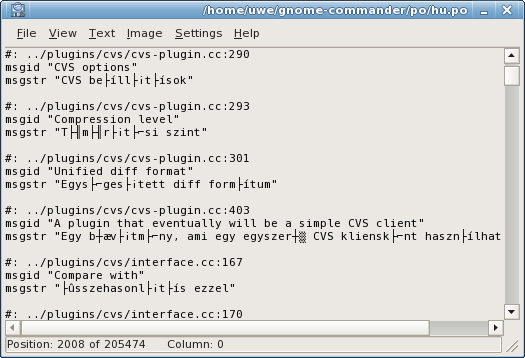
In UTF-8 Input mode (Press «U» to set it), the correct characters are displayed:
Other input modes such as cyrillic or greek can be selected in the «Text» menu, section «Encoding».
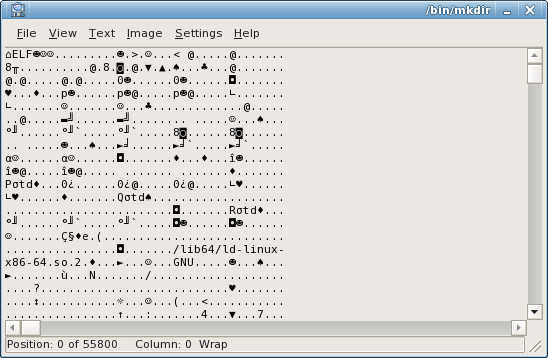
Binary Display Mode
Binary display mode is suitible for quickly viewing binary files. In Binary display mode, the number of bytes displayed on each line can be changed in the «Settings» menu.
Viewing a file in Binary display mode, in ASCII input mode:

The same file as above, with Codepage 437 encoding:
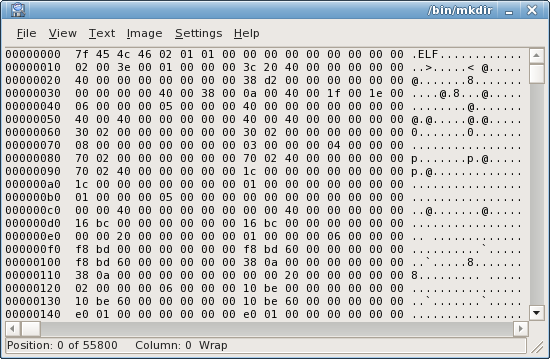
Hex dump Display Mode
This is a simple Hex dump display mode (similar to using od -t x1 ). In Hex dump display mode, you can only use ASCII input mode, with or without additional character encodings (but not UTF-8).
Below is a short demonstration of the Hex dump display mode. The file displayed is 256 bytes in size, each byte corresponds to a different ASCII value.
Codepage 437 Encoding:

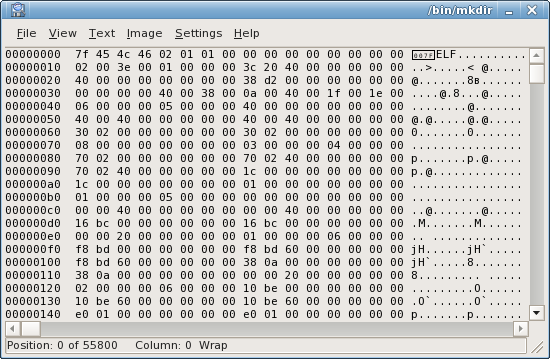
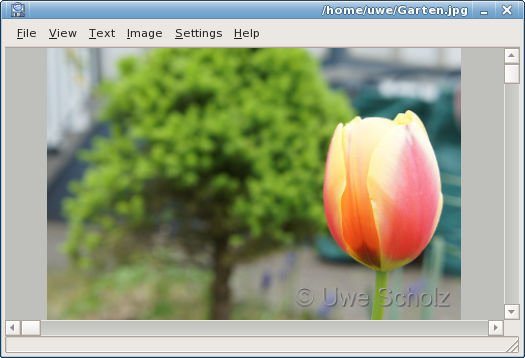
Image Display Mode
The viewer starts with the image fitted to the viewer window size = larger window = larger view
Metadata in GNOME Commander
Metadata
Metadata formats supported by GNOME Commander:
Metadata
Most multimedia formats can contain different kinds of metadata describing the subject matter and some technical data about the content of the file. From version 1.2.1, GNOME Commander has some ability to handle different kinds of metadata embedded in files. This page lists all tags supported with descriptions of the tags, and some descriptions on how and where to make use of it.


