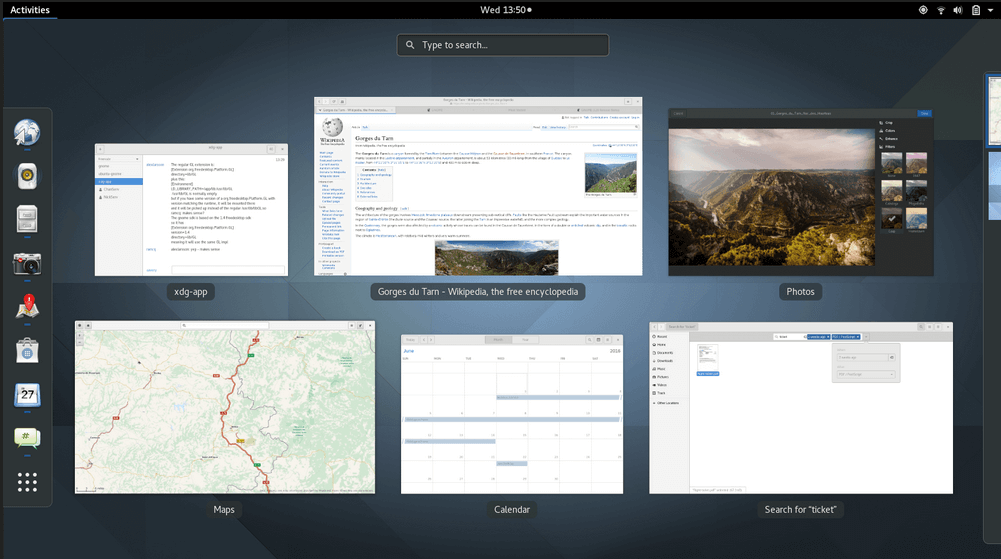
Установка расширений Gnome Shell
Несмотря на то, что разработчики в погоне за простотой окружения Gnome отказались от большого количества настроек, благодаря энтузиастам, существует множество расширений, которые позволяют восполнить этот недостаток. С помощью расширений вы можете изменить практически все во внешнем виде вашего окружения.
В этой статье мы разберем как выполняется установка расширений Gnome Shell в Ubuntu. Данная статья ориентирована в первую очередь на Ubuntu, но приведенные здесь советы также будут работать и в других дистрибутивах.
Где брать расширения?
Все доступные расширения для Gnome расположены на сайте extensions.gnome.org.

Здесь можно отсортировать расширения по популярности, загрузками, дате добавления, а также фильтровать по поддерживаемой версии оболочки Gnome. Вы можете искать расширения и на других интернет-ресурсах, но этот считается официальным.
Установка расширений Gnome через сайт
Расширения можно устанавливать двумя способами. Автоматически с веб-сайта или вручную, скачав архив расширения. Сначала рассмотрим автоматический вариант. Для установки расширений с сайта необходимо установить chrome-gnome-shell и расширение для браузера.
Для установки пакета выполните:
sudo apt install chrome-gnome-shell
Затем нужно установить расширение для вашего браузера. Обычно, когда вы открываете сайт расширений Gnome, то на странице вам предлагают скачать расширение для вашего браузера. Поддерживаются Chrome, Firefox и Opera.


После установки расширения для браузера нужно перезапустить браузер и перезайти в систему если вы устанавливали пакет chrome-gnome-shell. После этого на странице каждого расширения появится вот такая кнопка, с помощью которой можно будет установить, включить, отключить или удалить расширение:

Для установки просто переключите выключатель в положение On:

Затем согласитесь на установку:


На вкладке Installed Extensions можно увидеть все установленные вами расширения:

Также посмотреть список установленных расширений и управлять ими можно с помощью утилиты gnome-tweak-tool:
sudo apt install gnome-tweak-tool
Здесь установленные расширения приведены на вкладке Расширения:

Как установить расширение Gnome вручную
Если у вас не получается установить расширение через браузер, то ничего страшного, можно все сделать вручную. Сначала смотрим какая у вас версия Gnome:

Затем на странице нужного расширения выберите вашу версию Gnome и версию расширения в пункте Download. После этого автоматически начнется загрузка архива:

Далее, нужно узнать UUID только что скачанного расширения:
/Загрузки/caffeine@patapon.info.v30.shell-extension_ov9BwbU.zip metadata.json | grep uuid | cut -d \» -f4

У расширения Caffeine — это caffeine@patapon.info. Создаем папку для этого расширения в нашей домашней папке. Имя папки — полученный ранее UUID:
Осталось только распаковать наше расширение в эту папку:
/Загрузки/caffeine@patapon.info.v30.shell-extension_ov9BwbU.zip -d extension
cp -r extension/*
Затем осталось активировать расширение командой:
gnome-shell-extension-tool -e caffeine@patapon.info

В отличие от варианта с браузером, здесь все немного сложнее, чтобы расширение заработало нам необходимо перезапустить оболочку Gnome Shell.
Выводы
В этой небольшой статье мы рассмотрели, как выполняется установка расширений Gnome в Ubuntu и других дистрибутивах. Если у вас остались вопросы, спрашивайте в комментариях!


Оцените статью:
Об авторе
Основатель и администратор сайта losst.ru, увлекаюсь открытым программным обеспечением и операционной системой Linux. В качестве основной ОС сейчас использую Ubuntu. Кроме Linux, интересуюсь всем, что связано с информационными технологиями и современной наукой.
10 комментариев
Gnome всё ближе пытается приблизиться к KDE. Ставьте KDE, и все проблемы решены сразу. Разве я не прав .
Возможно я его себе и поставлю- но не может ли KDE конфликтовать с другими DE? (Я попробовал установить «третьегном» рядом с Mate- проблемы из за этого были мелкие (некоторые настройки в Mate после этого изменились и я их возстановил- больше пока других проблем не замечаю). Но а если я еще эту коллекцию KDE пополню? Это мне интересно, я всю жизнь только «Mate» использую (и буду и далее использовать)- я все перепробовал, а остановился лишь на одном (и а как и винду такой сделать?)
И что касается распробования этих разширений: зашел я сейчас туда ( https://extensions.gnome.org/ )- а всевозможных вариантов разширений там удивительно много- я самостоятельно не смог в них разобраться но я думаю, что большинству «типа счастливых обладателей» «третьегнома» сего в него достаточно лишь какие-то определенные единицы из тех разширений «для полного счастья» доустановить», чтобы этот «третьегном» можно было бы значительно улучшить (у кого таковой имеется (это очень актуально- вот мне в оригинальном официальном своем виде «третьегном» и отвратителен и я не смог с этим разобраться. Я из существующих DE все что можно перепробовал и я уже много лет только на «Mate» сижу- лучше него все равно, я считаю, ничего нет. А какое-нибудь еще DE (в т.ч. и «третьегном») я себе все же хочу доустановить- это мне в спортивных/профессиональных интересах и как для коллекции нужно- только бы между собой разные DE потом не конфликтовали (а то было вот раньше такое (что-то с зависимостями там)- надеюсь теперь это наконец в них там устранено (и еще установка «третьегнома» (и KDE) удивительно много всяких библиотек за собой натягивает- а они часто бывают нужны при установках какого-либо ПО (ведь много какое ПО при его установке всякие библиотеки там за собой тянет. А при установке софта оффлайн то «типа полное собрание сочинений» может оказаться очень даже к стати (правда после того, как я устанавливая «третьегном» всем тем его ассортиментом обзавелся- этот «третьегном» после своей установки заодно похоже чего-то еще и в автозагрузку непонятного лишнего мне внес- теперь в сеансе «Mate» моя «18.04.2» оперативной памяти жрать стала больше, чем раньше (но в третьегномовом сеансе такая ОС у меня мегабайт так еще на 400 RAM больше «жрет»- как разобраться?)))
▧ Установка из под командной строки ( sudo apt install chrome-gnome-shell ) потребовала у меня 76 пакетов, а установка потом и самого третьегнома ( sudo apt install ubuntu-gnome-desktop
)- еще целых 100 пакетов (и версия третьегнома сего установилась у меня «3.28.1». Хотя и «3.32» в эти дни вот уже зарелизилось- очень интересно,- у кого и когда до этой версии обновления придут?) Завершив сеанс с Mate я запустил сеанс с «третьегномом»- очень опять мне он не понравился (все настройки в нем перебрал- не помогло. Видимо помимо того, чего я себе там так много понаустанавливал- тем не менее что-то еще «для полного счастья» там требуется. Но я и не знаю, что и похоже с «Mate» третьегном не конфликтует- а раз так, то тогда я бы всем советовал и не морочить голову и не боясь в третьегномовую убунту «Mate» тогда доустановить, запустить, распробовать, сравнить).
▧ Мне тем не менее в любом случае интересно- а какие дополнения для «третьегнома» в него надо установить, чтобы он стал максимально схожим с «Mate» с тем, который как я хотел- я смог настроить под себя? (Ну и заодно и а как еще и винду такой сделать?) И из твиков, которые везде нужны- вот во многих DE (в т.ч. и в базовом «третьегноме») в настройках отсутствует такая функция, как возможность открывать (или запускать) файлы одним, а не двойным кликом мыши. И еще мне очень нравится, когда под каждой файлом и папкой (ниже их названий) отображается и их объем (и под папками- еще и количества файлов в них).
(да много в каких еще твиках ОС нуждаются- иначе они будут очень «умственно неполноценны»- https://forum.ubuntu.ru/index.php?topic=276655.msg2313821#msg2313821 )
))) Был такой писатель — Кафка! Его стиль в литературе — «поток сознания», читать нормальному человеку — не возможно! Так и тут, Миша )))
Так, почти ни чего, не понял из Вашего письма (попытаюсь разобраться, когда будет время).
Одно знаю Gnome, Mate и KDE, если вместе поставить, то всё работает там, и там, и там.
Но, если в KDE использовать всё, что нужно для программ в окружении Gnome, то также всё будет работать. Сам, KDE мне понадобился для работы в разных комнатах (это очень удобно, не путайте рабочие столы и комнаты). Кстати в KDE ещё вид и красота, которую вы выбираете себе Сами.
Пользуюсь KDE, установил всё что мне нужно. Практически всё работает, что и для Gnome написано.
Кроме Compiz — для KDE эта серия пакетов не нужна, там и так всё есть изначально.
Короче, использую только KDE с установленными пакетами для Gnome (если они нужны), стоит только одно окружение KDE, и всё работает, как для Gnome окружения, так и для KDE. Проблем не знаю.
Gnome shell windows manager
Tiling window manager
- Horizontal, vertical, spiral layouts
- Gaps
- (Experimental) Multi-monitor
- Clone the project to the gnome-shell extension directory:
-
Reload GNOME Shell: Alt+F2 then r or log out and in;
Enable the extension:
Most of your interactions with Tilingnome will be through the use of keyboard shortcuts. The available ones are listed below.
Default keybinding Function Description Super+x Toggle tile Toggle whether to tile the currently-focused window Super+return Focus first tile Focus the first tile in the tile list Super+j Focus next tile Focus the next tile in the tile list Super+k Focus previous tile Focus the previous tile in the tile list Shift+Super+return Swap first tile Swap currently-focused tile with the first tile Shift+Super+j Swap next tile Swap currently-focused tile with the next tile Shift+Super+k Swap prev tile Swap currently-focused tile with the previous tile Default keybinding Function Description Super+z Switch next layout Switch to the next available layout Shift+Super+z Switch previous layout Switch to the previous available layout Default keybinding Function Description Super+u Decrease split Decrease the split ratio by the split ratio step Super+i* Increase split Increase the split ratio by the split ratio step Shift+Super+u Decrease master count Decreate the master count by one Shift+Super+i Increase master count Increase the master count by one Pull requests welcome for features and fixes!
Gnome shell windows manager

PaperWM is an experimental Gnome Shell extension providing scrollable tiling of windows and per monitor workspaces. It’s inspired by paper notebooks and tiling window managers.
Supports Gnome Shell from 3.28 to 3.38 on X11 and wayland.
While technically an extension it’s to a large extent built on top of the Gnome desktop rather than merely extending it.
Clone the repo and run the install.sh script from the repository. The installer will create a link to the repo in $XDG_DATA_HOME/gnome-shell/extensions/ . It will then ask if you want to apply the recommended settings (see Recommended Settings) and lastly it will ask to enable PaperWM.
To uninstall simply run ./uninstall.sh .
You’ll by default follow the develop branch. If you want a possibly more stable experience you can follow the releases by checking out the master branch.
Cloning the repo directly into $XDG_DATA_HOME also works (you can then run install.sh to enable PaperWM):
Running the extension will automatically install a user config file as described in Development & user configuration.
Note for Ubuntu users
There’s three different gnome-desktop variants in Ubuntu:
The default ubuntu-desktop ships with desktop-icons which doesn’t work correctly with PaperWM (#145, #218). Turning the extension off in gnome-tweaks should work in 19.10, but there’s reports of this not working in 19.04, so your milage my vary.
For the easiest out of the box experience we reccommend ubuntu-gnome-desktop . vanilla-gnome-desktop adds some keybindings which plays badly with PaperWM (#233), making it unsuitable at the moment.
Most functionality is available using a mouse, eg. activating a window at the edge of the monitor by clicking on it. In wayland its possible to navigate with 3-finger swipes on the trackpad. But the primary focus is making an environment which works well with a keyboard.
All keybindings start with the Super modifier. On most keyboards it’s the Windows key, on mac keyboards it’s the Command key. It’s possible to modify the keyboard layout so that Super is switched with Alt making all the keybindings easier to reach. This can be done through Gnome Tweaks under Keybard & Mouse ⟶ Additional Layout Options ⟶ Alt/Win key behavior ⟶ Left Alt is swapped with Left Win .
Most keybindings will grab the keyboard while Super is held down, only switching focus when Super is released. Escape will abort the navigation taking you back to the previously active window.
Adding Ctrl to a keybinding will take the current window with you when navigating.
Window management and navigation is based around the three following concepts.
Scrollable window tiling
New windows are automatically tiled to the right of the active window, taking up as much height as possible. Super Return will open a new window of the same type as the active window.
Activating a window will ensure it’s fully visible, scrolling the tiling if necessary. Pressing Super . activates the window to the right. Super , activates the window to the left. On a US keyboard these keys are intuitively marked by and > , they are also ordered the same way on almost all keyboard layouts. A minimap will be shown when Super is continually being pressed, as can be seen in the above screenshot.
Pressing Super I will move the window to the right below the active window, tiling them vertically in a column. Super O will do the opposite, pushing the bottom window out of the current column.
Swiping the trackpad horizontally with three fingers will scroll the tiling (only available in Wayland).
Alt Tab is of course also available.
PaperWM doesn’t handle attached modal dialogs very well, so it’s best to turn it off in Gnome Tweaks (under Windows).
Keybindings Super , or Super . Activate the next or previous window Super Left or Super Right Activate the window to the left or right Super Up or Super Down Activate the window above or below Super Home or Super End Activate the first or last window Super Ctrl , or Super Ctrl . Move the current window to the left or right Super Ctrl Left or Super Ctrl Right Move the current window to the left or right Super Ctrl Up or Super Ctrl Down Move the current window up or down Super t Take the window, placing it when finished navigating Super Tab or Alt Tab Cycle through the most recently used windows Super Shift Tab or Alt Shift Tab Cycle backwards through the most recently used windows Super C Center the active window horizontally Super R Resize the window (cycles through useful widths) Super Shift R Resize the window (cycles through useful heights) Super F Maximize the width of a window Super Shift F Toggle fullscreen Super Return or Super N Create a new window from the active application Super Backspace Close the active window Super I Absorb the window to the right into the active column Super O Expel the bottom window out to the right The workspace stack & monitors
Pressing Super Above_Tab will slide the active workspace down revealing the stack as shown in the above screenshot. You can then flip through the most recently used workspaces with repeated Above_Tab presses while holding Super down. Above_Tab is the key above Tab ( ` in a US qwerty layout). Like alt-tab Shift is added to move in reverse order:
Pressing Super Page_Down and Super Page_Up will slide between workspaces sequentially:
The workspace name is shown in the top left corner replacing the Activities button adding a few enhancements. Scrolling on the name will let you browse the workspace stack just like Super Above_Tab . Right clicking the name lets you access and change the workspace name and the background color:
Swiping the trackpad vertically with three fingers lets you navigate the workspace stack (only available in Wayland).
There’s a single scrollable tiling per workspace. Adding another monitor simply makes it possible to have another workspace visible. The workspace stack is shared among all the monitors, windows being resized vertically as necessary when workspace is displayed on another monitor.
PaperWM currently works best using the workspaces span monitors preference, this can be turned on with Gnome Tweaks under Workspaces. If you want to use workspaces only on primary you need to place the secondary monitor either below or above the primary (with the best result having it below).
Workspace Keybindings Super Above_Tab Cycle through the most recently used workspaces Super Shift Above_Tab Cycle backwards through the most recently used workspaces Super Ctrl Above_Tab Cycle through the most recently used, taking the active window with you Super Ctrl Shift Above_Tab Cycle backwards through the most recently used, taking the active window with you Super Page_Down / Page_Up Cycle sequentially through workspaces Super Ctrl Page_Down / Page_Up Cycle sequentially through workspaces, taking the active window with you Monitor Keybindings Super Shift Arrow_key Select neighbouring monitor Super Shift Ctrl Arrow_key Move active window to neighbouring monitor The scratch layer is an escape hatch to a familiar floating layout. This layer is intended to store windows that are globally useful like chat applications and in general serve as the kitchen sink. When the scratch layer is active it will float above the tiled windows, when hidden the windows will be minimized.
Opening a window when the scratch layer is active will make it float automatically.
Pressing Super Escape toggles between showing and hiding the windows in the scratch layer. Activating windows in the scratch layer is done using Super Tab , the floating windows having priority in the list while active. When the tiling is active Super Shift Tab selects the most recently used scratch window.
Super Ctrl Escape will move a tiled window into the scratch layer or alternatively tile an already floating window. This functionality can also be accessed through the window context menu ( Alt Space ).
Keybindings Super Escape Toggle between showing and hiding the most recent scratch window Super Shift Escape Toggle between showing and hiding the scratch windows Super Ctrl Escape Toggle between floating and tiling the current window Super Tab Cycle through the most recently used scratch windows Super H Minimize the current window Development & user configuration
A default user configuration, user.js , is created in
/.config/paperwm/ with three functions init , enable and disable . init will run only once on startup, enable and disable will be run whenever extensions are being told to disable and enable themselves. Eg. when locking the screen with Super L .
We also made an emacs package, gnome-shell-mode, to make hacking on the config and writing extensions a more pleasant experience. To support this out of the box we also install a metadata.json so gnome-shell-mode will pick up the correct file context, giving you completion and interactive evaluation ala. looking glass straight in emacs.
Pressing Super Insert will assign the active window to a global variable metaWindow , its window actor to actor , its workspace to workspace and its PaperWM style workspace to space . This makes it easy to inspect state and test things out.
Using dconf-editor to modify settings
It’s possible to create simple rules for placing new windows. Currently most useful when a window should be placed in the scratch layer automatically. An example, best placed in the init part of user.js :
The wm_class of a window can be found by using looking glass: Alt F2 lg Return Go to the «Windows» section at the top right and find the window. X11 users can also use the xprop command line tool.
New Window Handlers
If opening a new application window with Super Return isn’t doing exactly what you want you can create custom functions to fit your needs. Say you want new emacs windows to open the current buffer by default, or have new terminals inherit the current directory:
The app id of a window can be looked up like this:
Available application actions can be listed like this:
Due to limitations in the mutter keybinding API we need to steal some built in Gnome Shell actions by default. Eg. the builtin action switch-group with the default Super Above_Tab keybinding is overridden to cycle through recently used workspaces. If an overridden action has several keybindings they will unfortunately all activate the override, so for instance because Alt Above_Tab is also bound to switch-group it will be overridden by default. If you want to avoid this, eg. you want Alt Tab and Alt Above_Tab to use the builtin behavior simply remove the conflicts (ie. Super Tab and Super Above_Tab and their Shift variants) from /org/gnome/desktop/wm/keybindings/switch-group (no restarts required).
User defined keybindings
Extension.imports.keybindings.bindkey(keystr, name, handler, options)
Option Values Meaning activeInNavigator true , false The keybinding is active when the minimap/navigator is open opensMinimap true , false The minimap will open when the keybinding is invoked See examples/keybindings.js for more examples.
Fixed Window Size
Currently it is not possible to have a default fixed window size. Please check the following issues for progress / info:
Recommended Gnome Shell Settings
There’s a few Gnome Shell settings which works poorly with PaperWM. Namely
- workspaces-only-on-primary : Multi monitor support require workspaces spanning all monitors
- edge-tiling : We don’t support the native half tiled windows
- attach-modal-dialogs : Attached modal dialogs can cause visual glitching
To use the recommended settings run set-recommended-gnome-shell-settings.sh . A «restore previous settings» script is generated so the original settings is not lost.
These extensions are good complements to PaperWM:
- Switcher — combined window switcher and launcher
- Dash to Dock — a great dock
A similar idea was apparently tried out a while back: http://10gui.com/
About
Tiled scrollable window management for Gnome Shell


