- GNS3 Mac Install
- Introduction#
- Supported Operating Systems#
- Download GNS3#
- Allow installation of GNS3 before OSX Sierra#
- Installation of GNS3#
- GNS3 Setup Wizard#
- GNS3 for Mac
- GNS3 Network
- Overview – GNS3 [Graphical Network Simulator]
- Benefits of using GNS3
- Download GNS3 for Windows
- Requirements to run GNS3 – The Graphical Network Simulator
- Download GNS3 for Linux Operating system
- Download GNS3 VM Images (VMWare & Virtual Box)
- Getting Started with GNS3 – Creating First Project in GNS3
- How to add Routers and Switches in GNS3
- Steps to Importing an IOS Router Image :
- Creating your first Network topology in GNS3
- Getting Starting with Command Line Interface (CLI) in GNS3
- Basic Commands which can be used in GSN3
- How to Download and use Cisco IOU Images in GNS3
- Importing a Cisco IOU Image in GNS3
- Creating the First Project with Cisco IOU
- Creating VLAN’s on Cisco IOU Switch
- Related Articles
- Summary
GNS3 Mac Install
Introduction#
This document explains how to install GNS3 using when a Mac OS X environment. You will learn how to:
- Download the required software
- Install the software
Supported Operating Systems#
GNS3 supports OS X Lion (version 10.12) and later. GNS3 v2.1.9 is the last version that runs on OS X version 10.11 (El Capitan).
Download GNS3#
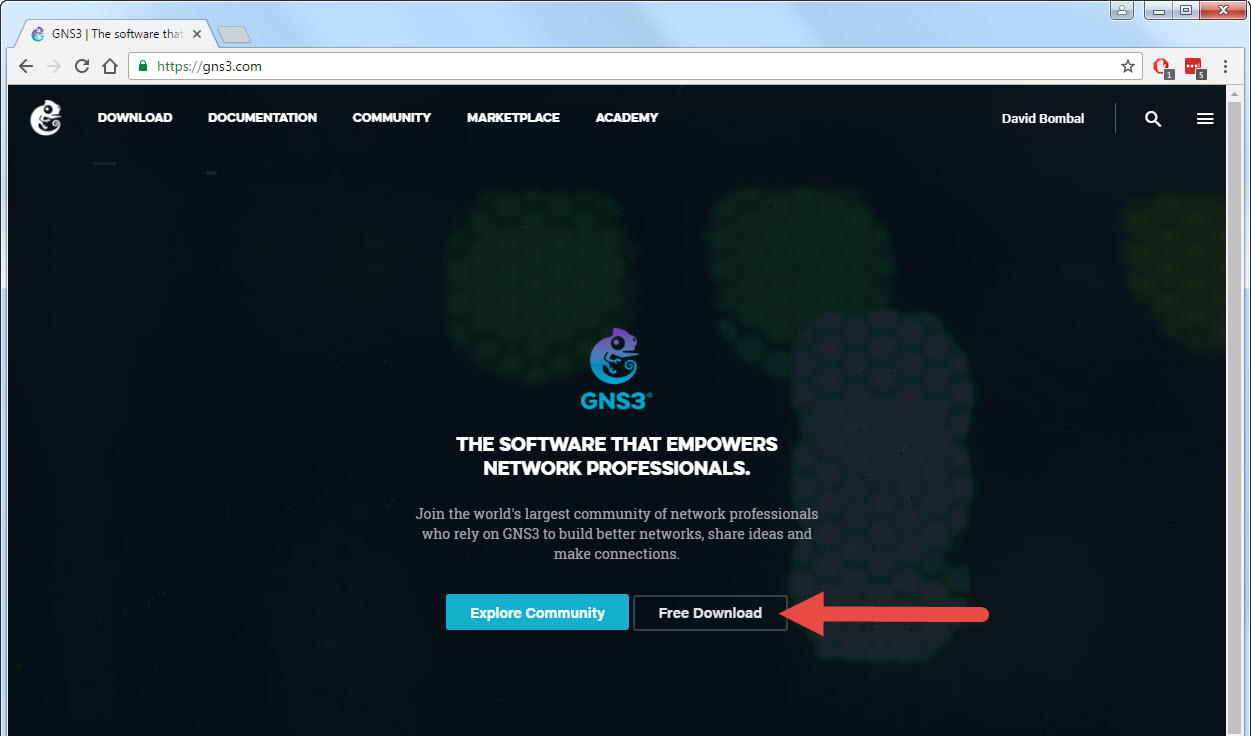
Follow these steps to download GNS3 to you MAC. Using a web browser, browse to https://gns3.com and click the Free Download link:
If you have not already registered on the GNS3 site, create an account and then click Create Account & Continue:

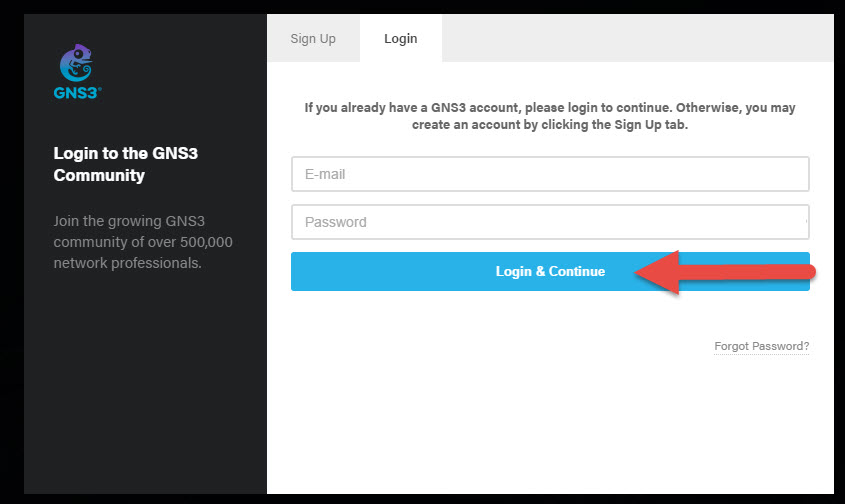
Or, if you already have an account, click Login, fill in the your details and then click Login & Continue:
After login, you will be prompted to select the version of GNS3 to download. In this guide, we will select the Mac installation. Click the Download button to download the Mac OS X package.
Allow installation of GNS3 before OSX Sierra#
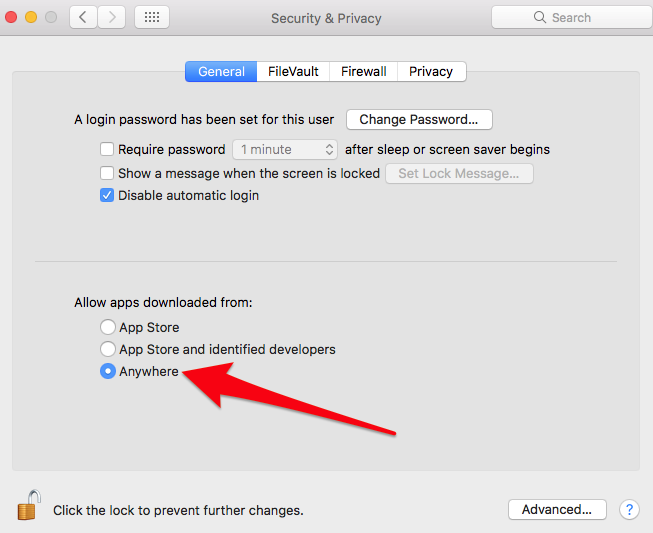
GNS3 is distributed outside the Apple App Store. Due to this, you need to allow the installation of applications from anywhere.
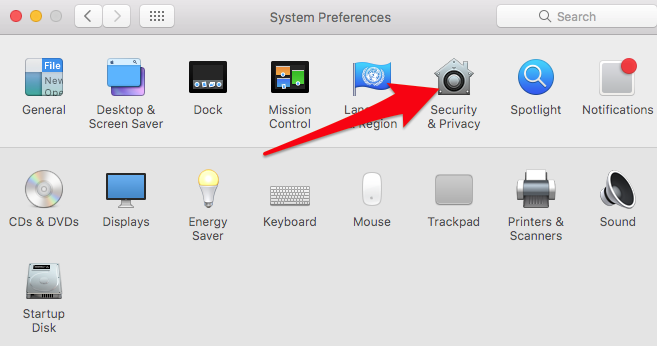
Go to the Security & Privacy in System Preferences.
Click on the lock:
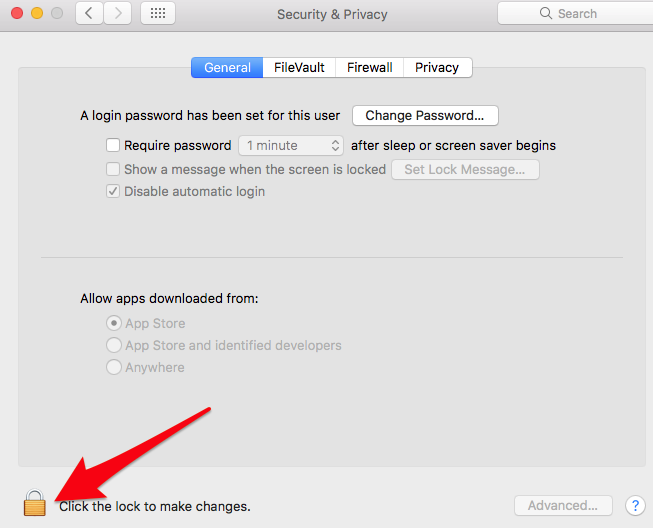
Select the Anywhere option under Allow apps downloaded from:
Installation of GNS3#
Click on the downloaded DMG and drag the GNS3 icon to the Applications folder:
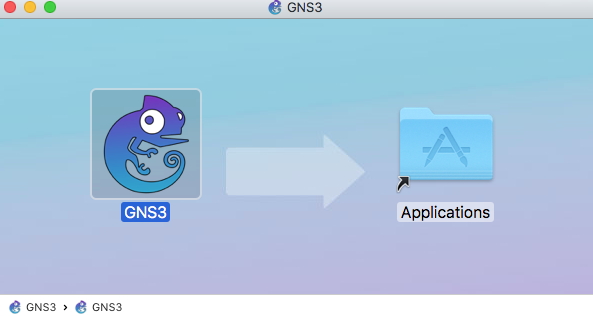
Click on the Applications icon. Find the GNS3 icon and click it to start GNS.
Make sure GNS3 is installed in “Applications” to avoid any problem. It has been reported that the application may crash if launched from a path containing non-ascii characters.
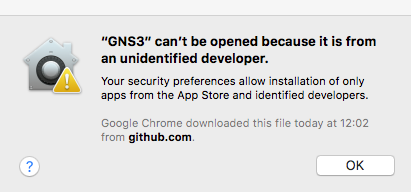
If the following security warning is displayed (starting with OSX Sierra), click OK:
If the above security prompt was shown, right click on the GNS3 icon and click on Open:
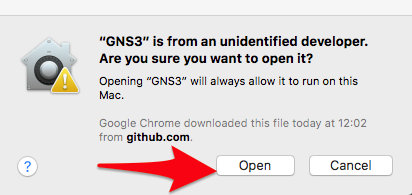
This is required only at first launch. The next time you click on GNS3, the application will start normally as Mac OS X will remember the configured security settings.
Unlike for Windows and Linux versions of GNS3, the Mac version of GNS3 is not signed due to Apple restrictions.
If OSX say the .dmg is damaged and even right click is not working you could need to temporary disable gatekeeper and renable it. This seem to reset a cache in the OS. https://www.tekrevue.com/tip/gatekeeper-macos-sierra/
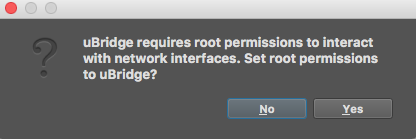
Once GNS3 starts, you will be prompted to allow root uBridge. This is required to allow GNS3 to control your network. Click Yes:
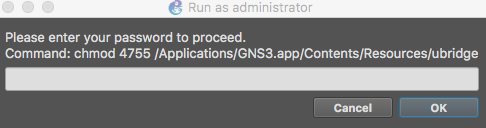
You will prompted twice to enter your root password:
GNS3 Setup Wizard#
The GNS3 Setup Wizard will display:
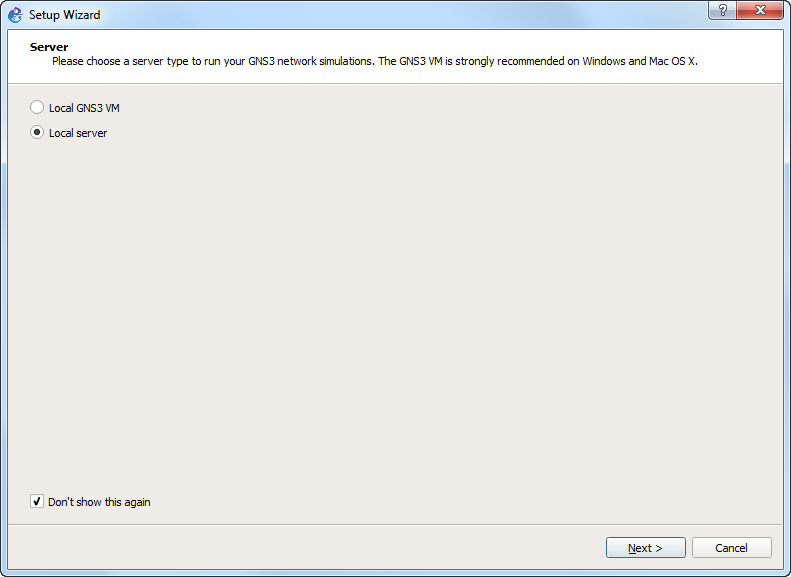
You now need to make a decision and then you can return to this document to complete to create an initial GNS topology:
- If you are unsure, click here
- If you are going to only use Cisco IOS images, use the Local server and click here for instructions
- If you are going to use IOSvL2, IOU, ASAv or create complex topologies, then use the GNS3 VM and click here for instructions.
Источник
GNS3 for Mac
GNS3 2.2.26 LATEST
Mac OS X 10.9 or later
GNS3 for Mac 2021 full offline installer setup for Mac
GNS3 for Mac is a software that simulate complex networks while being as close as possible from the way real networks perform, all of this without having dedicated network hardware such as routers and switches. It can also be used to experiment features or to check configurations that need to be deployed later on real devices.
Build, Design and Test your network in a risk-free virtual environment and access the largest networking community to help. Whether you are studying for your first networking exam or building out a state-wide telecommunications network, GNS3 for macOS offers an easy way to design and build networks of any size without the need for hardware. And the best part is it’s free!
Why should you use GNS3?
Real-time network simulation for pre-deployment testing without the need for network hardware
Run the OS that emulates real behavior of network hardware.
Test 20+ different network vendors in risk-free virtual environment
Quickly run and test multiple hardware vendors without the need for hardware.
Create dynamic network maps for troubleshooting and proof of concept (POC) testing
Test your networks before you build them to reduce the time it takes to get a production network up and running.
Connect GNS3 to any real network
Leverage your existing hardware and expand your current lab by connecting your GNS3 topologies directly to it.
Customized topologies and labs within GNS3 for network certification training
GNS 3 is the best study tool for aspiring network professional seeking their certifications, without the need for a home lab.
Note: Requires 64-bit processor.
Источник
GNS3 Network
GNS3 is one of the greatest network simulators. GNS3 stands for Graphical Network Simulator. It helps to learn and design networks. In this article, you can download gns3 for Windows / Linux and macOS.
If you are a beginner and don’t have any idea to download and install gns3 in your operating system, then don’t worry, I’ll explain to you the process of downloading and installing gns3. So, let’s start.

Image Source: gns3.com
Table of Contents
Overview – GNS3 [Graphical Network Simulator]
GNS3 stands for Graphical Network Simulator. GNS3 a Network Simulator which lets you run virtual network devices like, Routers, Switch, and Firewalls.
Since it’s an open-source tool, so you can easily run different appliance belongs to different vendors. So, you can easily practice with different products to build your carrier in networking.
GNS3 also a cross-platform network simulator, so you can easily download and install in Windows, Linux, and macOS based systems.
In case, if you are a networking student and preparing for any of the Cisco Certifications, i.e. CCNA, CCNP, or CCIE, you defiantly try it out. You will get an amazing experience of virtualization.
Another best thing in that newer versions of GNS3 supports QCOW files, which means you can run KVM virtual machines directly on it. So, you can able to run virtual firewalls directly on it. I am also using Firewalls, i.e. Palo Alto, Cisco ASA, FortiGate within the GNS3.
The GUI of the GNS3 network simulator is straightforward to use. By default, you will get some pre-defined device templates. However, to use different virtual products (i.e., Cisco/Juniper Routers, Switches, Firewalls) on GNS3, you just need to get a binary image of the devices. GNS3 supports virtual routers and switches in the IOU (IOS on Unix) and IOS (Internetworking Operating System) formats.
In GNS3, you have a facility called, u-bridge, which can be used to connect any GNS3 appliance with other virtualization applications such as VMWare Workstation and Virtual Box. So, in case, if you need to connect your Routers or Switches with any operating systems, you can connect.
Benefits of using GNS3
I am a network security engineer, and today I also using the GNS3 network simulator. The beauty of this application that you can integrate any new application and learn it very efficiently. Since, it allows me to run firewalls such as Palo Alto, FortiGate; I used the same tool to solve my technical issues. Some of the benefits of os using GNS3 is given below:
- GNS3 is an open-source application, so it is available for everyone.
- It’s also a cross-platform application, so you can download and install it on Windows, Linux, and macOS.
- Apart from Cisco, you can also import other vendors’ devices such as Juniper, Palo Alto, Fortinet, etc.
- When needed, we can easily integrate the GNS3 virtual devices such as Router to the other virtualization platform, i.e VMWare, Virtual Box, etc.
- GNS3 is helpful for Network and Network Security certifications such as CCNA, CCNP, CCIE, PCNSE, etc.
- The GUI of the GNS3 is very easy to use, so you can easily drag and drop installed templates. So, you can easily build new topologies and learn protocols such as OSPF, EIGRP, STP, etc.
Download GNS3 for Windows
The GNS3 network simulator is completely free for all types of operating systems. But, as you already know, the GNS3 can only be available for 64 bit of Windows System.
Since it is an open-source simulator, so you can download it from GitHub. However, if you want to download it from the official gns3 website, you need to signup on gns3.com. Currently, the latest version of GNS3 is 2.2.16.
Note: GNS3 is a Free and Open Source software under GPL v3 licensing!
Before downloading the GNS3 network simulator, let’s go through the minimum and recommended requirements of the system.
Requirements to run GNS3 – The Graphical Network Simulator
Minimum Requirements
Operating System: Windows 7, Windows 8 & Windows 10 (64 bit), Linux Distro – Debian/Ubuntu-based Linux Operating Systems (Ubuntu, Mint, Debian) & macOS
Processor: 2 or more Logical cores – AMD-V / RVI Series or Intel VT-X / EPT – virtualization extensions present and enabled in the BIOS. More resources allow for larger simulation
Memory: 4 GB RAM
Storage: 1 GB available space (Windows Installation is Download GNS3 for macOS
The GNS3 can also be download for the MAC Operating System. The .dmg file of the gns3, may you already know that very easy to install can be directly downloaded from the below link.
But, make sure you also install several other tools like Wireshark, putty as well. This will allows you to take complete benefits of the GNS3 and obviously, you can enhance your skills as well.
Download GNS3 for Linux Operating system
In Linux, you can directly download GNS3 using your terminal application. However, the complete process can be achieved by the repository. If you don’t know about the repository, then don’t worry, the installation process is as easy as in Windows Operating System. You need to follow the following steps to download and install GNS3 on Linux Systems such as Ubuntu, Mint, Debian, etc.
During the installation, the setup will ask you to download and install other applications such as Wireshark. You can skip the installation of such applications, but the recommendation is you should always install such applications.
You will also notice that the setup will ask several types of permissions, you need to allow it accordingly. Now, just follow the following steps to download and install gns3 in Linux ( Ubuntu, Mint, etc.).
- First, open your terminal: For the GNS3 installation, you have to open your terminal. Either you can search Terminal in installed programs, or you can press the Alt+Ctrl+T shortcut key.
- Now, type following commands to install GNS3 GUI (Graphical User Interface) and GNS3 Server :
If you want some additional support of GNS3 IOU, you need to run additional commands as given below:
If you need the installation help of IOS & IOU, don’t worry, just read the full article, you will defiantly get an idea about IOU & IOS used in GNS3.
Download GNS3 VM Images (VMWare & Virtual Box)
At the time of development, GNS3 is built for UNIX based systems like various Linux (Debian/RPM) and Unix systems. But in later versions is starts providing supports for Microsoft Windows.
Today, you can run it on Windows. But, for the better performance, you must have to integrate GNS3 VM with GNS3 so that it can run smoothly and gives the best performance to you.
Here, you can download GNS3 VM for VMWare, Virtual, VMWare ESXi and Microsoft Hyper-V. You can set up the GNS3 Virtual Machine as per your setup. Just download it and build your first lab today.
Do you Need a GNS3 VM on Linux Machine?
If you are using GNS3 Network Simulator in your Linux machine, you do not need to install and configure additionally Virtual Machine for GNS3. But you can! The main purpose of GNS3 VM is to give Unix Based IOU support to Microsoft Windows. But, in Linux, by default, you have the full support of IOU (IOS on UNIX). So, you can continue your installation process with the above instruction.
But, If you are installing GNS3 on Windows, It’s recommended you should go for GNS3 VM. Because, with the help of GNS3 VM, you can improve the overall performance of the system. Also, with the help of GNS3 VM, you can run several Cisco IOS (Routers) and IOU (Premium Switches) in comparison without GNS3 Virtual Machine Installation.
Getting Started with GNS3 – Creating First Project in GNS3
How to add Routers and Switches in GNS3
As we know GNS3 is an open-source Network Simulator that supports Dynamips (Dynamips is an emulator computer program that was written to emulate Cisco routers). So, with the help of Dynamips, we can import any router image which is with .bin extension.
Steps to Importing an IOS Router Image :
- First of all open GNS3 Network Simulator
- Go to Edit >> Preference
- Go to IOS Router under Dynamips
- Click New and then select New Image
- Browse for an IOS Router Image
- Now, just give the name and import various Interface according to your needs.
Creating your first Network topology in GNS3
So far, we came to know what is GNS3 where we use GNS3. In this section, we will create our first Network Topology, with the help of Cisco 7200 Series Routers. For this, first, open GNS3 and create your First Project.
 GNS3 New Project
After, creating a new project. Now you just have to select your Network appliances present in the left-hand pane. In this lab, I’m just taking four Routers of the Cisco 7200 series. Now, by double-clicking, you got the CLI (Command Line Interface) of the router on your Terminal or Putty(A application to take CLI of various devices). After that, you can configure their interface and various protocols. (i.e. Routing protocol or DHCP, DNS, etc.).

Getting Starting with Command Line Interface (CLI) in GNS3
In GNS3, after adding your first IOS (Internetwork Operating System) of the Router, you need to create a Topology as given in the above picture. Now, you need to start the appliance either by right-clicking on Network Device or clicking on the start button given below the Main Menu. After the starting of IOS, you just need to double click to get CLI (Command Line Interface) of that Device.

Basic Commands which can be used in GSN3
After getting the CLI of a Cisco router, you have to use commands on CLI so that you can configure your desired network topology and can work smoothly with this. Some basic commands for a Cisco Router are given below :
1. Changing the Hostname of a Router :
In GNS3, by default, the hostname of a Router is either R(1) or Router(1). When you take more than one router, the number (1) is increased by the number of routers you take. Below command can be used to change the hostname of a Router using CLI :
2. To know Router Interfaces :
If you want to know a total number of interfaces in a router, just type below command and you will get information about all interfaces.
2. Assigning an IP address of an Interface :
We must have to assign an IP address to get communicate with other network devices like Router, Switches, and End devices. You can assign an IP address in configuration mode. You can follow below command to assign an IP address of an Interface:
How to Download and use Cisco IOU Images in GNS3
Many times, we require to create a network topology with a layer 2 or a layer 3 switch. By default, GNS3 has an Unmanageable switch. We can’t configure them with the help of CLI. Therefore, we need Cisco IOU (IOS on Unix) to add Layer 2 or Layer 3 switches. Below steps will guide you to configure IOU Switch in GNS3 :
Importing a Cisco IOU Image in GNS3
First of all, you need a Cisco IOU Switch image with a Licence given by Cisco. To add the IOU switch, first, you need to import the IOU Switch image to GNS3. This can be down in the following steps :
- Open GNS3 Network Simulator
- Go to Edit >> Preference
- Click IOS on UNIX and Enter valid License
 Cisco IOU License Details
 How to add cisco IOU in GNS3
Creating the First Project with Cisco IOU
Now, times to create our first project with the help of the Cisco IOU. For, this, just create a simple project. Now, take a Cisco IOU, which is just imported, and make a topology with the help of that IOU Switch. Here, I’m just taking two switches and creating VLAN (Virtual LAN’s) on that.
 IOU Switches in GNS3.
Creating VLAN’s on Cisco IOU Switch
After the design of Network topology with the help of Cisco IOU, now we try to create VLAN’s so that we can verify the working of these switches. As you can see, we can configure the VLAN using the default commands which is used in real cisco ios switches.

Related Articles
Summary
Here, you can always download the latest version of GNS3 for Windows, Linux, and macOS systems. If you getting any issue while downloading the GNS3, you can comment in the comment box.
Also, don’t forget to visit the official website of GNS3, i.e. gns3.com, and support the gns3 community. Make sure gns3network.com does not belong to the gns3.com. This is a blog with the latest articles related to network and network security.
Don’t forget to share us on social media 🙂 !
Источник


