- Install GoLand
- System requirements
- Install using the Toolbox App
- Install the Toolbox App
- Install the Toolbox App
- Install the Toolbox App
- Standalone installation
- Silent installation on Windows
- Silent configuration file
- Install as a snap package on Linux
- Register GoLand
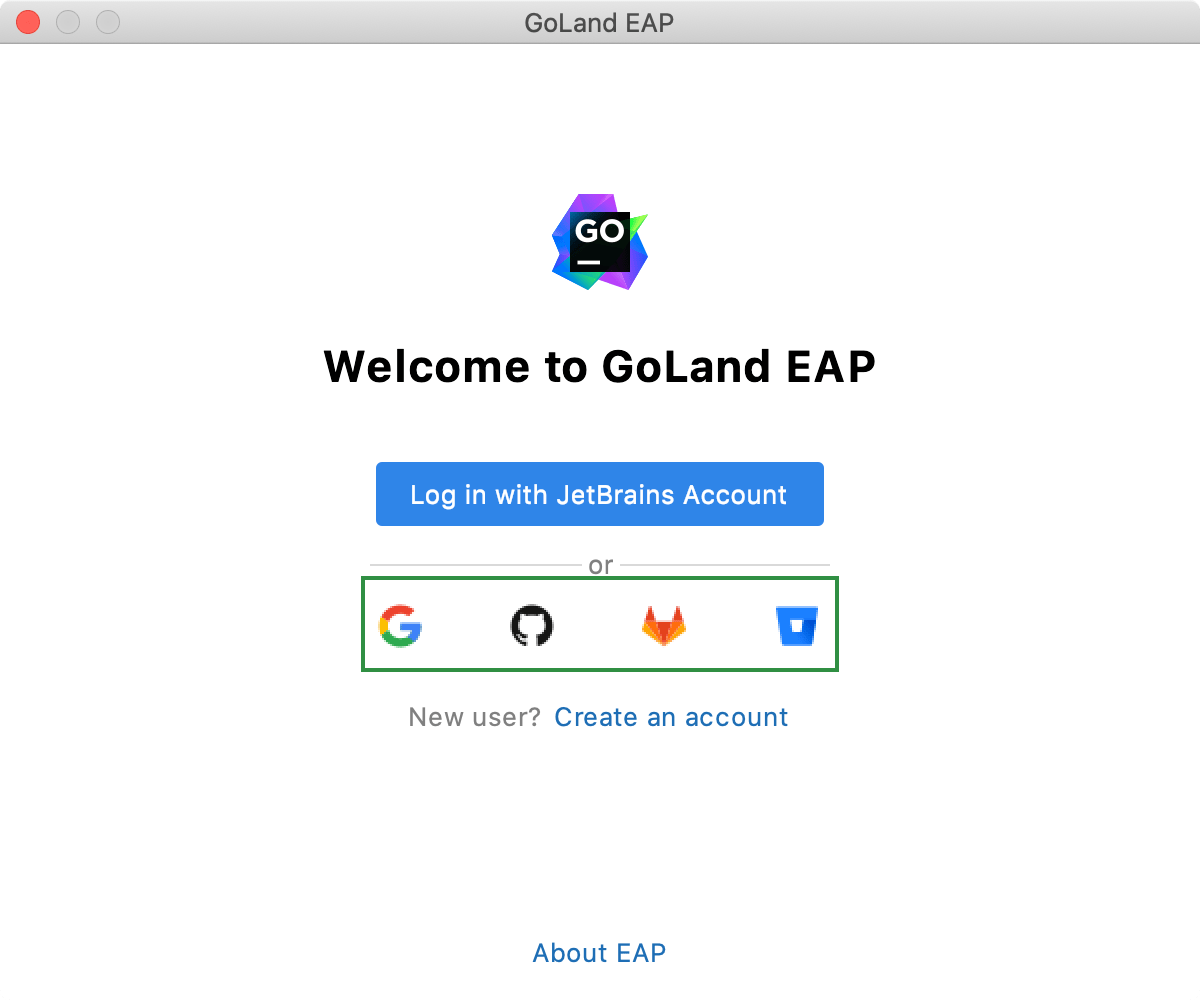
- Early Access Program
- Login options
- Log in with an authorization token
- FAQ about GoLand
- General questions
- Is there a GoLand Community edition?
- What are Early Access Program (EAP) and nightly builds?
- What is the Early Access Program?
- What are nightly builds?
- How to get GoLand for free or at a discount?
- Useful links
- Is GoLand available via the JetBrains Toolbox as part of the All Products Pack?
- What is the difference between GoLand and the Go plugin for IntelliJ IDEA Ultimate?
- Does GoLand include support for databases?
- In addition to Go, which web technologies does GoLand support?
- How to leave feedback or submit a bug?
- Useful links
- Configuring Go development environment
- What configuration is needed before the start?
- Useful links
- How do I run gofmt/goimports/golang-ci on save?
- Useful links
- How do I see the results of static analysis tools in the editor?
- How do I change the output directory of the application binary (go build -o)?
- Useful links
- How do I provide arguments to `go build` and `go test` commands?
- Useful links
- How to add test flags like ‘-race’, ‘-failfast’, ‘-short’, and others
- How to change the name of a compiled binary?
- Working with projects
- How do I open a VSCode project in GoLand?
- What’s the difference between workspaces and projects?
- Useful links
- How can I open several projects in GoLand simultaneously?
- Useful links
- How do I change the Go SDK for my project?
- Useful links
- How do I change the GOPATH variable for my project?
- Useful links
- How do I run or debug my application?
- Useful links
- How do I view dependencies for my project in the same window?
- Useful links
- How do I close a project?
- How do I start with VCS integration?
- Useful links
- Working with the code editor
- Can I use the VSCode key bindings in GoLand?
- How do I see the documentation on a mouseover?
- How does code completion in GoLand work?
- Useful links
- How can I use multiple carets/cursors?
- Useful links
- How can I select and rename multiple elements at once?
- Useful links
- What are the automated code refactoring tools available?
- Useful links
- Are there any special code analysis features in GoLand?
- Useful links
- How to disable code folding for one-line returns/panics and formatted strings?
- Using plugins
- How do I find the plugin that I need?
- How do I install the plugin that I have available on my computer?
- I’d like to write a plugin for GoLand. Are there any instructions?
- Can I use Visual Studio Code plugins in GoLand?
Install GoLand
GoLand is a cross-platform IDE that provides consistent experience on the Windows, macOS, and Linux operating systems.
System requirements
| Requirement | Minimum | Recommended |
|---|---|---|
| RAM | 2 GB of free RAM | 4 GB of total system RAM |
| CPU | Any modern CPU | Multi-core CPU. GoLand supports multithreading for different operations and processes making it faster the more CPU cores it can use. |
| Disk space | 2.5 GB and another 1 GB for caches | SSD drive with at least 5 GB of free space |
| Monitor resolution | 1024×768 | 1920×1080 |
| Operating system | Latest 64-bit version of Windows, macOS, or Linux (for example, Debian, Ubuntu, or RHEL) |
You do not need to install Java to run GoLand because JetBrains Runtime is bundled with the IDE (based on JRE 11).
Install using the Toolbox App
The JetBrains Toolbox App is the recommended tool to install JetBrains products. Use it to install and manage different products or several versions of the same product, including Early Access Program (EAP) and Nightly releases, update and roll back when necessary, and easily remove any tool. The Toolbox App maintains a list of all your projects to quickly open any project in the right IDE and version.
For more information about Nightly builds, see What are nightly builds? in the FAQ section.
Install the Toolbox App
Download the installer .exe from the Toolbox App web page.
Run the installer and follow the wizard steps.
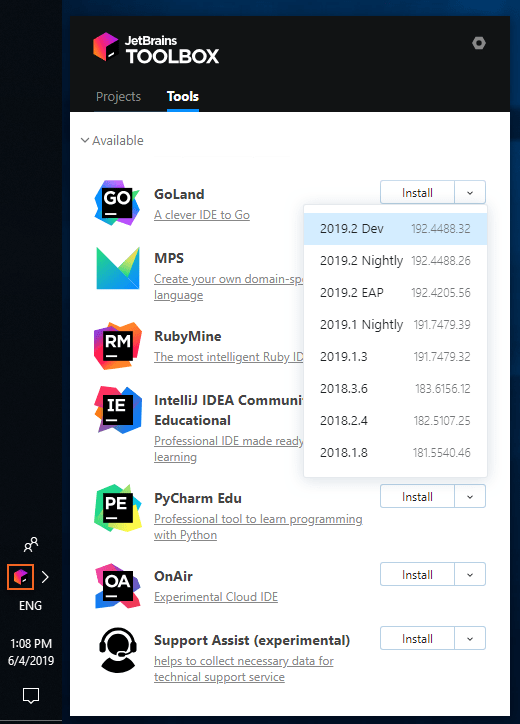
After you run the Toolbox App, click its icon in the notification area and select which product and version you want to install.
To install a nighltly build, select the version that has Nightly in its name from the list of versions (for example, 2021.1 Nightly).
Log in to your JetBrains Account from the Toolbox App and it will automatically activate the available licenses for any IDE that you install.
Install the Toolbox App
Download the disk image .dmg from the Toolbox App web page.
There are separate disk images for Intel and Apple Silicon processors.
Mount the image and drag the JetBrains Toolbox app to the Applications folder.
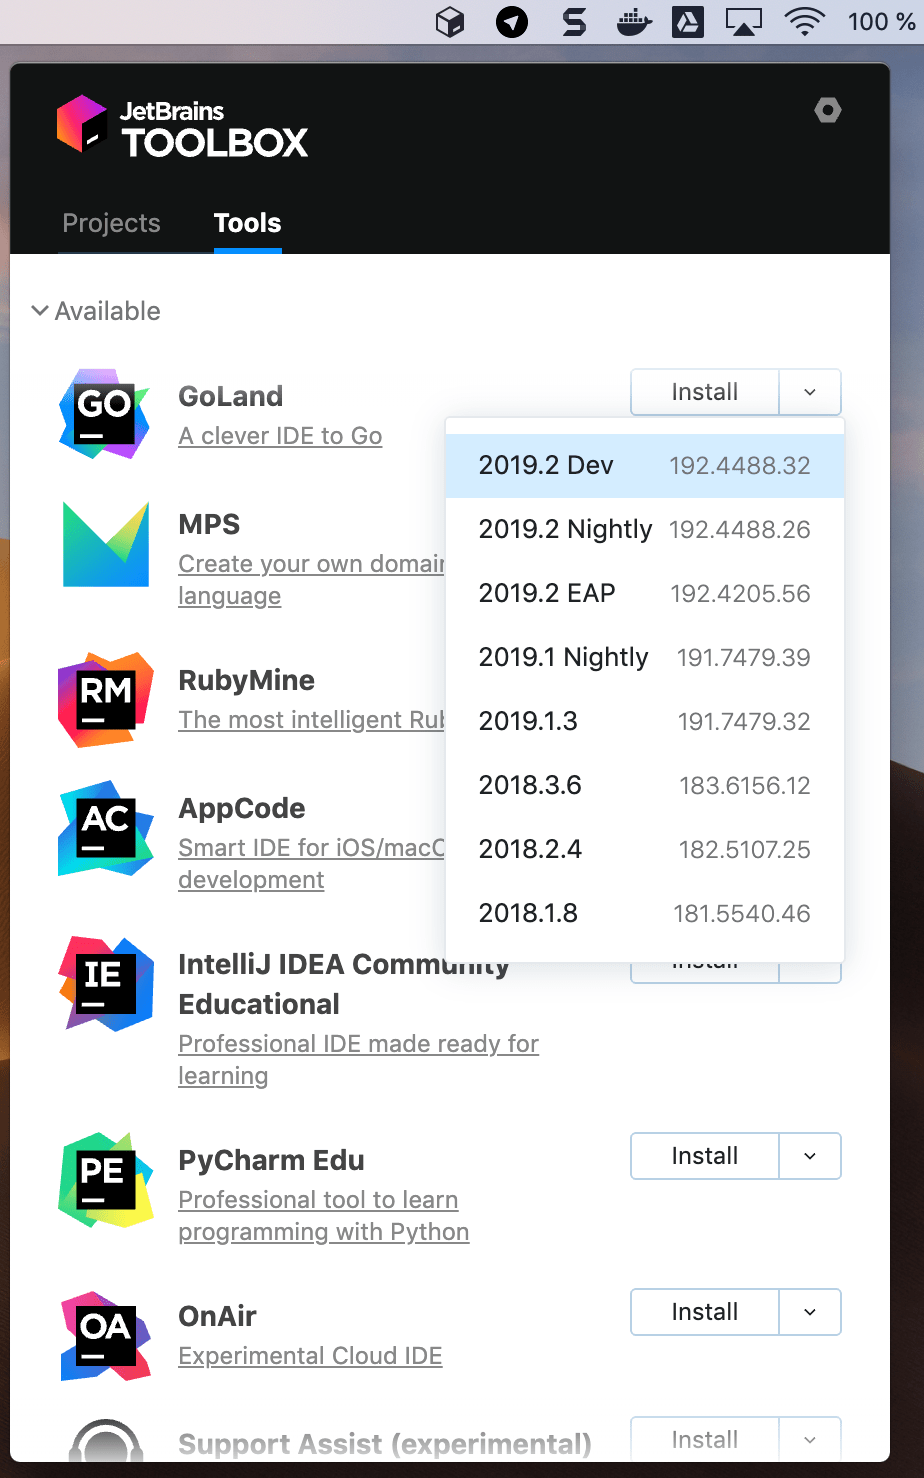
After you run the Toolbox App, click its icon in the main menu and select which product and version you want to install.
To install a nighltly build, select the version that has Nightly in its name from the list of versions (for example, 2021.1 Nightly).
Log in to your JetBrains Account from the Toolbox App and it will automatically activate the available licenses for any IDE that you install.
Install the Toolbox App
Download the tarball .tar.gz from the Toolbox App web page.
Extract the tarball to a directory that supports file execution.
For example, if the downloaded version is 1.17.7391, you can extract it to the recommended /opt directory using the following command:
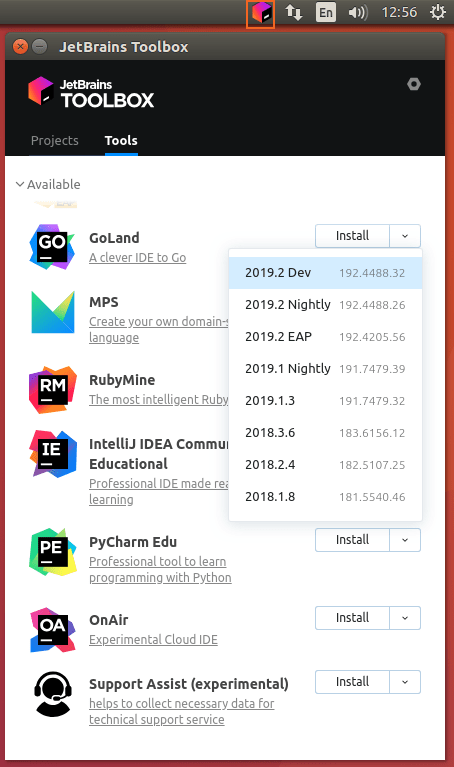
Execute the jetbrains-toolbox binary from the extracted directory to run the Toolbox App and select which product and version you want to install. After you run the Toolbox App for the first time, it will automatically add the Toolbox App icon to the main menu.
To install a nighltly build, select the version that has Nightly in its name from the list of versions (for example, 2021.1 Nightly).
Log in to your JetBrains Account from the Toolbox App and it will automatically activate the available licenses for any IDE that you install.
You can use this shell script that automatically downloads the tarball with the latest version of the Toolbox App, extracts it to the recommended /opt directory, and creates a symbolic link in the /usr/local/bin directory.
Standalone installation
Install GoLand manually to manage the location of every instance and all the configuration files. For example, if you have a policy that requires specific install locations.
Run the installer and follow the wizard steps.
To run GoLand, find it in the Windows Start menu or use the desktop shortcut. You can also run the launcher batch script or executable in the installation directory under bin .
There are separate disk images for Intel and Apple Silicon processors.
Mount the image and drag the GoLand app to the Applications folder.
Run the GoLand app from the Applications directory, Launchpad, or Spotlight.
Extract the tarball to a directory that supports file execution.
For example, to extract it to the recommended /opt directory, run the following command:
Do not extract the tarball over an existing installation to avoid conflicts. Always extract it to a clean directory.
To create a desktop entry, do one of the following:
On the Welcome screen, click Configure | Create Desktop Entry
From the main menu, click Tools | Create Desktop Entry
When you run GoLand for the first time, some steps are required to complete the installation, customize your instance, and start working with the IDE.
Silent installation on Windows
Silent installation is performed without any user interface. It can be used by network administrators to install GoLand on a number of machines and avoid interrupting other users.
To perform silent install, run the installer with the following switches:
/S : Enable silent install
/CONFIG : Specify the path to the silent configuration file
/D : Specify the path to the installation directory
This parameter must be the last in the command line and it should not contain any quotes even if the path contains blank spaces.
To check for issues during the installation process, add the /LOG switch with the log file path and name between the /S and /D parameters. The installer will generate the specified log file. For example:
Silent configuration file
You can download the default silent configuration file for GoLand at https://download.jetbrains.com/go/silent.config
The silent configuration file defines the options for installing GoLand. With the default options, silent installation is performed only for the current user: mode=user . If you want to install GoLand for all users, change the value of the installation mode option to mode=admin and run the installer as an administrator.
The default silent configuration file is unique for each JetBrains product. You can modify it to enable or disable various installation options as necessary.
It is possible to perform silent installation without the configuration file. In this case, omit the /CONFIG switch and run the installer as an administrator. Without the silent configuration file, the installer will ignore all additional options: it will not create desktop shortcuts, add associations, or update the PATH variable. However, it will still create a shortcut in the Start menu under JetBrains .
Install as a snap package on Linux
You can install GoLand as a self-contained snap package. Since snaps update automatically, your GoLand installation will always be up to date.
To use snaps, install and run the snapd service as described in the installation guide.
On Ubuntu 16.04 LTS and later, this service is pre-installed.
GoLand is distributed via two channels:
The stable channel includes only stable versions. To install the latest stable release of GoLand, run the following command:
The —classic option is required because the GoLand snap requires full access to the system, like a traditionally packaged application.
The edge channel includes EAP builds. To install the latest EAP build of GoLand, run the following command:
When the snap is installed, you can launch it by running the goland command.
To list all installed snaps, you can run sudo snap list . For information about other snap commands, see the Snapcraft documentation.
Источник
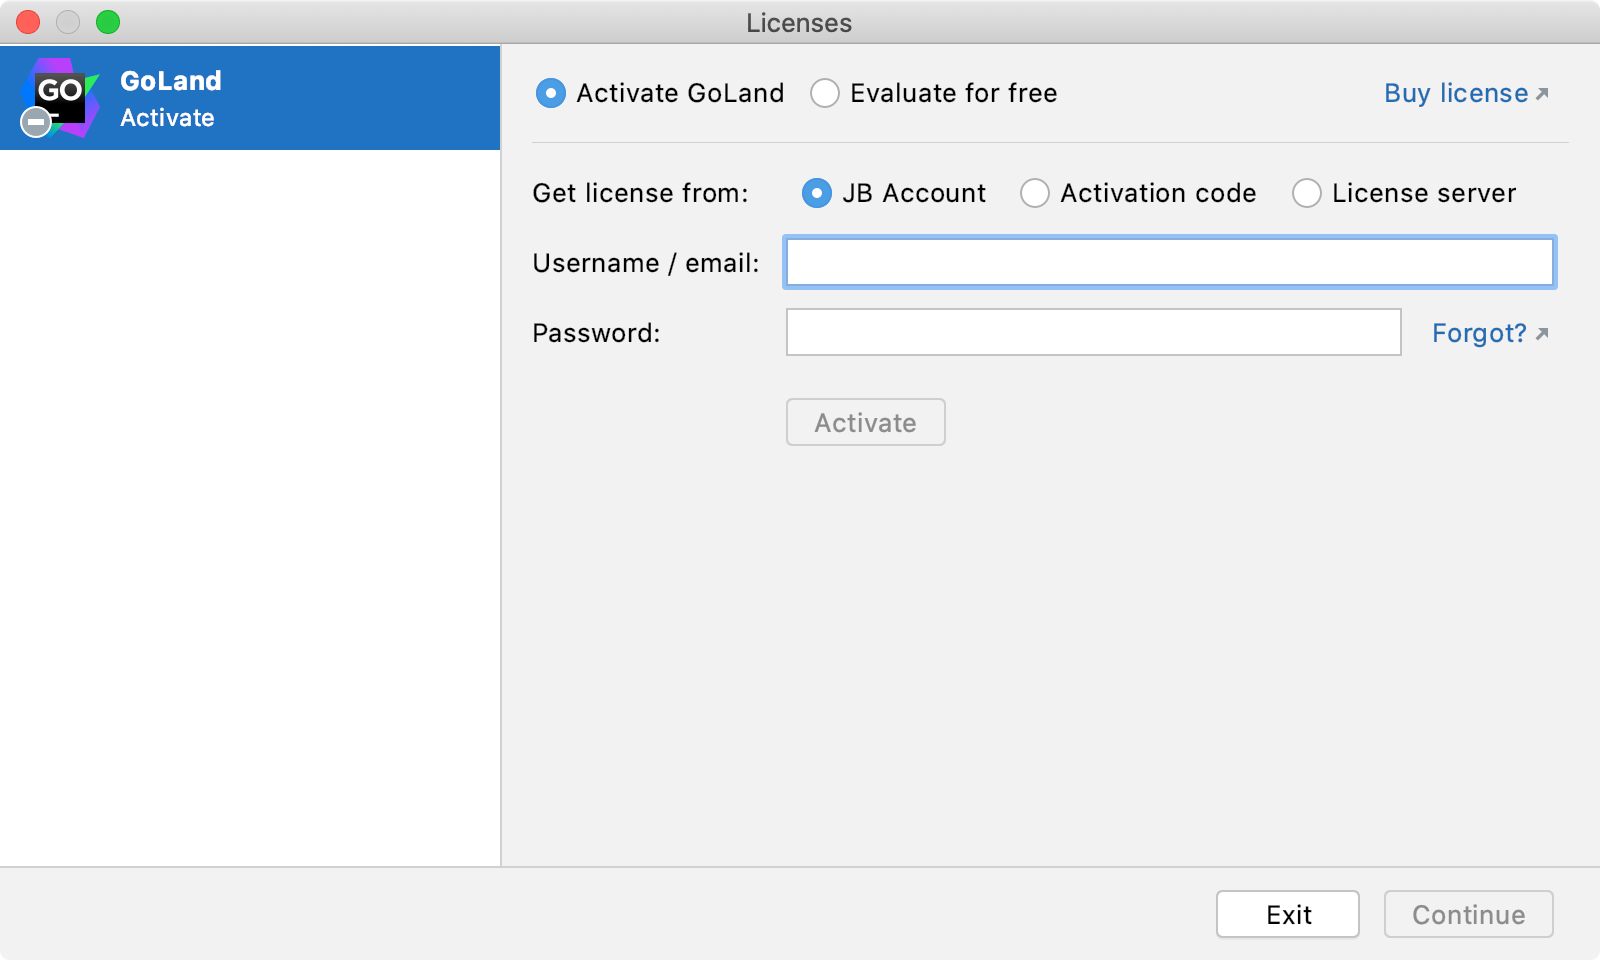
Register GoLand
You can evaluate GoLand for up to 30 days. After that, buy and register a license to continue using the product.
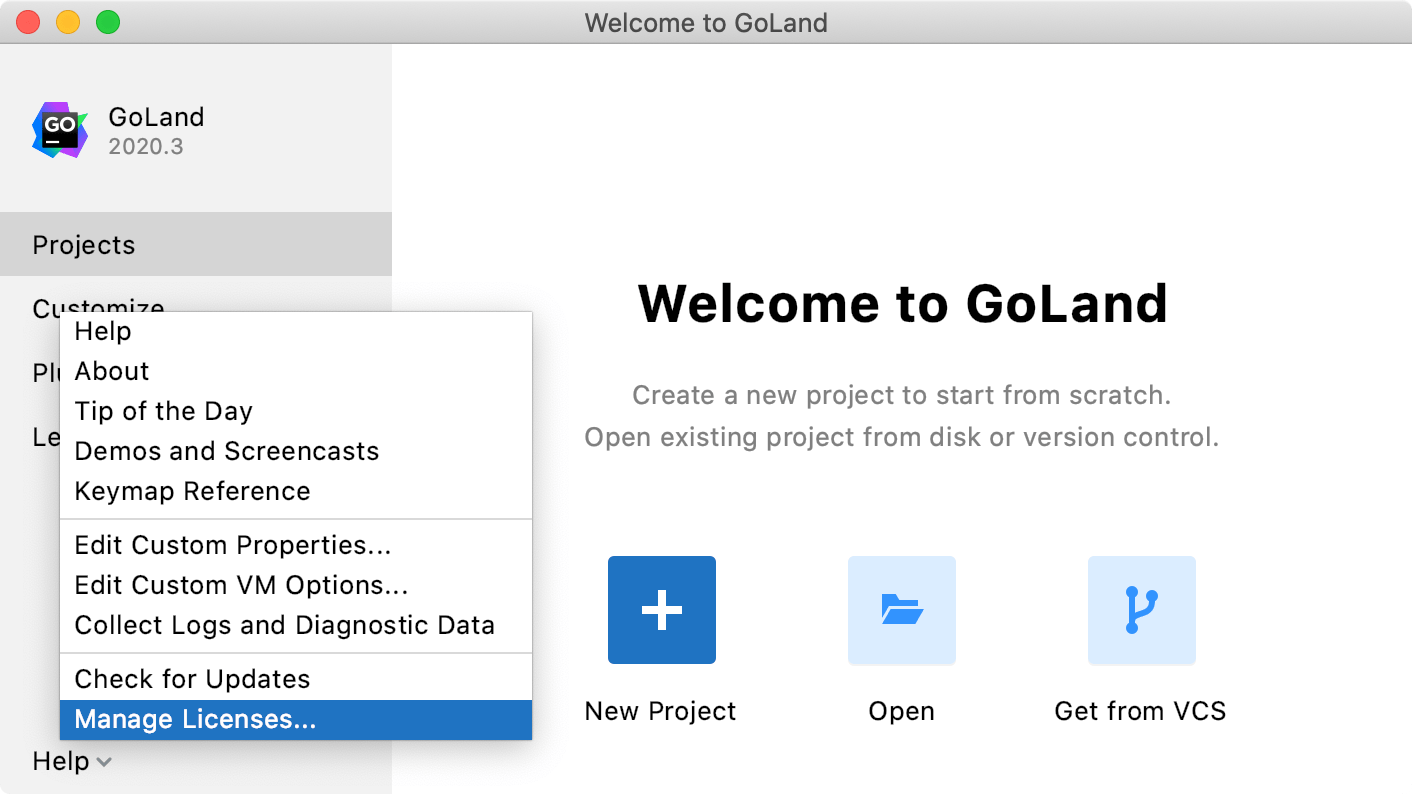
Do one of the following to open the Licenses dialog:
From the main menu, select Help | Register
On the Welcome screen, click Help | Manage License
Select how you want to register GoLand or a plugin that requires a license:
| Option | Description | ||||||||||
|---|---|---|---|---|---|---|---|---|---|---|---|
| JB Account | |||||||||||
| Activation code |


| GoLand | IntelliJ IDEA Ultimate | |
|---|---|---|
| Location of Go settings | ||
| Plugins | Some plugins are already bundled for Go development (for example, The Go Template plugin) Some plugins for Go development are not bundled, you need to install them manually Some plugins are not compatible between GoLand and IntelliJ IDEA Ultimate (for example, the GoLand Help plugin). To attach a folder, you navigate to File | Open and then click Attach . You can manage the project structure in the Project Structure menu. For more information about working with a project structure, see Content root. To attach a folder you need to add it as a module. For more information about modules in IntelliJ IDEA Ultimate, see the Modules topic in the IntelliJ IDEA documentation. | |
| Prebuilt indexes for Go SDK | Shipped with GoLand | Not shipped |
| Location of the IML file | GoLand stores all the settings files in the .idea directory. | When you create a Go project in IntelliJ IDEA, you can specify a directory for the .iml file. By default, it is the root directory of the project. For more information about changing the directory for the .iml file, see Change the IML file location for Go projects in IntelliJ IDEA. |

Does GoLand include support for databases?
Yes. The database management functionality in GoLand is supported by the Database tools and SQL plugin. The Database tools and SQL plugin provides support of all the features that are available in DataGrip, the standalone database management environment for developers. With the plugin, you can query, create, and manage databases. Databases can work locally, on a server, or in the cloud. The plugin supports MySQL, PostgreSQL, Microsoft SQL Server, SQLite, MariaDB, Oracle, Apache Cassandra, and others. See the full list of supported vendors in Database connection.
In addition to Go, which web technologies does GoLand support?
In addition to tools for core Go development, GoLand supports JavaScript, TypeScript, Node.js, SQL, Databases, Docker, Kubernetes, Terraform, and other technologies.
How to leave feedback or submit a bug?
The Support and assistance topic describes how to leave feedback, report a bug, or submit a feature request.
Useful links
Youtrack issues for GoLand: log in to your JetBrains account and click New issue .
Requests in the JetBrains Support Center: click the Submit a request button that is at the top of the main page.
Twitter: tweet us about your problem. Mention @GoLandIDE in your tweet.
goland-support@jetbrains.com: email our team about your problem. Describe your problem, and attach all available materials that can speed up troubleshooting (code samples, screenshots, logs, animations, videos, and other materials).
Configuring Go development environment
What configuration is needed before the start?
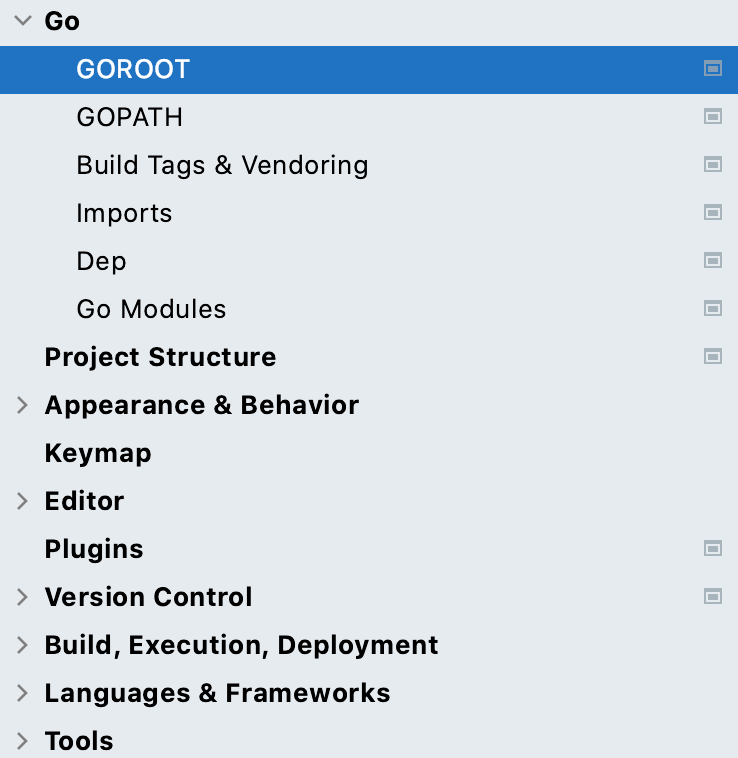
To start coding, you need to install Go SDK. In most cases, GOROOT and GOPATH variables are set automatically.
If you have Go SDK installed, GoLand automatically detects and uses it.
If Go SDK is not detected, right from GoLand, you can download Go SDK from the official repository or navigate to the Go SDK directory. You can do that when you create a new project or in settings.
GOROOT is automatically set to the installation directory of Go SDK. The installation directory must include bin and src directories.
GOPATH is automatically set to $HOME/go on Unix and macOS and %USERPROFILE%/go on Windows. You can configure the global, project, and module GOPATH variable in settings (press ( Ctrl+Alt+S ) and navigate to Go | GOPATH ).
Useful links
QuickStart Guide: a step-by-step tutorial about how you can start coding with GoLand.
Configuring GOROOT and GOPATH: a help page that shows you how to set GOROOT and GOPATH in GoLand.
Setting GOPATH: a help page about GOPATH in the golang repository on GitHub.
How do I run gofmt/goimports/golang-ci on save?
For a single file, you can use the built-in import management and code formatter. Imports are managed on-the-fly. To customize import management, open settings by pressing Ctrl+Alt+S and navigate to Go | Imports .
To reformat code, press Ctrl+Alt+L . Comparing to gofmt, GoLand’s formatter works with syntactically incorrect code and can be invoked on an arbitrary block. There are other features such as automatically inserting semicolons, wrapping parameters and arguments, and others.
Alternatively, you can use file watchers to trigger gofmt and goimports. File watcher is a built-in GoLand tool that allows you to run command-line tools automatically when files are changed or saved. GoLand automatically saves changes that you make in your files.
For example, to set a file watcher to run gofmt, open settings by pressing Ctrl+Alt+S and navigate to Tools | File Watchers , click the Add button and select gofmt . In the New Watcher dialog, click OK .
Useful links
Autosave: more information about the autosave functionality.
File Watchers: a topic about how to create and use file watchers.
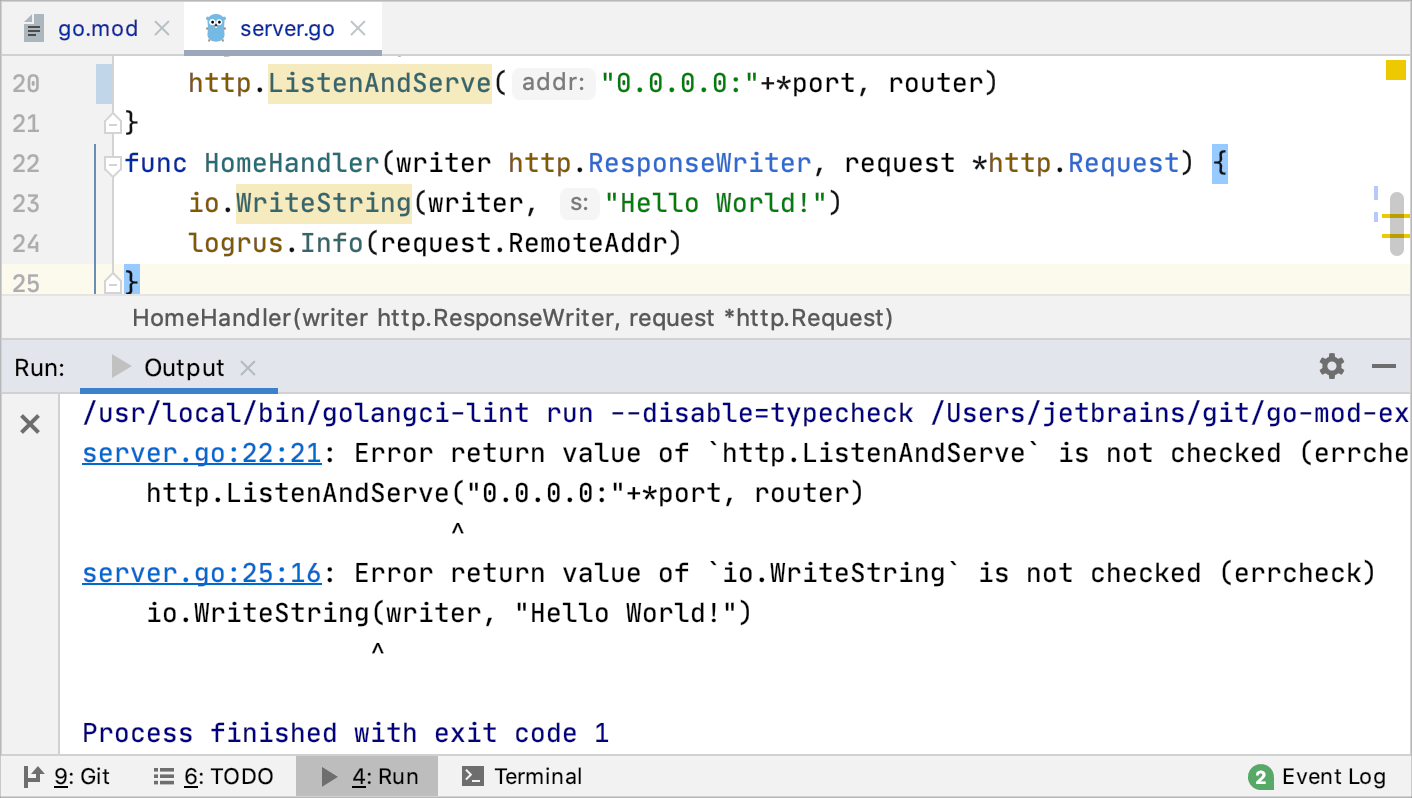
How do I see the results of static analysis tools in the editor?
Results of static analysis tools are displayed in the Output tab of the Run tool window.
You can use the built-in or external (like golang-ci) static analysis tool.
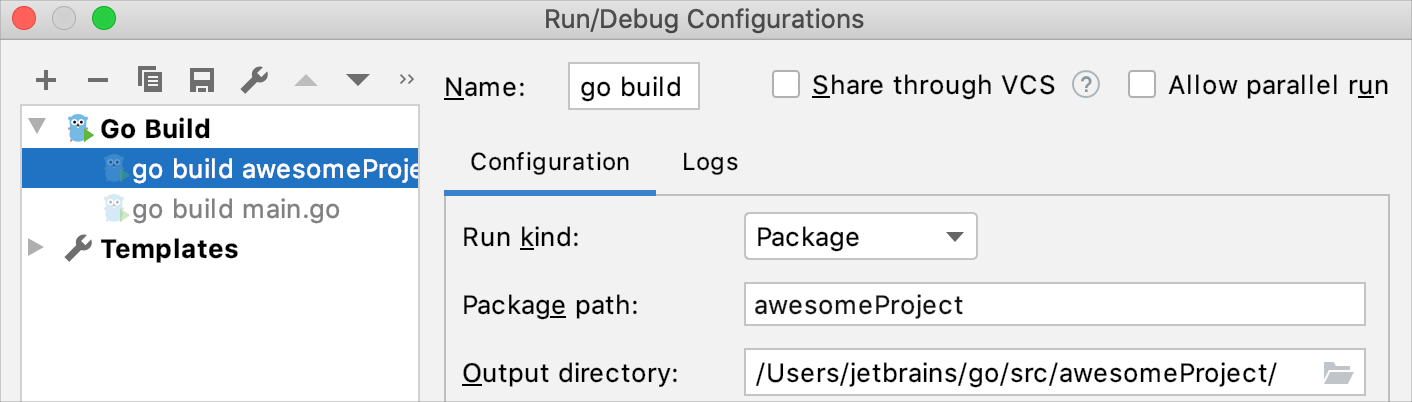
How do I change the output directory of the application binary (go build -o)?
Navigate to Run | Edit configurations , click the run/debug configuration that you use to run your application. In the Output directory field, specify the path that you want to use as the output directory of the application binary.
Alternatively, open your run/debug configuration and specify -o directory_path in the Go tool arguments field.
Useful links
Run/debug configurations: read more about run/debug configurations and how to use them.
How do I provide arguments to `go build` and `go test` commands?
Navigate to Run | Edit Configurations , click the run/debug configuration that you use to run your application or your tests. In the Go tool arguments field, type a space-separated list of arguments that you want to use with go build or go test .
If you need to set build constraints, open settings by pressing Ctrl+Alt+S and navigate to Go | Build Tags & Vendoring . For more information about possible build constraints, see Build Constraints at golang.org.
Useful links
Build Constraints: information about build constraints in Go at golang.org.
Run/debug configurations: read more about run/debug configurations and how to use them.
Run/debug configuration templates for tests: see how to create run/debug configurations for tests.
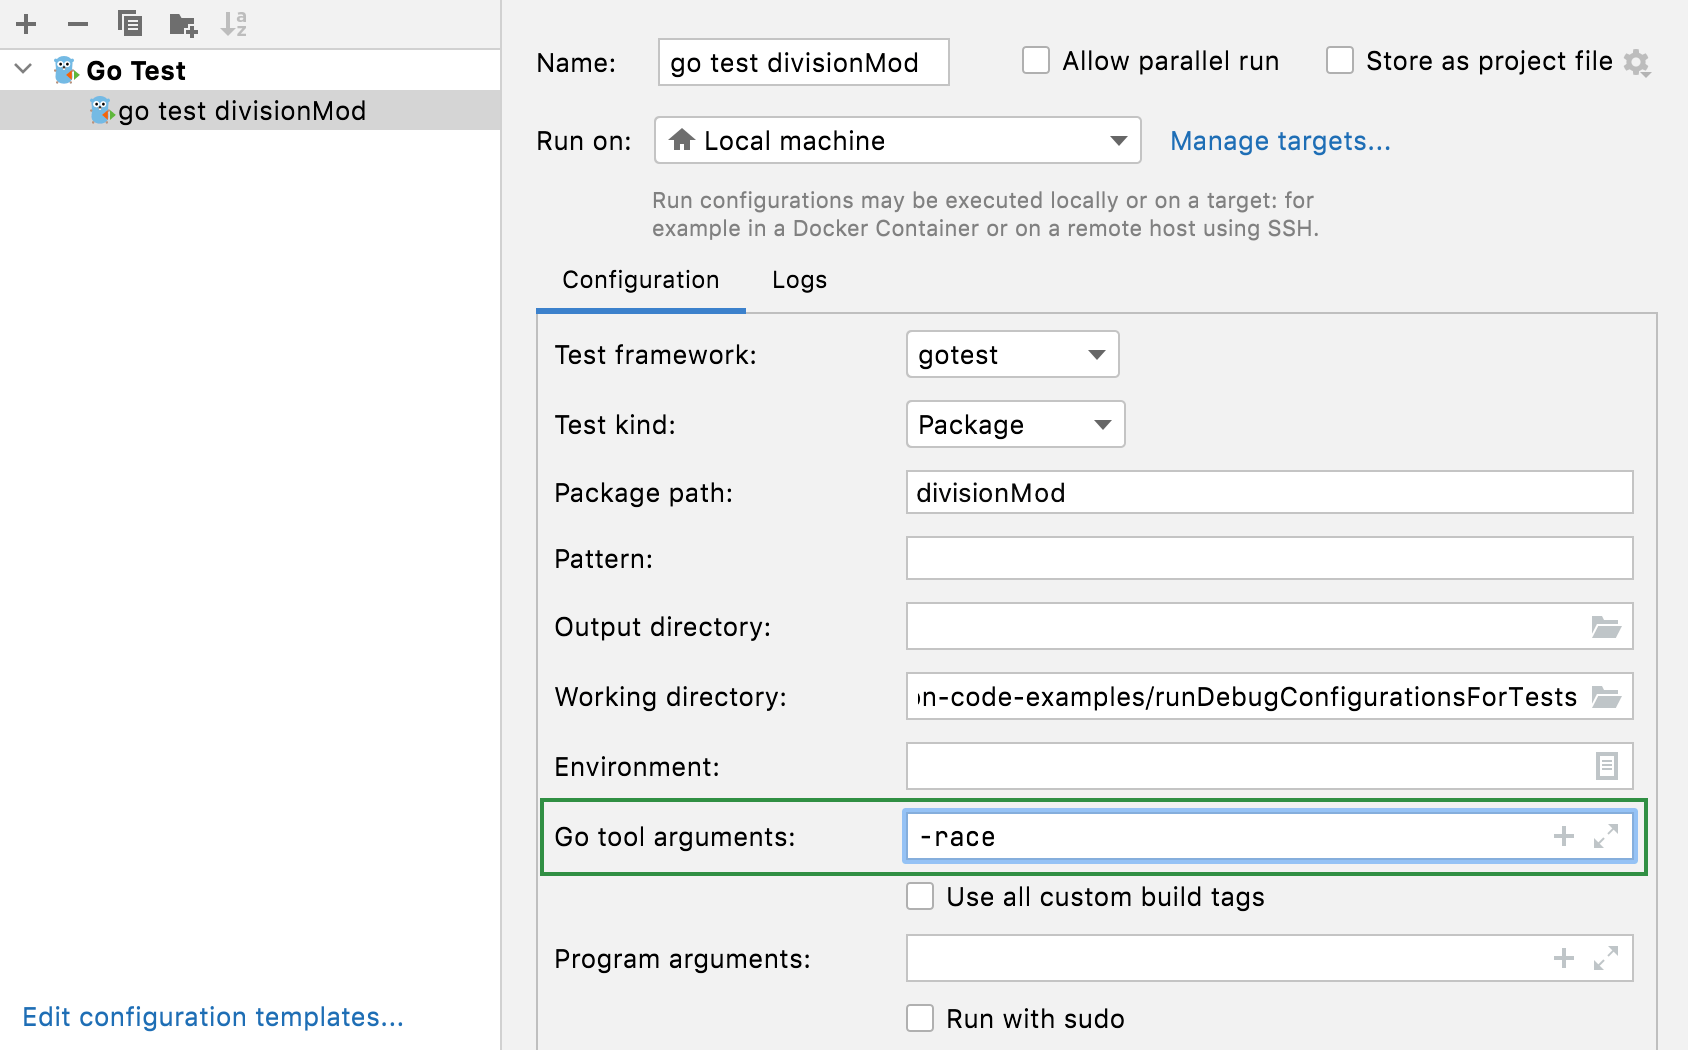
How to add test flags like ‘-race’, ‘-failfast’, ‘-short’, and others
Navigate to Run | Edit Configurations , click the run/debug configuration that you use to run your application or your tests. In the Go tool arguments field, specify a flag that you plan to use:
-race : enables data race detection. Supported only on linux/amd64 , freebsd/amd64 , darwin/amd64 , windows/amd64 , linux/ppc64le and linux/arm64 (only for 48-bit VMA).
-test.failfast : stops new tests after the first test failure.
-test.short : shortens run time of long-running tests.
-test.benchmem : prints memory allocation statistics for benchmarks.
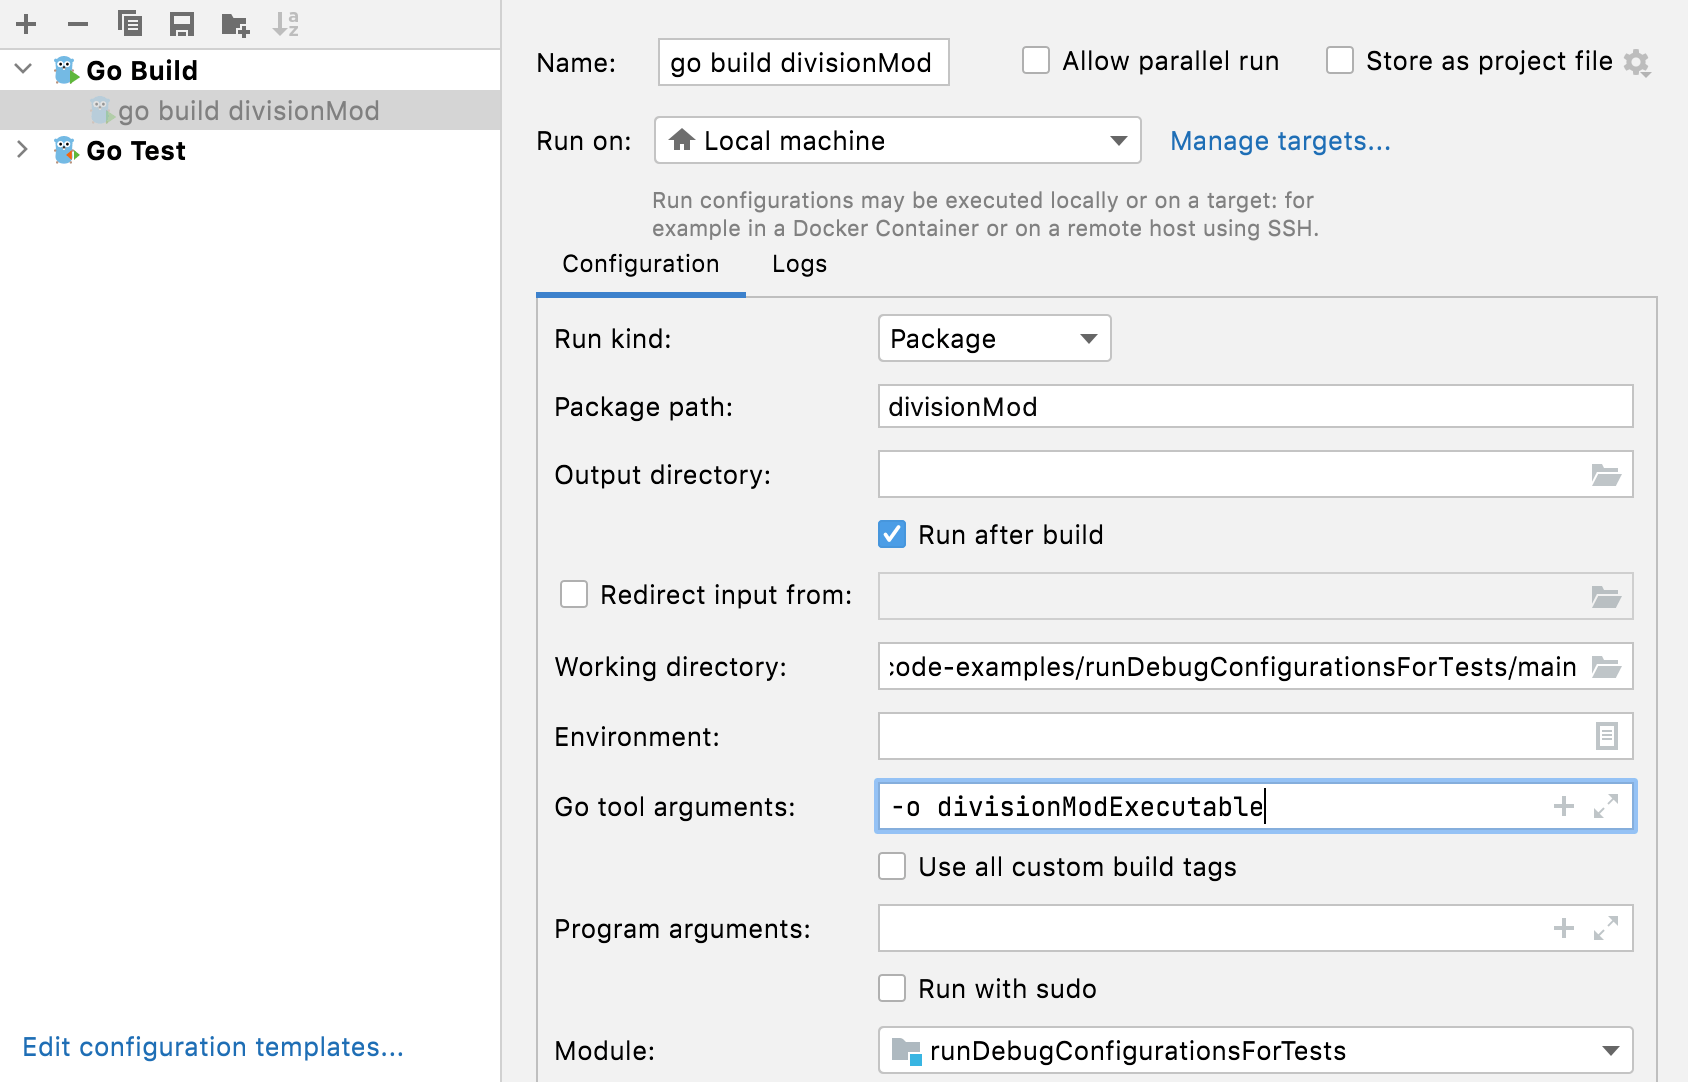
How to change the name of a compiled binary?
Navigate to Run | Edit Configurations , click the run/debug configuration that you use to run your application or your tests. In the Go tool arguments field, specify -o customExecutableName .
Working with projects
How do I open a VSCode project in GoLand?
Navigate to File | Open , select the folder that you want to add, and click Open .
What’s the difference between workspaces and projects?
The main difference is that a workspace can contain multiple projects. In Visual Studio Code, you add multiple projects as roots to your workspace (see Multi-root Workspaces in the Visual Studio Code documentation).
GoLand does not use a workspace concept. To have a multi-root structure in GoLand, you need to define projects that you want to add as content roots (see How can I open several projects in GoLand simultaneously?).
If you have only one project in your workspace, these two concepts have no differences.
Useful links
Content roots: read how you can work with files from several directories that do not have a common immediate parent.
Managing directories: see how to attach and detach directories.
How can I open several projects in GoLand simultaneously?
You can add any number of directories as content roots. To add a content root, open settings by pressing Ctrl+Alt+S and navigate to Settings | Project structure | Add Content Root .
Another way is to click File | Open , select the folder of a project that you want to add, and click Open . In the popup window, select Attach .
Useful links
Content roots: read how you can work with files from several directories that do not have a common immediate parent.
Managing directories: see how to attach and detach directories.
How do I change the Go SDK for my project?
You can either download Go SDK from the official repository or navigate to your local copy.
Open settings by pressing Ctrl+Alt+S and navigate to Go | GOROOT . Click the Add button. To navigate to your local copy of Go SDK, select Local . To download Go SDK, click Download .
Useful links
Configuring GOROOT and GOPATH: a help page that shows you how to set GOROOT and GOPATH in GoLand.
How do I change the GOPATH variable for my project?
Open settings by pressing Ctrl+Alt+S and navigate to Go | GOPATH . Depending on the scope that you want to apply, select the corresponding section (Global GOPATH, Project GOPATH, Module GOPATH) and click the Add button . Navigate to the directory that you want to associate with GOPATH.
You can configure GOPATH for the following scopes: Global, Project, and Module. If you specified all three scopes, GoLand selects the narrowest scope first.
Useful links
Configuring GOROOT and GOPATH: a help page that shows you how to set GOROOT and GOPATH in GoLand.
How do I run or debug my application?
To run or debug your application, you can use the following approaches:
In the left gutter of the editor, click the Run application icon and select Run in or Debug in .
Right-click the opened file or a method in the editor and select Run in Ctrl+Shift+F10 or Debug in Shift+F9 .
Create a run/debug configuration. For more information about run/debug configurations, see Create a run/debug configuration.
Useful links
Create a run/debug configuration: see how to create a run/debug configuration.
Running: see for more information about running applications.
Debugging: learn how to start a debugging session, examine a suspended program
How do I view dependencies for my project in the same window?
You can create a diagram with all the dependencies in the project. Right-click the go.mod file in your project and select Diagrams | Show Diagram .
To ensure that Go modules are enabled in the project, open settings by pressing Ctrl+Alt+S and navigate to Go | Go modules . Ensure that the Enable Go modules integration checkbox is selected.
Useful links
Create a diagram of dependencies: see the animation that shows how to create a diagram of dependencies.
How do I close a project?
Click File | Close Project .
How do I start with VCS integration?
VCS integration enables automatically.
To enable VCS integration manually, click VCS | Enable Version Control Integration . In the Enable Version Control Integration dialog, select the VCS that you want to use and click OK .
Useful links
Version control: read about how to work with VCS in GoLand. Support of Git and Mercurial is bundled. To enable support for other VCS, install the corresponding VCS plugin. For more information about plugin management, see Plugins.
Working with the code editor
Can I use the VSCode key bindings in GoLand?
Install the VS Code Keymap plugin.
To install the VS Code Keymap plugin, use one of the following approaches:
You can download the plugin from plugins.jetbrains.com by using the following link: https://plugins.jetbrains.com/plugin/12062-vs-code-keymap/.
Open settings by pressing Ctrl+Alt+S and navigate to Plugins . In the search field, type VS Code Keymap . Find VS Code Keymap by JetBrains and click Install .
How do I see the documentation on a mouseover?
Hover the cursor over the code element to see documentation on it.

How does code completion in GoLand work?
By default, GoLand displays the code completion popup automatically as you type. Alternatively, you can press Ctrl+Space or select Code | Completion | Basic from the main menu.
Useful links
Code completion: read about other types of code completion and how you can use them.
How can I use multiple carets/cursors?
To add or remove multiple carets, press and hold Shift+Alt and click at the next location of the caret.
Alternatively, to add multiple carets, you can press Ctrl twice, and then without releasing it, press the Up or Down arrow keys. You can also make a multiple selection by pressing Ctrl and dragging the caret.
Useful links
Multiple carets and selection ranges: learn about other cases of multiple caret usage.
How can I select and rename multiple elements at once?
In the editor, select an element you want to rename and press Shift+F6 . Alternatively, select Refactor | Rename from the main menu.
Use the Rename refactoring to change names of symbols, files, and all the references to them throughout code.
Useful links
Rename refactorings: see the topic for more features of the Rename refactoring.
What are the automated code refactoring tools available?
The full list of refactorings for the current context is available under the Refactor menu item.
Change signature changes the method or function name; adds, removes, and reorders parameters; assigns default values to new non-variadic parameters.
Extract refactorings extracts code fragments that can be grouped. You can extract a constant, a variable, a method, and an interface.
Inline refactoring moves an extracted code fragment to the calling code. An opposite to the Extract refactoring.
Copy refactoring copies a file, a directory, or a package to a different directory or a package.
Move refactoring moves source code sections to another package or a file. For example, you can use the Move refactoring to move methods to another package.
Useful links
Code refactoring: see the section to learn more about the mentioned refactorings.
Are there any special code analysis features in GoLand?
GoLand supports gotest, gocheck, and gobench. By using these packages, you can ensure that the behavior of your code is correct and expected.
You can use profiling to get a performance analysis of your tests and benchmarks. During profiling, you see the CPU and memory usage, the frequency and duration of function and method calls. For more information about profiling, see Profiling for tests.
Useful links
Testing: see this section for more information about creating test configurations and running tests.
Profiling for tests: learn about tools for profiling your tests and benchmarks.
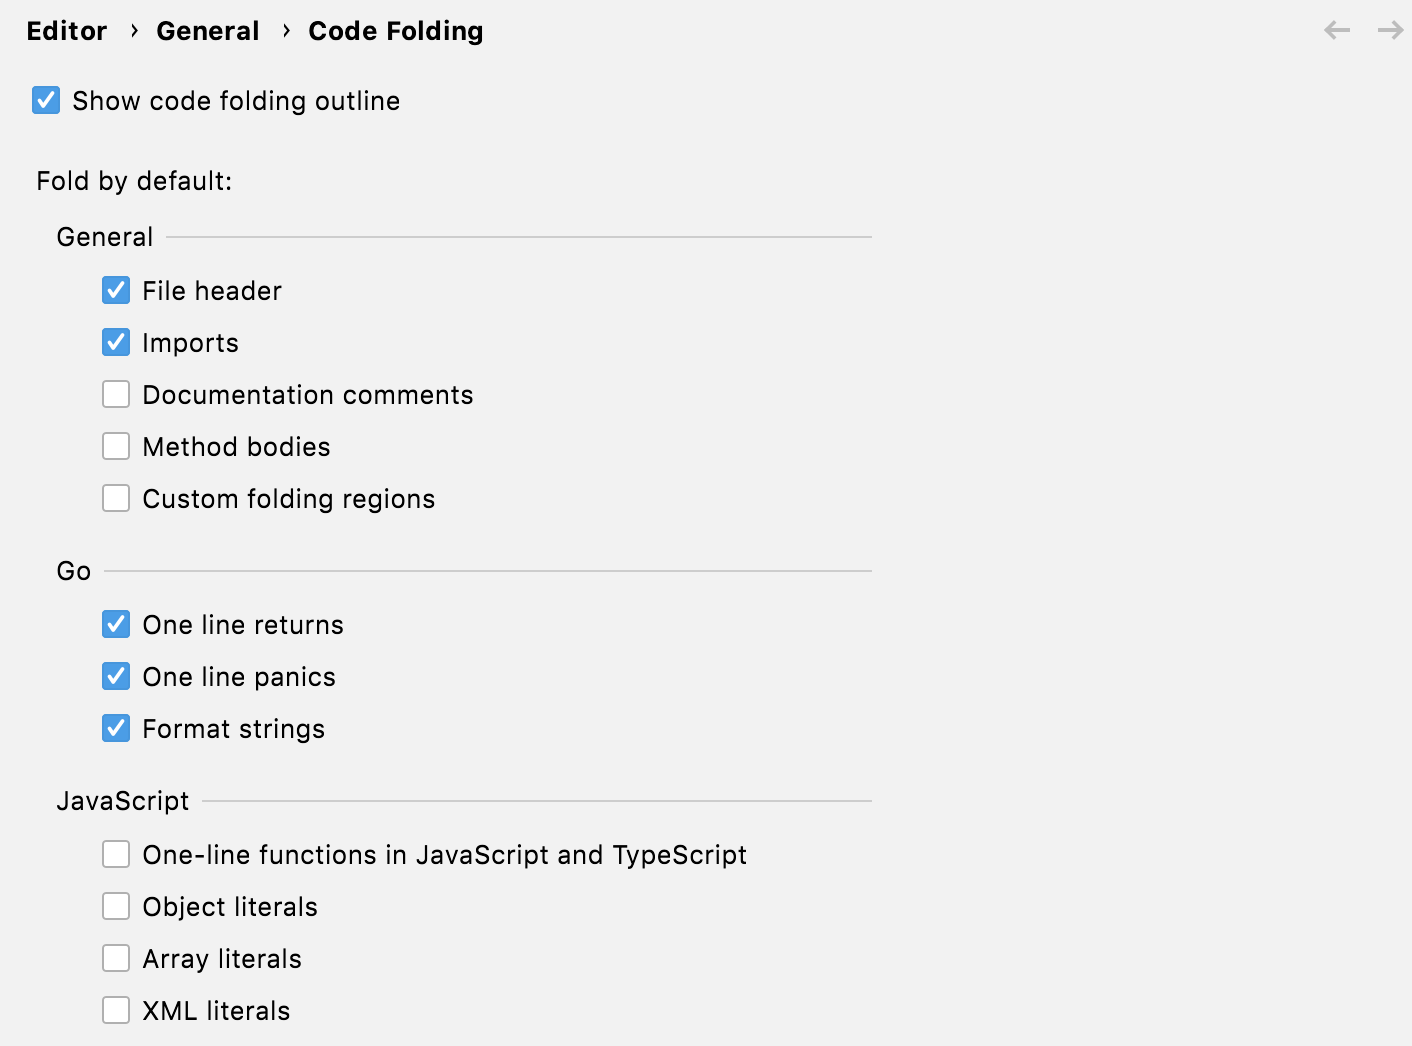
How to disable code folding for one-line returns/panics and formatted strings?
Open settings by pressing Ctrl+Alt+S and navigate to Editor | General | Code Folding . In the Go section, clear all or some of the checkboxes that toggle code folding.
Using plugins
How do I find the plugin that I need?
Open settings by pressing Ctrl+Alt+S and navigate to Plugins . In the search field, type a plugin or technology name. Press Enter to start searching.
Alternatively, you can search for a plugin at plugins.jetbrains.com and install it manually.
How do I install the plugin that I have available on my computer?
In the Settings/Preferences dialog Ctrl+Alt+S , select Plugins and click Install Plugin from Disk . Select the plugin archive file and click OK . Restart the IDE if prompted.
I’d like to write a plugin for GoLand. Are there any instructions?
You can use any edition of GoLand to develop plugins. It provides an open API, a dedicated SDK, module, and run/debug configurations to help you.
The recommended workflow is to use Gradle. For more information, see the IntelliJ Platform SDK Developer Guide.
Can I use Visual Studio Code plugins in GoLand?
No, but you can find a similar plugin in the plugin marketplace. For details, see How do I find the plugin that I need?.
Источник


