- Google Authenticator
- Contents
- Installation
- Setting up PAM
- Request OTP only when connecting from outside your local network
- Generating a secret key file
- Setting up your OTP-generator
- Testing
- Storage location
- Desktop logins
- Code generation
- Code managers
- Command line
- Двухфакторная аутентификация в Linux
- Двухфакторная аутентификация в Linux с использованием Google Authenticator
- 6 easy steps to setup offline two factor authentication in Linux
- Lab Environment
- Google Authenticator with PAM
- Step 1: Install Google Authenticator on RHEL/CentOS 7 and 8 Linux
- Method 1: Install using DNF or YUM
- Method 2: Install using source code
- Step 2: Configure offline two factor authentication in Linux
- Step 3: Download and configure Google Authenticator Mobile App
- Step 4: Configure ssh two factor authentication
- Step 4.1: Configure /etc/pam.d/sshd module
- Step 4.2: Configure /etc/ssh/sshd_config
- Step 4.3: Verify ssh two factor authentication
- Step 5: Configure sudo two factor authentication (Optional)
- Step 5.1: Modify /etc/pam.d/sudo module
- Step 5.2: Verify sudo two factor authentication
- Step 6: Configure su two factor authentication (Optional)
- Step 6.1: Configure /etc/pam.d/su module
- Step 6.2: Verify su two factor authentication
- Related Posts
Google Authenticator
Google Authenticator provides a two-step authentication procedure using one-time passcodes (OTP). The OTP generator application is available for iOS, Android and Blackberry. The authentication mechanism integrates into the Linux PAM system. This guide shows the installation and configuration of this mechanism.
For the reverse operation (generating codes compatible with Google Authenticator under Linux) see #Code generation below.
Contents
Installation
Install libpam-google-authenticator package, which provides the client program google-authenticator and the PAM module pam_google_authenticator.so . The development version is available with google-authenticator-libpam-git AUR .
Setting up PAM
Usually one demands two-pass authentication only for remote login. The corresponding PAM configuration file is /etc/pam.d/sshd . In case you want to use Google Authenticator globally you would need to change /etc/pam.d/system-auth , however, in this case proceed with extreme caution to not lock yourself out. In this guide we proceed with editing /etc/pam.d/sshd which is most safely (but not necessarily) done in a local session.
To enter both, your unix password and your OTP, add pam_google_authenticator.so above the system-remote-login lines to /etc/pam.d/sshd :
This will ask for the OTP before prompting for your Unix password. Changing the order of the two modules will reverse this order.
To allow login with either the OTP or your Unix password use:
Enable keyboard interactive authentication in /etc/ssh/sshd_config :
Request OTP only when connecting from outside your local network
Sometimes, we just want to enable the 2FA capability just when we connect from outside our local network. To achieve this, create a file (e.g. /etc/security/access-local.conf ) and add the networks where you want to be able to bypass the 2FA from:
Then edit your /etc/pam.d/sshd and add the line:
Generating a secret key file
Every user who wants to use two-pass authentication needs to generate a secret key file in his home folder. This can very easily be done using google-authenticator:
It is recommended to store the emergency scratch codes safely (print them out and keep them in a safe location) as they are your only way to log in (via SSH) when you lost your mobile phone (i.e. your OTP-generator). They are also stored in
/.google_authenticator , so you can look them up any time as long as you are logged in.
Setting up your OTP-generator
Install a generator application on your mobile phone (e.g.):
In the mobile application, create a new account and either scan the QR code from the URL you were told when generating the secret key file, or enter the secret key (in the example above ‘ZVZG5UZU4D7MY4DH’) manually.
Now you should see a new passcode token being generated every 30 seconds on your phone.
Testing
SSH to your host from another machine and/or from another terminal window:
Storage location
If you want to change the secret key files’ storage path, you can use the flag —secret :
Then, do not forget to change the location path for PAM, in /etc/pam.d/sshd :
user=root is used to force PAM to search the file using root user.
Also, take care with the permissions of the secret key file. Indeed, the file must be only-readable by the owner (chmod: 400 ). Here, the owner is root.
Desktop logins
The Google Authenticator PAM plugin can also be used for console logins and with GDM. Just add the following to /etc/pam.d/login or the /etc/pam.d/gdm-password file:
Code generation
If you have Google Authenticator configured with other systems, then losing your device can prevent you from being able to log in to those systems. Having additional ways to generate the codes can be helpful.
Code managers
A script that enables the display, generation, storage and management of google authenticator codes is available from the AUR ( gashell AUR ). Alternatively there is also auther ( auther-git AUR ).
Command line
The easiest way to generate codes is with oath-tool . It is available in the oath-toolkit package, and can be used as follows:
On most Android systems with sufficient user access, the Google Authenticator database can be copied off the device and accessed directly, as it is an sqlite3 database. This shell script will read a Google Authenticator database and generate live codes for each key found:
Источник
Двухфакторная аутентификация в Linux
Двухфакторная аутентификация (2FA) — это процесс входа в систему, состоящий из механизма двойной аутентификации. Наиболее известные реализации включают в себя классическое подтверждение кода SMS или электронной почты для новых / неизвестных браузеров и устройств.
В этом сценарии, даже если хакер получит пароль PayPal или хостинга, он не сможет войти в систему без кода подтверждения, отправленного на телефон или электронную почту жертвы.
Внедрение двухфакторной аутентификации — один из лучших способов защиты нашей электронной почты, учетных записей социальных сетей, хостинга и многого другого. К сожалению, наша система не исключение.
В этом руководстве показано, как реализовать двухфакторную аутентификацию для защиты доступа по SSH с помощью Google Authenticator или Authy-ssh. Google Authenticator позволяет проверять логин с помощью мобильного приложения, а Authy-ssh можно реализовать без приложения с помощью проверки по SMS.
Двухфакторная аутентификация в Linux с использованием Google Authenticator
Примечание. Прежде чем продолжить, убедитесь, что на вашем мобильном устройстве установлен Google Authenticator.
Для начала выполните следующую команду, чтобы установить Google Authenticator (дистрибутивы Linux на основе Debian):

Чтобы установить Google Authenticator в дистрибутивах Linux на базе Red Hat (CentOS, Fedora), выполните следующую команду:
После установки запустите Google Authenticator, как показано на скриншоте ниже.
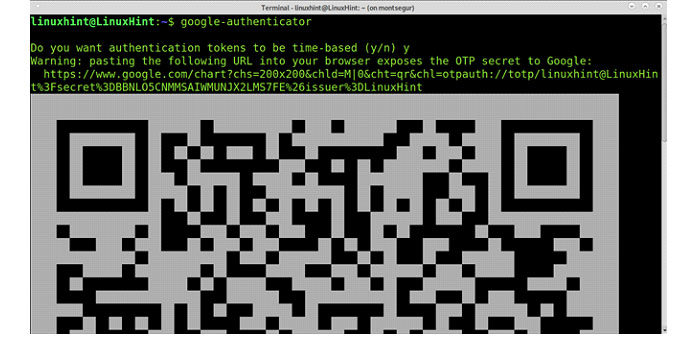
Как видите, появляется QR-код. Вам необходимо добавить новую учетную запись, щелкнув значок + в мобильном приложении Google Authenticator и выбрав Сканировать QR-код.
Google Authenticator также предоставит резервные коды, которые необходимо распечатать и сохранить на случай, если вы потеряете доступ к своему мобильному устройству.
Вам будут заданы некоторые вопросы, которые подробно описаны ниже, и вы можете принять все параметры по умолчанию, выбрав Y для всех вопросов:
- После сканирования QR-кода в процессе установки потребуется разрешение на редактирование вашего дома. Нажмите Y,чтобы перейти к следующему вопросу.
- Второй вопрос рекомендует отключить несколько логинов с использованием одного и того же проверочного кода. Нажмите Y,чтобы продолжить.
- Третий вопрос касается срока действия каждого сгенерированного кода. Опять же, вы можете позволить временной сдвиг, нажмите Y,чтобы продолжить.
- Включите ограничение скорости, до 3 попыток входа каждые 30 секунд. Нажмите Y,чтобы продолжить.
Источник
6 easy steps to setup offline two factor authentication in Linux
Table of Contents
In this article I will share Step-by-Step Guide to Install and Configure Offline Two Factor Authentication using Open Source Google Authenticator for below scenarios in Linux
- Configure offline two factor authentication for SSH
- Configure offline two factor authentication for SUDO
- Configure offline two factor authentication for SU
Lab Environment
I have installed Oracle Virtual Box on Linux node on which I have created multiple Virtual Machines with RHEL/CentOS 7 and 8 Linux. The steps from this article to configure two factor authentication are verified on RHEL/CentOS 7 and 8 Linux environment.
You need internet connectivity on your Virtual Box to download and install the required Google Authenticator packages. But once two factor authentication is configured, you do not need internet connectivity for validation which means this will act as offline two factor authentication in Linux.
Google Authenticator with PAM
Using the pluggable authentication modules provided by PAM, Open Source Google Authenticator supports the following features for Offline two factor authentication in Linux, according to its GitHub page:
- Per-user secret and status file stored in the user’s home directory
- Support for 30-second TOTP codes
- Support for emergency scratch codes
- Protection against replay attacks
- Key provisioning via display of a QRCode
- Manual key entry of RFC 3548 base32 key strings
Step 1: Install Google Authenticator on RHEL/CentOS 7 and 8 Linux
There are two methods to install Google Authenticator on your RHEL/CentOS 7 and 8 Linux environment.
Method 1: Install using DNF or YUM
I hope you are aware of DNF which is an alternate to YUM. By default google authenticator rpm is not part of the CentOS or Red Hat repository so you must first install EPEL repository on your Linux node.
Next install google authenticator rpm before we enable offline two factor authentication:
Content of the rpm on RHEL/CentOS 7
Content of the rpm on RHEL/CentOS 8
Method 2: Install using source code
You can clone the google authenticator git repository on your Linux node
Next build and install
This will install and configure Google Authenticator on your Linux node.
Step 2: Configure offline two factor authentication in Linux
Now we do not need internet on the Linux node to enable offline two factor authentication. Execute the google-authenticator binary without any arguments as shown below, which will prompt you for various inputs

Step 3: Download and configure Google Authenticator Mobile App
Before we jump into the steps to enable and configure offline two factor authentication, we need this Google Authenticator app which will give us the OTP for verification code.
Download and Install » Google Authenticator » from your «Google Play Store» or «App Store» based on your device.
Click on «BEGIN» to go to the next screen.

Next add a account. You can use the BARCODE or the KEY which was generated at Step 2 to add a new account.
 Once you add the account, you should start getting the OTP (Verification Code) which you can use to login on your Linux node configured with offline two factor authentication ssh.

Step 4: Configure ssh two factor authentication
To secure your SSH and prevent against brute force attacks you can configure SSH two factor authentication so that for every SSH attempt, you will need to also provide OTP or Verification code from Google Authenticator.
Step 4.1: Configure /etc/pam.d/sshd module
To enable SSH two factor authentication we will use the PAM module. The file /etc/pam.d/sshd needs to be adjusted to call the google-authenticator module:
Step 4.2: Configure /etc/ssh/sshd_config
Next enable ChallengeResponseAuthentication in /etc/ssh/sshd_config
Restart the sshd service to activate the changes
Step 4.3: Verify ssh two factor authentication
Open a new SSH session which should now prompt for verification code
Since we have used » auth required pam_google_authenticator.so «, Linux will prompt for verification code followed by the password of the user :
If you use » auth sufficient pam_google_authenticator.so » then Linux will only prompt for verification code before logging in :
Step 5: Configure sudo two factor authentication (Optional)
If your requirement is only to configure SSH two factor authentication the you can ignore this step. But to enhance your security, you can also configure sudo two factor authentication so that every time a user uses SUDO, the user will be prompted for a OTP (Verification Code)
Step 5.1: Modify /etc/pam.d/sudo module
To enable sudo two factor authentication we will use the PAM module. The file /etc/pam.d/sudo needs to be adjusted to call the google-authenticator module:
Step 5.2: Verify sudo two factor authentication
Next you can try to perform a sudo operation using any user:
Step 6: Configure su two factor authentication (Optional)
Again if your requirement is limited to SUDO or SSH two factor authentication you can ignore this step. But to enhance your security, you can also configure su two factor authentication so that every time a normal user attempts to switch user (su) role, the user will be prompted for OTP (Verification Code)
Step 6.1: Configure /etc/pam.d/su module
To enable su two factor authentication we will use the PAM module. The file /etc/pam.d/su needs to be adjusted to call the google-authenticator module:
Step 6.2: Verify su two factor authentication
Next verify your PAM configuration by trying to switch user (su):
Lastly I hope the steps from the article to configure offline two factor authentication using Google Authenticator on RHEL/CentoS 7/8 Linux was helpful. So, let me know your suggestions and feedback using the comment section.
Related Searches: two factor authentication linux ssh, ssh two factor authentication google, ssh otp google authenticator, linux 2 factor authentication
Related Posts
Didn’t find what you were looking for? Perform a quick search across GoLinuxCloud
If my articles on GoLinuxCloud has helped you, kindly consider buying me a coffee as a token of appreciation.

For any other feedbacks or questions you can either use the comments section or contact me form.
Thank You for your support!!
Источник


