- Google Crash Handler — Что это за процесс в Windows 10?
- Является ли Google Crash Handler вирусом?
- Можно ли удалить Google Crash Handler?
- GoogleCrashHandler.exe что это за процесс и как его отключить?
- 4 Solutions to Fix Chrome Keeps Crashing Windows 10 [MiniTool News]
- Summary :
- 4 solutions to Fix Chrome Keeps Crashing Windows 10
- Solution 1. Close Tabs and Disable Extensions
- Solution 2. Use the No-Sandbox Flag
- Solution 3. Run a Virus Scan
- Solution 4. Check and Remove the Incompatible Programs
- Final Words
- ABOUT THE AUTHOR
- Google chrome crashing on my Windows 10 Laptop after some recent updates installed in late May 2018
- Replies (8)
Google Crash Handler — Что это за процесс в Windows 10?
Google Crash Handler — это процесс компании Google, который отправляет отчеты при аварии приложения и отвечает за управление, загрузку и установку обновлений приложений Google. Он устанавливается с любым приложением, разработанной компанией Google, чтобы компания могла анализировать ошибки приложения и вносить в них исправления.
Является ли Google Crash Handler вирусом?
Процесс GoogleCrashHandler.exe не является вирусом и полностью легитимен. Однако, некоторые вирусы могут подделывать имя процесса для маскировки GoogleCrashHandler.exe. Чтобы убедится, что это не вирус:
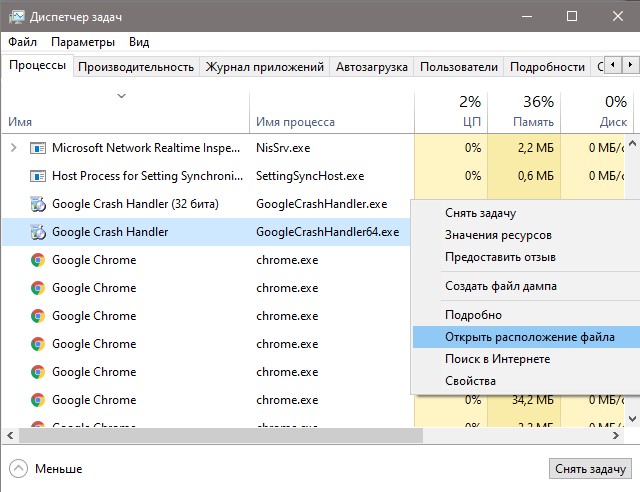
- Откройте диспетчер задач Ctrl+Shift+Esc.
- Нажмите правой кнопкой по Google Crash Handler.
- Выберите «Открыть расположение файла«.
Если файл находится по пути C:\Program Files (x86)\Google\Update\1.3.36.72, то он не является вирусом, но вы также можете просканировать систему встроенным антивирусом. Он достаточно хорош для выявления поддельных процессов в своей системе.
Можно ли удалить Google Crash Handler?
Да. Процесс Google Crash Handler не является процессом самой Windows 10 и его можно безопасно удалить. Ко всему вышесказанному, Google прекратила поддержку GoogleCrashHandler.exe.
Как правильно удалить?
- Откройте расположение Google Crash Handler как указано выше, через диспетчер задач.
- Завершите процессы Google Crash Handler и 32 бита в диспетчере задач.
- Удалите их в открывшимся местоположении.
GoogleCrashHandler.exe что это за процесс и как его отключить?
 Всем привет
  Вот как-то смотрю я в диспетчер задач и вижу там такой процесс как GoogleCrashHandler.exe, также есть еще процесс GoogleCrashHandler64.exe, это как я понимаю типа 64-битная версия процесса так бы сказать. Итак, что мне сразу приходит на ум? Ну, наверно тоже самое что и вам, это то, что этот процесс от браузера Гугл Хром, и оно так и есть!
Ну и что теперь делать подумаете вы? Ну тут не все так просто.. Дело в том, что процесс содержит в себе слово Google, поэтому многие пользователи могут сразу подумать, ну мол тут все нормалек, это процесс от Google, переживать не стоит и все такое.. НО, под этот процесс спокойно может маскироваться ВИРУС, понимаете? Вот в чем опасность! Поэтому не стоит думать что если написано Google в имени процесса, то значит процесс безопасный, это может быть вирус и он специально замаскирован, чтобы вы там ничего не подумали! Ну, надеюсь вы поняли что я имею ввиду. На всякий случай я вам дам в конце статьи ссылки на антивирусные утилиты, лучше ими проверить комп, если есть время, то таки проверьте, мой вам совет!
Итак, теперь давайте посмотрим на сам процесс, вернее процессы, вот они у меня висят в диспетчере задач:

Как видим они много памяти не кушают, можно даже сказать что вообще не кушают, процессор также не грузят. В колонке Описание написано что это Google Crash Handler, то есть что-то типа связано с ошибками Хрома, ну что-то вроде этого..
Запускаются эти процессы у меня вот из этой папки:
C:\Program Files (x86)\Google\Update\1.3.31.5

Я так понимаю что это связано таки с Гугл Хромом, поэтому в моем случае это не вирус и это радует 
Значит теперь такой вопрос наверно вас заинтересует, можно ли вообще отключить процессы GoogleCrashHandler.exe и GoogleCrashHandler64.exe? В принципе я думаю что можно. Ничего страшного не произойдет, вернее не должно. Итак, как же это сделать? Значит в диспетчере задач нажимаете правой кнопкой по процессу GoogleCrashHandler.exe и выбираете там в меню пункт Открыть место хранения файла:

Откроется папка, вот в этой папке нужно нажать вот сюда:

После этого нажатия вы должны попасть в папку, в которой будут другие папки, вот какие именно:

Вот видите, тут выделена папка Update, видите? Это означает, что мы из той папки только что вышли! То есть эта папка и содержит файлы GoogleCrashHandler.exe и GoogleCrashHandler64.exe ну и остальное барахло. Вот эту папку Update можно или удалить или же переименовать. Но чтобы подстраховать себя, так бы сказать обезопасить от проблем, то я советую ее не удалять, а переименовать, например просто добавив символ нижнего пробела. Короче вы это, ну сначала папку не трогайте, сначала вам нужно в диспетчере задач завершить процессы GoogleCrashHandler.exe и GoogleCrashHandler64.exe, это очень просто! Нажимаете правой кнопкой по процессу GoogleCrashHandler.exe и там выбираете Завершить процесс:

И вот тоже самое делаете с GoogleCrashHandler64.exe! Процессы завершили, отлично, теперь можно переименовать папку, как я уже писал выше, достаточно будет просто добавить символ нижнего пробела, в итоге у вас должно получится так:

Кстати, чтобы быстро переименовать, то выберите папку и нажмите F2
Папку можно и удалить, но вдруг будут глюки, ну вдруг? А вот если они таки будут, то вы можете быстро взять и переименовать обратно, то есть вернуть все как было, и это будет вам сделать легко! Но блин, как понять тогда где находится эта папка? Не переживайте, я вам для этого дам адрес, где она находится у меня, у вас думаю она будет по такому же адресу, в общем вот он:
C:\Program Files (x86)\Google
Вот в этой папке у меня и находится папка Update.
Ну что ребята, вроде бы все? А вот и не все, я же писал что дам антивирусные утилиты, вдруг это у вас вирус, ну все в этой жизни может быть! Значит какие антивирусные утилиты я рекомендую? Ну это конечно же утилита от Доктора Веба, называется она Dr.Web CureIt!, я о ней писал здесь, советую глянуть. Dr.Web CureIt! это утилита находит серьезные вирусы, трояны, в общем реально серьезные вирусы. А есть еще рекламные вирусы, которые суют везде рекламу, они не так страшны, не воруют вроде пароли, но везде суют рекламу блин! Против вот таких рекламных вирусов и просто рекламного ненужного хлама я советую утилиту HitmanPro, о ней я писал здесь. Также рекламный хлам отлично удалят утилита AdwCleaner, о ней я тут писал. В общем такие дела, проверьте комп, ну реально, мой вам совет
Ну что ребята, вроде бы все написал? Ничего не забыл? Вам тут надеюсь что все понятно, а если что-то не так, то прошу извинить. Удачи вам ребята и чтобы все у вас было хорошо!
4 Solutions to Fix Chrome Keeps Crashing Windows 10 [MiniTool News]
By Tina | Follow | Last Updated March 04, 2021
Summary :

What to do if Chrome keeps crashing Windows 10? How to fix the problem that Chrome keeps crashing Windows 10? This post shows how to fix the issue Chrome keeps crashing Windows 10 with 4 solutions. In addition, you can use MiniTool software to safeguard your computer and files.
Google Chrome is a commonly used browser, but some users complain that Chrome keeps crashing Windows 10. Thus, it would be a vexing thing.
However, this post will show you how to fix the problem that Chrome keeps crashing Windows 10. If you have the same problem, try these solutions.
4 solutions to Fix Chrome Keeps Crashing Windows 10
Solution 1. Close Tabs and Disable Extensions
You may have noticed that Google Chrome will become slow when there are too many tabs opening in the browser. So, Google Chrome may keep crashing or no response.
So, in order to solve the problem that Chrome keeps crashing Windows 10, you can try to close all tabs and restart Chrome to check whether you have fixed this problem.
After you have closed all tabs, if the problem that Google Chrome keeps crashing Windows 10 still exists, you can try to disable the extensions. For example, if your extensions get updated, the new updated one is not compatible with Google Chrome. So, it may give rise to the problem Chrome crashing Windows 10. Hence, you can try to disable extensions in Chrome to solve the problem that Chrome keeps crashing Windows 10.
If this solution is not effective, keep on your reading.
Solution 2. Use the No-Sandbox Flag
The major reason for the problem that Chrome keeps closing is Sandbox. It will make the 64-bit Chrome crash. So in order to solve the problem that Chrome keeps crashing Windows 10, you can try to use the no-sandbox flag.
Now, we will show you the detailed operation to do so in the following section.
Step 1: Right-click the Google Chrome shortcut on the Desktop and choose Properties to continue.
Step 2: In the pop-up window, please go to the Shortcut tab and select it to view its content. Then find Target and click the text. Then type the –no-sandbox at the end of the context and click Apply and OK to continue.
After that, you can reboot the Google Chrome and check whether the problem that Chrome keeps crashing Windows 10 is solved.
Solution 3. Run a Virus Scan
Now, we will show you the third solution to fix the problem that Chrome keeps crashing Windows 10.
The problem of Chrome crashing Windows 10 may be caused by the virus attack or malware on the computer. So in order to solve this problem, you can run a virus scan.
If there is any malware detected on your computer, you can follow the instruction to handle it.
After that, restart Google Chrome and check whether the issue Chrome keeps crashing Windows 10 is solved.
Solution 4. Check and Remove the Incompatible Programs
The problem that Chrome keeps closing may be caused by incompatible programs. So, in order to solve this problem, you can check whether there are incompatible programs on your computer and remove them.
Now, we will show you how to do that.
Step 1: Open the Settings of Google Chrome.
Step 2: In the pop-up window, click Advanced to continue.
Step 3: Click Find and remove harmful software under Reset and clean up section. Then click Find to continue.
Step 4: After that, if you find any program that may prevent Google Chrome from working normally, remove it.
When all steps are finished, restart Google Chrome and check whether the problem that Chrome keeps crashing Windows 10 is solved.
If all these solutions can’t solve the problem Chrome crashing Windows 10, you can try to reinstall the Google Chrome or choose to reinstall the operating system. But, before doing that please remember backing up files firstly.
Final Words
To sum up, this post has introduced how to fix the problem that Chrome keeps crashing Windows 10 with 4 solutions. If you encounter the same issue, try these solutions.
ABOUT THE AUTHOR

Position: Columnist
Tina is a technology enthusiast and joined MiniTool in 2018. As an editor of MiniTool, she is keeping on sharing computer tips and providing reliable solutions, especially specializing in Windows and files backup and restore. Besides, she is expanding her knowledge and skills in data recovery, disk space optimizations, etc.
On her spare time, Tina likes to watch movies, go shopping or chat with friends and enjoy her life.
Google chrome crashing on my Windows 10 Laptop after some recent updates installed in late May 2018
For the past several days, my google chrome app on my Windows 10 laptop has been black screening, crashing, and freezing. This issue started after some recent updates were installed on my computer. I had my laptop repaired and upgraded from Windows 8 to Windows 10 following a virus attack on April 9, and now I am worried this problem is due to a virus I unknowingly put into my system. I have done scans with my Kaspersky Anti Virus, and with Malwarebytes, but neither found anything. I also ran system file check via command prompt and it didn’t find any corrupt files. I am seriously worried, based on what an article I read online said, that if my google chrome continues to crash frequently, it will make my system unstable. I don’t want to spend another hundred dollars on repairs/a new laptop. Is anything being done to correct this google chrome problem and is anyone having the same issue?
Replies (8)
Try to delete chrome, restart you pc, then install it back.
Was this reply helpful?
Sorry this didn’t help.
Great! Thanks for your feedback.
How satisfied are you with this reply?
Thanks for your feedback, it helps us improve the site.
How satisfied are you with this reply?
Thanks for your feedback.
Hi Evan. I’m Greg, an installation specialist and 8 year Windows MVP, here to help you.
I would uninstall any 3rd party antivirus and try running the built-in Defender which offers best WIndows performance with fewest issues, and is from Microsoft who knows how to protect their OS best.
Use Malwarebytes and AdwCleaner free scanners for on-demand scanning.
As to Chrome, as suggested I’d uninstall, restart PC and then reinstall it.
You should never have to pay money to reinstall Windows and especially if they restored Windows 7 before doing the inferior Upgrade. No tech enthusiasts would ever run a Factory or Upgrade install so you paid money to have a double whammy bad install. Instead you could have done this Clean Install which should get you past all difficulties as it has hundreds of thousands of others who have followed the steps in this link and never come back to report another problem: http://answers.microsoft.com/en-us/windows/wiki.
Make sure during the booted install to follow the illustrated steps to delete all partitions down to Unallocated Space to get it cleanest, then click Next to let it auto-create the needed partitions, format them and begin install — this makes it foolproof.
You will get and keep the best possible install to the exact extent you stick with the steps, tools and methods in the linked tutorial. It’s a better install than any amount of money could buy and a great learning experience that will make you the master of your PC.
I hope this helps. Feel free to ask back any questions and let us know how it goes. I will keep working with you until it’s resolved.
________________________________________________________
Standard Disclaimer: There are links to non-Microsoft websites. The pages appear to be providing accurate, safe information. Watch out for ads on the sites that may advertise products frequently classified as a PUP (Potentially Unwanted Products). Thoroughly research any product advertised on the sites before you decide to download and install it.
Over 100,000 helped in forums for 11 years. I don’t quit for those who are polite and cooperative.
Windows MVP 2010-21
Was this reply helpful?
Sorry this didn’t help.
Great! Thanks for your feedback.
How satisfied are you with this reply?
Thanks for your feedback, it helps us improve the site.
How satisfied are you with this reply?
Thanks for your feedback.
Hi Evan. I’m Greg, an installation specialist and 8 year Windows MVP, here to help you.
I would uninstall any 3rd party antivirus and try running the built-in Defender which offers best WIndows performance with fewest issues, and is from Microsoft who knows how to protect their OS best.
Use Malwarebytes and AdwCleaner free scanners for on-demand scanning.
As to Chrome, as suggested I’d uninstall, restart PC and then reinstall it.
You should never have to pay money to reinstall Windows and especially if they restored Windows 7 before doing the inferior Upgrade. No tech enthusiasts would ever run a Factory or Upgrade install so you paid money to have a double whammy bad install. Instead you could have done this Clean Install which should get you past all difficulties as it has hundreds of thousands of others who have followed the steps in this link and never come back to report another problem: http://answers.microsoft.com/en-us/windows/wiki.
Make sure during the booted install to follow the illustrated steps to delete all partitions down to Unallocated Space to get it cleanest, then click Next to let it auto-create the needed partitions, format them and begin install — this makes it foolproof.
You will get and keep the best possible install to the exact extent you stick with the steps, tools and methods in the linked tutorial. It’s a better install than any amount of money could buy and a great learning experience that will make you the master of your PC.
I hope this helps. Feel free to ask back any questions and let us know how it goes. I will keep working with you until it’s resolved.
________________________________________________________
Standard Disclaimer: There are links to non-Microsoft websites. The pages appear to be providing accurate, safe information. Watch out for ads on the sites that may advertise products frequently classified as a PUP (Potentially Unwanted Products). Thoroughly research any product advertised on the sites before you decide to download and install it.
Even more bad news now, My Microsoft Edge and Mozilla Firefox, which is what I recently installed on my laptop, have also stopped working. I think this is a virus attack. Or maybe Windows 10 is a lemon
1 person found this reply helpful
Was this reply helpful?
Sorry this didn’t help.
Great! Thanks for your feedback.
How satisfied are you with this reply?
Thanks for your feedback, it helps us improve the site.
How satisfied are you with this reply?
Thanks for your feedback.
Hi Evan, please try this
Open Windows file Explorer
On the View Ribbon, check the box marked ‘Hidden Items’
Delete this Folder (replace username with your login name):
Restart your PC
Power to the Developer!
MSI GV72 — 17.3″, i7-8750H (Hex Core), 32GB DDR4, 4GB GeForce GTX 1050 Ti, 256GB NVMe M2, 2TB HDD
1 person found this reply helpful
Was this reply helpful?
Sorry this didn’t help.
Great! Thanks for your feedback.
How satisfied are you with this reply?
Thanks for your feedback, it helps us improve the site.
How satisfied are you with this reply?
Thanks for your feedback.
Then I would follow the steps now to do the Clean Install: http://answers.microsoft.com/en-us/windows/wiki.
Make sure during the booted install to follow the illustrated steps to delete all partitions down to Unallocated Space to get it cleanest, then click Next to let it auto-create the needed partitions, format them and begin install — this makes it foolproof.
To create Windows 10 Installation Media on another PC install Media Creation Tool and follow the directions here: http://windows.microsoft.com/en-us/windows-10/m. . Uncheck the box for Recommended Settings to choose the exact version and bit rate for the target PC only.
Insert media, boot it by powering up PC while pressing the BIOS Boot Menu Key: https://www.sysnative.com/forums/hardware-tutor.
If the media won’t boot you may need to enter BIOS/UEFI Setup (pressing key given in chart in link above) to turn off Fast Boot or Fast Startup first.
Choose the boot device as a UEFI device if offered, on second screen choose Install Now, then Custom Install, then at the drive selection screen delete all partitions down to Unallocated Space to get it cleanest, click Next to let it create needed partitions and start install — this makes it foolproof.
If you want to try to repair it first, then go over this checklist to make sure the install is set up correctly, optimized for best performance, and any needed repairs get done: http://answers.microsoft.com/en-us/windows/wiki.
Start with Step 4 to turn off Startup freeloaders which can conflict and cause issues, then Step 7 to check for infection the most thorough way, then step 10 to check for damaged System Files. Then continue with the other steps to go over your install most thoroughly.
If any steps cannot be performed normally then try them in Safe Mode with Networking or Safe Mode: https://www.digitalcitizen.life/4-ways-boot-saf.
Update your drivers from the PC’s Support Downloads web page, using the full model number, Serial Number or Dell Service Tag on sticker. Compare the latest drivers available for download with the ones presently installed in Device Manager reached by right clicking the Start Menu. Make sure you have the latest BIOS or UEFI firmware, Chipset, Display (Video), Sound, USB3, Bluetooth, Network and all other drivers, or else download and install the latest now.
If nothing else helps then run a Repair Install by installing the Media Creation Tool and choosing from it to Upgrade Now. This solves many problems and will also bring it up to the latest version which you need anyway and by the most stable method. http://windows.microsoft.com/en-us/windows-10/m.
Over 100,000 helped in forums for 11 years. I don’t quit for those who are polite and cooperative.


