- How to install and setup Google Drive on Linux Mint
- No native Google desktop client for Linux
- How to install and setup Google Drive on Linux Mint
- How to access your Google Drive folder
- Используем Google drive в linux через webdav и ocamlfuse
- WebDaV Google drive Linux
- Google drive в Ubuntu, Linux Mint, Archlinux, Manjaro используя google-drive-ocamlfuse
- Linux mint Google Drive
- Google диск linux mint
- Mounting Google Drive On Xfce Or MATE Desktops (Ubuntu, Linux Mint)
- Mounting Google Drive using Gnome Online Accounts in Xfce, MATE and others
- Using Google Drive OCamlFUSE to mount Google Drive in Linux
How to install and setup Google Drive on Linux Mint

You can say a lot of things about Google. And indeed there are many, many different opinions about this internet services giant. Many of Google’s products are free and of course we also know that free in this case is not really free, but that you as a user pay by giving in a bit of privacy so that the Google advertising logic can adapt to your behavior on the internet. But the fact is that a large part of the people in this world are satisfied users of the products Google is offering and are therefore willing to give up a bit of their privacy for that. So chances are that you are somehow a Google user as well, for example via your Android phone or only via the Google Drive office suite, and if you are also a Linux enthusiast then you most likely want to connect Google Drive to your Linux installation. In this article I explain how to install and setup Google Drive on Linux Mint. But Ubuntu users and users of other Ubuntu based distributions will also benefit from this article because of the equal foundation.
No native Google desktop client for Linux
Google provides a native backup and sync desktop client solution for macOS and Windows. This software allows you to back up files from your computer or other devices to the Google Drive cloud. You can find your files on any device or computer using Google Drive as they are conveniently synced between your devices via the cloud functionality. Unfortunately, Google has so far always failed or was just not interested to develop a desktop client for Linux. Of course you can simply go to the online version of Google Drive via your web browser, but that is not what we want to achieve in this article. We want to be able to access our files on Google Drive through our desktop environment.
How to install and setup Google Drive on Linux Mint
If you use Linux Mint 19 or higher or Ubuntu 18.04 or higher, it is child’s play to connect Google Drive to your Linux desktop, since everything that is needed is already built into the operating system, namely via the Online Accounts function. In that case start below from step 5. But if you are currently running older versions then you must first take some extra steps to install Online Accounts. So let’s start with the assumption that you are running Linux Mint 18.3 or lower or Ubuntu 17.10 or lower.
We start by installing GNOME Control Center and GNOME Online Accounts.
1) Open the terminal via Ctrl + Alt + T.
2) Type the following command and give Enter.
sudo apt-get update
3) Type the following command and give Enter.
sudo apt-get install gnome-control-center
4) Type the following command and give Enter.
sudo apt-get install gnome-online-accounts
The basis for the next steps has now been laid. These follow-up steps must be performed for all versions of Linux Mint and Ubuntu.
5) Click on the Linux Mint start button to open the Application Menu.
6) Search for “System Settings”.
7) Click on System Settings to open it.
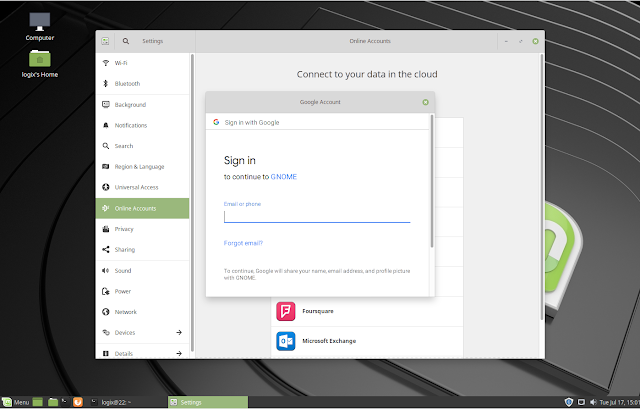
In the System Settings you see the option “Online Accounts”.
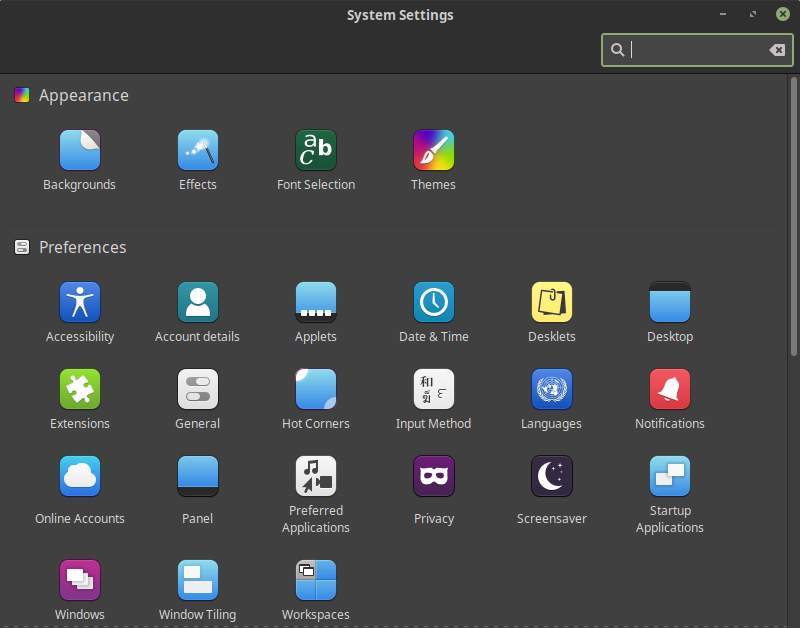
8) Click on “Online Accounts”.
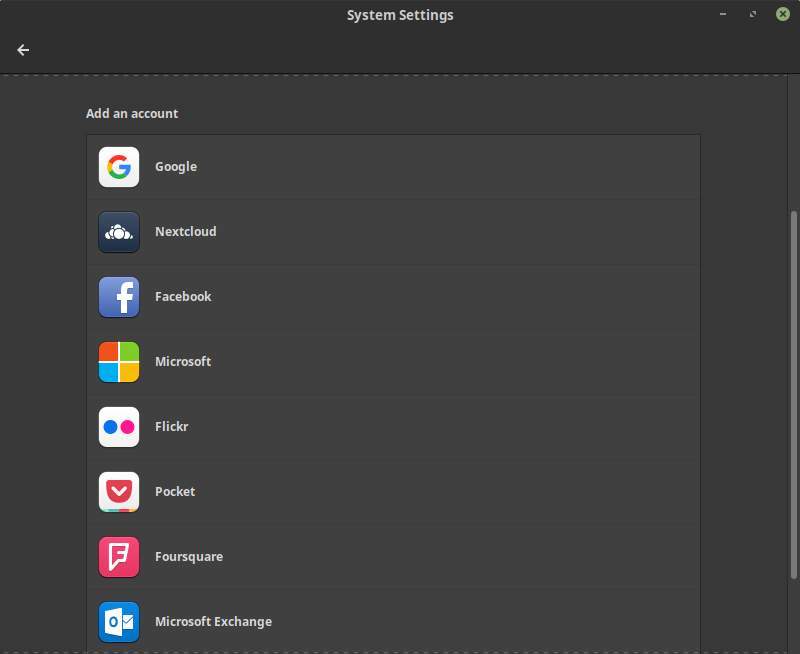
9) Click on “Google”.
Now Online Accounts will contact Google and asks to log in.
10) Provide you email address and click Next.
11) Provide your password and click Next.
Now you get a popup that shows that GNOME wants to access your Google account.
12) Click on Allow.
Now you get a popup that show options to use for your Google account.
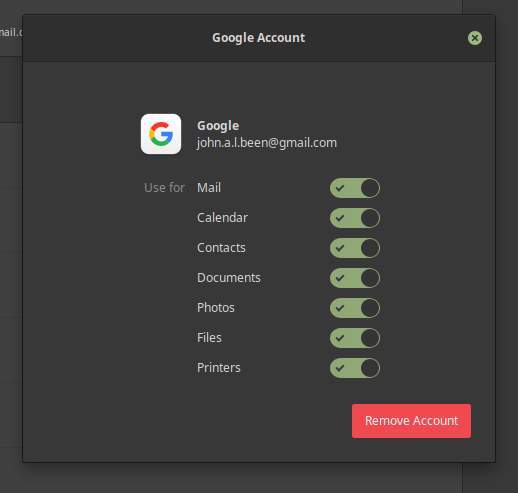
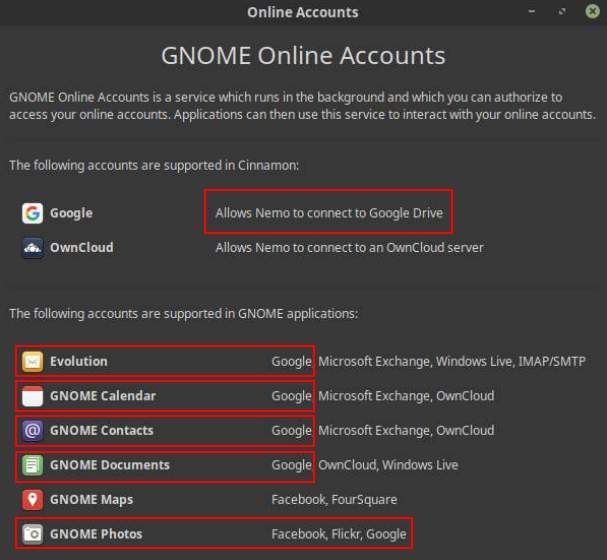
Here you can select or deselect the available options. These options are available in the following desktop environment and applications:
13) Close the popup screen when you are ready.
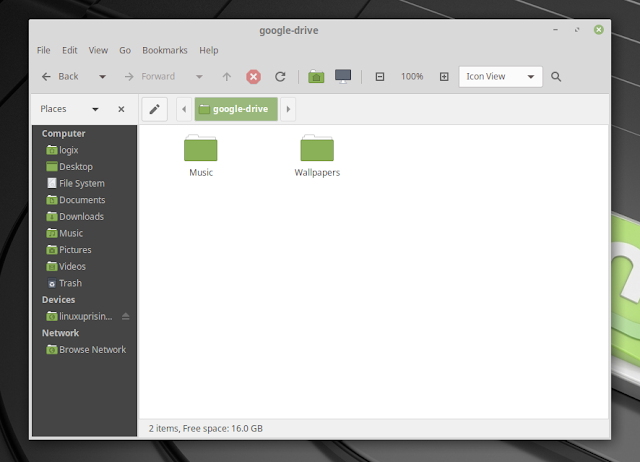
Google Drive is now integrated and can be used via the Nemo file manager. But you can also access and maintain your calendar items and contacts via Calendar and Contacts. It is important to know that the files that you have stored in Google Drive are not duplicated to your local machine. So there is no synchronization folder that you can also use offline. If you do not have an internet connection, the Google Drive content is not visible.
How to access your Google Drive folder
1) Click on the Linux Mint start button to open the application menu.
2) Search for “Files” and click it to open the Nemo file manager.
3) On the left hand side look under Network. There you find your Google email address.
4) Click on your Google email address.
Now it takes a while to load your Google Drive data. A “Loading” status message is being shown in the right hand lower corner of the Nemo file manager. After a couple of seconds all your own folders and the shared folders will be visible in the file manager and can be opened to find files or move files to.
Источник
Используем Google drive в linux через webdav и ocamlfuse
Сегодня Google drive в linux не пробовал использовать разве что ленивый, ведь помимо этого сервиса Google предоставляет ряд других прекрасных сервисов, таких как Google Docs, Google Calendar
Компания Гугл бесплатно предоставляет любому желающему 15 Гигабайт дискового пространства. Файлы находящиеся там, вы можете открывать с любого устройства под любой операционной системой в любой точке мира.
Предлагаю вашему вниманию новую статью из цикла статей о Linux: Шифрование облачного диска Linux (файлов, папок)
WebDaV Google drive Linux
К сожалению в Google Drive нет встроенной поддержки технологии WebDAV. Я нашёл на просторах костыльный способ подключения по WebDaV. Для этого нужно зарегистрироваться по ссылке https://dav-pocket.appspot.com/signup . Сразу хочу предупредить, что в этом случае какой то сторонний сервис получит доступ к вашим данным в google drive, если вас это устраивает, то используйте.
Необходимо будет в нём подключить свой Гугл аккаунт. Для подключения Google Drive через WebDAV потребуются данные, выданные сервисом: имя аккаунта, пароль и адрес сервера. Это касаемо всех дистрибутивов, теперь же перейдём к конкретике на примере Ubuntu и Archlinux (и их производных).
Установим пакет davfs2 в Ubuntu и производные
После введения второй команды, система спросит разрешение на монтирования WebDaV раздела непривилегированным пользователям. Соглашаемся.
в Archlinux и производные
Далее первой командой в домашней директории создаём папку в которую будем монтировать наш удалённый файловый хостинг. Второй командой создадим папку с файлом в который запишем данные полученные от стороннего сервиса, ссылку на который вы видели дюжиной строк выше.
В него вписываем следующие строки(разумеется внеся свои login и password и вместо tehnojam имя своего пользователя)
Если всё до текущего шага у вас таки получилось сделать, то остался последний штрих- добавление в fstab сведений для автомонтирования нашего новоявленного файлоохранилища:
и в конце дописываем (вместо tehnojam не забываем вписать имя своего пользователя)
Теперь всё должно автомонтироваться при перезагрузке.
Google drive в Ubuntu, Linux Mint, Archlinux, Manjaro используя google-drive-ocamlfuse
Реализация подключения Google Drive в linux реализуется пакетом google-drive-ocamlfuse. Так как установка и настройка подключения в различных дистрибутивах несколько разнится, то опишу это далее на конкретных дистрибутивах.
Так как Ubuntu и Linux Mint наиболее популярные дистрибутивы Linux, то далее будет пример подключения в этих дистрибутивах.
Для установки и настройки google-drive-ocamlfuse в Ubuntu и Linux Mint, нам необходимо подключить дополнительный репозиторий введя в терминале эти команды:
Для установки и настройки google-drive-ocamlfuse в Archlinux и Manjaro выполним в терминале:
#для пользователей yaourt ввести
yaourt -S google-drive-ocamlfuse
#для пользователей pacaur ввести
pacaur -S google-drive-ocamlfuse
Далее создаём в домашней директории папку, в которую будем осуществлять монтирование облака, выполняем это командой:
После отработки последней команды откроется окно вашего дефолтного браузера

После введения своих данных от гугл аккаунта увидите что-то подобное:

Поздравляю, у вас в домашнем каталоге появился ваш Google Drive.
Linux mint Google Drive
Так как на моей машине сейчас стоит Linux Mint 19, то в завершение статьи о Google Drive приведу один понравившийся простой и безболезненный способ использования гуглового файлохранилища в данном дистрибутиве.
Достаточно просто введя одну команду
установить gnome-control-center , запустить его, и кликнуть по пункту «Online Account»

Там выберем аккаунт google, вводим свои логин и пароль и вуаля, Google Drive уже появился в Nautilus и при нажатии легко и непринужденно монтируется к вашей машине.
Наверное прочитав статью, вы в недоумении скажете: «И что? Где нормальные решения? Где повествования о Rclone или ODrive?» Безусловно есть куча различных мейнстрим клиентов на линукс, но о них расписаны уже тысячи страниц. Я же решил поделиться менее распространёнными способами интегрирования Google Drive в Linux.
Источник
Google диск linux mint
02 май 2017, 07:13
Grive2 — независимая реализация клиента Google Drive для GNU / Linux с открытым исходным кодом. Он написан на C ++ и взаимодействует с Google Диском с помощью API REST Google.
Он работает, просто загружая файлы на вашем Google Диске в текущий каталог и загружая или загружая изменения обратно на ваш диск Google или на ваш рабочий стол Linux соответственно.
Grive2 является форком клиента Grive Google Drive, и его функции закачки включают Drive REST API и частичную синхронизацию.
- Свободный и открытый источник. Лицензия распространяется на GNU GPL v2.
- Поддержка полной двусторонней синхронизации между Google Диском и локальным каталогом.
- Смотреть действия , которые Grive2 хочет выполнить, не выполняя их с помощью параметра -dry-run.
- Укажите один каталог ti syn с использованием параметра -s subdir.
- Исключить каталоги для синхронизации с помощью параметра -ignore.
- Возможность исключения файлов с использованием Perl regexp.
Некоторые жизненно важные функции, которые еще не поддерживаются в Grive2, — это поддержка Документов Google и рекурсивный процесс проверки изменений; То есть вам придется вручную запустить grive для приложения, чтобы синхронизировать ваши последние изменения.
По моему мнению, до тех пор, пока вышеупомянутые функции не будут включены, Grive2 не сможет идти наравне с другими альтернативами клиента Google Диска, такими как CrossCloud или Rclone.
Введите следующее в новое окно терминала:
$ sudo add-apt-repository ppa:nilarimogard/webupd8
$ sudo apt-get update
$ sudo apt-get install grive
Подробные инструкции для других дистрибутивов Linux можно найти здесь:
http://yourcmc.ru/wiki/Grive2#Installation
Как я уже сказал, Grive просто загрузит / выгрузит новые или измененные файлы обратно на ваш Google Диск из каталога, в котором вы его запускаете. Поэтому сначала создайте новый каталог «grive» в своем домашнем каталоге и перемещайтесь внутри него.
Теперь запустите Grive2, используя аргумент -a , чтобы назначить ему разрешение на доступ к вашему Google Диску.
После выполнения вышеуказанной команды на нем будет отображаться URL-адрес — скопируйте / вставьте этот URL-адрес в веб-браузере, чтобы предоставить доступ к Google Диску для вашего клиента Grive, нажав «Разрешить доступ» — на экране будет выведен код аутентификации , Скопируйте / вставьте этот код в терминал.
После того, как вы введете код, он начнет синхронизировать ваш Google Диск с вашим локальным каталогом grive в вашей системе.
Если вы хотите снова синхронизировать свой Google Диск с вашим локальным каталогом grive, просто запустите команду grive без параметра -a, как показано.
Источник
Mounting Google Drive On Xfce Or MATE Desktops (Ubuntu, Linux Mint)
Gnome offers an easy way to access your Google Drive files from your Linux desktop — open Online Accounts, add your Google account and you’ll be able to transfer files from / to your Google Drive directly from the Files (Nautilus) application. KDE Plasma 5 was includes similar Google Drive integration, and Cinnamon supports this as well.
But what about other desktop environments? There are ways of mounting Google Drive on any desktop environment, and this article includes 2 such options: installing and using Gnome Settings (Control Center) and Gnome Online Accounts in other desktop environments, like Xfce or MATE, or using Google Drive OCamlFUSE, a tool that achieves something similar to Gnome Online accounts, but without all the Gnome dependencies.

Using any of these 2 options, you’ll be able to access Google Drive directly from your file manager of choice. It should work with Thunar, Nemo, Caja, and others. You’ll be able to add new files to your Google Drive, delete or modify existing files, etc.
Compared to the Gnome Online Accounts method, Google Drive OCamlFUSE offers more flexibility, it doesn’t have Gnome dependencies, but appears to be slower. That may depend on the way one uses Google Drive though, so this may not be accurate. In any case, try it and judge for yourself.
There are also various unofficial Google Drive clients, from command line clients (like grive2) to complete desktop solutions which include file manager integration (like Insync, which costs $29.99 per Google account / one time fee). This article is about mounting Google Drive on Linux desktops that don’t have a built-in way of doing this though, and not about all those Google Drive clients.
The instructions below include some Ubuntu (Xubuntu, Ubuntu MATE, etc.), and Linux Mint (MATE, Xfce) specific installation commands. The tools (Google Drive OCamlFUSE and Gnome Online Accounts) themselves should produce the same result on any Linux distribution though.
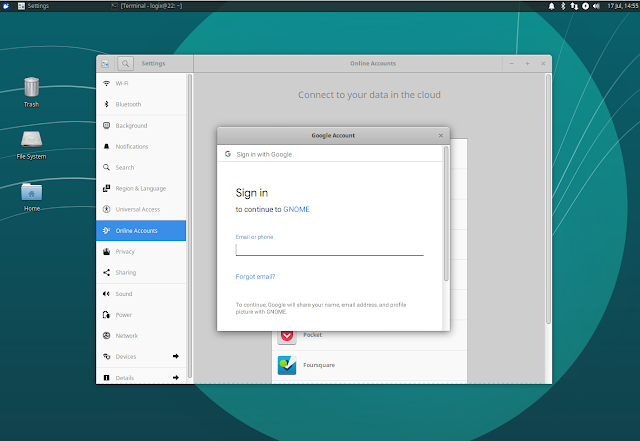
Mounting Google Drive using Gnome Online Accounts in Xfce, MATE and others
To mount Google Drive using Gnome Online Accounts / Gnome Settings (Control Center) in desktop environments such as Xfce, MATE, and others, you’ll need to install the gnome-control-center and gnome-online-accounts packages. They include multiple Gnome dependencies — if you don’t want this, you can check out the Google Drive OCamlFUSE option below.
Open a terminal and type this command to install them:
Gnome Settings is hidden and doesn’t show up in the menu on non-Gnome desktop environments. So if you use Xfce, MATE or some other desktop environment you won’t see Gnome Settings or Gnome Control Center in your menu. To run it, we’ll need to use a terminal and add XDG_CURRENT_DESKTOP=GNOME before the executable, like this:
Now go to Online Accounts, click Google and add your Google account:
 |
| Gnome Online Accounts on Linux Mint 19 MATE |
 |
| Gnome Online Accounts on Xubuntu 18.04 |
Immediately after adding your Google account to Online Accounts, you should see your Google Drive folder in the file manager (Caja, Thunar or whatever file manager you may be using):
 |
| Google Drive mounted in Caja (default MATE file manager) using Gnome Online Accounts / Linux Mint 19 MATE |
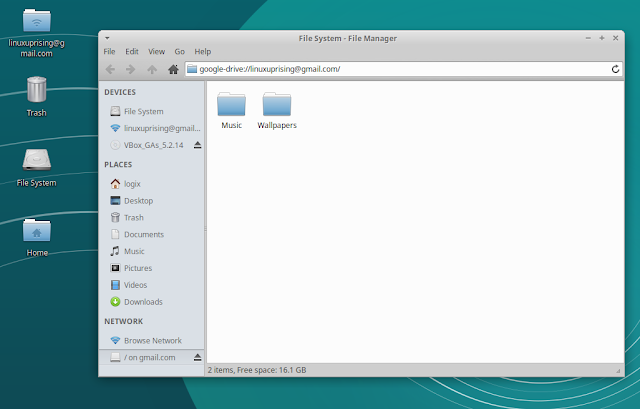 |
| Google Drive mounted in Thunar (default Xfce file manager) using Gnome Online Accounts / Xubuntu 18.04 |
Using Google Drive OCamlFUSE to mount Google Drive in Linux
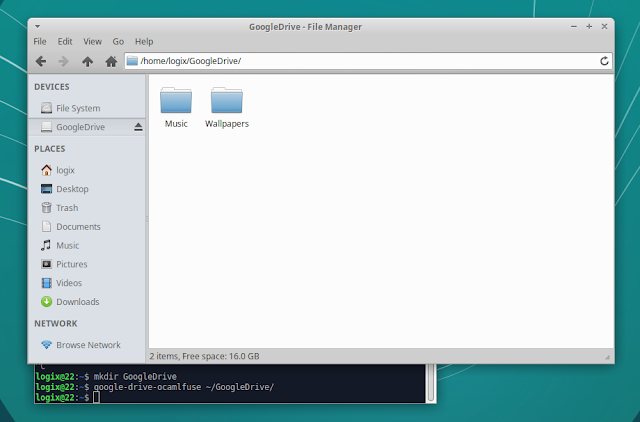 |
| Google Drive mounted using google-drive-ocamlfuse is available using Thunar / Xubuntu 18.04 |
Another way of mounting Google Drive in Linux (for any desktop environment) is by using Google Drive OCamlFUSE. This tool implements a FUSE filesystem over Google Drive, and includes features such as full read/write access to regular files and folders, multiple accounts support, and more. As opposed to using Gnome Online Accounts, this does not come with specific Gnome dependencies.
In Ubuntu (Xubuntu, Ubuntu MATE, Lubuntu, etc.) or Linux Mint (Xfce, MATE) you can install Google Drive OCamlFUSE by using the official stable PPA:
Users of other Linux distributions: see the installation instructions from here.
Now you’ll have to authenticate google-drive-ocamlfuse with your Google account. To do this, run google-drive-ocamlfuse in a terminal, without appending any options, like this:
A new tab should open in your default web browser, which asks you to allow google-drive-ocamlfuse to access your Google account. You’ll need to allow it and proceed to the next step.
Next, you’ll need to create an empty folder in your home directory, which will be used as your Google Drive folder. Something like GoogleDrive should do it. Note that all the instructions below assume you’re using
/GoogleDrive as your Google Drive mount point (if you use a different mount point, remember to change it in all the commands that follow).
After creating this folder in your home directory, run the command below to mount Google Drive to this folder, like this:
You’ll also need to add google-drive-ocamlfuse with the mount point as an argument to your startup applications. You can access your startup applications as follows:
- Xfce: launch Session and Startup from the menu, go to the Application Autostart tab and click Add
- MATE: launch Startup Applications and click Add
After clicking Add , use the following:
- Name: google-drive-ocamlfuse
- Command: sh -c «google-drive-ocamlfuse
/GoogleDrive»
It’s similar for pretty much any desktop environment as long as it has a way of adding applications to startup.
Instead of adding google-drive-ocamlfuse to startup, you can also automatically mount it in various ways, as explained here.
For advanced google-drive-ocamlfuse configuration you can check out this page.
Источник


