- Safely back up your files
- Sync Google Drive with your computer
- Get Drive Everywhere
- Download Backup and Sync for Windows
- Download Backup and Sync for Mac
- Google Drive Terms of Service
- Google drive sync linux
- How to Use Google Drive in Linux
- Best tools to use Google Drive in Linux
- 1. Insync
- 3. Rclone
- 3. overGrive
- 4. Drive
- 5. GNOME
- Your pick?
- Linux: Подключение Google Drive или бэкап для бедных
- Дубликаты не найдены
- Автоматизация бэкапов.
- Мини сервер для бекапов часть 1 (подготовительная)
Safely back up your files
Upload and store files from any folder on your computer, camera, and SD cards in the cloud. You can find your content on any phone, tablet, or computer using Google Drive, and your photos and videos in Google Photos.
G Suite customer? Learn about Drive File Stream.
There is no Drive app for Linux at this time. Please use Drive on the web and on your mobile devices.
Sync Google Drive with your computer
Browse and view files from drive.google.com in the Google Drive folder on your computer.
Open, organize, and make changes to any of your files.
Any changes you make to files will sync everywhere.
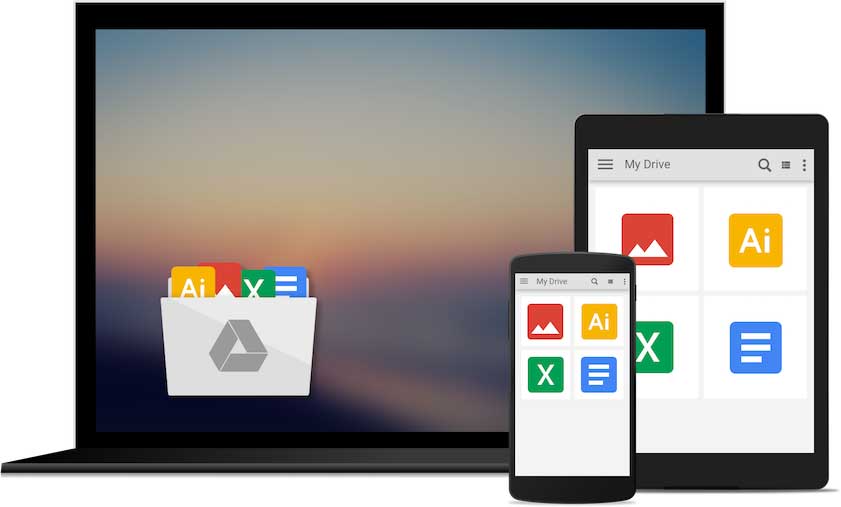
Get Drive Everywhere
Add files to Drive from your Mac and they sync with your other devices — automatically.
Download Backup and Sync for Windows
Download Backup and Sync for Mac
Google Drive Terms of Service
By using Backup and Sync, you agree to the Google Terms of Service. If you are a Google Apps user, your use is subject to either the appropriate Google Apps Terms of Service, or the negotiated Google Apps terms, if applicable.
By using Google Drive, you agree to the Google Terms of Service. If you are a Google Apps user, your use is subject to either the appropriate Google Apps Terms of Service, or the negotiated Google Apps terms, if applicable.
Источник
Google drive sync linux
v 1.4.0
A command line utility that synchronizes your Google Drive files with a local folder on your machine. Downloads new remote files, uploads new local files to your Drive and deletes or updates files both locally and on Drive if they have changed in one place. Allows blacklisting or whitelisting of files and folders that should not / should be synced.
Works as a replacement for the Google Drive client for Windows and Mac
Please note that the pre-packaged version has been removed because Travelling Ruby stopped being maintained, causing some SSL issues.
Requires Ruby >= 2.0. If Ruby isn’t installed on your system, get it through rvm or install it yourself with your distro’s package manager.
When Ruby is installed, get drivesync:
You can then run DriveSync with ruby drivesync.rb
The easiest way to get the latest version is by going in the directory that contains drivesync.rb and running git pull . DriveSync checks for updates whenever it starts and notifies you if there is a new version. However, users that automate DriveSync may not see this notice, so I suggest checking this site occasionally or running ruby drivesync.rb -v to check for updates.
There is a config file located in
/.drivesync/config.yml containig all of DriveSync’s settings. This file can also be edited directly with ruby drivesync.rb config . The settings are explained in the config file. For now, the most important option is the location for the drive folder on your local system. Set it to where you would like your local drive to be.
Make sure to run DriveSync manually at least once after you install it, as it will ask you to authenticate.
Ideally, you shouldn’t have to sync your Drive manually, so let’s run DriveSync periodically as a Cronjob. To do this, edit your crontab with crontab -e and add a Cronjob.
If you use rvm to manage your Ruby installations, you may need to run rvm cron setup before you can use ruby in Cronjobs
This will attempt to run DriveSync every minute. If DriveSync is started, but a sync is already in progress then the program will terminate and let the sync finish. You can also redirect the software’s output into a log file so you can keep track of what is being synced or any errors that might occur: ruby path/to/drivesync/drivesync.rb > /tmp/drivesync.log
Personally, I wouldn’t advise automatically syncing «large» (anything in the several hundred MB range) files between platforms with this or any other software. By default, DriveSync will ignore any file above 512 MB but this can be changed in the config file. If you do this, you may have to increase the timeout threshold which can also be done in the config file.
If you encounter any difficulties, feel free to open an issue here and I’ll get to you as soon as possible. Alternatively, running ruby drivesync.rb reset will reset your installation and clear your local drive folder, which might also help.
The Google Drive filesystem allows folders or files with identical paths, while common Linux filesystems do not. I strongly advice against having multiple files with identical paths on Drive (for example a folder with two files called foo.txt).
Currently, DriveSync ignores Google Docs files (documents, presentations, spreadsheets, etc). In the future, these files might be «downloaded» as links to the corresponding files on Drive.
Folders are not deleted remotely if they are deleted locally. The contents will be deleted, however.
Neither I nor this software are in any way affiliated with Google. Although I tested this software very thoroughly and have been using it myself for over a year without any loss of data, you agree to use DriveSync at your own risk and I am not responsible for any damages that may occur.
Источник
How to Use Google Drive in Linux
Last updated September 13, 2021 By Munif Tanjim 57 Comments
Brief: While Google Drive is not officially available for Linux, here are tools to help you use Google Drive in Linux .
Google Drive is an integral part of the Google ecosystem. It offers 15 GB of free storage which is shared across your Gmail account, Google Photos, various Google and Android services.
Since its debut in 2012, we’ve seen official Google Drive clients for Windows, OS X, Android, iOS. But, unfortunately, an official Linux client is yet to see the light of the day, if ever. This deliberate and continual ignore by Google has prompted Linux users to question if Google hates desktop Linux?
However, in the world of Linux, there’s always an alternative or workaround. Here we’re going to see such alternatives ways you can use Google Drive in Linux .
Some applications mentioned here are not open source. They are listed here because they are available on Linux and the article’s focus is on Linux.
Best tools to use Google Drive in Linux
The list here is no particular order. I have just listed a few Google Drive desktop clients for Linux along with some other hacks.
1. Insync

Insync is the most feature-rich Google Drive desktop client available out there. You’ll find almost everything you want from a Google Drive client in it, including multiple account support, desktop notification, symlink support etc.
It’s available for all major Linux distros and the installation process straightforward. It offers a beautiful GUI as well as the command-line interface.
The only downside is that Insync is neither free nor open source. Insync provides a 15-day free trial period. After that, it’ll cost you about $29 one-time payment for a single account and for multiple accounts, Insync has per-year pricing plans. If you have no problem with that, we can safely say that Insync is the Google Drive desktop client you’re looking for.
3. Rclone
Rclone is actually more than just a Google Drive client. It is a command-line program to sync files and directories to and from various cloud storage services, including Google Drive, Dropbox, Amazon S3, OneDrive etc. The installation and usage documentation can be found on their official website. For configuring Google Drive with Rclone, read this.
It’s completely free and open source. You can find the source code in the GitHub repository of Rclone. If you are comfortable working with the command-line interface, you can pick this one.
There are some GUI implementations of this tool like Rclone Browser that let you use Rclone in a slightly easier manner.
3. overGrive
overGrive is yet another feature-rich Google Drive desktop client. It includes almost all the features from Insync with some exceptions, such as no symlink support. It provides a nice GUI and an interactive setup process. overGrive supports all major Linux distros and desktop environments. It’s also available in multiple languages.
Though overGrive is not free, its price is far less than that of Insync. The license fee for overGrive is only $4.99. It can be a good choice for Google Drive desktop client.
4. Drive
This one’s a little bit interesting. Drive was originally developed by Burcu Dogan, while working on Google Drive platform’s team. So, this is the closest thing we have to an official client.
It’s a command-line tool written with GO programming language. It doesn’t have background sync feature. It’s designed to upload/download files in a push/pull style. Frankly, it’s a little difficult to use it for everyday purposes. You’ll find a complete guide for Drive on its GitHub project.
Platform specific installation methods can be found here.
5. GNOME

If you use GNOME as your desktop environment, you’re in luck. Starting from version 3.18, GNOME has baked in a Google Drive feature in their file manager Nautilus.
If you add your Google Account in GNOME Online Accounts, Nautilus will automatically have Google Drive added to its sidebar as a remote filesystem. It’s not actually a desktop client. But you can do some cool things like drag&drop file uploading, opening Google Drive files directly from Nautilus, copying files from Google Drive to your local filesystem etc.
Your pick?
It’s totally disappointing that Google hasn’t yet come forward with an official Google Drive client for Linux despite the growing popularity of Linux. Until it does, these alternatives are all we have.
Speaking of alternatives, there are many other free cloud storage services and some of them even provide native Linux clients. I use pCloud and MEGA for my personal photo backup.
Which one of these is your favorite? Do you have any other suggestions to use Google Drive in Ubuntu or any other Linux? Are you facing trouble using any of these methods? Whatever the reason is, you’re always welcomed to use our comment section.
Like what you read? Please share it with others.
Источник
Linux: Подключение Google Drive или бэкап для бедных

Установка и настройка gdrive
Все действия ниже выполняются на CentOS7. Если вы хотите поставить gdrive на другой linux-дистрибутив, то перейдите на страницу проекта на github и скопируйте необходимую ссылку
# mv drive /usr/sbin/drive
# chmod +x /usr/sbin/drive
Всё, gdrive установлен. Ну очень просто)
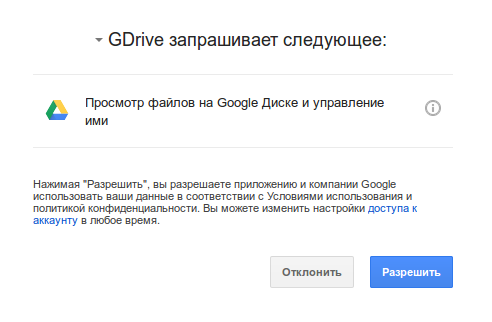
Теперь запустим drive для запуска процесса авторизации:
Появится следующее сообщение:
Go to the following link in your browser:
Enter verification code:
Необходимо скопировать и открыть эту ссылку в браузере. После авторизации появится следующая страница:
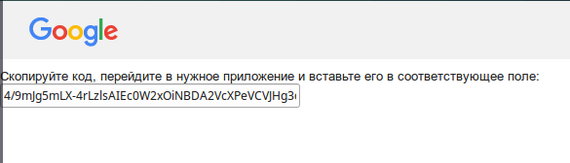
Копипастим этот код в консоль и подтверждаем:
Enter verification code: 5/8r1pjcEwaRzIpF88QdA0CTwV0lacGXAE6x8czOFK6k9
Все gdrive настроен.
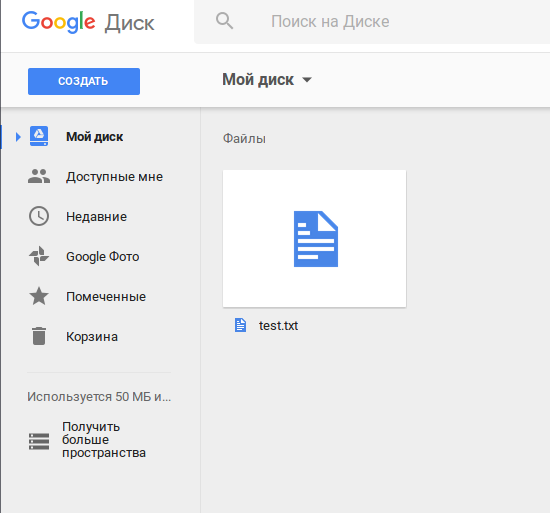
Проверим его работу. Создадим простой текстовый файл и скопируем его на гугл-диск:
# echo test > test.txt
# drive upload —file test.txt
—file test.txt — файл, который нужно скопировать.
После выполнения команды drive upload в консоль выводится информация о загруженном файле:
Created: 2016-08-26 12:58:04
Modified: 2016-08-26 12:58:04
Owner: Test Account
MIME Type: text/plain; charset=utf-8
Uploaded ‘test.txt’ at 5.0 B/s, total 5.0 B
Для просмотра содержимого диска используется команда drive list.
Откроем в браузере наш гугл-диск, чтобы еще раз убедиться, что файл все-таки скопировался:
Для удаления файла необходимо использовать следующую команду:
# drive delete —id 0B4KhH190NxVwZ0VQRzlFbXhkVHM
Removed file ‘test.txt’
— 0B4KhH190NxVwZ0VQRzlFbXhkVHM — Id файла, который нужно удалить.
Скрипт резервного копирования
Дубликаты не найдены
Если вы знаете какие-нибудь другие способы подключения Google Drive на linux — пишите в комментариях.
Но вообще, какой смысл так извращаться использовать сервис, который не поддерживает твою платформу, когда есть столько альтернатив(я уж не говорю про сервисы типа crashplan)? Имхо, даже с OneDrive в линукс работать проще, чем с гуглом, который обещал поддержку ещё лет 5 назад.
Спасибо за наводку на cloudcross, не знал о такой штуке.
Я не очень то и доверяю всем этим облачным ресурсам для хранения критически важной информации, все бэкапы держу на своих серверах. Так спится спокойнее)
Но бывали случаи, что выручал такой вариант, описанный в посте.
Прошло 955 дней (угадайте, как я сюда попал? :)) ) . И ничего не изменилось, всё те же «извращения». Жутко хотелось именно Google Drive на Centos7. Загрузка файлов по id, за что они так с нами?
А как с этой утилитой автоматом удалять старые файлы с GoogleDrive?

Автоматизация бэкапов.
Может и не совсем интересно, но кому-то может понадобиться такой мануал (ни в коем случае не реклама, только в ознакомительных целях). Мне руководитель поставил задачу на работе и вот так я ее решил.
Представим ситуацию, когда, у нас появилось слишком много филиалов и в каждом стоит роутер «Mikrotik» (в моем случае их 50+), Вы всегда делали бэкапы и сливали конфигурацию. НО! К примеру, работаете Вы не один — это раз, надоело вручную заходить и делать бэкапы — это два, даже если уверены в своих коллегах — нужно страховаться — это три. При всем этом роутеров много и количество будет рости. *Нужно автоматизировать это дело* — подумаете Вы, этим собственно и займемся.
— UNIX-подобная система (в моем случае FreeBSD)
— Пара роутеров «Mikrotik» для проверки скрипта
Принцип работы скрипта:
— Скрипт будет заходить на каждый роутер указанный в массиве по SSH, под каким-либо пользователем
— Давать команду на создание бэкапа в двоичном и текстовом виде, а именно в расширениях *.backup и *.rsc
— Сливать файлы на наш сервер по SCP
— Удалять созданные бэкапы на самом роутере
— Проверять в папке с бэкапами, чтоб файлы были не старше трех дней, если старше — то удаляем. Другими словами у нас будут бэкапы за последние три дня.
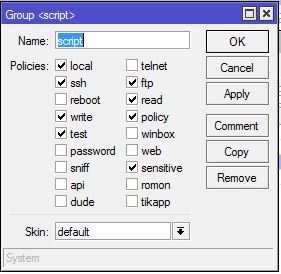
1: Создадим сначала пользователя, с нужными на правами. Заходим на наш микротик, в меню жмакаем System -> Users и переходим в открывшемся окне на вкладку Group, нажимаем на «+«, чтобы добавить новую группу (я назвал ее script) и назначаем права как на картинке:
Далее переходим в вкладку Users и там жмем снова «+» вбиваем название пользователя, назначаем нашу созданную группу и пароль. Пусть будет у нас «Валли»

Должно получиться так:

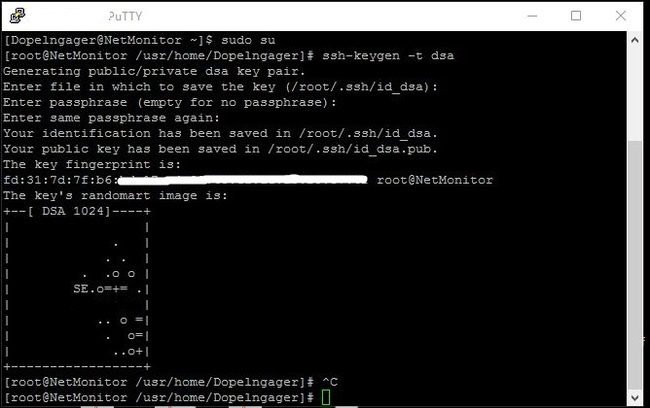
2: Теперь нам нужно сгенерировать публичный ключ — для того, чтобы, скрипт подключался к микротику по ssh не спрашивая пароль т.е. автоматически. Заходим на наш FreeBSD под root’ом (для не знающих команда sudo su) и генерируем ключ командой: ssh-keygen -t dsa.
Будет вопрос в каком каталоге сохранять? я оставляю по дефолту, поэтому Enter, так же будет вопрос о пароле на ключ, оставляем пустой т.е. тоже нажимаем Enter.
Должно получиться так:
Проверить наличие сгенерированного ключа можно так: ls -lh /root/.ssh/ и увидите в списке свой файл, с названием id_dsa.pub.
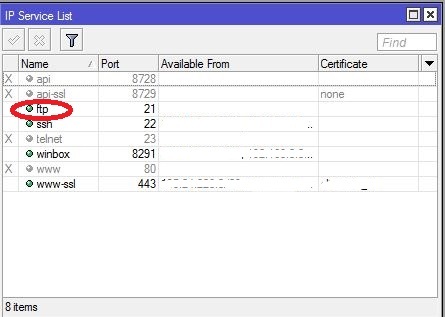
3: Следом надо залить ключ на микротик. Возвращаемся к микротику, нажимаем IP -> Services и там есть сервис «ftp«, если он выключен, то включите.
Возвращаемся на сервер и переходим в каталог с нашим ключом: cd /root/.ssh/.
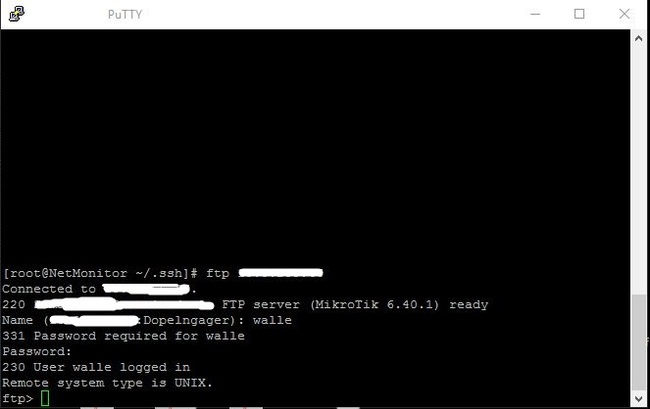
Подключаемся на микротик через FTP командой: ftp 192.168.88.1
Спросит имя пользователя, вводим нашего: walle, следом пароль от него и увидите приветствие микротика:
Вводим команду передачи ключа: put id_dsa.pub и .
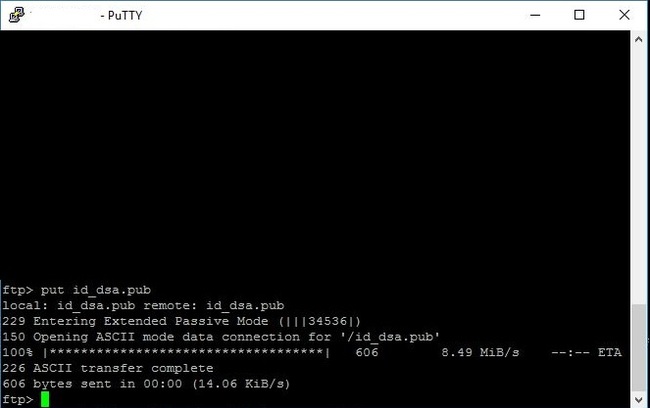
Это говорит о том, что передача успешна и завершилась, вводим: exit.
4. Теперь надо назначить ключик нашему пользователю, переходим на роутер.
Откройте Files, там увидите свой ключик:
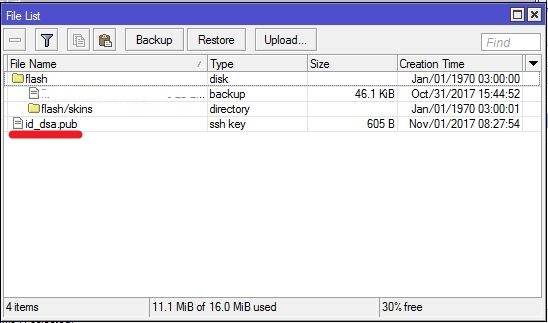
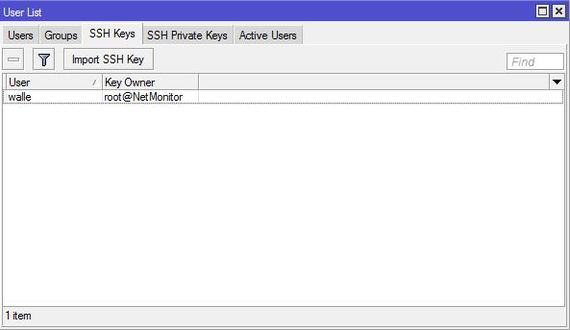
Ключ мы успешно импортировали и он будет работать.
Переходим на наш FreeBSD и пробуем подключиться по SSH с использованием ключа: ssh walle@192.168.88.1.
При первом подключении вам зададут вопрос: Are you sure you want to continue connecting (yes/no)? — отвечаем: yes. Больше спрашивать не будет.
После увидите приветствие роутера.
5. Необходимо на нашем FreeBSD создать папку для бэкапов, сделал я вот такой командой: mkdir /var/mikrotik_backups/.
Назначил полные права папке chmod 777 /var/mikrotik_backups/.
6. Необходимо создать сам файл скрипта: перехожу в свой каталог cd /usr/home/Dopelngager/ и создаем файл скрипта: touch backup_mikrotik.
Назначаю точно так же полные права chmod 777 backup_mikrotik.
7. Пришли теперь к основному, а именно к написанию скрипта.
Открываем файл скрипта командой: ее backup_mikrotik
и записываем в файл вот это:
#!/usr/local/bin/bash
routers=( 192.168.88.1 )
backupdir=»/var/mikrotik_backups/»
privatekey=»/root/.ssh/id_dsa»
login=»walle»
DATE=»`date ‘+%Y-%m-%d’`»
for r in $
cmd_backup=»/system backup save name=$
ssh $
sleep 2
cmd_backup=»/export file=$
ssh $
sleep 5
scp -i $privatekey $
scp -i $privatekey $
ssh $
ssh $
done
find $backupdir* -mtime +3 -exec rm <> \;
Если у вас не один роутер, то, шаги с 1 по 4 нужно сделать с каждым и в скрипт добавить роутеры в строку «routers«, между скобок. ОБЯЗАТЕЛЬНО!: добавлять роутеры через пробел и пробелы около скобок тоже должны быть! Для примера добавим еще один роутер:
routers=( 192.168.88.1 192.168.88.2 ).
Проверим наш скрипт, вводим команду: ./backup_mikrotik
Должен пойти процесс скачивания и сохранения файлов.
8. Остался последний шаг — это добавить скрипт в планировщик.
Вводим команду открытия планировщика Cron: ее /etc/crontab
#backup Mikrotik routers
* 21 * * * root /usr/home/Dopelngager/backup_mikrotik
Сохраняем и необходимо перезапустить cron: /etc/rc.d/cron restart.
Таким образом я запланировал работу скрипта ежедневно в 21 час, еженедельно, ежемесячно, ежегодно. ВАЖНО! Соблюдайте пробелы и табуляции при добавлении записей в файл, cron чувствителен к этим вещам. А лучше про него подробнее почитайте в интернете.
У меня все, надеюсь было полезно. За ошибки и шакальные картинки простите. Unix-подобные системы знаю плохо, только учусь — так что сильно не придирайтесь. Если у кого есть вариант улучшить скрипт или его работу — обязательно приму во внимание.
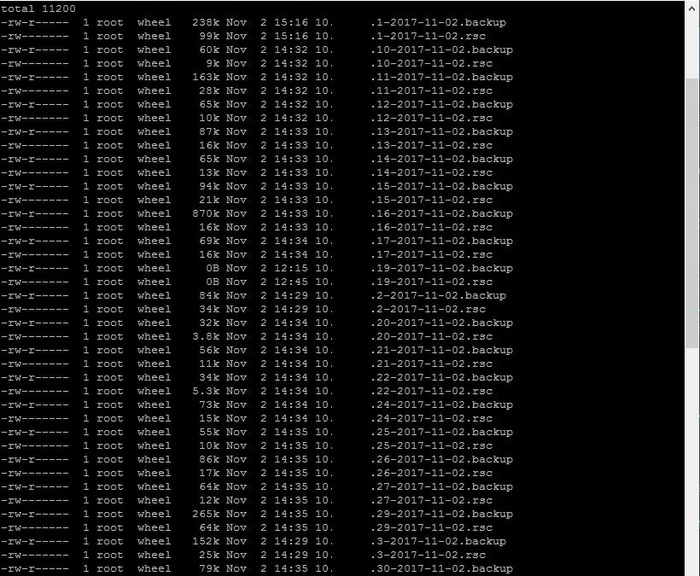
А вот кстати результат работы срипта:

Мини сервер для бекапов часть 1 (подготовительная)
Добрый день, пикабу!
На волне паники, касающейся троянов-шифровальщиков, решил поделиться простой и надежной схемой создания многоуровневых бекапов в корпоративной сети, при минимальной затрате средств. Стоит отметить, что данная система внедрена довольно давно, успешно работает, и защищает не только от троянов, но и от разгильдяйства пользователей, которые могут случайно удалить или запороть какие-либо важные документы.
Сервер для хранения резервных копий можно поднять даже на очень старых машинах.
В данном примере я буду использовать ОС Ubuntu Server 15.04
Дано: небольшая организация с парком в 20 рабочих станций и файловым сервером под управлением Win2k3 Server.
Необходимо: Реализовать механизм резервного копирования данных с минимальными затратами.
Затраты: «какойнибудь комп» (я откопал системник на базе Athlon64 3200+ c 512MB оперативы) и новый жесткий диск (желательно конечно пару для массива). Ессно емкость жесткого диска должна быть больше емкости хранилища на файловом сервере.
В первую очередь, необходимо установить на машинку нашу новую операционку. Гайдов в сети полно, установка несложная, единственные вопросы могут возникнуть с разбивкой дисков, но об этом, а так же об особенностях файловых систем я расскажу в следующих постах. Важно понимать, что систему желательно устанавливать на отдельный диск. Можно небольшой емкости. Даже 80 ГБ для полноценной работы хватит вполне, и еще останется. Что касается диска или массива для хранения данных, его емкость должна быть больше, чем на файловом сервере. Раздел необходимо создавать с файловой системой ext3, ext4 или XFS.
У нас установлена чистая новая ось. Новый жесткий диск (или пара в массиве) установлены и размечены как отдельный раздел. Лично у меня он примонтирован как /back
Далее, необходимо проверить наличие, а в случае отсутствия установить следующие пакеты: openssh-server cifs-utils rsync cron
Делается это следующей командой:
sudo apt-get install openssh-server cifs-utils rsync cron
Затем создадим в системе пользователя, от имени которого процесс бекапа и будет запускаться:
sudo useradd -rm backuper
и зададим ему пароль:
sudo passwd backuper
Следующим шагом будет подключение сетевой папки на файловом сервере в нашу файловую систему. Если в организации поднят домен, то необходимо будет создать отдельного пользователя для доступа к сетевому ресурсу.
Сначала создадим папку, в которую мы ресурс будем подключать. У меня она находится по адресу /mnt/nw делается это командой:
sudo mkdir /mnt/nw
Затем сменим владельца созданной папки и зададим права:
sudo chown backuper:backuper /mnt/nw
sudo chmod 775 /mnt/nw
Чтобы подключиться к сетевому диску, отредактируем файлик /etc/fstab
В его конце надо будет добавить одну строку следующего вида:
//server/share/ /mnt/nw cifs userid=id,passwd=pass,iocharset=utf8,dir_mode=0777,sec=ntlm,file_mode=0775 0 0
где в параметры userid и passwd ставим логин и пароль пользователя, имеющего доступ к ресурсу. А вместо //server/share имя сервера и название шары.
Чтобы немедленно подключить сетевой ресурс, набираем
Все, подготовительная часть завершена, далее необходимо настроить rsync и планировщик cron. Этим мы займемся во 2й части.
Источник


