- How to use Google Test for C++ in Visual Studio
- Add a Google Test project in Visual Studio 2019
- Add a Google Test project in Visual Studio 2017
- Configure the test project
- Set additional options
- Add include directives
- Write and run tests
- Использование Google Test для C++ в Visual Studio How to use Google Test for C++ in Visual Studio
- Добавление проекта Google Test в Visual Studio 2019 Add a Google Test project in Visual Studio 2019
- Создание проекта Google Test в Visual Studio 2017 Add a Google Test project in Visual Studio 2017
- Настройка тестового проекта Configure the test project
- Настройка дополнительных параметров Set additional options
- Добавление директив include Add include directives
- Написание и запуск тестов Write and run tests
- Google Test
- Adding Google Test to your project
- Generate menu for Google Test
- Google Test run/debug configuration
- Running tests
- Exploring results
- Skipping tests at runtime
How to use Google Test for C++ in Visual Studio
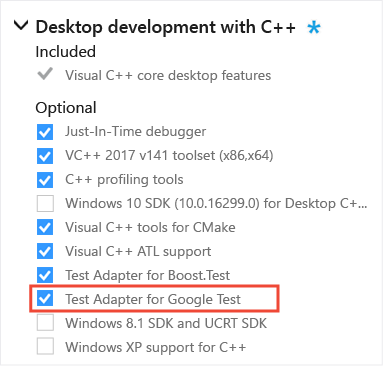
In Visual Studio 2017 and later, Google Test is integrated into the Visual Studio IDE as a default component of the Desktop Development with C++ workload. To verify that it is installed on your machine, open the Visual Studio Installer and find Google Test under the list of workload components:
Add a Google Test project in Visual Studio 2019
- In Solution Explorer, right-click on the solution node and choose Add >New Project.
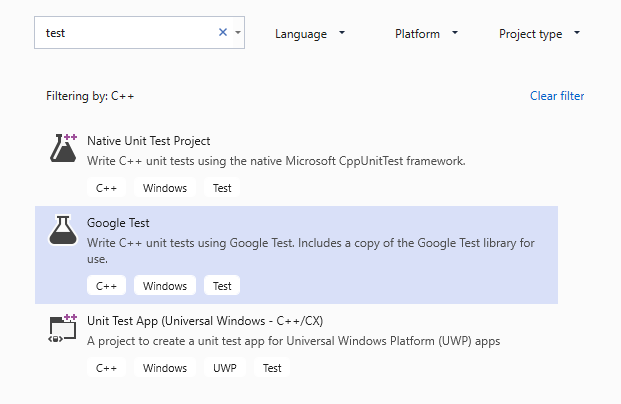
- Set Language to C++ and type test in the search box. From the results list, choose Google Test Project.
- Give the test project a name and click OK.

Add a Google Test project in Visual Studio 2017
- In Solution Explorer, right-click on the solution node and choose Add >New Project.
- In the left pane, choose Visual C++ >Test and then choose Google Test Project in the center pane.
- Give the test project a name and click OK.

Configure the test project
In the Test Project Configuration dialog that appears, you can choose the project you want to test. When you choose a project, Visual Studio adds a reference to the selected project. If you choose no project, then you need to manually add references to the project(s) you want to test. When choosing between static and dynamic linking to the Google Test binaries, the considerations are the same as for any C++ program. For more information, see DLLs in Visual C++.

Set additional options
From the main menu, choose Tools > Options > Test Adapter for Google Test to set additional options. See the Google Test documentation for more information about these settings.

Add include directives
In your test .cpp file, add any needed #include directives to make your program’s types and functions visible to the test code. Typically, the program is up one level in the folder hierarchy. If you type #include «../» an IntelliSense window will appear and enable you to select the full path to the header file.

Write and run tests
You are now ready to write and run Google Tests. See the Google Test primer for information about the test macros. See Run unit tests with Test Explorer for information about discovering, running, and grouping your tests by using Test Explorer.
Использование Google Test для C++ в Visual Studio How to use Google Test for C++ in Visual Studio
В Visual Studio 2017 и более поздних версиях решение Google Test интегрировано в среду Visual Studio как компонент рабочей нагрузки Разработка классических приложений на C++ . In Visual Studio 2017 and later, Google Test is integrated into the Visual Studio IDE as a default component of the Desktop Development with C++ workload. Чтобы проверить, установлен ли этот компонент на компьютере, откройте Visual Studio Installer и найдите Google Test в списке компонентов рабочей нагрузки. To verify that it is installed on your machine, open the Visual Studio Installer and find Google Test under the list of workload components:

Добавление проекта Google Test в Visual Studio 2019 Add a Google Test project in Visual Studio 2019
- В обозревателе решений щелкните узел решения правой кнопкой мыши и выберите пункты Добавить >Новый проект. In Solution Explorer, right-click on the solution node and choose Add >New Project.
- Задайте Язык как C++ и введите тест в поле поиска. Set Language to C++ and type test in the search box. Выберите в списке результатов Проект Google Test. From the results list, choose Google Test Project.
- Укажите имя тестового проекта и нажмите кнопку ОК. Give the test project a name and click OK.
Создание проекта Google Test в Visual Studio 2017 Add a Google Test project in Visual Studio 2017
- В обозревателе решений щелкните узел решения правой кнопкой мыши и выберите пункты Добавить >Новый проект. In Solution Explorer, right-click on the solution node and choose Add >New Project.
- В левой области выберите Visual C++ >Тест, а в центральной области — Проект Google Test. In the left pane, choose Visual C++ >Test and then choose Google Test Project in the center pane.
- Укажите имя тестового проекта и нажмите кнопку ОК. Give the test project a name and click OK.

Настройка тестового проекта Configure the test project
В открывшемся диалоговом окне Конфигурация тестового проекта можно выбрать проект, который необходимо тестировать. In the Test Project Configuration dialog that appears, you can choose the project you want to test. При выборе проекта Visual Studio добавляет ссылку на него. When you choose a project, Visual Studio adds a reference to the selected project. Если проект не выбран, необходимо вручную добавить ссылки на проекты, которые следует тестировать. If you choose no project, then you need to manually add references to the project(s) you want to test. При выборе статического или динамического связывания с двоичными файлами Google Test следует учитывать те же факторы, что и в случае с любой другой программой C++. When choosing between static and dynamic linking to the Google Test binaries, the considerations are the same as for any C++ program. Дополнительные сведения см. в статье DLL в Visual C++. For more information, see DLLs in Visual C++.

Настройка дополнительных параметров Set additional options
Чтобы настроить дополнительные параметры, в главном меню выберите Сервис > Параметры > Адаптер тестов для Google Test. From the main menu, choose Tools > Options > Test Adapter for Google Test to set additional options. Дополнительные сведения об этих параметрах см. в документации по Google Test. See the Google Test documentation for more information about these settings.

Добавление директив include Add include directives
В CPP-файле теста добавьте необходимые директивы #include , чтобы типы и функции программы были доступны коду теста. In your test .cpp file, add any needed #include directives to make your program’s types and functions visible to the test code. Как правило, программа находится в иерархии папок на один уровень выше. Typically, the program is up one level in the folder hierarchy. Если ввести #include «../» , появится окно IntelliSense, в котором можно выбрать полный путь к файлу заголовка. If you type #include «../» an IntelliSense window will appear and enable you to select the full path to the header file.

Написание и запуск тестов Write and run tests
Все готово к написанию и выполнению тестов Google Test. You are now ready to write and run Google Tests. Сведения о макросах тестов см. в учебнике по началу работы с Google Test. See the Google Test primer for information about the test macros. Сведения об обнаружении, выполнении и группировании тестов с помощью обозревателя тестов см. в статье Выполнение модульных тестов с помощью обозревателя тестов. See Run unit tests with Test Explorer for information about discovering, running, and grouping your tests by using Test Explorer.
Google Test
Google Test and Google Mock are a pair of unit testing tools developed by Google.
Learn about the framework specifics in the Google Test section of our Unit Testing Tutorial .
Adding Google Test to your project
Download Google Test from the official repository and extract the contents of googletest-master into an empty folder in your project (for example, Google_tests/lib ).
Alternatively, clone Google Test as a git submodule or use CMake to download it (instructions below will not be applicable in the latter case).
Create a CMakeLists.txt file inside the Google_tests folder: right-click it in the project tree and select New | CMakeLists.txt .
Customize the following lines and add them into your script:
In your root CMakeLists.txt script, add the add_subdirectory(Google_tests) command to the end, then reload the project.
When writing tests, make sure to add #include «gtest/gtest.h» at the beginning of every .cpp file with your tests code.
Take a look at this example in Unit Testing Tutorial .
Generate menu for Google Test
In the files with gtest included, you can generate code for tests and test fixtures using the Generate menu Alt+Insert .
When called from a fixture, this menu additionally includes SetUp Method and TearDown Method : 
Google Test run/debug configuration
Although Google Test provides the main() entry, and you can run tests as regular applications, we recommend using the dedicated Google Test run/debug configuration. It includes test-related settings and let you benefit from the built-in test runner, which is unavailable if you run tests as regular programs.
CLion automatically creates a Google Test configuration for every CMake target linked with gtest or gmock .
To create a Google Test configuration, go to Run | Edit Configurations , click and select Google Test from the list of templates.
Specify the test or suite to be included in the configuration, or provide a pattern for filtering test names. Auto-completion is available in the fields to help you quickly fill them up: 
Set wildcards to specify test patterns, for example: 
In other fields of the configuration settings, you can set environment variables and command line options. For example, use Program arguments field to pass the —gtest_repeat flag and run a Google test multiple times: 
The output will look as follows:
Save the configuration, and it’s ready for Run or Debug .
Instead of editing a single configuration, you can modify the Google Test template itself . In this case, the settings you specify will apply as defaults to all new configurations of this type.
Running tests
In CLion, there are several ways to start a run/debug session for tests, one of which is using special gutter icons. These icons help quickly run or debug a single test or a whole suite/fixture:
Gutter icons also show test results (when already available): success or failure .
When you run a test/suite/fixture using gutter icons, CLion creates a temporary Google Test configuration, which is greyed out in the configurations list. To save a temporary configuration, select it in the Edit Configurations dialog and press : 
Exploring results
When you run tests, the results (and the process) are shown in the test runner window. This window includes:
progress bar with the percentage of tests executed so far,
tree view of all the running tests with their status and duration,
tests’ output stream,
toolbar with the options to rerun failed tests, export or open previous results saved automatically , sort the tests alphabetically to easily find a particular test, or sort them by duration to understand which test ran longer than others.
Test tree shows all the tests while they are being executed one by one. For parameterized tests, you will see the parameters in the tree as well. Also, the tree includes disabled tests (those with the DISABLED prefix in their names) and marks them as skipped with the corresponding icon.

Skipping tests at runtime
You can configure some tests to be skipped based on a condition evaluated at runtime. For this, use the GTEST_SKIP() macro.
Google Test supports this feature starting from the version 1.10.0, so make sure to update the framework’s sources in your project.
Add the conditional statement and the GTEST_SKIP() macro to the test you want to skip:
Use the Show ignored icon to view/hide skipped tests in the Test Runner tree:


