- Как установить и использовать GParted на Linux Mint
- Начало работы с GParted
- Получить информацию об устройстве
- Попытка спасения данных
- Создать новую таблицу разделов
- Создать новый раздел
- Вывод
- Как изменить часовой пояс в Ubuntu?
- Как установить VirtualBox на CentOS 8
- комментарий
- Добавить комментарий Отменить ответ
- Популярные статьи
- GParted Live on USB
- USB setup with Windows
- Windows Method A: Unetbootin
- Windows Method B: Manual
- Windows Method C: LinuxLive USB Creator
- Windows Method D: Tuxboot
- USB setup with GNU/Linux
- GNU/Linux Method A: Unetbootin
- GNU/Linux Method B: Manual
- GNU/Linux Method C: Manual — Overwrite
- GNU/Linux Method D: Tuxboot
- Downloads
- Download Links
Как установить и использовать GParted на Linux Mint
Gparted — популярный и бесплатный инструмент для управления дисками в Linux. Используя GParted, мы можем создавать разделы диска и управлять ими. Это позволяет нам создавать новые таблицы разделов, разделы, просматривать информацию о диске и т.д.
Я использую Linux Mint 20 для выполнения команд и подготовки этого сообщения.
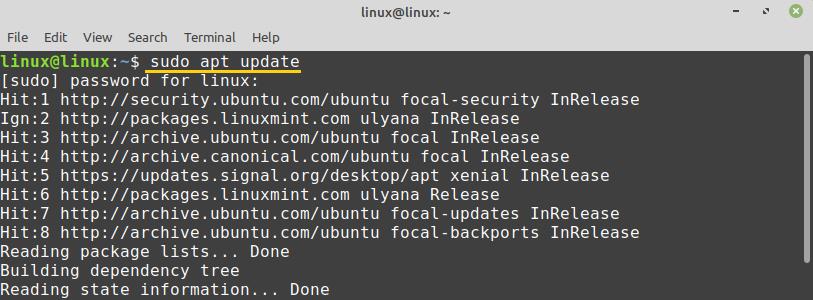
GParted — это хорошо известный инструмент, доступный в стандартных репозиториях Linux Mint.
Вам нужно открыть терминал и ввести:
Пришло время две установки gparted, и способ сделать это:
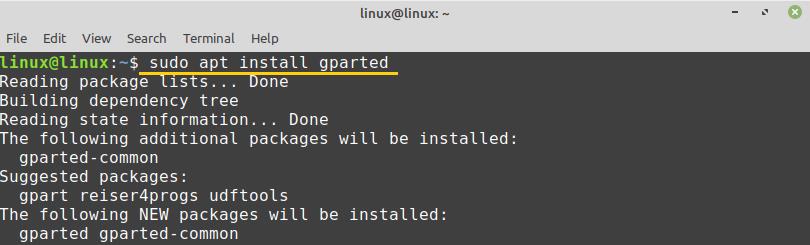
Нажмите «y» на клавиатуре вашего компьютера, чтобы установить GParted.

GParted будет успешно установлен на Linux Mint.
Начало работы с GParted
После установки приложения GParted откройте меню приложения и найдите «GParted».
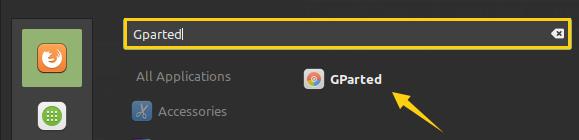
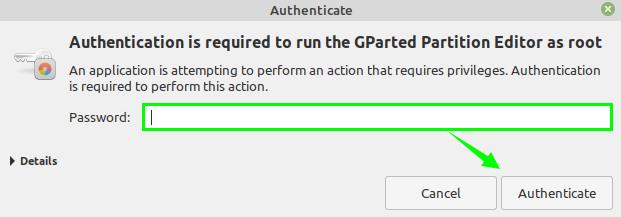
Щелкните «GParted», чтобы открыть его. Для запуска приложения GParted требуется аутентификация. Введите свой пароль и нажмите кнопку «Аутентификация».
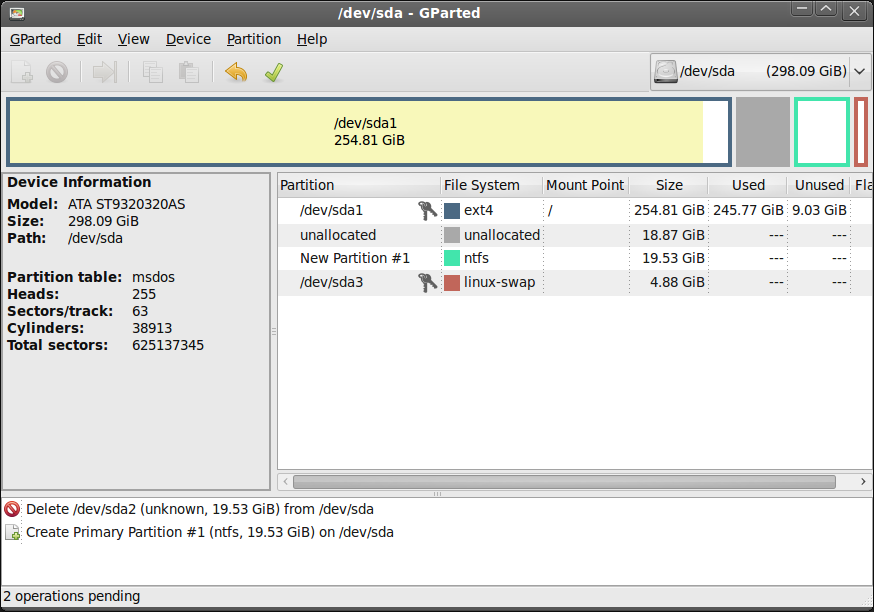
Откроется GParted, и вы увидите его интерфейс.
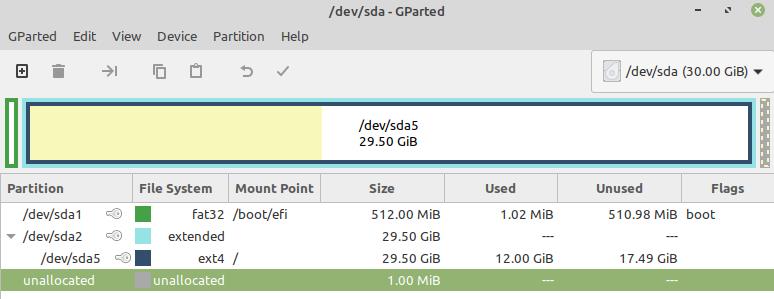
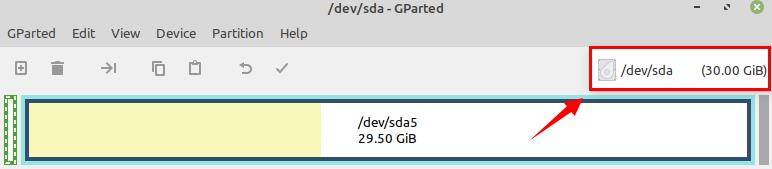
В правом углу выберите раскрывающееся меню и выберите диск, если у вас несколько дисков. Я выбрал размер жесткого диска 30 ГБ.
/dev/sda5 — это мой основной жесткий диск, на котором хранятся все файлы и приложения в системе Linux Mint.

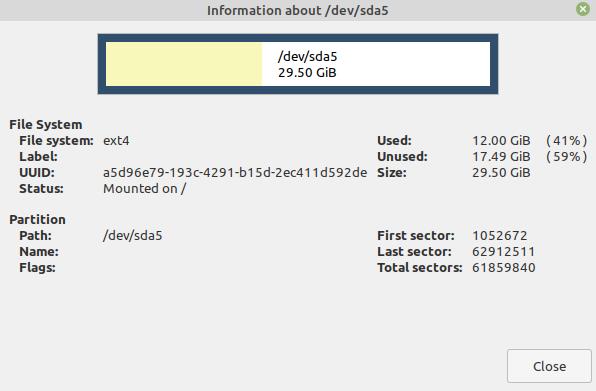
Получить информацию об устройстве
Если вы хотите увидеть информацию о диске, выберите диск и щелкните его правой кнопкой мыши.
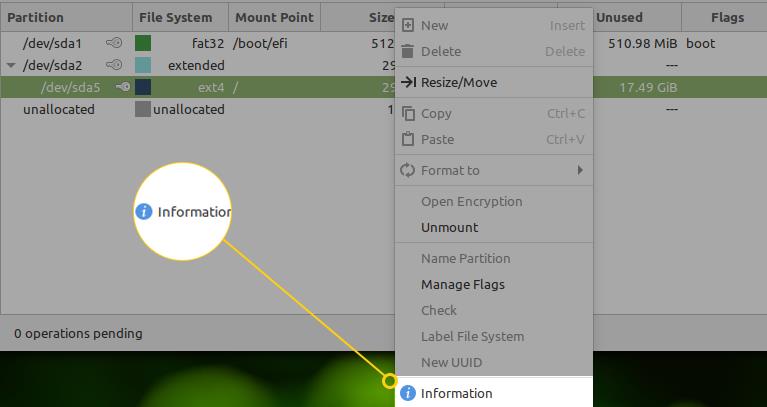
Выберите опцию «Информация». Информация о диске будет отображаться на новом экране.
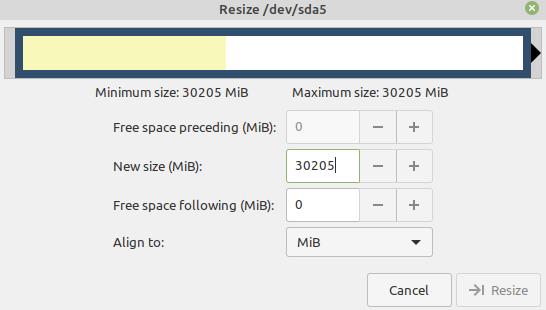
Используя GParted, вы можете легко изменять размер или перемещать разделы. Для этого выберите раздел и щелкните его правой кнопкой мыши. Теперь выберите параметр «Изменить размер/переместить».

Введите новый размер диска в мегабайтах для изменения размера раздела и нажмите «Изменить размер».
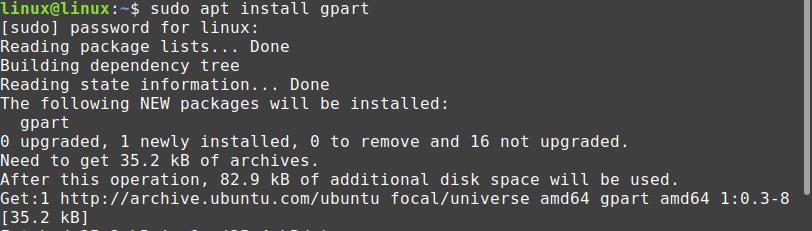
Попытка спасения данных
Мы можем восстановить потерянные данные в Linux с помощью GParted. Чтобы восстановить потерянные данные, сначала нам нужно установить команду gpart. Запустите терминал и установите gpart с помощью команды:
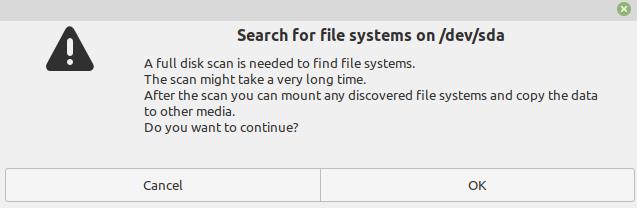
Нажмите «Устройство» в верхнем меню и выберите «Попытка восстановления данных».
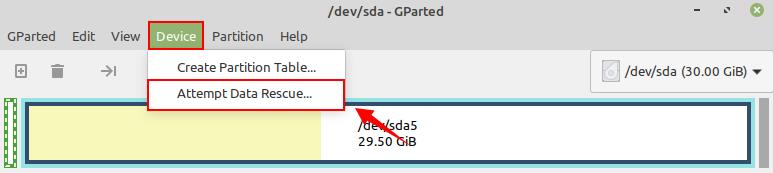
Для поиска файловых систем будет выполнено полное сканирование диска. Это может занять много времени. Найдя файловую систему, вы можете легко смонтировать ее и скопировать на другой носитель.
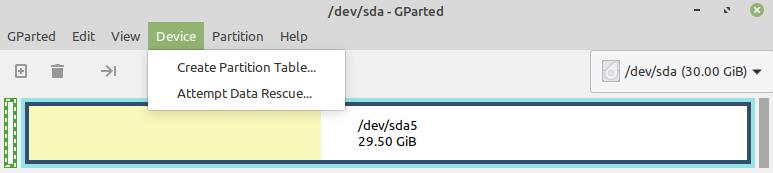
Создать новую таблицу разделов
Вы можете создать новую таблицу разделов с помощью Gparted. Щелкните «Устройство» и выберите «Создать таблицу разделов». При создании таблицы разделов вы также сможете выбрать тип раздела.
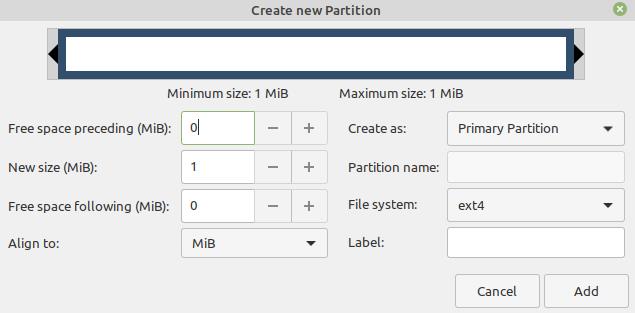
Создать новый раздел
Чтобы создать новый раздел, нажмите «Раздел» и выберите опцию «Новый».

У вас должно быть свободное место для создания нового раздела. Введите соответствующие данные во все обязательные поля и нажмите «Добавить».
Вывод
GParted — это бесплатный инструмент для управления дисками и разделами с открытым исходным кодом. Используя инструмент GParted, мы можем проверить информацию о диске, восстановить потерянные данные и создать новую таблицу разделов и новые разделы. В этой статье объясняется установка и использование GParted в Linux Mint.
Как изменить часовой пояс в Ubuntu?
Как установить VirtualBox на CentOS 8
комментарий
Доброго!
Я аматер. 16 часов (на работе 8+8))) бился, чтобы увеличить на минте 19-ть 32х битовом при помощи GParted объем на dev/sda 1 (ntfs) 30 GB (то есть КОРНЕВОМ), где пополам минт и винда ХР — оба занимают 16 ГБ, а остальное пространство в 14 ГБ — НЕ ЗАНЯТО. Кроме этого на компе еще 70 гб есть в других директориях (на физических дисках).
Комп рабочий, переустанавливать ну очень не хочется (устал уже старую технику всем на работе реанимировать). Есть ли выход без переустановки? Все время на минте пишет, что осталось 9 мб места, хотя вроде благодаря GParted на подкачку добавил 4 ГБ, но не вижу после операции этого результата. По-прежнему пишет же, что мало места! Заранее благодарю за ЧТО ДЕЛАТЬ по Чернышевскому )))
Скрины есть, могу выслать
Старый дед Миша
Добавить комментарий Отменить ответ
Этот сайт использует Akismet для борьбы со спамом. Узнайте, как обрабатываются ваши данные комментариев.
Популярные статьи

Copyright © 2021 Сеть без проблем. Все права защищены.
Источник
GParted Live on USB
The bootable GParted Live image can also be installed on a USB flash drive.
Following are instructions on how to setup GParted Live on your USB flash drive using either MS Windows or GNU/Linux.
NOTE: These installation methods only work when the USB flash drive is formatted with a FAT file system. Some users have reported that only the FAT16 file system worked for them. For other file systems you might try to use grub or some other boot loader.
USB setup with Windows
Choose one of the following methods to setup GParted Live on your USB flash drive using MS Windows:
Windows Method A: Unetbootin
- If you already have Unetbootin installed on your computer then skip to the next step (2).
Otherwise download and install Unetbootin on your MS Windows computer. - Download the GParted Live iso file.
- From Windows, run the Unetbootin program and follow the instructions in the GUI to install GParted Live on your USB flash drive.
Windows Method B: Manual
WARNING! DO NOT RUN makeboot.bat from your local hard drive!
Doing so could cause your MS windows not to boot.
- Download the GParted Live zip file.
- If you already have a partition of at least 300 MB in size on your USB flash drive formatted with a FAT file system then skip to the next step (3).
Otherwise create at least a 300 MB partition on your USB flash drive and format it with a FAT16 or FAT32 file system.
The partition must be large enough to hold the extracted contents of the GParted Live zip file.
(PS: The above description is modified from: http://www.pendrivelinux.com/2007/01/02/all-in-one-usb-dsl. Thanks to PDLA from http://pendrivelinux.com)
Windows Method C: LinuxLive USB Creator
- If you already have LinuxLive USB Creator installed on your computer then skip to the next step (2).
Otherwise download and install LinuxLive USB Creator on your MS Windows computer. - Download the GParted Live iso file.
- From Windows, install then run the LinuxLive USB Creator program and follow the instructions in the GUI to install GParted Live on your USB flash drive.
Windows Method D: Tuxboot
- Download Tuxboot on your MS Windows computer.
- Follow the USB setup with MS Windows instructions to install GParted Live on your USB flash drive.
USB setup with GNU/Linux
Choose one of the following methods to setup GParted Live on your USB flash drive using GNU/Linux:
GNU/Linux Method A: Unetbootin
- If you already have Unetbootin installed on your computer then skip to step 2.
Otherwise install Unetbootin on your GNU/Linux computer. - Download the GParted Live iso file.
- From GNU/Linux, run the Unetbootin program and follow the instructions in the GUI to install GParted Live on your USB flash drive.
GNU/Linux Method B: Manual
WARNING! Confirm you have the correct path name before executing commands!
Failure to do so could cause loss of data or your GNU/Linux not to boot.
/dev/sde is a device path name
/dev/sde1 is a partition path name
- Download the GParted Live zip file.
- If you already have a FAT16 or FAT32 partition on your USB flash drive then skip to the next step (3).
Otherwise prepare at least a 300 MB partition formatted with either a FAT16 or FAT32 file system.
The partition must be large enough to hold the extracted contents of the GParted Live zip file.
If the USB flash drive or USB hard drive does not have any partition, you can use a partitioning tool (e.g. gparted, parted, fdisk, cfdisk or sfdisk) to create a partition with a size of 300 MB or more.
Here we assume your USB flash drive or USB hard drive is /dev/sdd ( You have to confirm your device name, since it’s _NOT_ always /dev/sdd ) on your GNU/Linux, so the partition table is like: Then format the partition as FAT with a command such as «mkfs.vfat -F 32 /dev/sdd1»
WARNING! Executing the mkfs.vfat command on the wrong partition or device could cause your GNU/Linux not to boot. Be sure to confirm the command before you run it.
WARNING! Executing makeboot.sh with the wrong device name could cause your GNU/Linux not to boot. Be sure to confirm the command before you run it.
NOTE: There is a known problem if you run makeboot.sh on Debian Etch, since the program utils/linux/syslinux does not work properly. Make sure you run it on newer GNU/Linux, such as Debian Lenny, Ubuntu 8.04, or Fedora 9.
 If you use GParted and it helps you with your task, then please consider making a donation to help us make GParted better.
 | Architecture | Description |
| amd64 | 64-bit version runs on x86-64 based computers, with ability to access more than 4 gigabytes of memory, and supports use of multiple processor cores. Works with UEFI secure boot. |
| i686 | 32-bit version runs on x86 and x86-64 based computers, limited to physical address space of 4 gigabytes, and uses one processor only. |
| i686-PAE | 32-bit version runs on x86 (i686 and higher) and x86-64 based computers, with Physical Address Extension to access more than 4 gigabytes of memory, and supports use of multiple processor cores. |
| GParted Live CD/USB/HD/PXE Bootable Image Stable Releases | |||
|---|---|---|---|
| Download gparted-live-1.3.1-1-amd64.iso Stable directory (.iso/.zip) | Release notes | Changelog | Checksums Checksums.gpg (Signed by GParted live maintainer Steven Shiau, updated on Sep/18/2017), or available on the 2nd key server. See steps to verify checksums. |
| Testing Releases | |||
| Testing directory (.iso/.zip) (for i686, i686-pae and amd64 architectures) | Release notes and checksums in same directory. See steps to verify checksums. | ||
| GParted Application Source Code | |
|---|---|
| Source code directory (.tar.gz) | Release notes and checksums in same directory. |
| Linux Distribution * | Package | Command Prompt Install |
|---|---|---|
| Debian | gparted | |
| Fedora | gparted | |
| Mageia | gparted | |
| OpenSUSE | gparted | |
| Ubuntu | gparted |
* NOTE: Distribution packages might not contain the most recent versions of GParted.
Источник


