- Установка фона (обоев) рабочего стола через групповые политики
- Настройка групповых политик управления фоном рабочего стола
- Настройка фона рабочего стола через реестр и GPO
- На Windows 10 не применяются обои рабочего стола через GPO
- Changing Desktop Background Wallpaper in Windows through GPO
- How to Configure Desktop Wallpaper Settings via GPO?
- Set Desktop Wallpaper via Registry and GPP
- Why Desktop Wallpaper Group Policy Doesn’t Work for Windows 10 Clients?
Установка фона (обоев) рабочего стола через групповые политики
Рассмотрим, как с помощью групповых политик можно установить одинаковый рисунок рабочего стола (обои) на всех компьютерах домена. Как правило, такое требование возникает в крупных организациях, требующих использовать на всех компьютерах одинаковый фон рабочего стола, выполненного в корпоративном стиле компании.
Нам понадобится, собственно файл с рисунком, который вы хотите использовать в качестве обоев. Это может быть файл формата bmp или jpg.
Файл с изображением можно предварительно скопировать на все компьютеры, но на мой взгляд проще, чтобы клиенты автоматически брали jpg файл из сетевого каталога. Для этого можно использовать файл-сервер, каталог SYSVOL на контроллерах домена или DFS каталог. Для нашей распределенной сети мы выбрали второй вариант, ведь так как содержимое SYSVOL автоматически реплицируется между всеми DC, это уменьшит WAN — трафик между филиалами при получении клиентами файла с рисунком.
Скопируйте файл с изображением на любом контроллер домена в каталог C:\Windows\SYSVOL\sysvol\winitpro.loc\scripts\Screen. UNC путь к файлу будет выглядеть так: \\winitpro.loc\SYSVOL\winitpro.loc\scripts\Screen\corp_wallpaper.jpg.

Проверьте, что у пользователей домена есть права на чтение этого файла (проверьте NTFS разрешения, предоставив право Read группе Domain Users или Authenticated Users).
Настройка групповых политик управления фоном рабочего стола
Затем откройте консоль управления доменными GPO (GPMC.msc). Создайте новую политику и назначьте ее на нужный OU с пользователями (в нашем примере мы хотим, чтобы политика применялась на все компьютеры и сервера домена, поэтому мы просто отредактируем политику Default Domain Policy). Перейдите в режим редактирования политики.
Перейдите в секцию секции User Configuration -> Policies -> Administrative Templates -> Desktop -> Desktop (Конфигурация пользователя -> Административные шаблоны -> Рабочий стол -> Рабочий стол).
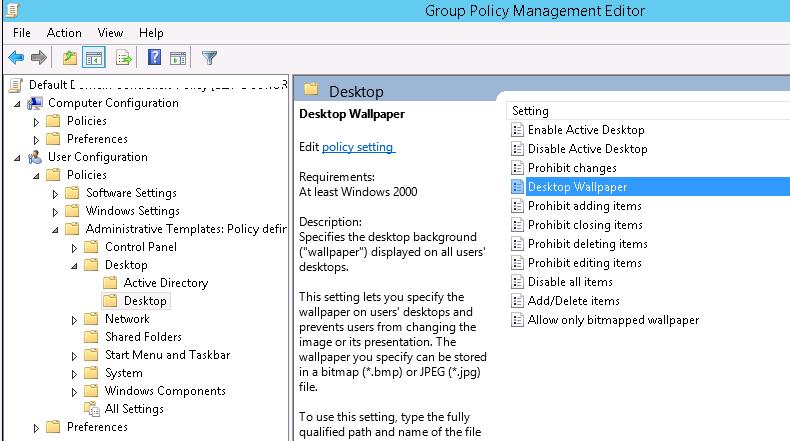
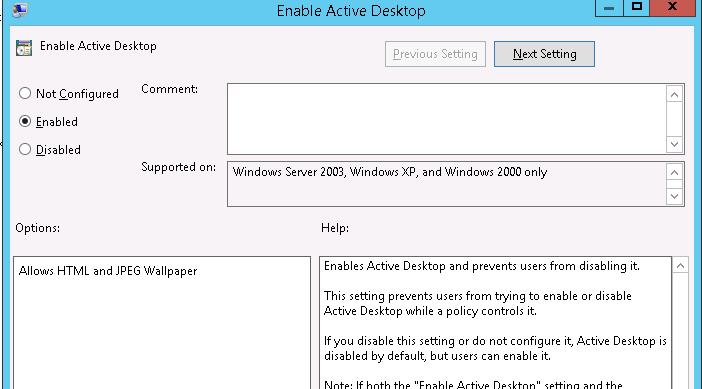
Включите политику Enable Active Desktop (Включить Active Desktop).

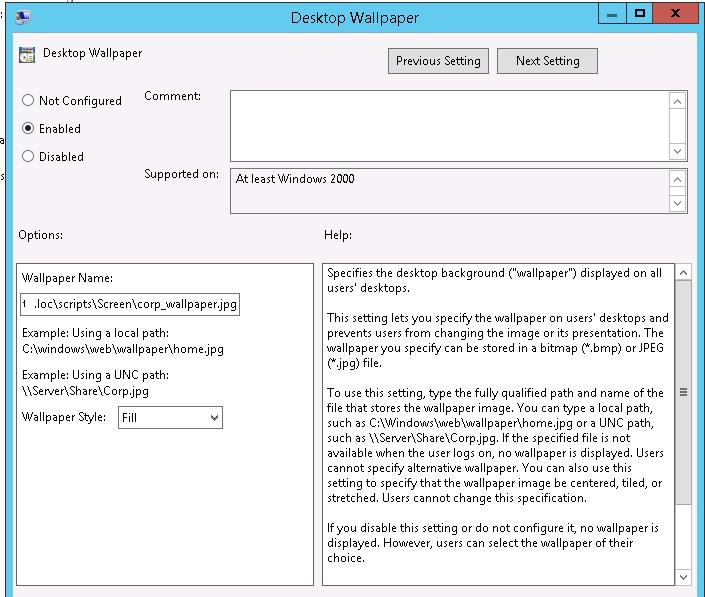
Затем включите политику Desktop Wallpaper (Фоновые рисунки рабочего стола). В параметрах политики укажите UNC путь к файлу с рисунком и выберите стиль фонового рисунка (Wallpaper Style) — Fill (Заполнение).
Чтобы проверить работу политики на клиенте, выполните выход из системы (logoff) и зайдите в систему опять. На рабочем столе пользователя должны отобразиться заданные обои.
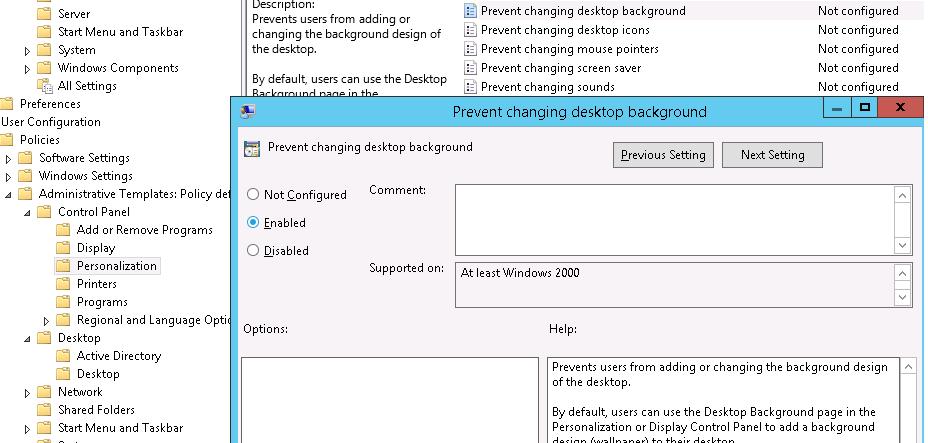
Если требуется запретить пользователям менять фоновый рисунок рабочего стола, включите политику Prevent Changing Desktop Background (Запрет изменения фона рабочего стола) в разделе User Configuration -> Administrative Templates -> Control Panel -> Personalization.

Если вы хотите более точно нацеливать политику с обоями на клиентов, вы можете использовать WMI Фильтры GPO, например, чтобы применить обои только к десктопам с Windows 10, используйте следующий WMI фильтр:
select * from Win32_OperatingSystem where Version like “10.%”
Настройка фона рабочего стола через реестр и GPO
Вы можете задать параметры и файл фонового рисунка рабочего стола через реестра. Путь к файлу обоев хранится в строковом (REG_SZ) параметре реестра Wallpaper в ветке HKEY_CURRENT_USER\Control Panel\Desktop\ или HKEY_CURRENT_USER\Software\Microsoft\Windows\CurrentVersion\Policies\System. В этом параметре нужно указать UNC путь к вашей картинке.
В этой же ветке реестра параметром WallpaperStyle (REG_SZ) задается положение изображения на рабочем столе. Для растягивания изображения используется значение 2.
Если вы хотите запретить пользователям менять фон рабочего стола, создайте в ветке реестра HKEY_LOCAL_MACHINE\SOFTWARE\Microsoft\Windows\CurrentVersion\Policies\ActiveDesktop параметр «NoChangingWallPaper»=dword:00000001
Эти настройки реестра можно распространить на компьютеры пользователей через расширение GPO – Group Policy Preferences. Для этого перейдите в раздел User Configuration -> Preferences -> Windows Settings и создайте два параметра реестра с режимом Update.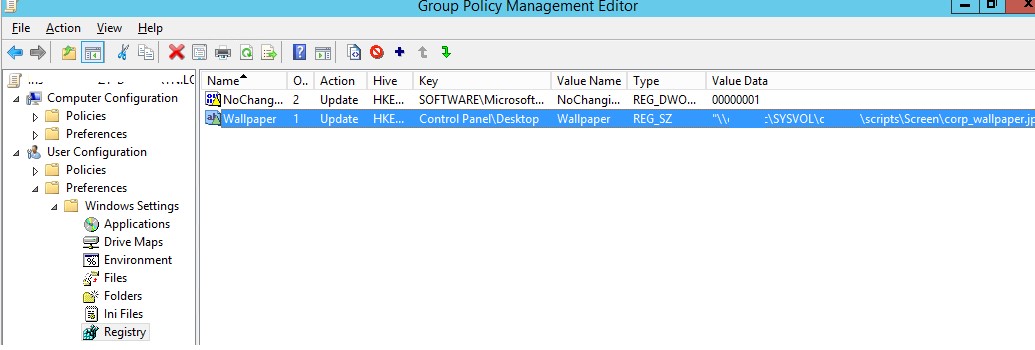
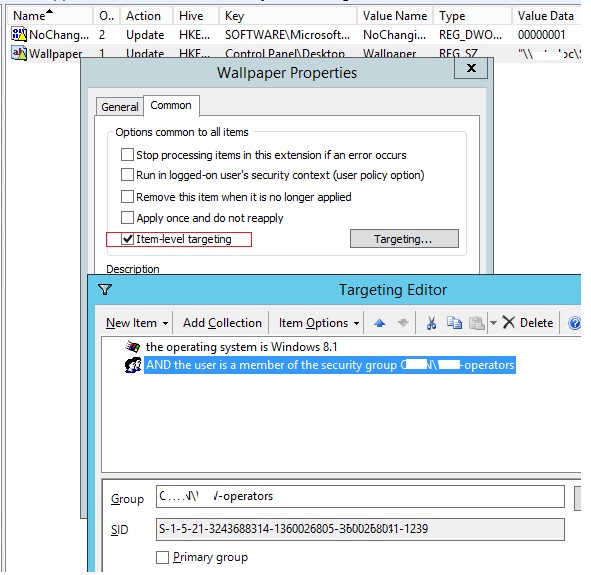
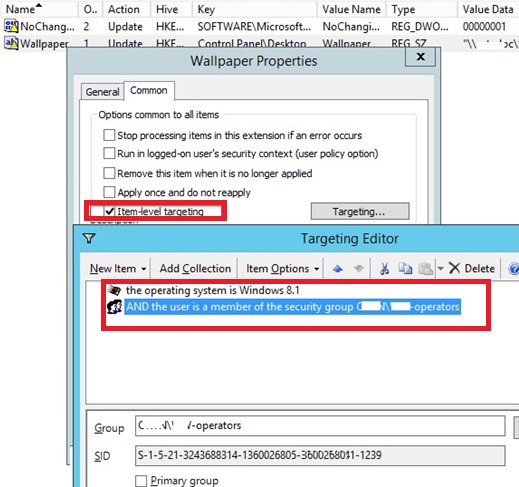
С помощью Group Policy Preferences Item level Targeting вы можете более точно назначить политику обоев на клиентов. Например, в свойствах параметра реестра в политике на вкладке Common включите Item level Targeting, нажмите кнопку Targeting и с помощью простого мастера укажите, что данные настройки политики фонового рисунка должны применяться только к компьютерам с Windows 10 и пользователям из определённой группы безопасности AD.
Аналогичным образом вы можете сделать несколько разных файлов обоев для разных групп пользователей (или устройств). Добавив нужных пользователей в группы доступа вы можете задать различный фоновый рисунок рабочего стола для разных категорий сотрудников.
Дополнительно вы можете изменить картинку на экране входа в систему. Для этого можно использовать политику Force a specific default lock screen image в разделе GPO Computer Configuration -> Policies -> Administrative Templates -> Control Panel -> Personalization или через следующие параметры реестра:
- HKLM\Software\Policies\Microsoft\Windows\Personalization — LockScreenImage — путь к jpg изображению на экране блокировки;
- HKLM\Software\Policies\Microsoft\Windows\Personalization — LockScreenOverlaysDisabled = 1;
- HKLM\Software\Policies\Microsoft\Windows\System — DisableLogonBackgroundImage = 0.
На Windows 10 не применяются обои рабочего стола через GPO
На компьютерах с Windows 10 политика обоев рабочего стола может применяться не с первого раза. Дело в том, что Windows 7 и Windows 10 по-разному используют кеш фонового рисунка рабочего стола. В Windows 7 при каждом входе пользователя в систему кэш фонового изображения обоев перегенеририуется автоматически.
В Windows 10, если путь к картинке не изменился, не происходит обновление кэша, соответственно пользователь будет видеть старую картинку, даже если вы обновили ее в каталоге на сервере.
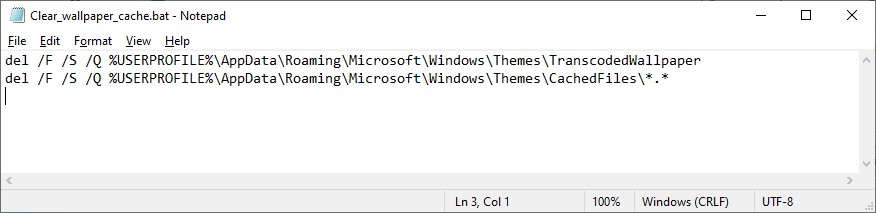
Поэтому для Windows 10 можно добавить дополнительный логоф скрипт, который очищает кэш изображения при выходе пользователя из системы. Это может быть bat файл Clear_wallpaper_cache.bat с кодом:
del /F /S /Q %USERPROFILE%\AppData\Roaming\Microsoft\Windows\Themes\TranscodedWallpaper
del /F /S /Q %USERPROFILE%\AppData\Roaming\Microsoft\Windows\Themes\CachedFiles\*.*
В результате фон рабочего стола у пользователей Windows 10 станет применяться нормально.
Changing Desktop Background Wallpaper in Windows through GPO
Let’s consider how to deploy the same desktop background image (wallpaper) on all Windows workstations in the Active Directory domain using Group Policies. As a rule, it is important for large businesses that require all employees using the same corporate desktop background image on all computers.
We’ll need an image file you want to use as a desktop wallpaper. It can be a BMP or JPG file.
This image file can be pre-copied to all computers, but it is more convenient if the clients take the jpeg file automatically from the shared network folder. To do this, you can use a file server, a SYSVOL folder on the domain controllers or a DFS folder. We have chosen the second variant for our distributed network since the SYSVOL contents are automatically replicated between all DCs and allow reducing WAN traffic between the branch offices when the clients are getting the image file.
Copy the image file on any domain controller to the C:\Windows\SYSVOL\sysvol\woshub.loc\scripts\Screen folder. An UNC path to this file looks as follows: \\woshub.loc\SYSVOL\woshub.loc\scripts\Screen\corp_wallpaper.jpg.

Check that the domain users have read permissions for this file (grant Read NTFS permission for the Domain Users or Authenticated Users group).
How to Configure Desktop Wallpaper Settings via GPO?
Open the domain GPO Management console GPO (GPMC.msc). Create a new policy and assign it to the necessary OU with the users (in our case, we want the policy to be applied to all domain computers and servers, so we just edit the Default Domain Policy). Switch to the policy Edit mode.
Go to the section User Configuration -> Policies -> Administrative Templates -> Desktop -> Desktop.

Enable the policy Enable Active Desktop.
Then enable the Desktop Wallpaper policy. In the policy settings, specify the UNC path to the jpeg image file and select Fill as a wallpaper style.

To make sure that the policy has been enabled on a user’s computer, log off and sign in again. The user’s desktop should display the specified wallpaper image.
If you have to prevent users from changing the wallpaper image, enable Prevent Changing Desktop Background policy in User Configuration -> Administrative Templates -> Control Panel -> Personalization.
select * from Win32_OperatingSystem where Version like “10.%”
Set Desktop Wallpaper via Registry and GPP
You can set the parameters and the desktop wallpaper image through the registry. The path to the wallpaper image file is stored in the registry parameter Wallpaper (REG_SZ) under the registry key HKEY_CURRENT_USER\Control Panel\Desktop\ or HKEY_CURRENT_USER\Software\Microsoft\Windows\CurrentVersion\Policies\System. You need to specify the UNC path to your image file in this registry parameter.
In the same registry key, the WallpaperStyle parameter (REG_SZ) sets the position of the image on the desktop. Use 2 to center and stretch the image.
If you want to prevent users from changing the desktop background. Create the following registry key: [HKEY_CURRENT_USER\Software\Microsoft\Windows\CurrentVersion\Policies\ActiveDesktop]
«NoChangingWallPaper»=dword:00000001
These registry settings can be deployed to users’ computers through the special GPO extension – Group Policy Preferences (GPP). To do this, go to the User Configuration -> Preferences -> Windows Settings -> Registry section and create two registry settings with the Update action.

With Group Policy Preferences Item Level Targeting, you can assign wallpaper policies to clients more accurately. For example, in the registry setting policy on the Common tab, enable Item level Targeting, click the Targeting button and use a simple wizard to specify that the wallpaper policy settings should be applied to computers with Windows 10 and users from a specific AD security group.
Similarly, you can make several different wallpaper files for different user groups (or devices). By adding the necessary users to AD groups, you can set different desktop wallpapers for different categories of employees.
Also, you can change the login screen image. To do this, you can use the Force a specific default lock screen image policy in the GPO section Computer Configuration -> Policies -> Administrative Templates -> Control Panel -> Personalization or through the following registry keys:
- HKLM\Software\Policies\Microsoft\Windows\Personalization — LockScreenImage — path to jpg image for the lock screen;
- HKLM\Software\Policies\Microsoft\Windows\Personalization — LockScreenOverlaysDisabled = 1;
- HKLM\Software\Policies\Microsoft\Windows\System — DisableLogonBackgroundImage = 0.
Why Desktop Wallpaper Group Policy Doesn’t Work for Windows 10 Clients?
On computers running Windows 10, the desktop wallpaper policy may not apply immediately. The fact is that Windows 7 and Windows 10 use the desktop background cache differently:
- In Windows 7, every time a user logs on to the system, the background wallpaper cache is automatically regenerated;
- In Windows 10, if the path to the wallpaper image has not changed, the cache doesn’t update. So the user will see the old desktop background, even if you updated the jpeg file in the shared folder on the server.
For Windows 10, you can add an additional logoff script that clears the image cache on the user sign out. It could be a bat file Clear_wallpaper_cache.bat with the following code:
del /F /S /Q %USERPROFILE%\AppData\Roaming\Microsoft\Windows\Themes\TranscodedWallpaper
del /F /S /Q %USERPROFILE%\AppData\Roaming\Microsoft\Windows\Themes\CachedFiles\*.*
![]()
As a result, the desktop background image for Windows 10 users will be applied normally.


