- Update drivers in Windows 10
- Before you begin
- Update the device driver
- Reinstall the device driver
- More help
- Как ускорить видеокарты Nvidia на Windows 10 May 2020 Update
- How to: Update graphics driver on Windows 10
- How can I update graphics drivers on Windows 10?
- 1. Update drivers automatically
- DriverFix
- 2. Use Device Manager
- Install the drivers from your local computer.
- 3. Download the drivers manually
- How to update Graphics Drivers in Windows 10
- How to update Graphics Drivers
- You can now easily update Intel GPU drivers on Windows 10
Update drivers in Windows 10
Before you begin
Driver updates for Windows 10, along with many devices, such as network adapters, monitors, printers, and video cards, are automatically downloaded and installed through Windows Update. You probably already have the most recent drivers, but if you’d like to manually update or reinstall a driver, here’s how: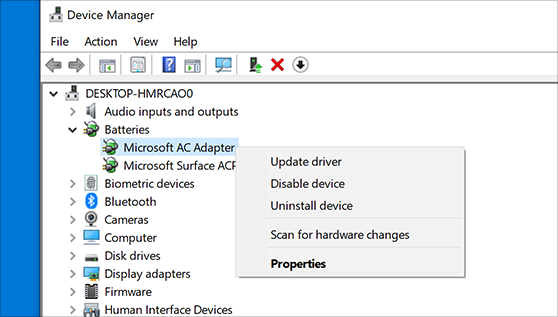
Update the device driver
In the search box on the taskbar, enter device manager, then select Device Manager.
Select a category to see names of devices, then right-click (or press and hold) the one you’d like to update.
Select Search automatically for updated driver software.
Select Update Driver.
If Windows doesn’t find a new driver, you can try looking for one on the device manufacturer’s website and follow their instructions.
Reinstall the device driver
In the search box on the taskbar, enter device manager, then select Device Manager.
Right-click (or press and hold) the name of the device, and select Uninstall.
Restart your PC.
Windows will attempt to reinstall the driver.
More help
If you can’t see the desktop and instead see a blue, black, or blank screen, see Troubleshoot blue screen errors or Troubleshoot black or blank screen errors.
Как ускорить видеокарты Nvidia на Windows 10 May 2020 Update

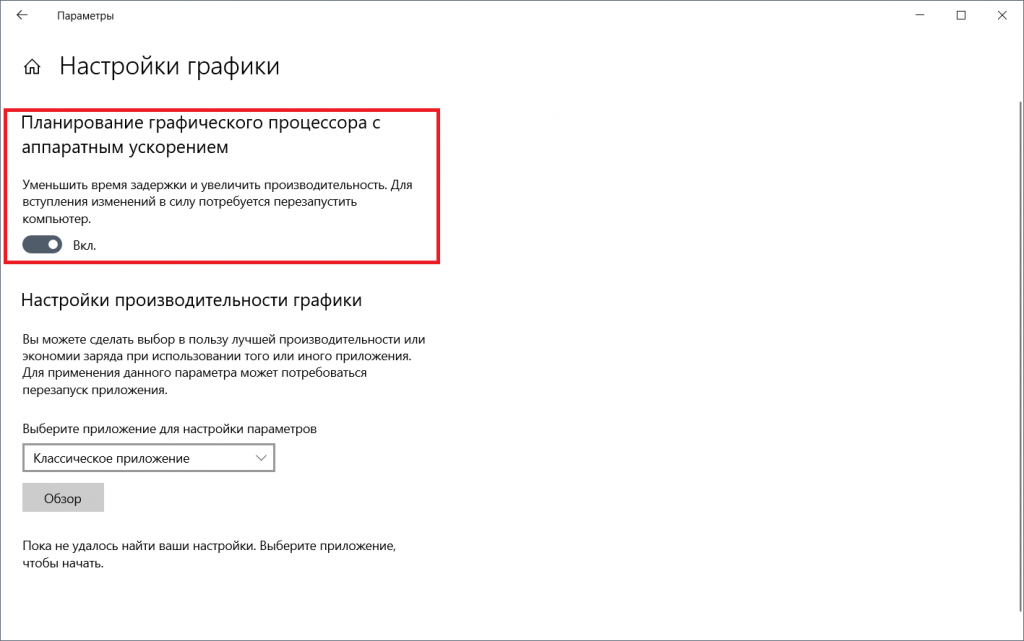
В последнем мажорном апдейте Windows 10 появилась поддержка новой версии архитектуры графических драйверов — WDDM 2.7. И одно из нововведений точно оценят пользователи, имеющие видеокарты с небольшим количеством видеопамяти. Это — «аппаратно ускоренный планировщик ГП» (Hardware-accelerated GPU scheduling), и его включение позволяет видеокарте самостоятельно управлять своей видеопамятью, что должно снизить задержки и увеличить итоговую производительность, а, значит, и FPS или скорость рендеринга.
На данный момент включить эту функцию можно лишь на видеокартах Nvidia, более того — поддерживаются только решения на архитектуре Pascal (GTX 1000) и Turing (RTX 2000), причем любые: планировщик доступен даже на ультрабучной MX150. Также, разумеется, на ПК должна быть установлена Windows 10 с майским обновлением и последний на данный момент пользовательский драйвер NVIDIA GeForce 451.48 WHQL.
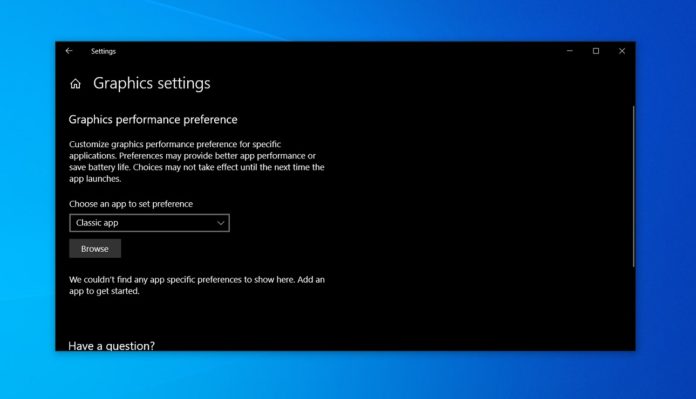
Если ваш компьютер удовлетворяет этим требованиям, то откройте Параметры > Система > Дисплей > Настройки графики и активируйте первый переключатель:
После этого перезагрузите ПК и можете приступать к тестам. Так, на GTX 1080 Ti с 11 ГБ видеопамяти разница в производительности минимальна, но точно фиксируется — 81-82 FPS в последнем Assassin’s Creed с включенным планировщиком и 78-79 FPS с выключенным:

Конечно, эти 3-5% заметить сложно, но, например, на GTX 1650 Super с всего 4 ГБ видеопамяти разница уже ощутимее, 8-9% в Forza Horizon 4: 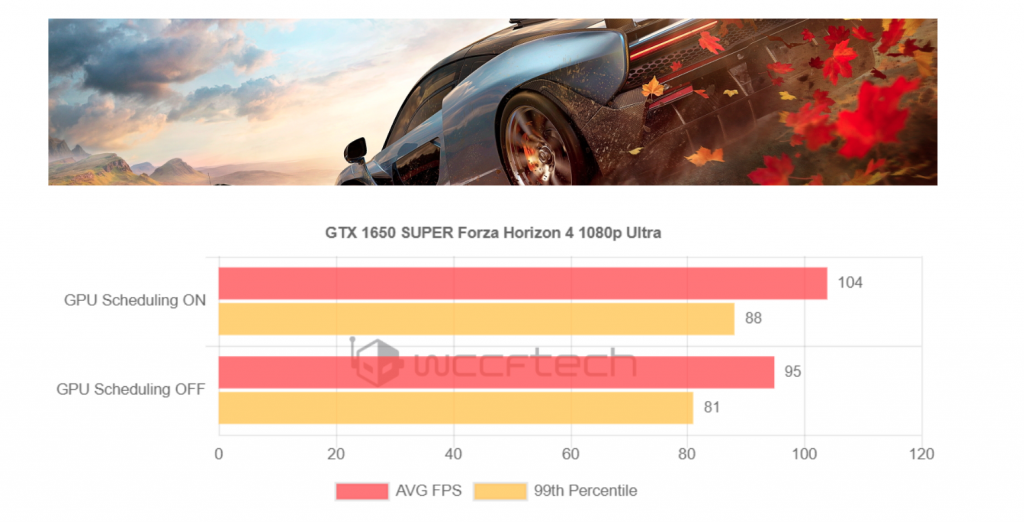
И, скорее всего, в будущем с оптимизацией драйверов прирост производительности будет только увеличиваться.
How to: Update graphics driver on Windows 10

- Your device’s performance has a lot to do with how up to date your drivers are.
- In this article, we will explore the best ways on how you can update them, so keep on reading.
- Feel free to visit our Tech Tutorials Hub for more useful information.
- Don’t forget to bookmark our Windows 10 Hub for more guides and articles.
- Download DriverFix now for free (secured download)
- Launch the program and press the Scan icon
- Wait for the scan to finish and start installing the needed drivers
- DriverFix has been successfuly downloaded by 0 readers this month.
Keeping your drivers updated is crucial if you want to achieve maximum performance.
New drivers usually bring various improvements, such as new features and improved stability, so you can see why it’s important to keep your drivers up to data.
This is especially important for graphic card drivers because newer versions can offer better performance in latest games.
Updating drivers is relatively simple, and today we’re going to show you how to update graphics driver in Windows 10.
How can I update graphics drivers on Windows 10?
1. Update drivers automatically
After several tests by our team, we strongly recommend using DriverFrix.
This tool will keep your system safe from permanent damage caused by the installation of the wrong driver version.
Once installed, the program will start scanning your PC for outdated drivers automatically. DriverFix will check your installed driver versions against its cloud database of the latest versions and recommend proper updates. All you need to do is wait for the scan to complete.
Upon scan completion, you get a report on all problem drivers found on your PC. Review the list and see if you want to update each driver individually or all at once.

DriverFix
2. Use Device Manager
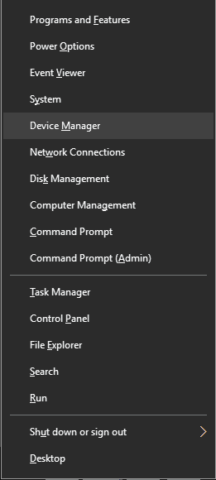
- Press Windows Key + X to open Win + X menu.
- Choose Device Manager from the list.

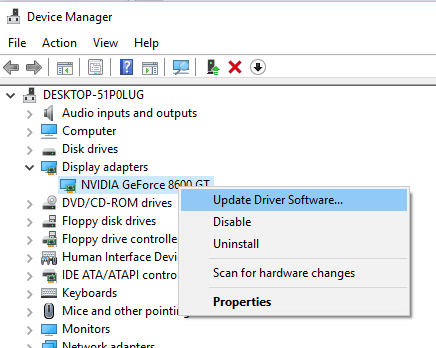
- Go to Display adapters section, right-click your graphics driver.
- Choose Update Driver Software from the menu.
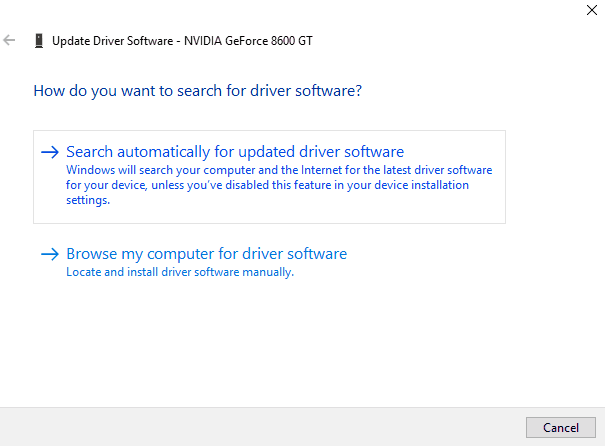
- Select Search automatically for updated driver software.
- Wait for a few moments while Windows 10 tries to find and install the latest driver for your PC.
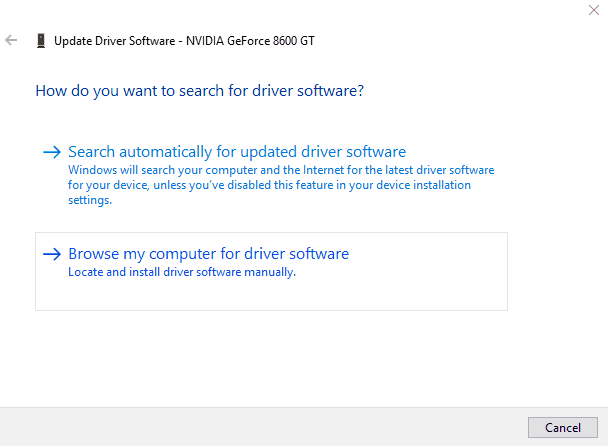
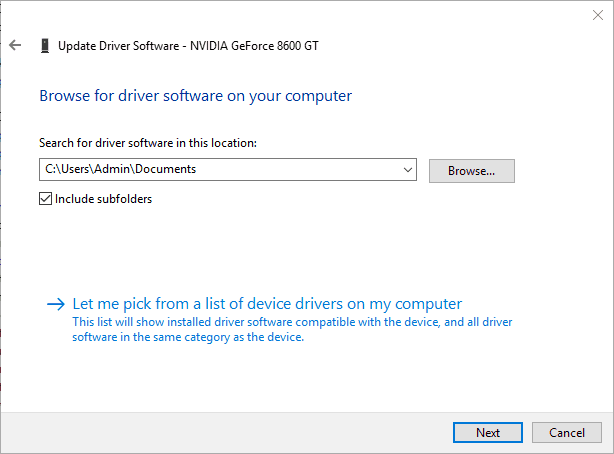
Install the drivers from your local computer.
- Follow Steps 1 and 2 from above.
- Click the Browse my computer for driver software option.
- Next, click on the Browse button.
- After finding the appropriate folder, click Next and wait for the Windows 10 to scan the folder. If compatible drivers are found, Windows 10 will automatically install them.
3. Download the drivers manually

This method is a bit more advanced since it requires you to know what type of graphic card you’re using.
To find out the model of your graphic card, you can use Device Manager and navigate to Display adapters section like in the previous solution.
After finding the model of your graphic card, you need to visit the manufacturer’s website. From there you need to navigate to the Download or Drivers section.
Now you need to choose Product Type, Product Series and Product. All this information is available from Device Manager or any other system information tool.
After selecting your graphic card model, you need to select the version of the operating system that you’re using.
Keep in mind that you need to select 64-bit version of the driver if you’re using 64-bit operating system in order to get the maximum performance.
After the new graphics driver is installed, restart your computer to complete the installation.
As you can see, updating the graphics driver on Windows 10 is quite simple, and we hope one of our methods will help you.
If you have other suggestions or recommendations let us know in the comments section below.
How to update Graphics Drivers in Windows 10
Very often we are required to update our Graphics Drivers manually. While Windows Update will update your computer system including the Device Drivers automatically, or the software updaters of your graphics hardware will inform you when updates are available, there may be a time when you may have to, on your own, update your systems video and graphic drivers, if you are facing issues like Laptop screen brightness flickering or if you wish to get better performance out of your Windows 10/8/7 system.
How to update Graphics Drivers
In Windows 10, click on the Start button to open the WinX Menu and select Device Manager. Expand Display adapters to see your graphics card details. In my case below, you will see an Intel as well as an NVIDIA GeForce entry. This means that my laptop switches between these two hardware depending on the need.
So I need to update Inter(R) HD Graphics family as well as NVIDIA GeForce card drivers. You can right-click on them and select Update Driver Software to update the drivers. This post will show you in detail how to uninstall, disable, roll-back or update Device Drivers.
Your computer will scan for available updates and download and install them automatically.
Once the Graphic Driver is installed, you will be informed and ask to restart your PC.
Restart your computer, and your driver will be updated!
There is another way to update NVIDIA GeForce drivers. Type GeForce in Start search and select GeForce experience. After this NVIDIA GeForce experience app is launched, you can right-click on its system tray icon and select Check for updates.
If updates are available, you will see a popup notification to this effect.
Click on it, and NVIDIA GeForce experience UI will open. Clicking on the green Download driver button will commence its download and installation.
This should give you a smooth experience.
Note: If you are using the latest version of NVIDIA GeForce experience then you may be asked to log in with your Facebook or Google account which can be pretty irritating and time-consuming as they ask for additional information, access to your Facebook/Google account and email verification.
There is yet another way, and that is to search for driver downloads for your system on the internet and then search for the driver’s name on the site. I have given a few links below for your ready reference. You may visit your computer manufacturer’s website, or you may visit the graphics hardware manufacturers site:
Some of you may want to use free Driver Update software or tools like AMD Driver Autodetect, Intel Driver Update Utility or Dell Update utility to update your device drivers. NV Updater will keep NVIDIA Graphic Card Driver updated.
You can now easily update Intel GPU drivers on Windows 10
For OEM/PC manufacturer’s validation reasons, Intel’s GPU drivers refuse to install on some PCs running Windows 10. Fortunately, Intel says it has finally developed a solution that would let you update your Intel graphics drivers without approval from the PC manufacturer.
Currently, PC manufacturers block users from deploying Intel drivers downloaded from their website, and it apparently affects everyone with a device that comes with OEM customizations.
If you’re unable to install drivers released by Intel, it means your computer manufacturer (HP, ASUS, Dell etc) has customized the Intel graphics drivers it preinstalled, which blocks graphics drivers downloaded from Intel’s website.
In that case, you’ve to grab the graphics driver updates form the system manufacturer, which is a bad thing as manufacturers don’t keep these graphics drivers updated. In fact, some manufacturers don’t even release updated drivers for their low-end and mid-range devices.
Intel says it has decoupled generic driver updates from OEM customizations. According to the chipmaker, users can now update GPU drivers as Intel releases them without losing out on settings enabled by the PC manufacturer.
In other words, you no longer need to wait for OEM to release new drivers and you should be to install them from Intel’s website if there are no other restrictions.
“Graphics Driver Smart Installer Enhancement allows end-users to upgrade systems with OEM DCH drivers to newer Intel generic DCH drivers. OEM customizations are preserved during this upgrade process, in accordance with Microsoft’s DCH driver design principles,” Intel noted.
So what does this mean for you? Simple: You’ll be able to download the installer of GPU drivers from Intel and update your graphics drivers without worrying about customizations.
While this eliminates the validation required by OEM, Intel warns that forcing their vanilla generic drivers might lead to problems on some devices. If you notice performance issues or platform-specific problems after replacing the drivers, Intel recommends reverting to OEM drivers.
Intel says it will begin rolling out these changes to Drivers and Support Assistant tool later today.


