- Build Cache
- Overview
- Enable the Build Cache
- Task Output Caching
- What does it look like
- Cacheable tasks
- Built-in cacheable tasks
- Caching for faster builds
- Introduction: Build avoidance
- Tour: Gradle Enterprise build cache
- Clean build
- Clean build with outputs taken from the remote cache
- Configuration example
- Hands-on Lab: Gradle Enterprise build cache
- Prerequisites
- Clean build
- Clean build with outputs taken from the remote cache
- Conclusion
Build Cache
| Want to learn the tips and tricks top engineering teams use to keep builds fast and performant? Register here for our Build Cache Training. |
Overview
The Gradle build cache is a cache mechanism that aims to save time by reusing outputs produced by other builds. The build cache works by storing (locally or remotely) build outputs and allowing builds to fetch these outputs from the cache when it is determined that inputs have not changed, avoiding the expensive work of regenerating them.
A first feature using the build cache is task output caching. Essentially, task output caching leverages the same intelligence as up-to-date checks that Gradle uses to avoid work when a previous local build has already produced a set of task outputs. But instead of being limited to the previous build in the same workspace, task output caching allows Gradle to reuse task outputs from any earlier build in any location on the local machine. When using a shared build cache for task output caching this even works across developer machines and build agents.
Apart from tasks, artifact transforms can also leverage the build cache and re-use their outputs similarly to task output caching.
| For a hands-on approach to learning how to use the build cache, start with reading through the use cases for the build cache and the follow up sections. It covers the different scenarios that caching can improve and has detailed discussions of the different caveats you need to be aware of when enabling caching for a build. |
Enable the Build Cache
By default, the build cache is not enabled. You can enable the build cache in a couple of ways:
Gradle will use the build cache for this build only.
Put org.gradle.caching=true in your gradle.properties
Gradle will try to reuse outputs from previous builds for all builds, unless explicitly disabled with —no-build-cache .
When the build cache is enabled, it will store build outputs in the Gradle user home. For configuring this directory or different kinds of build caches see Configure the Build Cache.
Task Output Caching
Beyond incremental builds described in up-to-date checks, Gradle can save time by reusing outputs from previous executions of a task by matching inputs to the task. Task outputs can be reused between builds on one computer or even between builds running on different computers via a build cache.
We have focused on the use case where users have an organization-wide remote build cache that is populated regularly by continuous integration builds. Developers and other continuous integration agents should load cache entries from the remote build cache. We expect that developers will not be allowed to populate the remote build cache, and all continuous integration builds populate the build cache after running the clean task.
For your build to play well with task output caching it must work well with the incremental build feature. For example, when running your build twice in a row all tasks with outputs should be UP-TO-DATE . You cannot expect faster builds or correct builds when enabling task output caching when this prerequisite is not met.
Task output caching is automatically enabled when you enable the build cache, see Enable the Build Cache.
What does it look like
Let us start with a project using the Java plugin which has a few Java source files. We run the build the first time.
We see the directory used by the local build cache in the output. Apart from that the build was the same as without the build cache. Let’s clean and run the build again.
Now we see that, instead of executing the :compileJava task, the outputs of the task have been loaded from the build cache. The other tasks have not been loaded from the build cache since they are not cacheable. This is due to :classes and :assemble being lifecycle tasks and :processResources and :jar being Copy-like tasks which are not cacheable since it is generally faster to execute them.
Cacheable tasks
Since a task describes all of its inputs and outputs, Gradle can compute a build cache key that uniquely defines the task’s outputs based on its inputs. That build cache key is used to request previous outputs from a build cache or store new outputs in the build cache. If the previous build outputs have been already stored in the cache by someone else, e.g. your continuous integration server or other developers, you can avoid executing most tasks locally.
The following inputs contribute to the build cache key for a task in the same way that they do for up-to-date checks:
The task type and its classpath
The names of the output properties
The names and values of properties annotated as described in the section called «Custom task types»
The names and values of properties added by the DSL via TaskInputs
The classpath of the Gradle distribution, buildSrc and plugins
The content of the build script when it affects execution of the task
Task types need to opt-in to task output caching using the @CacheableTask annotation. Note that @CacheableTask is not inherited by subclasses. Custom task types are not cacheable by default.
Built-in cacheable tasks
Currently, the following built-in Gradle tasks are cacheable:
Источник
Caching for faster builds
Gradle Enterprise’s remote cache makes all your builds go faster — for developers and for CI.
You can complete this tutorial in:
1 minute (read the Introduction)
5-10 minutes (read the Introduction and Tour)
15-20 minutes (read the Introduction and Tour and perform the Hands-on Lab)
Introduction: Build avoidance
Gradle logically has 3 layers of reuse that allow potentially expensive tasks from being executed:
Up-to-date checks for task outputs in the workspace.
A lookup for task outputs in the local cache.
A lookup for task outputs in a remote cache, such as the remote cache provided out of the box in Gradle Enterprise.

These 3 levels support making your builds faster in 3 different target scenarios:
Between consecutive runs of a Gradle build by developers, usually not many things change. The Gradle incremental build feature will only execute the tasks that are not up-to-date anymore since they were last executed.
Developers typically maintain many workspaces on many branches to perform logically distinct tasks. The local cache allows outputs to be quickly reused across workspaces and branches without having to transit any networks.
Oftentimes, CI nodes and developers run the same tasks with the same set of changes. The remote cache allows outputs to be reused across users and build agents, ensuring your team never has to build the same thing twice.
Tour: Gradle Enterprise build cache
Let’s dive right into how remote caching can speed up your builds.
Clean build
Consider a very simple example Java project. Here is the timeline page of a build scan (a complete record of what happened in a Gradle build) for a clean build of this project that rebuilt all tasks in the workspace with no benefit of caching. We can tell this by looking at the task timeline and seeing that none of the tasks say FROM-CACHE . The build, a simple contrived example, takes about 8 seconds to execute tasks, mostly to compile Java sources.
Click on the task :compileJava to see that the build cache result was a miss, followed by a store. We recompiled, and then stored the output in the remote cache.
We can also look at the build cache performance page of the build scan to see that this build enjoyed no cache hits, but it did store 3 outputs in the remote cache to the benefit of subsequent builds.
We can also see that since almost all of the time taken for this build was spent on compiling Java sources, and we stored that output, we would expect builds that can use this output via a cache hit to be much faster, saving developers time.
Clean build with outputs taken from the remote cache
Having stored the output of the compileJava tasks, we would expect that subsequent builds that use the build cache would not have to recompile the source.
Here is the timeline page of a build scan for a second build, run after the first one and configured to pull from the build cache. It could have been run by the same developer in a different or clean workspace, a different developer, or a CI build that has pulling from the build cache turned on.
We can immediately see that all the compilation and tests tasks are annotated FROM-CACHE , and that the build only took about a half second to complete. Using cached outputs has saved most of the time of the build.
We can also examine the build cache specifically on the build cache performance page, which shows 3 hits to the remote cache along with detailed information about the cache lookups and transfers.
Real builds often take many minutes or even hours to run. Often builds have to do the same work over and over. This is true of complex CI pipelines down to individual developer builds. Using the Gradle Enterprise build cache saves time, both in developer hours and required CI infrastructure. When we multiply the savings by the number of developer and CI builds per day, the savings are immense.
Faster builds mean developers can run more builds per day, find issues more quickly, and deliver changes more efficiently.
The result is an exceptionally productive team that can deliver more, faster, at lower cost.
Configuration example
We can achieve a high cache hit rate by having CI builds early in the build pipeline push task outputs to the remote cache, and downstream CI builds as well as developer builds pull task outputs from the remote cache.
In the diagram below, you can see the flow of CI agents pushing to the remote cache, and developers pulling from the remote cache.

A task runs on a CI server. The build is configured to push to a configured remote cache, so that task outputs can be reused by other CI pipeline builds or developer builds.
A developer runs the same task with a local change to a file. Gradle tries to load the task output from the local then the remote cache, misses, and the task executes. The task generates the task output which is stored both in the workspace and in the configured local cache. Outputs stored in the local cache can be reused in other workspaces local to that developer’s machine, or in the same workspace, even after running the clean task.
A second developer runs that task without any local changes from the commit that CI built. This time the remote cache lookup is a hit, the cached task output is downloaded and directly copied to the workspace and the local cache, and the task does not need to be executed.
Hands-on Lab: Gradle Enterprise build cache
Read on to go one level deeper and run builds to recreate the cache examples you viewed above.
Prerequisites
To follow these steps, you will need:
A zip file that includes the source code to recreate the build scans we discussed previously.
You can get this from here.
Unzip this anywhere, we will refer to that location as LAB_HOME in what follows.
A local JVM installed.
JVM requirements are specified at https://gradle.org/install. Note that a local Gradle Build Tool install is optional and not required. All hands-on labs will execute the Gradle Build Tool using the Gradle Wrapper.
An instance of a Gradle Enterprise server.
You can request a Gradle Enterprise trial here.
For the rest of the document, we will assume you have a Gradle Enterprise instance, available at https://gradle-enterprise.mycompany.com .
Open a terminal window in LAB_HOME/01-using-the-gradle-enterprise-build-cache .
Using the text editor of your choice, modify the build scan configuration in settings.gradle to point to your Gradle Enterprise server instance:
You will also need to modify the remote build cache configuration in the settings.gradle file, with your Gradle Enterprise build cache service location:
Clean build
At this point, the build is fully configured and ready to run. We will run this build with a clean , which will remove all task outputs from the workspace, execute all tasks, and then push all cacheable task outputs to the remote cache in your Gradle Enterprise instance.
Here is how this standard Gradle build will now interact with the configured Gradle Enterprise instance:
The local cache is disabled (according to settings.gradle ).
Each cacheable task does a lookup in the Gradle Enterprise server to see if there is a match between the cache key computed as a hash of task inputs with a matching element in the remote cache, at task execution time.
For a cache hit, task outputs are copied to the workspace, instead of rerunning the task.
For a cache miss, task outputs are rebuilt, and a cache key is generated and copied into the remote cache (since push is set to true for this cache in the settings.gradle file).
At the end of the build, Gradle sends the captured build data to the Gradle Enterprise instance. A unique URL pointing to the generated build scan is printed on the command line. This build scan contains very fine-grained details of all aspects of cache operations, and more.
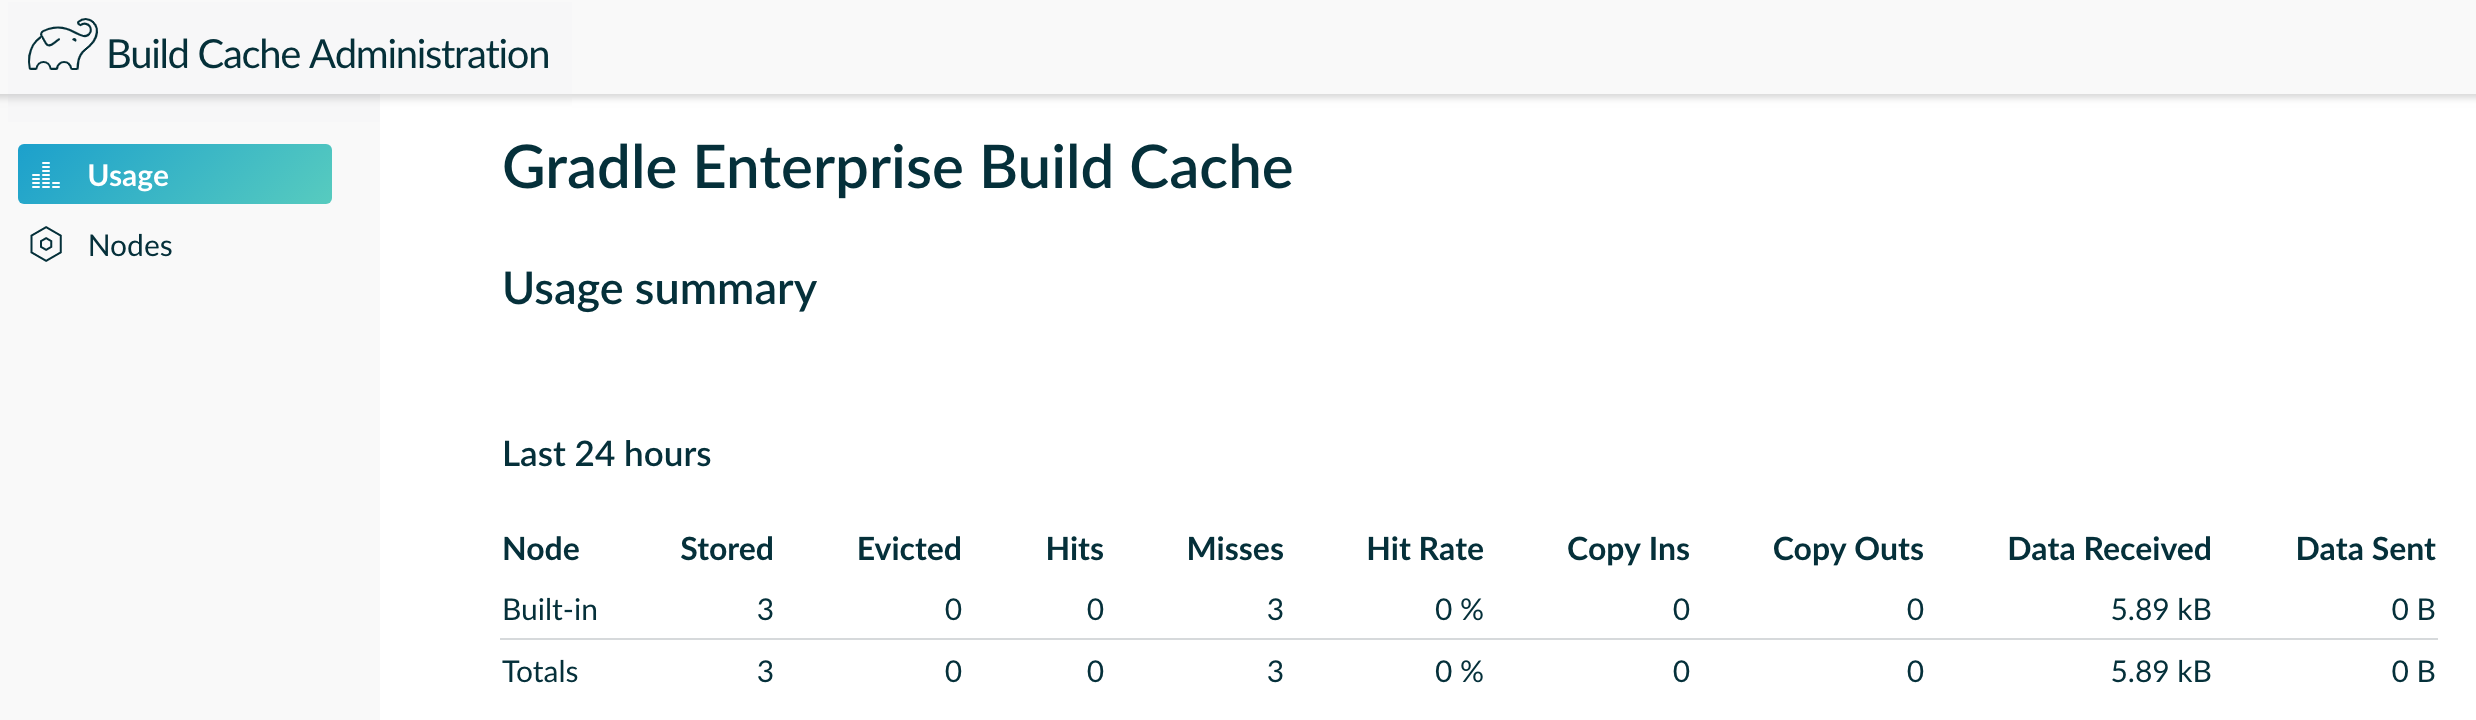
The Gradle Enterprise build cache has an administrative page that shows cache statistics, that can be viewed from https://gradle-enterprise.mycompany.com/cache-admin . At this point, assuming your Gradle Enterprise instance is fresh, you should see all zeros on this page.
We will now go ahead and run our first clean build which will remove all task outputs, rebuild them all, and then view the build scan and cache admin pages. Perform the clean build with
Your output should look something like:
If you follow the build scan link, you will see an identical build scan to the first build scan discussed in the earlier section, and you will be able to see that all the tasks rebuilt, that the build had 3 cache misses, and that 3 artifacts were written to cache.
At this point, if you revisit the cache admin page at https://gradle-enterprise.mycompany.com/cache-admin , you will see 3 artifacts now stored, along with the 3 cache misses.
Clean build with outputs taken from the remote cache
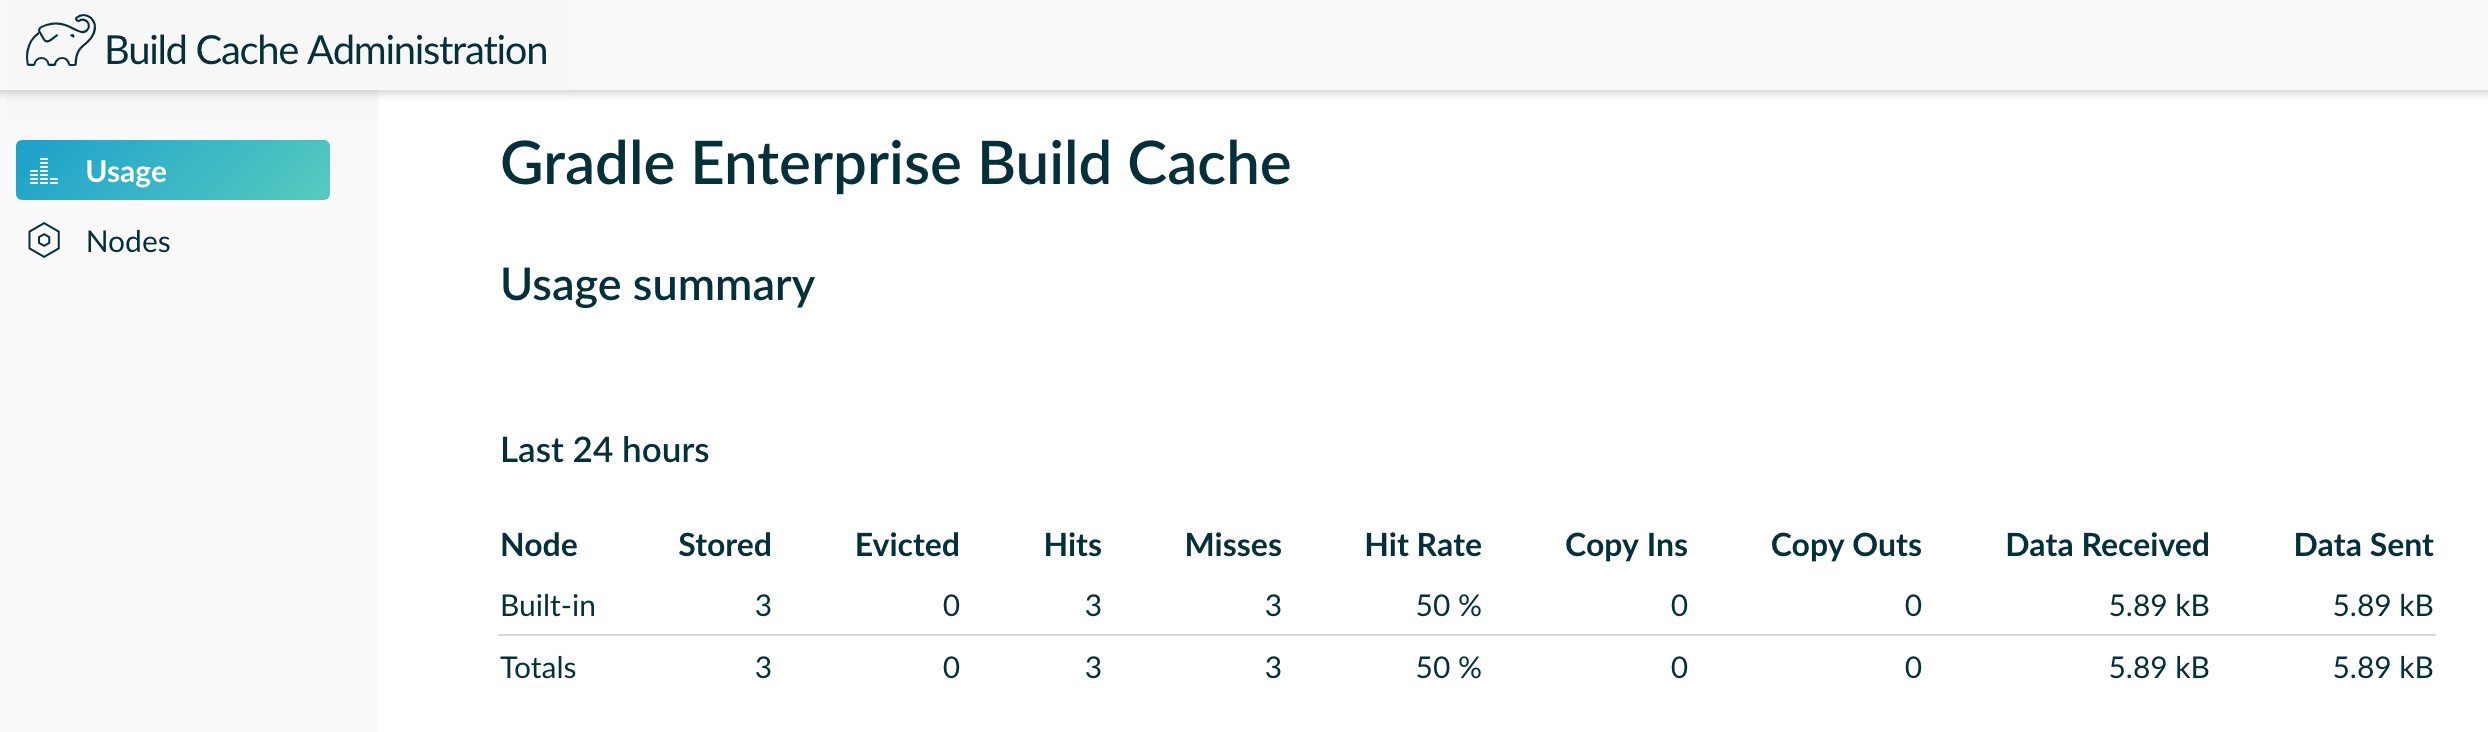
We will now go ahead and run our second clean build which will remove all task outputs from the workspace, but now experience cache hits, and then view the build scan and cache admin pages. Perform the second clean build with
Your output should look something like:
If you follow the build scan link, you will see an identical build scan to the second build scan discussed in the earlier section, and you will be able to see that 3 tasks reused outputs that were cache hits. Also note that this second build completed in 1 second (versus 7 for the first).
At this point, if you revisit the cache admin page, you will see a record of the cache hits.
Conclusion
To summarize, utilizing Gradle Enterprise’s build cache can result in dramatic improvements in build times for all your builds, returning time to your team to do more work and deliver more valuable features to your users more quickly and efficiently, which saves you time and your organization money.
Источник


