- Gross Beat VST скачать торрент v1.0.7 для FL Studio 20, Ableton 64bit
- Видео-инструкция по установке и активации Gross Beat VST v1.0.7
- Gross Beat в деталях
- Живой и прямой
- Резюме
- Gross Beat VST Crack Download – Mac/Windows
- Gross Beat VST Crack Demo & Tutorial
- How to use Gross Beat Crack Free Download
- VST Crack System Requirement
- Gross Beat VST Crack Download Features
- Why every producers are using Gross Beat Crack?
- How to crack and install Gross Beat on any DAW
- Download Links
- Gross Beat
- Main Options [return]
- Time Settings [return]
- Scratching Clock
- Time Slots
- Automating Slot Selection
- Volume Settings [return]
- Volume Slots
- Volume Knobs
- Automating Slot Selection
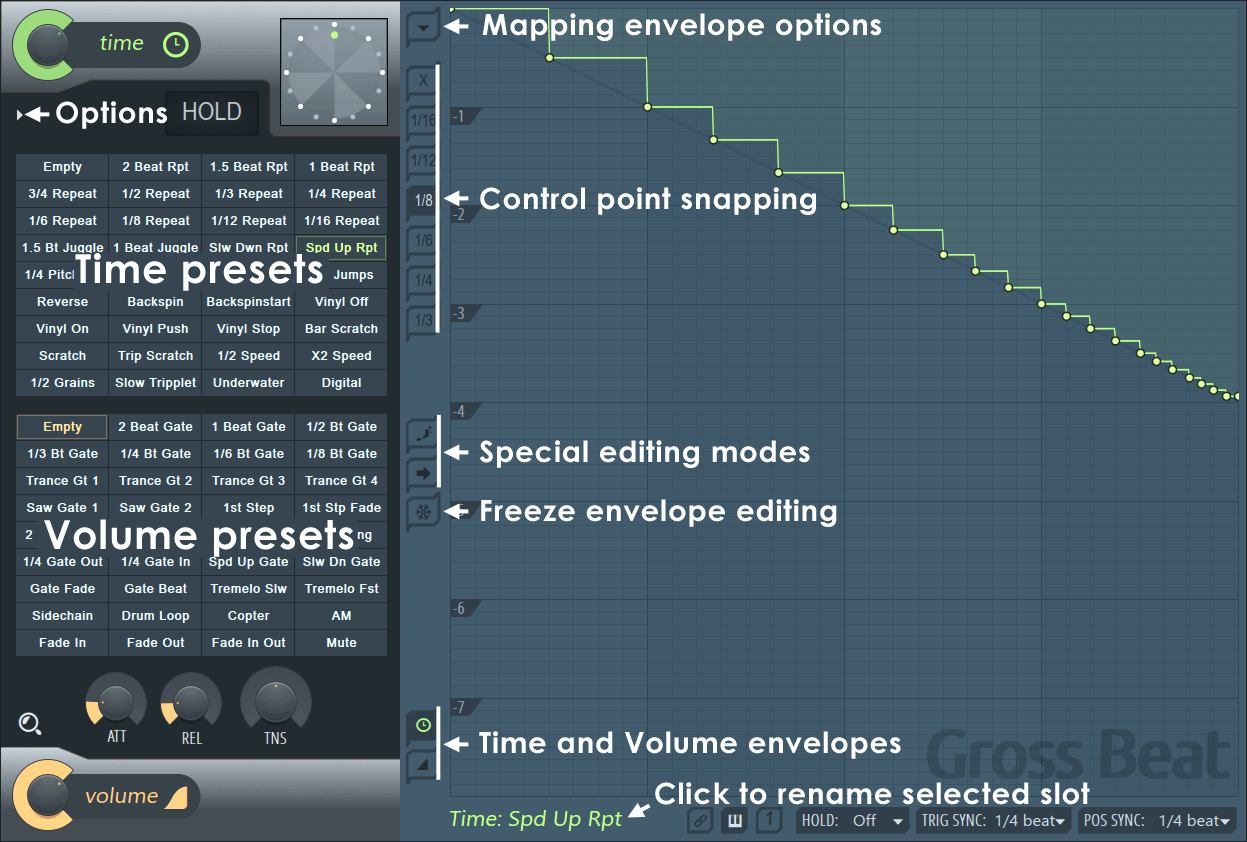
- Envelope Mapping Panel [return]
- Editing Mapping Envelopes
- Mapping controls
- Mapping Options Menu
- Snap Settings
Gross Beat VST скачать торрент v1.0.7 для FL Studio 20, Ableton 64bit

Посмотреть полный список ПО и софта для гитариста можно ЗДЕСЬ .
Видео-инструкция по установке и активации Gross Beat VST v1.0.7
Если видео не работает, обновите страницу или сообщите об этом в комментариях, поправлю.
Gross Beat ни в коем случае не является первым плагином, имитирующим функциональность вертушек — в прошлом такие инструменты, как Bioroid Turntablist Pro, и эффекты, такие как dblue Glitch (обе бесплатные программы), подражали экстремальным манипуляциям с высотой звука, которые стали возможны с помощью записывающих устройств.
Подключаемый модуль Image Line выводит идею на совершенно новый уровень сложности с помощью сложного графического пользовательского интерфейса, регулировки громкости и высоты тона, а также широких возможностей живого исполнения. Загвоздка в том, что это все, что делает Gross Beat — здесь нет никаких эффектов сбоя, только громкость в стиле ди-джея и манипуляции с высотой звука. Итак, стоит ли это ваших 99 долларов или достаточно бесплатного плагина?
Gross Beat в деталях
Большая часть интерфейса Gross Beat занята панелью Envelope Mapping Panel, которая используется для редактирования громкости и положения воспроизведения входного аудиосигнала, с иконками для выбора режима Time или Volume. Редактирование объема является более простым из двух. Горизонтальная ось представляет время — точнее, четыре удара, без возможности настройки. Вертикальная ось представляет объем со 100% вверху.
Точки создаются на дисплее щелчком правой кнопкой мыши по панели, и по умолчанию они привязываются к восьмым нотам и переходят от одного значения к другому, а не плавно нарастают. Однако можно изменить разрешение привязки или полностью отключить его, а также выбрать различные формы, в том числе различные кривые с определяемыми градиентами. Используя режим Volume панели Envelope Mapping Panel, вы можете имитировать использование ди-джеем кроссфейдера для создания быстрых заиканий при включении-выключении и быстрого затухания. Это не особо сложный эффект, но он проявляется в сочетании с режимом манипулирования временем Gross Beat.
Когда это задействовано, вертикальная ось панели преобразования конвертов представляет время, причем реальное время находится вверху сетки, а двумя полосами раньше внизу. Любое отклонение от вершины приведет к перемещению стрелки виртуальной записи в некоторую точку в прошлом. Если вы раньше использовали параметр Sample Offset в конвертах клипов Ableton Live, вы уже знакомы с этой концепцией.
Виртуальный «спинбэк» стал возможным благодаря созданию крутого наклона, который переводит виртуальный стилус на два такта раньше в течение одного удара. Точно так же можно перемещать пластинку вперед и назад для скретчинга, и в сочетании с моделями громкости в стиле кроссфейдера можно довольно реалистично имитировать эффект. В качестве альтернативы, используя ступенчатые точки, ритм можно воспроизводить с разных позиций, что упрощает выполнение эффектов нарезки.
Живой и прямой
Gross Beat предлагает множество возможностей для тех, кто хочет использовать его эффекты затирания звука на сцене. Процессоры Time и Volume имеют 36 слотов шаблонов на патч, что позволяет легко переключаться между ними на лету. Это можно сделать, щелкнув соответствующую сцену в главном интерфейсе, нажав MIDI-ноту или используя MIDI CC для прокрутки различных предлагаемых режимов.
При использовании MIDI можно дать команду Gross Beat вернуться к предыдущей сцене, как только нота будет отпущена, вернуться после того, как новый паттерн проигрался один раз, или просто остаться на выбранном патче — это удобно для создания живых сбивок и вариации. Также возможно управлять влажным/сухим микшированием как громкости, так и временных эффектов, или даже использовать CC для управления параметром смещения времени — «скрэтчинг» с помощью ручки на вашем MIDI-контроллере! Используя эти функции вместе, вы можете создавать эффекты, которые невозможны с винилом.
Резюме
Gross Beat — это по сути базовый эффект, который хорошо выполняет несколько простых вещей, не переусердствуя. Тем не менее, его можно настраивать и мы позаботились о том, чтобы он был полезен как вживую, так и в студии.
Источник
Gross Beat VST Crack Download – Mac/Windows
Share
Gross beat VST Crack is perfect for real-time or rendered gating, glitch, repeat, scratching and stutter performances. Image-Line Gross Beat stores audio in a 2-bar rolling buffer under the control of 36 user definable time and volume envelopes, giving you unlimited creative control. Gross Beat Time and Volume presets can be linked to a keyboard, pad controller or automation source for on-the-fly changes to the preset. Preset slots can be set to momentary (key-held), return to base (slot 1) or hold mode on a per-preset basis. Preset-change synchronization can be set from immediate through to 4 beats (1 bar). In addition to the gating possibilities afforded by the spline based envelope, Gross Beat Crack Download is perfect for side-chain effects without the need to link to an audio source. Just select one of the ducking-style presets for instant side-chain pumping.
Gross Beat VST Crack Demo & Tutorial
How to use Gross Beat Crack Free Download
Despite its relatively simple and user-friendly GUI, Gross Beat Crack Keygen is a versatile tool, capable of mangling audio beyond recognition or quickly applying subtle effects. The user interfaces with the plugin by drawing in modulation patterns on the XY pad, or by selecting a preset from the menu on the left.
Gross Beat Crack Mac offers plenty of permutations to control both pitch and time simultaneously over a given period. While users can create extremely detailed patterns simply by drawing in their instructions, Gross Beat FL Studio Crack really shines when it’s automated. This can be done through automation clips, or using the Fruity Keyboard Controller.
Coincidentally, many trap music producers are Windows users. Since FL is a reasonably priced DAW, and since Windows devices tend to be less expensive than their Apple counterparts, the barrier to entry is much lower for a budding young producer without a fancy studio or a production budget. FL Studio 12 is well-suited to experienced producers as well; it’s a full-fledged DAW with serious horsepower and plenty of exclusive plugins.
VST Crack System Requirement
| Plugin Name | Gross Beat |
| Compatible with | Mac & Windows |
| Developer | Image-Line |
| Version | 4.0.5 |
| VST Size | 170,4 Mo |
| Category | Effects, pitch shifting |
| Supported DAW | Ableton, Pro Tools, Cubase, FL Studio 20 |
Gross Beat VST Crack Download Features
- Powerful MIDI controlled envelopes.
- 2 bar audio buffer.
- Real time effect, perfect for live performance.
- 36 volume/gating envelopes with user-controlled smoothing.
- Linked or independent volume & gating slot operation.
- A large number of creative presets ready to go.
Why every producers are using Gross Beat Crack?
Gross Beat VST Crack is, essentially, a basic effect that does a few simple things well, without going overboard. Yet, it’s customisable and care has been taken to make sure that it’s useful both live and in the studio. So, if you think it sounds good on paper, you’ll most likely find it lives up to your hopes. It’s no replacement for a real turntable, though, so there’s no need to stick your 1200s on eBay just yet.
Gross Beat VST Crack Lover
How to crack and install Gross Beat on any DAW
- First of all, download the file Image.Line.Gross.Beat.4.0.5.Patched.zip with links below
- Once the VST Crack has been downloaded, extract the whole archive
- Open the .ZIP file and run the Setup as an administrator
- Now, you can go through all windows to install Gross Beat VST Crack on your Mac/Windows
- Good news: this VST is already cracked & patched, it means that no crack is required
- So you basically just need to add the plugin to on of your favorite DAW
- Enjoy Gross Beat Plugin Crack and make insane melodies effects
Download Links
Gross Beat Crack Free Download
Источник
Gross Beat 

TRIAL ONLY: Gross Beat comes as a demo version in FL Studio and needs to be purchased separately so you can use Gross Beat without the demo limitations.
Play with time! Gross Beat is a real-time, audio-stream playback, pitch, position and volume manipulation effect. Gross Beat stores audio in a 2-bar rolling buffer controlled by 36 time and 36 volume mapping envelopes for easy beat-synced glitch, stutter, repeat, scratching and gating effects. Welcome to Gallifrey Time Lord!
Alternatives to Gross Beat are Wave Traveller & Fruity Scratcher, however, these work on samples rather than a live audio stream.
Watch the  Gross Beat Video Tutorial Series or check the preset forum here.
Main Options [return]
Lurking in the darkness, just below the Time mix knob (as shown above):
- Click reduction — Reduces clicks caused by discontinuities in volume between the ‘jump-from’ and ‘jump-to’ locations. For the best results you may need to apply manual ‘click reduction’. Briefly ramp the volume down to zero to coincide with the point at which the Time Envelope relocates the playback position. Step the volume back to normal at or a fraction after the jump.
- Smoothing attack compensation — Compensates for the small period of silence at Time Envelope relocation events caused by manually applied volume smoothing envelopes (see above). Selecting this option will move the Time Envelope forward slightly so that attack transients are not lost when the Volume Envelope ramps down.
- Remove DC offset — Removes output offsets/biases when playback is stopped (e.g. when the Time Mapping envelope matches the angle of the Safety line).
- HQ resampling — Adaptive ‘sinc interpolation’ algorithm which improves the audio quality of pitch-shifted audio at the expense of increased CPU load.
- View scratching clock — Shows the scratching dial. To scratch, click on the clock-dial and move your mouse up/down. Right-click to link to external or internal controllers. NOTE: If the Scratching Clock is hidden and Gross Beat is put into Compact Mode (drag to the left on the right edge of the Mapping Envelope area, until the plugin compacts OR for the VST version use the ‘Resize’ menu option), then a small mapping envelope will display here.
- About — Opens the plugin credits ‘splash image’.
Time Settings [return]
These controls relate to the Time/Pitch mapping envelopes:
- Time — Time mapping envelope mix setting. Range: 0% to 100%. Use this in preference to external host Wet/Dry mix controls to avoid phasing.
- Time offset (scratching) — Click the Scratching clock to the right of the Time knob (this is activated from the Options menu if not visible). Hold and drag your mouse vertically to vary the time offset and manually scratch. Right-click to link the Clock to internal/external controllers.
Hold delay (bar repeat) — Repeats the bar as long as the button is held and the song continues to play.
Scratching Clock
Time Slots
Slots 1 to 36 (green) hold user-definable time mapping envelope presets. Slots are pre-assigned to MIDI keys and can be switched live from your controller keyboard (starting from Slot 1 = C5) OR slot changes can be automated by Right-clicking any slot and linking to internal or external controllers. NOTE: Time slots can be linked to the corresponding Volume slot number. Use the link setting (bottom middle of the mapping area) to create combined Time + Volume presets.
- Edit a slot mapping envelope — Select the slot by clicking it with your mouse. Edit the associated mapping envelope in the panel to the right. These changes are automatically associated with the selected slot.
- Move a slot — Right-click the slot button and select Move slot left / Move slot right from the popup menu OR hold CTRL to swap the selected slot with the next slot clicked.
- Rename a slot — Left-click on the slot name in the bottom-left corner of the Mapping area (as shown in the screenshot above) OR click on the slot with the middle-mouse button.
Automating Slot Selection
To control slot selection by Automation you can use one of three methods ( video here):
- MIDI Controller keyboard (live) — Select Gross Beat and then play notes on your controller. C1+ will control the Volume slots, C4+ will control the Time slots.
- Automation envelope — Right-click anywhere on the Time or Volume preset slots and select ‘Create automation clip’. Then select the type ‘Hold’ for Automation Clip control points. Finally select and Right-click slots to ‘Copy value’ then ‘Paste value’ to the Automation Clip Control Points.
- Fruity Keyboard controller (piano roll) — Add a Fruity Keyboard Controller to the project and then Right-click the Time or Volume slots and select ‘Link to controller’. On the Remote control settings pop-up, from the ‘Internal controller’ menu select ‘Kb Ctl (Fruity Keyboard Controller) — Note’ and press ‘Accept’. The Keyboard Controller notes can now be played from the Piano roll and Patterns added to the Playlist to control Gross Beat.
While editing and playing, slots will show three colors:
- White rectangle = Slot currently being edited.
- Green rectangle = Queued for playback.
- Green filled = Playing.
Volume Settings [return]
These controls relate to the Volume mapping envelopes.
Volume Slots
Slots 1 to 36 (orange) hold user-definable Volume mapping envelope presets. These slots are pre-assigned to MIDI keys and can be switched live from your controller keyboard (starting from Slot 1 = C2) OR slot changes can be automated by Right-clicking any slot and linking to internal or external controllers. NOTE: Volume slots can be linked to the corresponding Time slot number, use the link setting (bottom middle of the mapping area), in order to create combined Time + Volume presets.
- Edit a slot — Select the slot by clicking it with your mouse. Edit the associated mapping envelope to the right. These changes will be automatically associated with the selected slot.
- Move a slot — Right-click the slot button and select Move slot left / Move slot right from the pop-up menu OR hold CTRL to swap the selected slot with the next slot clicked.
- Rename a slot — Left-click on the slot name in the bottom-left corner of the Mapping area (as shown in the screenshot above) OR click on the slot with the middle-mouse button.
Volume Knobs
The volume knobs are ‘multiplier’ controls applied to the Volume mapping envelopes. They are useful for applying global ADSR tweaks to the volume dynamics of all Volume mappings.
- ATT — Attack volume smoothing. Range: 0ms to 500ms.
- REL — Release volume smoothing. Range: 0ms to 1000ms.
- TNS — Tension adjustment (slope) setting. Range: -100% to 100%.
- Volume — Volume mapping envelope mix setting. Range: 0% to 100%
Automating Slot Selection
To control slot selection by Automation you can use one of three methods ( video here):
- MIDI Controller keyboard (live) — Select Gross Beat and then play notes on your controller. C2+ will control the Volume slots, C5+ will control the Time slots.
- Automation envelope — Right-click anywhere on the Time or Volume preset slots and select ‘Create automation clip’. Then select the type ‘Hold’ for Automation Clip control points. Finally select and Right-click slots to ‘Copy value’ then ‘Paste value’ to the Automation Clip Control Points.
- Fruity Keyboard controller (piano roll) — Add a Fruity Keyboard Controller to the project and then Right-click the Time or Volume slots and select ‘Link to controller’. On the Remote control settings pop-up, from the ‘Internal controller’ menu select ‘Kb Ctl (Fruity Keyboard Controller) — Note’ and press ‘Accept’. The Keyboard Controller notes can now be played from the Piano roll and Patterns added to the Playlist to control Gross Beat.
While editing and playing, slots will show three colors:
- White rectangle = Slot currently being edited.
- Green rectangle = Queued for playback.
- Green filled = Playing.
Envelope Mapping Panel [return]
The envelope mapping panel displays the selected Time or Volume mapping envelope (slots are directly left of the Mapping Panel). Some notes about the mapping area:
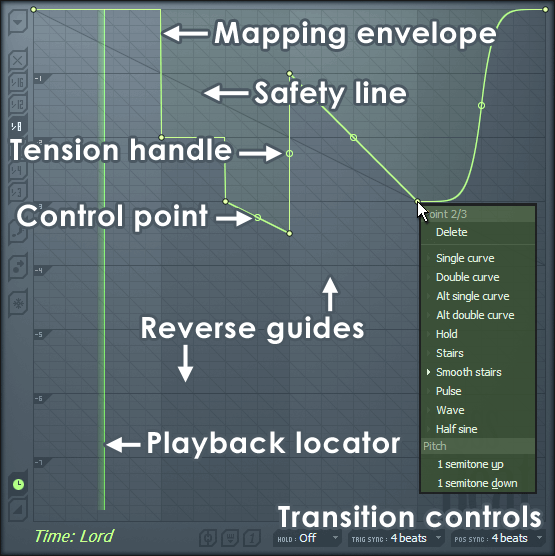
- Mapping controls — A series of controls & options run down the left side and under the mapping area. Top-left is a drop-down menu (as described below). Right-clicking a control-point will open a context menu with options for graphing shapes (as shown in the screen shot, right).
- Width vs height — The mapping panel is 4 beats (1 bar) wide and 8 beats (2 bars) high. This means it is possible to step back up to 8 beats (2 bars) from the current playback position, as long as the audio buffer is full (i.e. the plugin has received at least 2 bars of audio).
- The beat is indicated by the Playback locator — a vertical green scrolling line, visible only when the host is playing.
- Angled guide markings — You will notice single darker and multiple lighter angled lines across the mapping area:
- Safety line — The single dark ‘Safety Line’ cuts across the first 4 beats. The Safety Line shows the safe area for mapping envelopes during the first bar of a song. The area above the Safety Line (and behind the position of the Playback Locator) has buffered audio while the area below does not. If the Time mapping envelope goes below the Safety Line before the time-marker reaches that point, silence will be heard (or is that Gross Beat implodes creating an EMP, causing satellites to fall out of the sky? I can’t remember, you will just have to experiment). While it’s not shown, imagine the Safety Line continues down to the end of the second bar.
If you need to start a song with a full audio buffer add two pre-song bars (with audio, of course) and start with a Volume mapping envelope flat-lining line along the bottom of the Mapping Area, so the pre-bars won’t be heard. After two bars have played then any mapping curve is safe. Bear in mind that if you move into a new section of the song, change from verse to chorus for example, the previous two bars will be stored in the buffer and may not match the audio needed for the new section until another two bars have passed.
- Reverse guides — The multiple grey diagonal lines show the slope required to effect a normal speed reverse playback. Slopes steeper than this line will play fast reverse, shallower will be slow reverse, depending on the angle of the line. NOTE: You can change the slope in semitone units using the Mapping Options menu (select the right-most point defining a slope and apply the 1 semitone up / down function).
Editing Mapping Envelopes
Envelopes conform to the standard Image-Line envelope behaviors with some additional features tuned for use with Gross Beat.
- Add control points — Right-click on the mapping area, continue to hold and drag to reposition the point. Hold ( Shift ) while dragging to lock the vertical position, or ( Ctrl ) to lock the horizontal position. Hold ( Alt ) to override snapping (if selected).
- Move control points — Left-click the control point and drag to the desired position (the point will snap to the background grid unless SNAP is off, see below). Hold ( Shift ) while dragging to lock the vertical position, or ( Ctrl ) to lock the horizontal position. Hold ( Alt ) to override snapping (if selected).
- Change envelope curve — Left-click the tension handle (circle that appears on the envelope between control points) and move up/down. Holding ( Ctrl ) will allow fine adjustment. Right-click the tension handle to reset curve tension.
- Change curve type — There are a number of curve types to select from. Right-click the right-most control point of a pair of control points to select:
- Single curve — Default mode for creating straight or curved segments (depending on the tension).
- Double curve — Smooth ‘S’ curves, useful for scratching effects.
- Alt single curve — Asymmetrical smooth ‘S’ curves, useful for scratching effects.
- Alt double curve — Asymmetrical linear, or accelerating / decelerating curves (depending on the tension).
- Hold — Single steps between points, useful for creating jumps in position.
- Stairs — Multiple steps between the control points. Left-click on the tension handle and move your mouse up/down to change the step frequency. Useful for glitch / decimation effects. Step size controls the ‘graininess’.
- Smooth stairs — Multiple smooth steps between the control points. Left-click on the tension handle and move your mouse up/down to change the step frequency. Useful for changes in pitch and granular effects.
- Pulse — Square wave pulse, adjust the frequency with the tension handle.
- Wave — Sine wave pulse, adjust the frequency with the tension handle.
- Half sine — One half of a sine wave. Useful for creating start, stop and scratch effects.
- Add control points — Right-click the location where you want to add a control point.
- Delete control points — Right-click the point to be deleted and select ‘Delete’ from menu. Alternatively, hold ( Alt ) and Left-click the offending point.
Mapping controls
Down the left-hand side of the mapping area are a number of controls as follows:
Mapping Options Menu
Click on the down-arrow in the top-left corner of the area to access the following mapping envelope options:
- Open state file — Opens pre-saved Editor state files (envelopes, etc).
- Save state file — Saves an Editor state.
- Copy state — Copies the current Editor settings to be copied to another location.
- Paste state — Pastes the Editor state data to the clipboard.
- Undo — Undo last action.
- Undo history — History of edits; click the list to roll back changes.
- Last reset — Delete all edits to the last history reset.
- Tools — Contains a number of quick-edit options:
- Flip vertically — Mirrors the envelope vertically.
- Scale levels — Opens the Scale Level tool that allows you to maintain the current envelope shape while changing vertical values.
- Normalize levels — Scales the mapping envelope to the maximum vertical extent.
- Decimate points — A simple tool that adjusts the number of control points in a mapping envelope.
- Smooth up abrupt changes — Quick removal of ‘spikey’ or sudden changes in the envelope.
- Turn all points smooth — Preset filter to quickly filter the envelope.
- Create sequence — Opens the Envelope Sequencer tool.
- Analyze audio file — Opens a file-import window and analyzes the envelope volume of the selected audio, converting it to an mapping envelope.
Snap Settings
Snap determines how the envelope points snap (lock) to the nearest time/volume grid division.
- X — No snapping. Points can be freely moved to any location.
- 1/16 to 1/3 buttons — 1/16th beat snap to 1/3rd beat snap settings.
NOTES: ( Left-click+Alt ) overrides snapping, ( Shift+Left-click ) locks vertical movement and ( Ctrl+Left-click ) locks horizontal movement of control points.
Источник


