- Group office on windows
- Private Server
- Webuzo
- Softaculous
- Installatron
- AMPPS
- Manage who can create Microsoft 365 Groups
- Licensing requirements
- Step 1: Create a group for users who need to create Microsoft 365 groups
- Step 2: Run PowerShell commands
- Step 3: Verify that it works
- Your online office
- Features
- Cases
- Park and Fly
- Parking Management Software
- Greifswald University
- Groupware
- National Police
- Secure Email Sync
- Get Group Office Now
- Own server
- In the cloud
- Create a group in Outlook
- Stay connected and on schedule
- Instructions for classic Outlook on the web
- Create a PLC group in Outlook (Office 365 Education)
Group office on windows
Group-Office can be downloaded from multiple channels below. Group-Office is open source and free to use for everyone. We offer business add on modules in our shop. When you install Group-Office you can try these for free for 60 days.

Private Server
Take full control and install Group-Office on your own dedicated server. We made it easy with our Debian / Ubuntu packages and Docker image. But you can also use the source package.

Webuzo
Webuzo is a LAMP Stack and a Single User Control Panel which helps you deploy Apps on your server, virtual machine or in the cloud. Webuzo enables you to focus more on using applications rather than maintaining them. Webuzo is also available in the form of Virtual Appliances.
Webuzo has bundled Group Office into the Virtual appliance with all it dependencies i.e Apache, MySQL, PHP, etc.

Softaculous
«Softaculous is the leading Auto Installer having more than 300 great scripts, 1115 PHP Classes and many more to come. Softaculous is widely used in the Web Hosting industry and it has helped millions of users to install applications by the click of a button. Softaculous Auto Installer easily integrates into leading Control Panels like cPanel, Plesk, DirectAdmin, InterWorx, H-Sphere.
You can install Group-Office in just one click through Softaculous. Also you can rate, review and check demo of Group-Office through Softaculous.

Installatron
Installatron is a one-click web application installer that enables Group Office and other top web applications to be instantly installed and effortlessly managed.
Get Group Office up and running on your website in seconds and discover just how easy Installatron makes it to manage web applications

AMPPS
AMPPS is an easy to install software stack of Apache, Mysql, PHP, Perl, Python and Softaculous auto-installer that can be used on Desktops and office servers.
Intermesh BV
Veemarktkade 8
5222 AE ‘s-Hertogenbosch
View on map
Manage who can create Microsoft 365 Groups
By default, all users can create Microsoft 365 groups. This is the recommended approach because it allows users to start collaborating without requiring assistance from IT.
If your business requires that you restrict who can create groups, you can restrict Microsoft 365 Group creation to the members of a particular Microsoft 365 group or security group.
If you’re concerned about users creating teams or groups that don’t comply with your business standards, consider requiring users to complete a training course and then adding them to the group of allowed users.
When you limit who can create a group, it affects all services that rely on groups for access, including:
- Outlook
- SharePoint
- Yammer
- Microsoft Teams
- Microsoft Stream
- Planner
- Power BI (classic)
- Project for the web / Roadmap
The steps in this article won’t prevent members of certain roles from creating Groups. Office 365 Global admins can create Groups via the Microsoft 365 admin center, Planner, Exchange, and SharePoint Online. Other roles can create Groups via limited means, listed below.
- Exchange Administrator: Exchange Admin center, Azure AD
- Partner Tier 1 Support: Microsoft 365 Admin center, Exchange Admin center, Azure AD
- Partner Tier 2 Support: Microsoft 365 Admin center, Exchange Admin center, Azure AD
- Directory Writers: Azure AD
- SharePoint Administrator: SharePoint Admin center, Azure AD
- Teams Service Administrator: Teams Admin center, Azure AD
- User Administrator: Microsoft 365 Admin center, Azure AD
If you’re a member of one of these roles, you can create Microsoft 365 Groups for restricted users, and then assign the user as the owner of the group.
Licensing requirements
To manage who creates groups, the following people need Azure AD Premium licenses or Azure AD Basic EDU licenses assigned to them:
- The admin who configures these group creation settings
- The members of the group who are allowed to create groups
See Assign or remove licenses in the Azure Active Directory portal for more details about how to assign Azure licenses.
The following people don’t need Azure AD Premium or Azure AD Basic EDU licenses assigned to them:
- People who are members of Microsoft 365 groups and who don’t have the ability to create other groups.
Step 1: Create a group for users who need to create Microsoft 365 groups
Only one group in your organization can be used to control who is able to create Groups. But, you can nest other groups as members of this group.
Admins in the roles listed above do not need to be members of this group: they retain their ability to create groups.
In the admin center, go to the Groups page.
Click on Add a Group.
Choose the group type you want. Remember the name of the group! You’ll need it later.
Finish setting up the group, adding people or other groups who you want to be able to create groups in your org.
Step 2: Run PowerShell commands
You must use the preview version of Azure Active Directory PowerShell for Graph (AzureAD) (module name AzureADPreview) to change the group-level guest access setting:
If you haven’t installed any version of the Azure AD PowerShell module before, see Installing the Azure AD Module and follow the instructions to install the public preview release.
If you have the 2.0 general availability version of the Azure AD PowerShell module (AzureAD) installed, you must uninstall it by running Uninstall-Module AzureAD in your PowerShell session, and then install the preview version by running Install-Module AzureADPreview .
If you have already installed the preview version, run Install-Module AzureADPreview to make sure it’s the latest version of this module.
Copy the script below into a text editor, such as Notepad, or the Windows PowerShell ISE.
Replace with the name of the group that you created. For example:
$GroupName = «Group Creators»
Save the file as GroupCreators.ps1.
In the PowerShell window, navigate to the location where you saved the file (type «CD «).
Run the script by typing:
The last line of the script will display the updated settings:

If in the future you want to change which group is used, you can rerun the script with the name of the new group.
If you want to turn off the group creation restriction and again allow all users to create groups, set $GroupName to «» and $AllowGroupCreation to «True» and rerun the script.
Step 3: Verify that it works
Changes can take thirty minutes or more to take effect. You can verify the new settings by doing the following:
Sign in to Microsoft 365 with a user account of someone who should NOT have the ability to create groups. That is, they are not a member of the group you created or an administrator.
Select the Planner tile.
In Planner, select New Plan in the left navigation to create a plan.
You should get a message that plan and group creation is disabled.
Try the same procedure again with a member of the group.
If members of the group aren’t able to create groups, check that they aren’t being blocked through their OWA mailbox policy.
Your online office
Group-Office is an enterprise CRM and groupware tool. Share projects, calendars, files and e-mail online with co-workers and clients. Easy to use and fully customizable.
Features
- Group Office Community
- Group Office Professional
- Add-on modules
- Group Office Professional
Helpdesk Time Tracking Mobile Sync Projects Document editing
- Seperate Add-ons
Billing Document Search
Cases

Park and Fly
Parking Management Software
Parking at Schiphol Airport has never been this simple. We all know how much there is to organise before a holiday or business trip: the flights, the paperwork, the luggage. And it doesn’t end when you arrive at Schiphol. You still have to find a parking spot, board the shuttle bus — often with heavy luggage — and then find your way on foot to the correct departure lounge. A time-consuming and exhausting affair. But there is a simpler way: with Park and Fly!


Greifswald University
Groupware
In Greifswald we personally guided the IT department for two days. We helped them configuring Group-Office on an active-active cluster. The cluster consists of servers. Each server is equiped with 2 quad core processors and 24 GB of ram. The servers both run Apache, MySQL and an OSCFS2 clustered filesystem. This Group-Office installation hosts over 20.000 users. They maintain all their users in an LDAP directory so we configured Group-Office to use their LDAP directory for user authentication.

National Police
Secure Email Sync
The Rijksrecherche in the Netherlands uses Group-Office in the Hague with about 100 users. We developed PGP e-mail encryption for them and the SyncML plugin for synchronizing their mobiles.
Get Group Office Now
You can download Group-Office and install it on your own server or you can sign up for the cloud version hosted at Intermesh. You can also checkout the demo.
Own server
Download install on your server
In the cloud
Hosted Group Office
We’re proud to announce Group-Office version 6.5:
https://t.co/pe6rwnYhCA
#groupware #crm
Run your private office with Group-Office and @only_office ! Designed to make collaboration easy. A complete produc… https://t.co/OrsUfFfaDI
Intermesh BV
Veemarktkade 8
5222 AE ‘s-Hertogenbosch
View on map
Create a group in Outlook
Stay connected and on schedule
You can be organized, on time, and buttoned up with Outlook — your life organizer.
A Microsoft 365 group is different from a contact group (formerly called a distribution list). A contact group is a set of email addresses that you can use to send an email message or meeting invitation to everyone at once. To create a contact group, see Create a contact group.
Watch a short video about creating a group to be used as a company email address.

Open Outlook for Windows.
Select Home > New Group.

 Don’t see New Group in your ribbon? Your IT department might not have enabled Groups for your organization. Contact them for assistance.
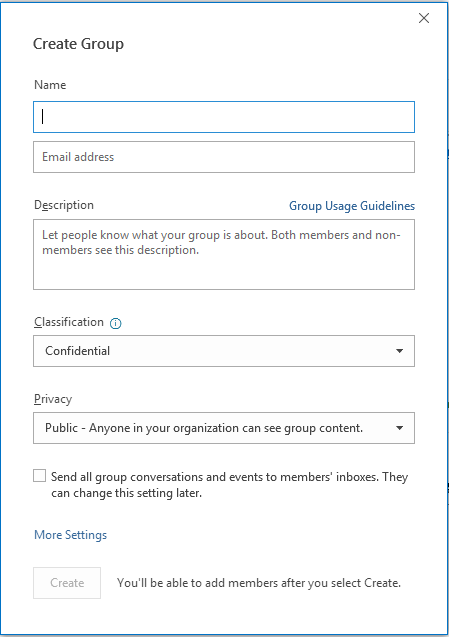
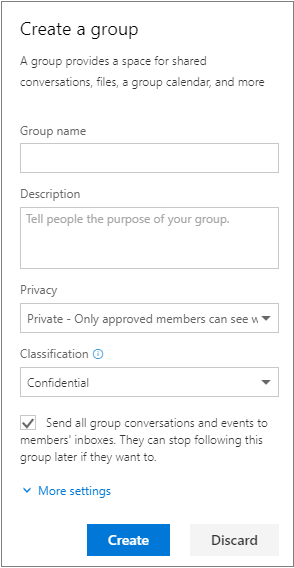
Fill out the group information.
Group name: Create a name that captures the spirit of the group.
Once you enter a name, a suggested email address is provided. «Not available» means the group name is already in use and you should try a different name. Note that once you choose a group name, it cannot be changed.
Description: Optionally, enter a description that will help others understand the group’s purpose. This description will be included in the welcome email when others join the group.
Classification: Choose a classification. Options available depend on what your organization has set up.
Privacy: By default, Groups are created as Private. This means only approved members in your organization can see what’s inside the group. Anyone else in your organization who is not approved cannot see what’s in the group.
Select Public to create a group where anyone within your organization can view its content and become a member.
Select Private to create a group where membership requires approval and only members can view group content.
Send all group conversations and events to members’ inboxes Optionally, check this box to enable members to see all group conversations and events in their inbox without having to visit separate group workspaces. Members can change this setting for their own mailboxes.
Note: This feature is available to Office Insider participants with Microsoft 365 subscription. If you are a Microsoft 365 subscriber, make sure you have the latest version of Office.
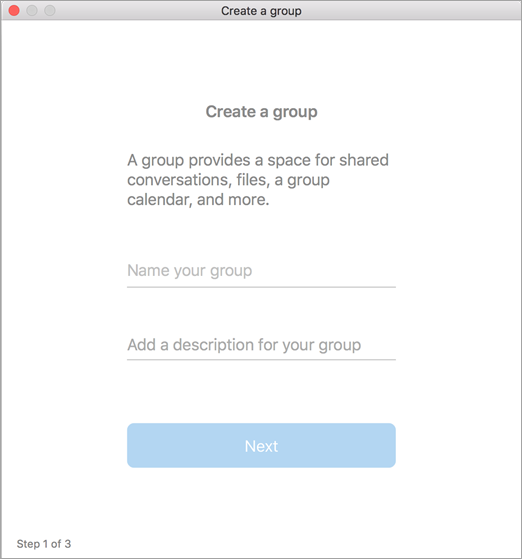
Open Outlook for Mac.
Select File > New > Group.
Don’t see Group in your menu? Your IT department might not have enabled Groups for your organization. Contact them for assistance.
Fill out the group information:
Group name: Create a name that captures the spirit of the group.
Once you enter a name, a suggested email address is provided. «Not available» means the group name is already in use and you should try a different name. Note that once you choose a group name, it cannot be changed.
Description: Optionally, enter a description that will help others understand the group’s purpose. This description will be included in the welcome email when others join the group. Click Next.
Type member email addresses or select members from the contact list to add to the group. You can add guests who are people outside your school or your organization to the group.
Privacy: By default, Groups are created as Private. This means only approved members in your organization can see what’s inside the group. Anyone else in your organization who is not approved cannot see what’s in the group.
Select Public to create a group where anyone within your organization can view its content and become a member.
Select Private to create a group where membership requires approval and only members can view group content.
Classification: Choose a classification. Options available depend on what your organization has set up.
Click Create. You’ll see a welcome mail in your newly created group inbox.
Note: If the instructions don’t match what you see, you might be using an older version of Outlook on the web. Try the Instructions for classic Outlook on the web.
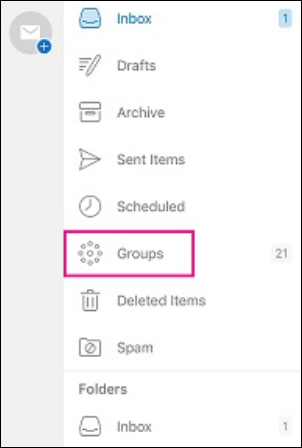
Open Outlook on the web
In the left pane, under Groups, select New group or right-click Groups and select New group.
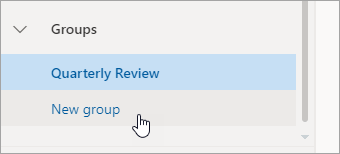
Note: If you don’t see Groups in the left pane, your organization may not have turned on Groups.
Fill out group information:
Group name: Create a name that captures the spirit of the group.
Once you enter a name, a suggested email address is provided. «Not available» means the group name is already in use and you should try a different name. Note that once you choose a group name, it cannot be changed.
Description: Optionally, enter a description that will help others understand the group’s purpose. This description will be included in the welcome email when others join the group.
Privacy: By default, groups are created as Private. This means only approved members in your organization can see what’s inside the group. Anyone else in your organization who is not approved cannot see what’s in the group.
Select Public to create a group where anyone within your organization can view its content and become a member.
Select Private to create a group where membership requires approval and only members can view group content.
Classification: Choose a classification. Options available depend on what your organization has set up.
Send all group conversations and events to members’ inboxes Optionally, check this box to enable members to see all group conversations and events in their inbox without having to visit separate group workspaces. Members can change this setting for their own mailboxes.
Instructions for classic Outlook on the web
Open Outlook on the web.
In the left pane, next to Groups, select the + button. (If you don’t see the + button, hover your mouse over the left pane.)
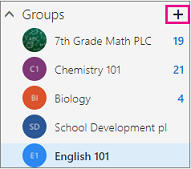
Note: If you don’t see Groups in the left pane, your organization may not have turned on Groups.
Fill out the group information.
Group name: Create a name that captures the spirit of the group.
Once you enter a name, a suggested email address is provided. «Not available» means the group name is already in use and you should try a different name. Note that once you choose a group name, it cannot be changed.
Description: Optionally, enter a description that will help others understand the group’s purpose. This description will be included in the welcome email when others join the group.
Privacy: By default, groups are created as Private. This means only approved members in your organization can see what’s inside the group. Anyone else in your organization who is not approved cannot see what’s in the group.
Select Public to create a group where anyone within your organization can view its content and become a member.
Select Private to create a group where membership requires approval and only members can view group content.
Classification: Choose a classification. Options available depend on what your organization has set up.
Send all group conversations and events to members’ inboxes Optionally, check this box to enable members to see all group conversations and events in their inbox without having to visit separate group workspaces. Members can change this setting for their own mailboxes.
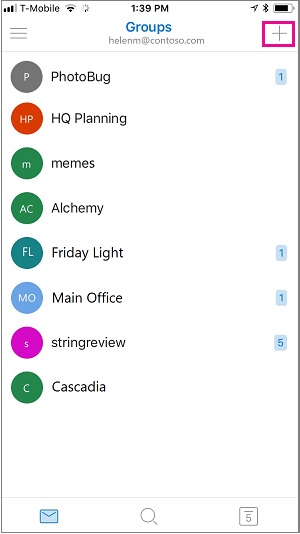
Open the Outlook mobile app.
Select Groups from the folder pane.
Don’t see Groups in your folder pane? Your IT department might not have enabled Groups for your organization. Contact them for assistance.
In the Groups header, tap +.
On the New Group page, type a name for the group > Next.
On the Settings page, enter the required information, including privacy level, (Public or Private), classification, and whether group members should follow group conversations and events in their personal inboxes.
Type member email addresses or select members from the contact list to add to the group. You can add guests to the group.
Tap Add. You’ll see a welcome mail in your newly created group inbox.
Create a PLC group in Outlook (Office 365 Education)
A Professional Learning Community (PLC) group is a type of Microsoft 365 Group that provides a shared space for educators to use for collaboration. PLCs are available in the Microsoft 365 Education plans.
A PLC is very similar to other Microsoft 365 groups. It comes with a shared mailbox and calendar, shared document library, and OneNote Notebook. The notebook is designed for educators and includes templates and lots of resources that provide ideas and assistance.
Creation of PLC groups is not supported in the new Outlook on the web. Creating PLC groups is now only available on Teams
If you want to create a PLC group, you can still do it in Teams or by switching to the classic version of Outlook on the web while it’s available.
Existing PLC groups are not affected, can be accessed from Outlook on the web as usual, and used as you have always done. This change only affects new PLC groups. To learn more on how to create PLC groups in Teams, see Create team for PLCs in Microsoft Teams


