- Как отключить Защитник Windows с помощью GPO
- Как отключить Защитник Windows с помощью системного реестра
- Защитник Windows отключен групповой политикой
- Защитник Windows отключен групповой политикой
- Проверьте, выключен ли Защитник Windows через Настройки
- Включить Защитник Windows с помощью групповой политики
- Настроить реестр, чтобы включить Защитника Windows
- Disable Windows Defender Application Control policies
- Disable unsigned Windows Defender Application Control policies
- Disable signed Windows Defender Application Control policies within Windows
- Disable signed Windows Defender Application Control policies within the BIOS
- FIX: Windows Defender is deactivated by Group Policy
- How can I fix This app is turned off by Group Policy error?
- 1. Check your PC for malware
- Malwarebytes
- 2. Consider switching to a different third-party antivirus
- Bitdefender Antivirus Plus
- 3. Make sure that old third-party antivirus tools are removed
- IObit Uninstaller
- 4. Use redegit
- Run a System Scan to discover potential errors
- 5. Use the Group Policy
- 6. Turn on Windows Defender from the Settings app
- 7. Turn on Windows Defender using the command line
- 8. Check if Windows Defender service is running
Как отключить Защитник Windows с помощью GPO
Редактор групповых политик является компонентом Windows 10 Pro и Enterprise (Корпоративная). Для отключения Защитника Windows нужно выполнить следующие шаги:
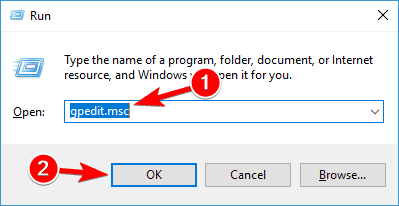
Нажмите иконку Поиск (или клавишу Windows) и введите gpedit.msc, затем нажмите клавиша ввода Enter. При необходимости подтвердите запрос службы контроля учетных записей для запуска редактора групповых политик.
Вы найдете нужный параметр по следующему пути Политика
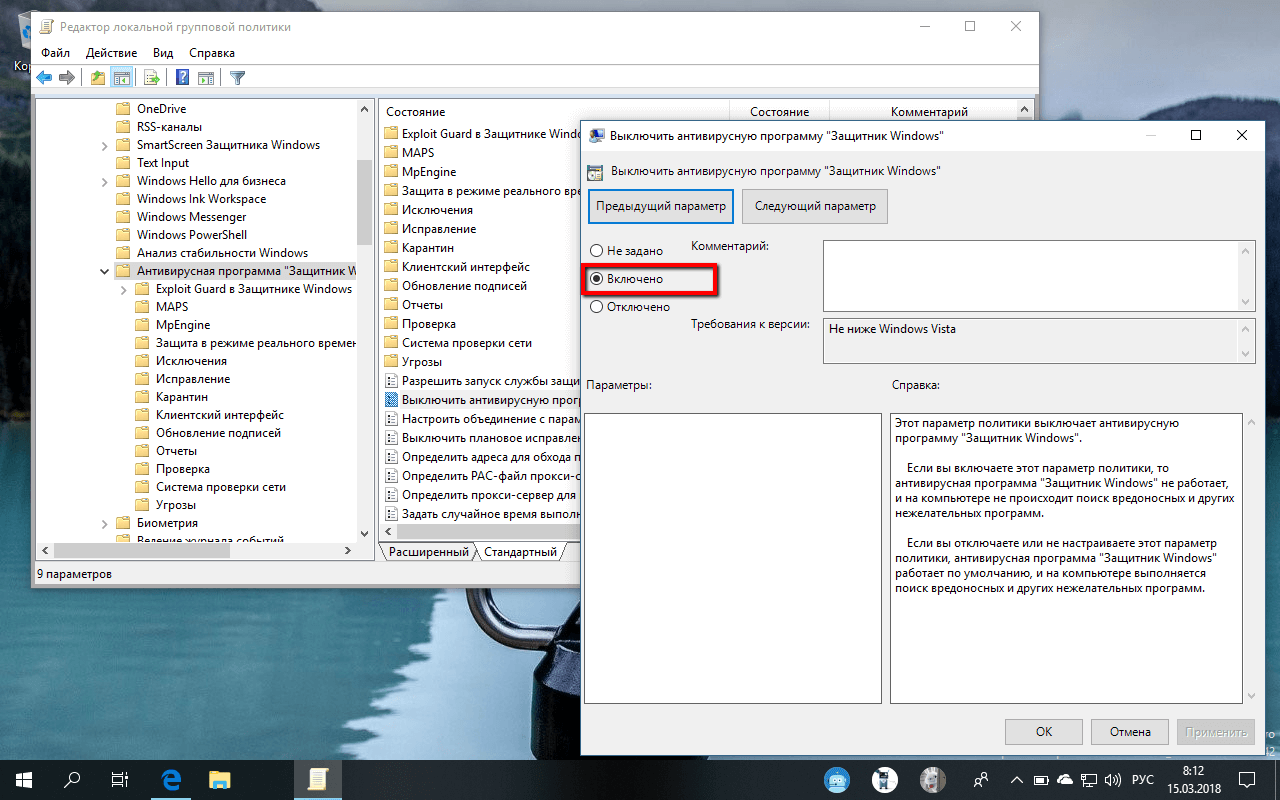
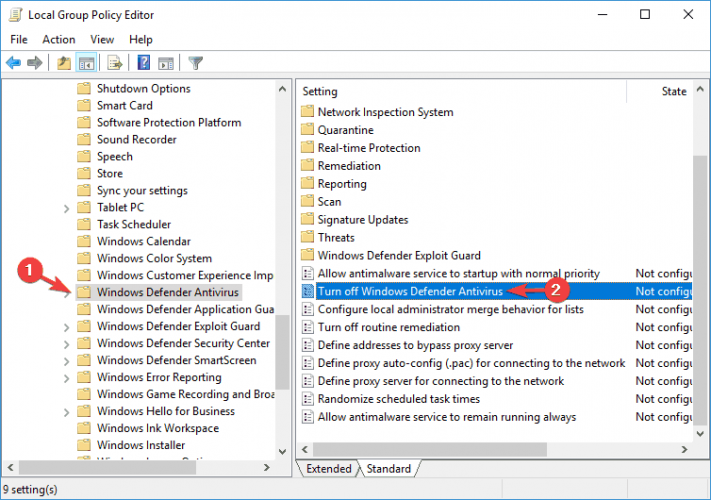
“Локальный компьютер” > Конфигурация компьютера > Административные шаблоны > Компоненты Windows > Антивирусная программа “Защитник Windows”.
В правой части окна выберите политику Выключить антивирусную программу “Защитник Windows” .
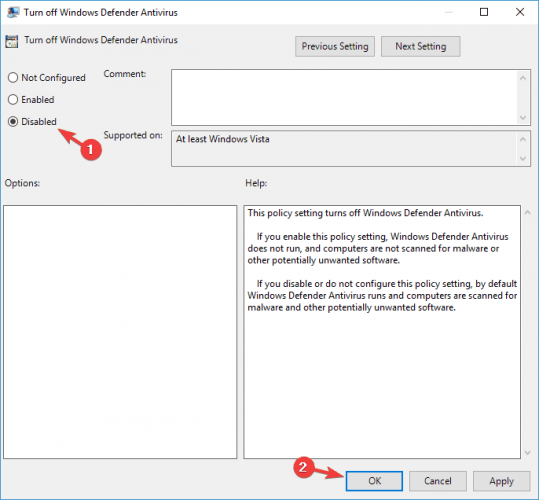
В открывшемся окне установите состояние политики на Включено и примените изменение, затем нажмите ОК.
Затем перейдите по следующему пути Политика
“Локальный компьютер” > Конфигурация компьютера > Административные шаблоны > Компоненты Windows > Антивирусная программа “Защитник Windows” > Защита в режиме реального времени.
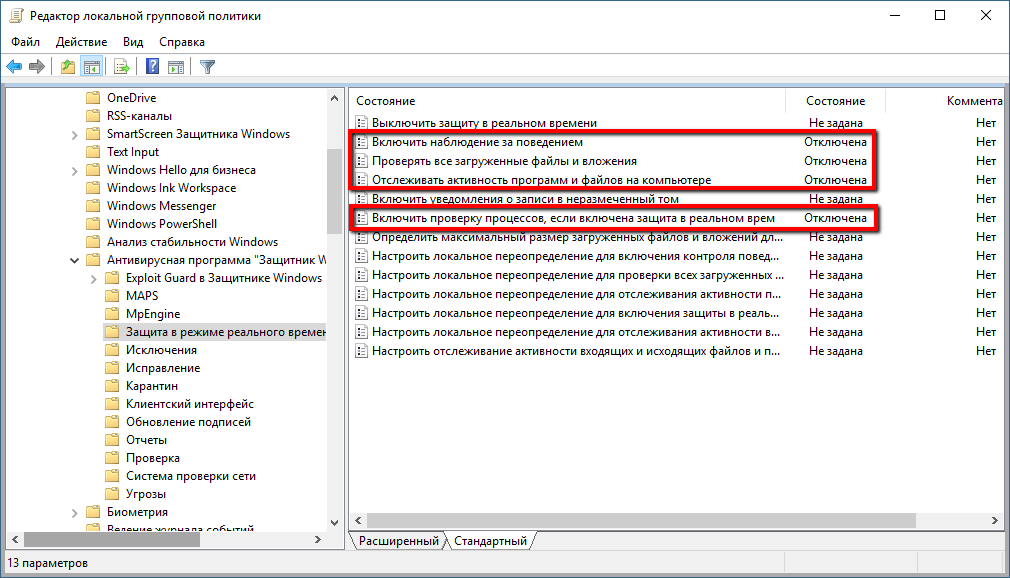
В правой части окна выберите политику Включить наблюдение за поведением.
В открывшемся окне установите состояние политики на «Отключено» и примените изменение, затем нажмите ОК.
Находясь в разделе “Защита в режиме реального времени” выберите политику Отслеживать активность программ и файлов на компьютере.
В открывшемся окне установите состояние политики на «Отключено» и примените изменение, затем нажмите ОК.
Находясь в разделе “Защита в режиме реального времени” выберите политику Включить проверку процессов, если включена защита реального времени.
В открывшемся окне установите состояние политики на «Отключено» и примените изменение, затем нажмите ОК.
Находясь в разделе Защита в режиме реального времени” выберите политику Проверять все загруженные файлы и вложения.
В открывшемся окне установите состояние политики на «Отключено» и примените изменение, затем нажмите ОК.
Перезагрузите компьютер
После завершения данных шагов и перезагрузки ПК Защитник Windows больше не будет сканировать и обнаруживать вредоносные программы.
В любое время вы можете снова включить антивирусную программу “Защитник Windows” — для этого выполните предыдущие шаги указав значение “Не задано”.
Как отключить Защитник Windows с помощью системного реестра
Редактор групповых политик недоступен в Windows 10 Домашняя, но вы можете сделать то же самое с помощью редактора реестра.
Примечание: Некорректное изменение реестра может привести к серьезным проблемам. Рекомендуется создать резервную копию реестра Windows перед тем, как выполнить данные шаги. В меню редактора реестра выберите Файл > Экспорт для сохранения резервной копии.
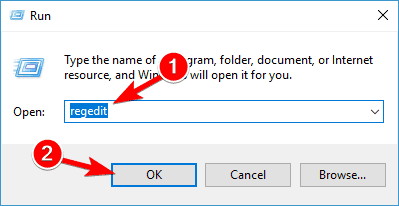
Нажмите иконку Поиск (или клавишу Windows) и regedit, затем нажмите клавиша ввода Enter. При необходимости подтвердите запрос службы контроля учетных записей для запуска редактора групповых политик. Перейдите по следующему пути
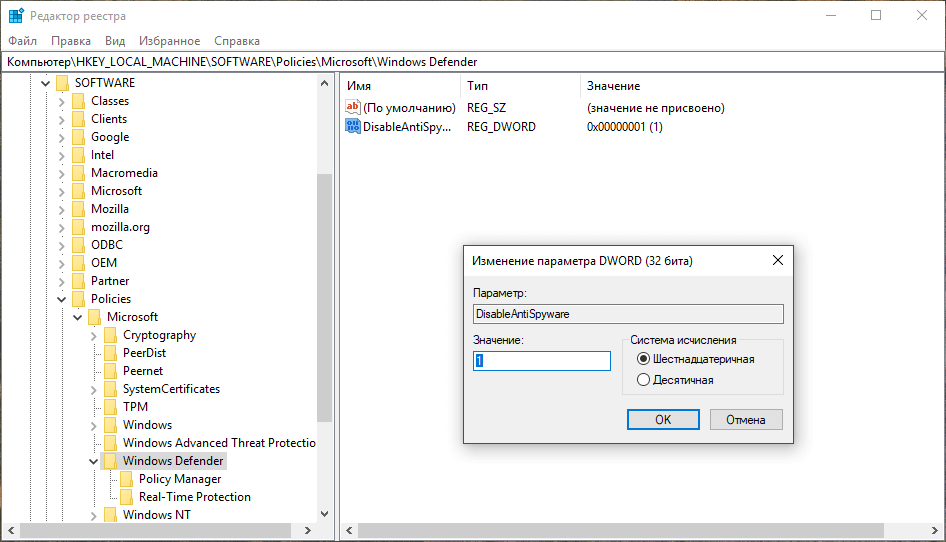
HKEY_LOCAL_MACHINE\SOFTWARE\Policies\Microsoft\Windows Defender
Щелкните правой кнопкой мыши по папке “Windows Defender”, выберите Создать > Параметр DWORD (32 бита).
Назовите параметр DisableAntiSpyware и нажмите Enter.
Щелкните дважды по созданному ключу и установите значение от 1, затем нажмите ОК.
Щелкните правой кнопкой мыши по папке “Windows Defender”, выберите Создать > Раздел.
Назовите раздел Real-Time Protection и нажмите Enter.
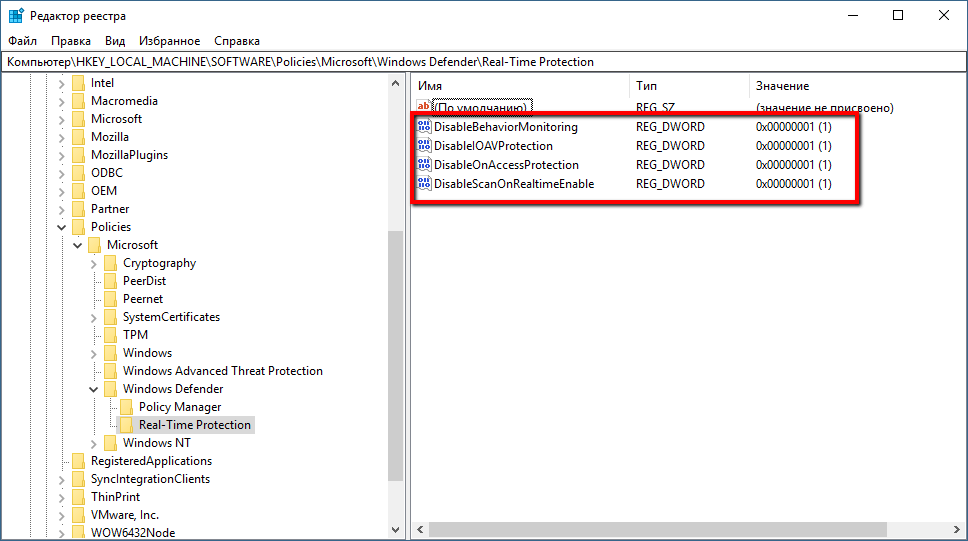
Щелкните правой кнопкой мыши по папке “Real-Time Protection”, выберите Создать > Параметр DWORD (32 бита) и создайте следующие параметры:
Назовите параметр DisableBehaviorMonitoring и нажмите Enter. Щелкните дважды по созданному ключу и установите значение 1, затем нажмите ОК.
Назовите параметр DisableOnAccessProtection и установите значение 1, затем нажмите ОК.
Назовите параметр DisableScanOnRealtimeEnable и нажмите Enter. Щелкните дважды по созданному ключу и установите значение 1, затем нажмите ОК.
Назовите параметр DisableIOAVProtection и нажмите Enter. Щелкните дважды по созданному ключу и установите значение 1, затем нажмите ОК.
После завершения данных шагов и перезагрузки ПК Защитник Windows больше не будет сканировать и обнаруживать вредоносные программы.
В любое время вы можете снова включить антивирусную программу “Защитник Windows”. Для этого нужно удалить ключ DisableAntiSpyware. Затем нужно удалить раздел “Real-Time Protection” и все его содержимое, после чего потребуется перезагрузка компьютера.
Защитник Windows отключен групповой политикой
Защитник Windows – это антивирус по умолчанию для Windows 10. Этого достаточно для большинства основных случаев. Следовательно, вам не понадобится сторонний вариант, за исключением крайних случаев, которые встречаются довольно редко. Не говоря уже о том, что Защитник Windows не является источником ресурсов, поэтому он должен хорошо работать с вашей системой Windows 10. Теперь бывают случаи, когда Защитник Windows не работает из-за групповой политики. Это может происходить время от времени, но не беспокойтесь, мы здесь для того, чтобы успокоить вас несколькими исправлениями.
Защитник Windows отключен групповой политикой

Если вы получили ошибку групповой политики Защитника Windows, в которой говорится, что Защитник Windows – это приложение отключено групповой политикой, вам необходимо включить его с помощью редактора групповой политики, параметров или реестра. Узнайте, как это сделать.
Проверьте, выключен ли Защитник Windows через Настройки
Первый вариант – проверить, не выключена ли Windows 10 с помощью приложения «Настройки». Мы сделаем это, запустив Windows Key + I , чтобы открыть приложение Настройки , а затем перейдите в Обновление и безопасность .
Выберите в меню Защитник Windows , затем выберите Открыть Центр безопасности Защитника Windows . Кроме того, перейдите в раздел Защита от вирусов и угроз , а затем перейдите в Настройки защиты от вирусов и угроз внизу.
Найдите Защита в реальном времени и включите ее, если она не была включена ранее. Это должно все исправить.
Если это не сработает, тогда нам придется сделать что-то более сложное, поэтому следуйте внимательно.
Включить Защитник Windows с помощью групповой политики
Запустите диалоговое окно «Выполнить», нажав Windows Key + R , и убедитесь, что вы вошли в систему как администратор. Введите gpedit.msc в поле и перейдите к:
Политика локального компьютера> Административные шаблоны> Компоненты Windows> Антивирус Защитника Windows.
На правой панели дважды нажмите Отключить антивирус Защитника Windows. Теперь в открывшемся окне «Свойства» выберите Не настроен и нажмите «ОК».
Этот параметр политики отключает Антивирус Защитника Windows. Если этот параметр политики включен, антивирус Защитника Windows не запускается, и компьютеры не сканируются на наличие вредоносных программ или другого потенциально нежелательного программного обеспечения. Если этот параметр политики отключен или не настроен, по умолчанию запускается антивирус Защитника Windows, и компьютеры сканируются на наличие вредоносных программ и другого потенциально нежелательного программного обеспечения.
Перезагрузите компьютер, чтобы увидеть окончательные изменения. Если все работает хорошо, то отлично.
Настроить реестр, чтобы включить Защитника Windows
Итак, план здесь – нажать Windows Key + R , чтобы открыть диалоговое окно Выполнить , затем введите regedit в поле и нажмите Enter после. Это должно запустить редактор реестра Windows 10. Найдите следующий ключ:
Если вы видите ключ DisableAntiSpyware , удалите его.
Если вам нужны дополнительные данные, этот пост в Защитнике Windows отключен или не работает.
Disable Windows Defender Application Control policies
Applies to:
- WindowsВ 10
- WindowsВ Server 2016
This topic covers how to disable unsigned or signed WDAC policies.
Disable unsigned Windows Defender Application Control policies
There may come a time when an administrator wants to disable a WDAC policy. For unsigned WDAC policies, this process is simple. The method used to deploy the policy (such as Group Policy) must first be disabled, then simply delete the SIPolicy.p7b policy file from the following locations, and the WDAC policy will be disabled on the next computer restart:
Note that as of the Windows 10 May 2019 Update (1903), WDAC allows multiple policies to be deployed to a device. To fully disable WDAC when multiple policies are in effect, you must first disable each method being used to deploy a policy. Then delete the
Disable signed Windows Defender Application Control policies within Windows
Signed policies protect Windows from administrative manipulation as well as malware that has gained administrative-level access to the system. For this reason, signed WDAC policies are intentionally more difficult to remove than unsigned policies. They inherently protect themselves from modification or removal and therefore are difficult even for administrators to remove successfully. If the signed WDAC policy is manually enabled and copied to the CodeIntegrity folder, to remove the policy, you must complete the following steps.
For reference, signed WDAC policies should be replaced and removed from the following locations:
Replace the existing policy with another signed policy that has the 6 Enabled: Unsigned System Integrity Policy rule option enabled.
NoteВ В To take effect, this policy must be signed with a certificate previously added to the UpdatePolicySigners section of the original signed policy you want to replace.
Restart the client computer.
Verify that the new signed policy exists on the client.
NoteВ В If the signed policy that contains rule option 6 has not been processed on the client, the addition of an unsigned policy may cause boot failures.
Delete the new policy.
Restart the client computer.
If the signed WDAC policy has been deployed using by using Group Policy, you must complete the following steps:
Replace the existing policy in the GPO with another signed policy that has the 6 Enabled: Unsigned System Integrity Policy rule option enabled.
NoteВ В To take effect, this policy must be signed with a certificate previously added to the UpdatePolicySigners section of the original signed policy you want to replace.
Restart the client computer.
Verify that the new signed policy exists on the client.
NoteВ В If the signed policy that contains rule option 6 has not been processed on the client, the addition of an unsigned policy may cause boot failures.
Set the GPO to disabled.
Delete the new policy.
Restart the client computer.
Disable signed Windows Defender Application Control policies within the BIOS
There may be a time when signed WDAC policies cause a boot failure. Because WDAC policies enforce kernel mode drivers, it is important that they be thoroughly tested on each software and hardware configuration before being enforced and signed. Signed WDAC policies are validated in the pre-boot sequence by using Secure Boot. When you disable the Secure Boot feature in the BIOS, and then delete the file from the following locations on the operating system disk, it allows the system to boot into Windows:
FIX: Windows Defender is deactivated by Group Policy

- Is Windows Defender deactivated by Group Policy? The troubleshooting tips below will help you out.
- They involve using regedit or turning on Windows Defender by running a couple of commands.
- You can also use one of these great anti-malware software tools to quickly scan your computer.
- Whenever you need help, remember that this Windows 10 Errors Hub includes unique solutions to all your problems.

- Download Restoro PC Repair Tool that comes with Patented Technologies (patent available here).
- Click Start Scan to find Windows issues that could be causing PC problems.
- Click Repair All to fix issues affecting your computer’s security and performance
- Restoro has been downloaded by 0 readers this month.
Microsoft’s built-in antivirus, Windows Defender, is used by millions of people to protect their computers.
Unfortunately, sometimes Windows Defender can’t do its job because of various errors.
One of the most common Windows Defender error messages is the following: This app is turned off by Group Policy.
This message appears if you installed another antivirus program or an anti-hacking tool that isn’t fully compatible with Microsoft’s built-in antivirus.
Windows Defender is a solid antivirus, but sometimes issues with it can occur. Speaking of Windows Defender issues, here are some problems that users reported:
- Group Policy blocks Windows Defender Windows 10 – This issue can occur on Windows 10 and even prior versions. Even if you don’t use Windows 10, you should be able to apply most of our solutions to the older versions of Windows.
- Turn Windows Defender on via Group Policy – If your Windows Defender is turned off by Group Policy, you can fix this problem with ease. Simply change a couple of values in Group Policy and Windows Defender should start working again.
- Group Policy blocks Windows Defender – If your Group Policy blocks Windows Defender, you might be able to fix the problem simply by making few changes in your registry.
- Unable to start Windows Defender Group Policy – If Windows Defender is blocked by Group Policy, you can solve the issue simply by starting Windows Defender from the Settings app.
- Windows Defender stopped by Group Policy, not working Group Policy – These are some common problems that can occur with Windows Defender, but you should be able to solve them with one of our solutions.
How can I fix This app is turned off by Group Policy error?
1. Check your PC for malware

Sometimes you can encounter this problem due to malware infection. Sometimes malware can get administrative privileges on your PC and disable Windows Defender from Group Policy.
However, you can fix that issue simply by scanning your PC with one of the best anti-malware tools that you can find. If you’re looking for such a tool, we suggest you try Malwarebytes.
It will clean your PC from malware, and it’s incredibly simple to use, so be sure to try it out. Once you remove the malware from your PC, you should be able to activate Windows Defender without any issues.
Malwarebytes
2. Consider switching to a different third-party antivirus

Windows Defender is a solid antivirus, but if you can’t fix the Windows Defender is deactivated by Group Policy message, you might want to consider switching to a third-party antivirus solution.
Unlike Windows Defender, third-party antivirus tools offer some advanced features that many users will find useful.
If you want extra security on your PC, you should consider Bitdefender Antivirus Plus. It’s the world’s nr.1 for a good reason – it offers great protection from malware.
Bitdefender Antivirus Plus
3. Make sure that old third-party antivirus tools are removed

Windows Defender is designed to turn itself off once you install a third-party antivirus. If you had a third-party antivirus on your PC, it’s possible that the issue was caused by it.
Even if you remove your antivirus, sometimes there might be some leftover files or registry entries. These files can also interfere with Windows Defender and cause this issue to appear.
To fix the problem, it’s important to remove those files from your PC. The best way to do it is to download a dedicated uninstaller for your antivirus.
If you can’t find this tool, you can also use uninstaller software. These tools will remove any leftover files and registry entries and completely remove any application from your PC.
There are many great uninstallers available, but one of the best is IOBit Uninstaller. After you remove the leftover files with this tool, you should be able to start Windows Defender without any issues.
IObit Uninstaller
4. Use redegit
- Press Windows Key + R shortcut, type regedit and hit Enter.

- Go to HKey_Local_Machine\SoftwarePolicies\Microsoft\Windows Defender
- Delete the value in the DisableAntiSpyware key.

Run a System Scan to discover potential errors


More specifically, some users will see two options
- Under type, it says – REG -DWORD
- Under Data, it says – (invalid DWORD (32-bit) value)
Double click on the REG -DWORD and a small window will open where you can delete the value or set it to zero. If you can’t change the key value, delete the whole key.
Some users are reporting that you can fix the problem by deleting the DisableRealtimeMonitoring DWORD so you might want to try that as well.
5. Use the Group Policy
- Log in as an administrator. Type gpedit.msc in the Search bar and hit Enter.
- Go to Local Computer Policy >Administrative Templates >Windows Components >Windows Defender Antivirus. Select Windows Defender > in the right-hand panel, you’ll see the option Turn off Windows Defender Antivirus. Double-click to open it.
- In the new window > select Disable > click OK to save the settings.
Want to use Group Policy on your Windows 10 Home edition? Find out how to get it by using this quick guide.
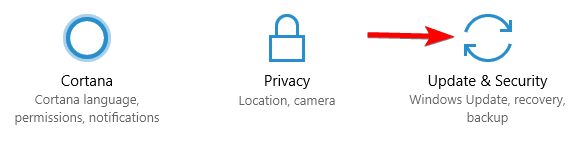
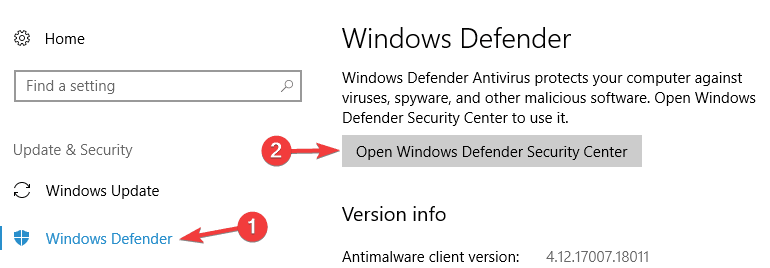
6. Turn on Windows Defender from the Settings app
- Open the Settings app. You can do that quickly by using Windows Key + I shortcut.
- When the Settings app opens, navigate to the Update & Security section.
- Select Windows Defender from the menu on the left and in the right pane click Open Windows Defender Security Center.
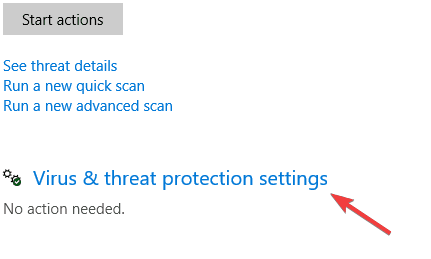
- Now select Virus & threat protection.
- Navigate to Virus & threat protection settings.
- Now locate Real-time protection and enable it.

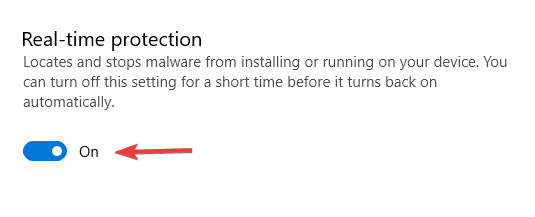
If you’re getting a message that Windows Defender is deactivated by Group Policy, you might be able to fix the problem simply by turning it on from the Settings app.
After doing that, Windows Defender should be enabled and your PC will be protected.
If you’re having trouble opening the Setting app, take a look at this dedicated article to solve the issue.
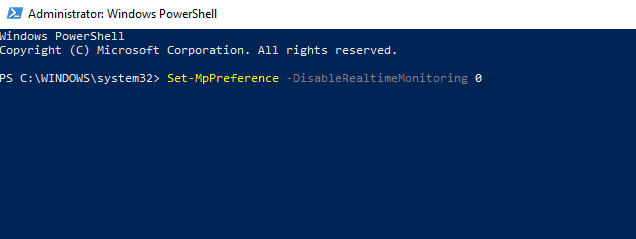
7. Turn on Windows Defender using the command line
- Press Windows Key + S and enter powershell. Right-click Windows PowerShell from the list and choose Run as administrator from the menu.
- When PowerShell opens, enter Set-MpPreference -DisableRealtimeMonitoring 0 and press Enter.

If you’re an advanced user, you can fix the problem with Windows Defender is deactivated by Group Policy message simply by running a couple of commands in the command line.
This method is the fastest since it allows you to turn on or off Windows Defender in a matter of seconds. To enable Windows Defender, you just need to do as described above.
After doing that, the Windows Defender will become enabled and the issue should be resolved.
You can also use Command Prompt to enable Windows Defender. By using the Command Prompt you’ll modify your registry.
Basically, you’ll perform the same action as in Solution 1, but you’ll do it with just a single command in a matter of seconds. To do that, just follow these steps:
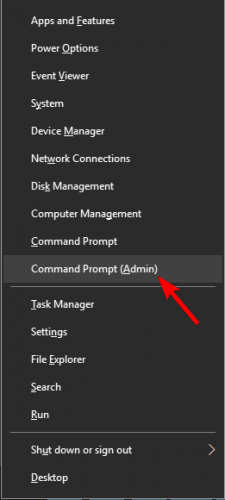
- Press Windows Key + X to open Win + X menu. Now choose Command Prompt (Admin) from the list.
- When Command Prompt opens, enter REG DELETE HKLMSOFTWAREPoliciesMicrosoftWindows Defender /v DisableAntiSpyware command and press Enter.
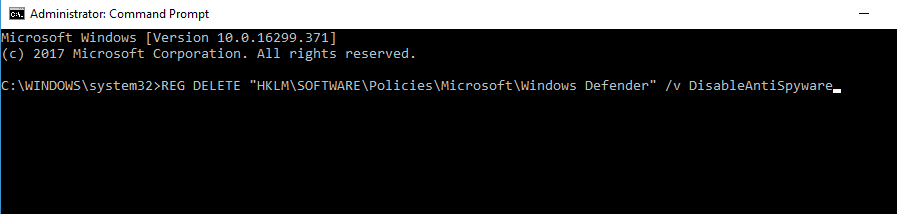
After doing that, the selected value will be deleted from the registry and Windows Defender should start working again.
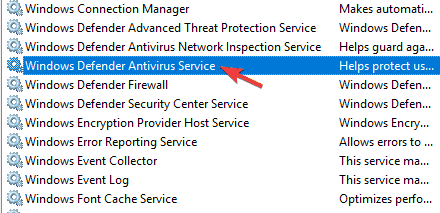
8. Check if Windows Defender service is running
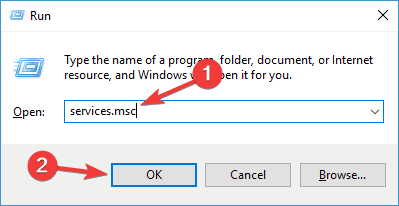
- Press Windows Key + R and enter services.msc. Now press Enter or click OK.
- A list of services will now appear. Scroll down and double-click the Windows Defender Antivirus Service to open its properties.
- Set the Startup type of the service to Automatic and click the Start button to start the service. Now click Apply and OK to save changes.
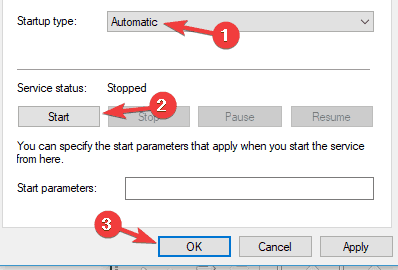
After enabling the service, the issue should be resolved and Windows Defender will start working again.
Windows relies on certain services in order to work properly, but if there’s a problem with one of those services, you might encounter certain issues.
If you’re getting a message saying that Windows Defender is deactivated by Group Policy, the problem might be the disabled Windows Defender service.
However, you can easily enable this service and fix the problem by doing as described above.
There you go, use one of these methods and the Group Policy will no longer disable Windows Defender. If you have any more suggestions or questions, feel free to drop them in the comments section below.


