- Грубая правда о Grub’е 2
- 1. Изменение настроек по умолчанию
- 2. Добавление и удаление пунктов меню. Редактирование этих пунктов
- 3. Создаем собственное модульное меню и деактивируем меню, созданное автоматически
- 4. Никому не верь, особенно разработчикам (Для самых отчаянных)
- 5. Подведение итогов
- Grub disable linux uuid
Грубая правда о Grub’е 2
Не понимаю я логики иных разработчиков.
Если берешься усовершенствовать, согласно своим представлениям, некую популярнейшую и необходимейшую миллионам людей программу, и при этом начинаешь писать ее с нуля, то почему бы тебе не дать проекту другое название. Пусть старая добрая программа остается со своим брендом, а ты создай новый бренд, если так уверен в успехе своей программы.
Вместо этого, старый добрый проект закрывается, новая поделка навязывается насильно, и всем плевать на свободу выбора, которой так гордился прежде мир свободного софта.
Сказанное относится: к незажившей ране ≈ KDE; к возникшему в начале 2011 года Gnome3; и к неотвратимо расползающемуся, подобно раковой опухоли, Grub2. Все три этих инновации объединяет то, что они откровенно хуже (ресурсоемкость, медлительность, неудобство или невозможность настроек), несовместимы со своими предшественниками и базируются на бредовых идеях. А цель подобных инноваций только одна ≈ сделать «как у Виндоуз» ≈ то есть, чтобы пользователь не смог самостоятельно настраивать программы, а при каждой нештатной ситуации бежал к «специалисту», то есть платил деньги.
Тема сегодняшнего обсуждения ≈ Grub2, давайте перейдем к нему.
На первый взгляд, он вроде бы не сильно отличается от предшественника ≈ Grub Legacy. При инсталляции так же бодро обследует жесткие диски, находит все операционные системы и выдает удобное загрузочное меню. Это меню снабжено всякими картинками и даже озвучено и внешне выгодно отличается от старого.
Приходилось слышать мнение ≈ «Дескать, в старом грубе один файл настройки, в новом ≈ другие, притерпимся и привыкнем».
Но горе вам, если вы постоянно устанавливаете новые дистрибутивы, удаляете старые, меняете ядра, имеете клоны разделов или просто хотите иметь внятные и понятные вам пункты меню вместо стандартных безликих надписей!
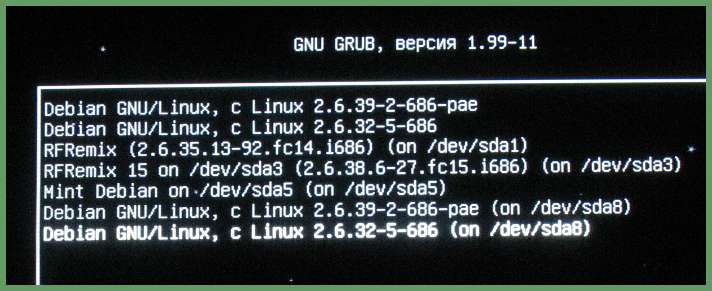
Попробуйте удалить ненужный пункт меню или добавить нужный! Попробуйте отредактировать параметры загрузки! Попробуйте поменять строки меню местами!
Все это в старом Grub Legacy делалось редактированием единственного файла menu.list в текстовом редакторе и занимало от силы 10 минут.
А вот как происходят эти же действия в новом Grub2:
1. Изменение настроек по умолчанию
К ним относится: время ожидания меню; строка, загружаемая по умолчанию; использование UUID’ов; наличие строк recovery mode (безопасный режим, он же режим восстановления) и прочие.
Все эти настройки собраны в файле /etc/default/grub .
GRUB_DEFAULT=0 ≈ В первой строке устанавливается строка меню, загружаемая автоматически (если не выбрана иная). Первая строка считается нулевой, вторая ≈ первой и т.д.
GRUB_TIMEOUT=5 ≈ Задержка до начала загрузки пункта меню в секундах. Чтобы остановить отсчет секунд, достаточно нажать клавишу пробел или стрелочки вверх-вниз.
GRUB_CMDLINE_LINUX_DEFAULT=»quiet» ≈ По умолчанию ядро LINUX будет загружено с параметром «quiet». Можно вписать сюда другие параметры, но они будут применяться ко всем ядрам подряд.
GRUB_CMDLINE_LINUX=»» ≈ Дополнительные параметры загрузки ядра.
Чтобы изменить эти четыре настройки, нужно вписать свои значения и запустить команду
Команда перепишет основной конфигурационный файл Grub2 ≈ /boot/grub/grub.cfg с новыми значениями.
Далее в файле /etc/default/grub еще есть возможность раскомментировать строки, позволяющие осуществить некоторые важные настройки:
Попросту, если хотите видеть root=/dev/sdaX вместо root=UUID=xxx, то снимите решетку перед словами GRUB_DISABLE_LINUX_UUID=true
Если не хотите появления пунктов меню «режим восстановления», то снимите решетку перед строкой GRUB_DISABLE_RECOVERY=»true»
Миленький такой гудочек.
Это, разумеется не все опции. Часть я сознательно опустил, часть не вошла в Дебиановский вариант файла /etc/default/grub . Чтобы получить полный список опций настройки, наберите в командной строке
Наберите, не пожалеете ≈ там еще очень много любопытного.
И опять-таки, чтобы изменения вошли в силу нужно переписать файл /boot/grub/grub.cfg при помощи команды
2. Добавление и удаление пунктов меню. Редактирование этих пунктов
Grub2 так умно и замечательно устроен, что не допускает возможности внесения изменений в автоматически созданное при инсталляции загрузочное меню. Так что редактирование невозможно.
Вместо этого предлагается создать свой собственный пункт меню, который вы уже сможете редактировать как вам угодно. Для облегчения процесса написания скрипта, создающего новый пункт меню (menuentry), есть специальный файл /etc/grub.d/40_custom .
Вот его полный текст:

Перевод: Этот файл обеспечивает простой способ добавлять собственные пункты меню. Просто впишите новые пункты, которые вы хотите добавить к меню, непосредственно после данного комментария. Не изменяйте строку ‘exec tail’ в начале файла.
Жаль что ничего не сказано про синтаксис этих самых menuentry, то есть пунктов меню. Но здесь нам послужит образцом файл /boot/grub/grub.cfg . Откроем его в текстовом редакторе, скопируем целиком один из menuentry, который вам хочется изменить, и вставим его в файл /etc/grub.d/40_custom . Например:
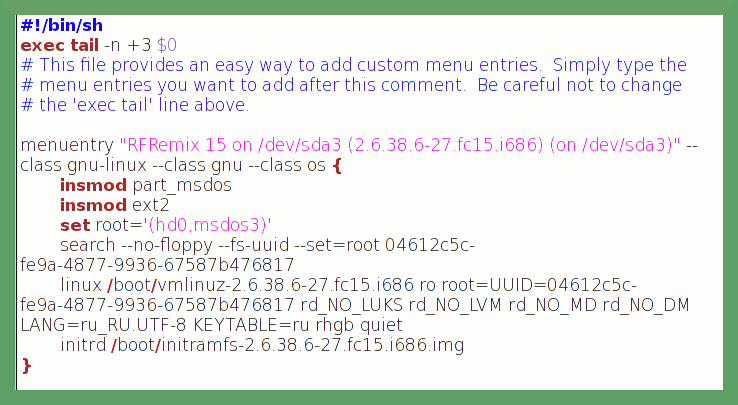
Затем отредактируем название пункта меню. Вместо «RFRemix 15 on /dev/sda3 (2.6.38.6-27.fc15.i686) (on /dev/sda3)» напишем просто «Fedora 15 on /dev/sda3»
Что касается всех остальных команд и их аргументов, то, если они загружают раздел нормально, менять их незачем, ведь в меню они не видны.
Но одно нужно иметь в виду: разработчики Grub2 сделали настоящую подлость в нотации разделов. Раздел (hd0,1) означает первый раздел первого диска, так как нумерация дисков начинаются с нуля, а нумерация разделов ≈ с единицы. Логики здесь нет никакой, просто желание запутать пользователя. Тем более, что номера пунктов меню, как положено, считаются с нуля.
После внесения всех изменений нужно сохранить файл как 11_fedora , например. Чем меньше порядковый номер, тем выше в меню окажется этот пункт. Затем делаем файл исполняемым любым способом, например:
После чего делаем неизменное
Теперь можно просмотреть файл /boot/grub/grub.cfg и убедиться, что в нем появился новый пункт меню ≈ «Fedora 15 on /dev/sda3». Пункт этот окажется последним, так как перед ним будут идти все menuentry, создаваемые скриптом 10_linux (который и создает меню по умолчанию).
Теперь нужно проверить, работает ли наш menuentry на деле. Придется перезагрузиться, выбрать в загрузочном меню пункт «Fedora 15 on /dev/sda3» и нажать ENTER.
Если загрузка состоялась, то продолжим работу.
3. Создаем собственное модульное меню и деактивируем меню, созданное автоматически
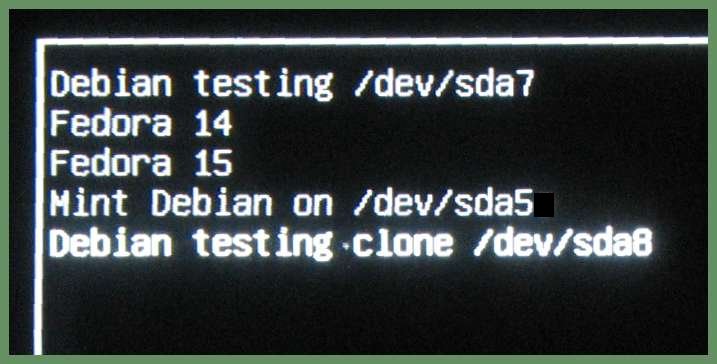
Так же точно создадим по файлу на каждую операционную систему на ваших дисках. Назовем их 12_myOS, 13_myOS, 14_myOS и так далее. Сделаем все скрипты исполняемыми. Запустим update-grub . Проверим работоспособность.
Теперь можно избавиться от пунктов, созданных при инсталляции. Только не нужно удалять никаких файлов, как советуют иные руководства. Достаточно снять исполняемый бит с файла /etc/grub.d/10_linux :
Если файл в директории /etc/grub.d не является исполняемым, то команда update-grub не может его запустить, что фактически означает его игнорирование.
После этого, нужно лишить исполняемого бита еще файл /etc/grub.d/30_os-prober , иначе этот скрипт снова обследует все диски и впишет дефолтные названия, на этот раз в конец списка.
Снова запустить update-grub .
Модульное меню готово. Теперь, чтобы убрать любой из пунктов меню, достаточно лишить соответствующий файл исполняемого бита. При необходимости его всегда можно подключить обратно.
Если вы создали новый раздел и установили новую ОС, то вам придется сделать файл /etc/grub.d /30_os-prober снова исполняемым, чтобы он мог найти и вписать новенькую. На основе этой записи вы сделаете очередной файл ХХ_myOS, а /etc/grub.d /30_os-prober опять деактивируете.
Поменять местами пункты меню можно просто поменяв первые цифры в названии файлов.
Спрашивается, а для чего делать по отдельному файлу на каждый menuentry, когда можно все их вписать в один файл 11_myOS ? Можно пойти и этим путем, но тогда придется редактировать этот файл при каждом изменении одного из menuentry или при изменении очередности пунктов меню. Если у вас всего две или три операционные системы, то, вероятно, это даже лучше. Но если число menuentry приближается к десятку, то модульность удобнее.
4. Никому не верь, особенно разработчикам (Для самых отчаянных)
Сказанное ниже не является руководством к действию, но как один из вариантов, вполне может быть принято на вооружение.
В первой строке файла /boot/grub/grub.cfg сказано: «DO NOT EDIT THIS FILE!». Во всех без исключениях руководствах по Grub2, на самом видном месте, иногда большими буквами написано: «Не пытайтесь редактировать файл /boot/grub/grub.cfg, Все равно он будет переписан и все ваши изменения пропадут».
Это все глупости. Смело редактируйте grub.cfg (в пределах разумного), меняйте названия menuentry, выбрасывайте некоторые из них целиком, вписывайте новые. Только не делайте после этого update-grub. Эта команда, будучи запущена, действительно запустит все скрипты из директории /etc/grub.d и они перезапишут grub.cfg . Но если ее не запускать. то ваше меню будет выглядеть как вам хочется, до тех пор, пока не придется вносить в него изменения. В доказательство привожу рисунок 4.
5. Подведение итогов
Надеюсь вы убедились, что смысле удобства использования старый Grub Legacy даст новому сто очков вперед. Так что если у вас есть возможность установить хоть один дистрибутив, допускающий использование Grub Legacy (например, Fedora), то ставьте его, хотя бы для того, чтобы им запускать все остальные. Можно также выделить загрузочный раздел на диске и установить туда Grub Legacy. В любом случае стоит оттянуть освоение недоношенного Grub’а 2 как можно дольше, авось он сам сойдет на нет.
Источник
Grub disable linux uuid
The program grub-mkconfig (see Invoking grub-mkconfig) generates grub.cfg files suitable for most cases. It is suitable for use when upgrading a distribution, and will discover available kernels and attempt to generate menu entries for them.
grub-mkconfig does have some limitations. While adding extra custom menu entries to the end of the list can be done by editing /etc/grub.d/40_custom or creating /boot/grub/custom.cfg , changing the order of menu entries or changing their titles may require making complex changes to shell scripts stored in /etc/grub.d/ . This may be improved in the future. In the meantime, those who feel that it would be easier to write grub.cfg directly are encouraged to do so (see Booting, and Shell-like scripting), and to disable any system provided by their distribution to automatically run grub-mkconfig .
The file /etc/default/grub controls the operation of grub-mkconfig . It is sourced by a shell script, and so must be valid POSIX shell input; normally, it will just be a sequence of ‘ KEY=value ’ lines, but if the value contains spaces or other special characters then it must be quoted. For example:
Valid keys in /etc/default/grub are as follows:
The default menu entry. This may be a number, in which case it identifies the Nth entry in the generated menu counted from zero, or the title of a menu entry, or the special string ‘ saved ’. Using the id may be useful if you want to set a menu entry as the default even though there may be a variable number of entries before it.
For example, if you have:
then you can make this the default using:
Previously it was documented the way to use entry title. While this still works it’s not recommended since titles often contain unstable device names and may be translated
If you set this to ‘ saved ’, then the default menu entry will be that saved by ‘ GRUB_SAVEDEFAULT ’ or grub-set-default . This relies on the environment block, which may not be available in all situations (see Environment block).
The default is ‘ 0 ’.
If this option is set to ‘ true ’, then, when an entry is selected, save it as a new default entry for use by future runs of GRUB. This is only useful if ‘ GRUB_DEFAULT=saved ’; it is a separate option because ‘ GRUB_DEFAULT=saved ’ is useful without this option, in conjunction with grub-set-default . Unset by default. This option relies on the environment block, which may not be available in all situations (see Environment block).
Boot the default entry this many seconds after the menu is displayed, unless a key is pressed. The default is ‘ 5 ’. Set to ‘ 0 ’ to boot immediately without displaying the menu, or to ‘ -1 ’ to wait indefinitely.
If ‘ GRUB_TIMEOUT_STYLE ’ is set to ‘ countdown ’ or ‘ hidden ’, the timeout is instead counted before the menu is displayed.
If this option is unset or set to ‘ menu ’, then GRUB will display the menu and then wait for the timeout set by ‘ GRUB_TIMEOUT ’ to expire before booting the default entry. Pressing a key interrupts the timeout.
If this option is set to ‘ countdown ’ or ‘ hidden ’, then, before displaying the menu, GRUB will wait for the timeout set by ‘ GRUB_TIMEOUT ’ to expire. If ESC or F4 are pressed, or SHIFT is held down during that time, it will display the menu and wait for input. If a hotkey associated with a menu entry is pressed, it will boot the associated menu entry immediately. If the timeout expires before either of these happens, it will boot the default entry. In the ‘ countdown ’ case, it will show a one-line indication of the remaining time.
‘ GRUB_DEFAULT_BUTTON ’ ‘ GRUB_TIMEOUT_BUTTON ’ ‘ GRUB_TIMEOUT_STYLE_BUTTON ’ ‘ GRUB_BUTTON_CMOS_ADDRESS ’
Variants of the corresponding variables without the ‘ _BUTTON ’ suffix, used to support vendor-specific power buttons. See Vendor power-on keys.
Set by distributors of GRUB to their identifying name. This is used to generate more informative menu entry titles.
Select the terminal input device. You may select multiple devices here, separated by spaces.
Valid terminal input names depend on the platform, but may include ‘ console ’ (native platform console), ‘ serial ’ (serial terminal), ‘ serial_
’ (serial terminal with explicit port selection), ‘ at_keyboard ’ (PC AT keyboard), or ‘ usb_keyboard ’ (USB keyboard using the HID Boot Protocol, for cases where the firmware does not handle this).
The default is to use the platform’s native terminal input.
Select the terminal output device. You may select multiple devices here, separated by spaces.
Valid terminal output names depend on the platform, but may include ‘ console ’ (native platform console), ‘ serial ’ (serial terminal), ‘ serial_
’ (serial terminal with explicit port selection), ‘ gfxterm ’ (graphics-mode output), ‘ vga_text ’ (VGA text output), ‘ mda_text ’ (MDA text output), ‘ morse ’ (Morse-coding using system beeper) or ‘ spkmodem ’ (simple data protocol using system speaker).
‘ spkmodem ’ is useful when no serial port is available. Connect the output of sending system (where GRUB is running) to line-in of receiving system (usually developer machine). On receiving system compile ‘ spkmodem-recv ’ from ‘ util/spkmodem-recv.c ’ and run:
The default is to use the platform’s native terminal output.
If this option is set, it overrides both ‘ GRUB_TERMINAL_INPUT ’ and ‘ GRUB_TERMINAL_OUTPUT ’ to the same value.
A command to configure the serial port when using the serial console. See serial. Defaults to ‘ serial ’.
Command-line arguments to add to menu entries for the Linux kernel.
Unless ‘ GRUB_DISABLE_RECOVERY ’ is set to ‘ true ’, two menu entries will be generated for each Linux kernel: one default entry and one entry for recovery mode. This option lists command-line arguments to add only to the default menu entry, after those listed in ‘ GRUB_CMDLINE_LINUX ’.
As ‘ GRUB_CMDLINE_LINUX ’ and ‘ GRUB_CMDLINE_LINUX_DEFAULT ’, but for NetBSD.
As ‘ GRUB_CMDLINE_LINUX ’, but for GNU Mach.
The values of these options are passed to Xen hypervisor Xen menu entries, for all respectively normal entries.
The values of these options replace the values of ‘ GRUB_CMDLINE_LINUX ’ and ‘ GRUB_CMDLINE_LINUX_DEFAULT ’ for Linux and Xen menu entries.
List of space-separated early initrd images to be loaded from ‘ /boot ’. This is for loading things like CPU microcode, firmware, ACPI tables, crypto keys, and so on. These early images will be loaded in the order declared, and all will be loaded before the actual functional initrd image.
‘ GRUB_EARLY_INITRD_LINUX_STOCK ’ is for your distribution to declare images that are provided by the distribution. It should not be modified without understanding the consequences. They will be loaded first.
‘ GRUB_EARLY_INITRD_LINUX_CUSTOM ’ is for your custom created images.
The default stock images are as follows, though they may be overridden by your distribution:
Normally, grub-mkconfig will generate menu entries that use universally-unique identifiers (UUIDs) to identify the root filesystem to the Linux kernel, using a ‘ root=UUID=. ’ kernel parameter. This is usually more reliable, but in some cases it may not be appropriate. To disable the use of UUIDs, set this option to ‘ true ’.
If grub-mkconfig cannot identify the root filesystem via its universally-unique indentifier (UUID), grub-mkconfig can use the UUID of the partition containing the filesystem to identify the root filesystem to the Linux kernel via a ‘ root=PARTUUID=. ’ kernel parameter. This is not as reliable as using the filesystem UUID, but is more reliable than using the Linux device names. When ‘ GRUB_DISABLE_LINUX_PARTUUID ’ is set to ‘ false ’, the Linux kernel version must be 2.6.37 (3.10 for systems using the MSDOS partition scheme) or newer. This option defaults to ‘ true ’. To enable the use of partition UUIDs, set this option to ‘ false ’.
If this option is set to ‘ true ’, disable the generation of recovery mode menu entries.
Normally, grub-mkconfig will generate menu entries that use universally-unique identifiers (UUIDs) to identify various filesystems to search for files. This is usually more reliable, but in some cases it may not be appropriate. To disable this use of UUIDs, set this option to ‘ true ’. Setting this option to ‘ true ’, will also set the options ‘ GRUB_DISABLE_LINUX_UUID ’ and ‘ GRUB_DISABLE_LINUX_PARTUUID ’ to ‘ true ’, unless they have been explicilty set to ‘ false ’.
If graphical video support is required, either because the ‘ gfxterm ’ graphical terminal is in use or because ‘ GRUB_GFXPAYLOAD_LINUX ’ is set, then grub-mkconfig will normally load all available GRUB video drivers and use the one most appropriate for your hardware. If you need to override this for some reason, then you can set this option.
After grub-install has been run, the available video drivers are listed in /boot/grub/video.lst .
Set the resolution used on the ‘ gfxterm ’ graphical terminal. Note that you can only use modes which your graphics card supports via VESA BIOS Extensions (VBE), so for example native LCD panel resolutions may not be available. The default is ‘ auto ’, which tries to select a preferred resolution. See gfxmode.
Set a background image for use with the ‘ gfxterm ’ graphical terminal. The value of this option must be a file readable by GRUB at boot time, and it must end with .png , .tga , .jpg , or .jpeg . The image will be scaled if necessary to fit the screen.
Set a theme for use with the ‘ gfxterm ’ graphical terminal.
Set to ‘ text ’ to force the Linux kernel to boot in normal text mode, ‘ keep ’ to preserve the graphics mode set using ‘ GRUB_GFXMODE ’, ‘ width x height ’[‘ x depth ’] to set a particular graphics mode, or a sequence of these separated by commas or semicolons to try several modes in sequence. See gfxpayload.
Depending on your kernel, your distribution, your graphics card, and the phase of the moon, note that using this option may cause GNU/Linux to suffer from various display problems, particularly during the early part of the boot sequence. If you have problems, set this option to ‘ text ’ and GRUB will tell Linux to boot in normal text mode.
The grub-mkconfig has a feature to use the external os-prober program to discover other operating systems installed on the same machine and generate appropriate menu entries for them. It is disabled by default since automatic and silent execution of os-prober , and creating boot entries based on that data, is a potential attack vector. Set this option to ‘ false ’ to enable this feature in the grub-mkconfig command.
List of space-separated FS UUIDs of filesystems to be ignored from os-prober output. For efi chainloaders it’s @
Normally, grub-mkconfig will generate top level menu entry for the kernel with highest version number and put all other found kernels or alternative menu entries for recovery mode in submenu. For entries returned by os-prober first entry will be put on top level and all others in submenu. If this option is set to ‘ true ’, flat menu with all entries on top level will be generated instead. Changing this option will require changing existing values of ‘ GRUB_DEFAULT ’, ‘ fallback ’ (see fallback) and ‘ default ’ (see default) environment variables as well as saved default entry using grub-set-default and value used with grub-reboot .
If set to ‘ y ’, grub-mkconfig and grub-install will check for encrypted disks and generate additional commands needed to access them during boot. Note that in this case unattended boot is not possible because GRUB will wait for passphrase to unlock encrypted container.
Play a tune on the speaker when GRUB starts. This is particularly useful for users unable to see the screen. The value of this option is passed directly to play.
If this option is set, GRUB will issue a badram command to filter out specified regions of RAM.
This option may be set to a list of GRUB module names separated by spaces. Each module will be loaded as early as possible, at the start of grub.cfg .
The following options are still accepted for compatibility with existing configurations, but have better replacements:
Wait this many seconds before displaying the menu. If ESC or F4 are pressed, or SHIFT is held down during that time, display the menu and wait for input according to ‘ GRUB_TIMEOUT ’. If a hotkey associated with a menu entry is pressed, boot the associated menu entry immediately. If the timeout expires before either of these happens, display the menu for the number of seconds specified in ‘ GRUB_TIMEOUT ’ before booting the default entry.
If you set ‘ GRUB_HIDDEN_TIMEOUT ’, you should also set ‘ GRUB_TIMEOUT=0 ’ so that the menu is not displayed at all unless ESC or F4 are pressed, or SHIFT is held down.
This option is unset by default, and is deprecated in favour of the less confusing ‘ GRUB_TIMEOUT_STYLE=countdown ’ or ‘ GRUB_TIMEOUT_STYLE=hidden ’.
In conjunction with ‘ GRUB_HIDDEN_TIMEOUT ’, set this to ‘ true ’ to suppress the verbose countdown while waiting for a key to be pressed before displaying the menu.
This option is unset by default, and is deprecated in favour of the less confusing ‘ GRUB_TIMEOUT_STYLE=countdown ’.
Variant of ‘ GRUB_HIDDEN_TIMEOUT ’, used to support vendor-specific power buttons. See Vendor power-on keys.
This option is unset by default, and is deprecated in favour of the less confusing ‘ GRUB_TIMEOUT_STYLE=countdown ’ or ‘ GRUB_TIMEOUT_STYLE=hidden ’.
Источник


