- NetworkManager
- Содержание
- Исправляем исчезающий апплет сети
- Подключение к мобильному интернету в командной строке
- Ubuntu Documentation
- Network Manager
- Installation
- VPN support
- Start
- Using Upstart
- Using Systemd
- NM-applet Overview
- Right-click Options
- Connection Information
- NM-connections editor
- Connection Types
- Wired connections
- Wireless
- Mobile Broadband
- Creating/Modifying a User connection
- Adding Wired connections
- Wired Tab
- 802.1x security
- IPv4 Settings
- User Settings and System Settings
- Issues
- Stopping and Disabling NetworkManager
- Using Upstart
- Using Systemd
- Editing Network Settings in nm-connection-editor
- Changing a network’s encryption key
- Ensuring connection to particular access points
- Using NetworkManager on the command line
- Gui network manager linux
- About
NetworkManager
Содержание
NetworkManager — программа для управления сетевыми соединениями в Ubuntu. Графический интерфейс представлен в виде индикатора на панели Unity.
 — надо написать! Пока что подключение_к_интернету
Исправляем исчезающий апплет сети
Этот способ решает проблему с исчезающим апплетом сети ( nm-applet , апплет NetworkManager ). Данная инструкция должна подойдет для всех Ubuntu начиная с Interpid 8.10 и до Lucid Lynx 10.04 (10.04.1)
В ubuntu существуют два режима работы с сетью:
Рассмотрим оба варианта
Управление сетевыми настройками через редактирование файла /etc/network/interfaces
Руководствуясь man interfaces , указываем свои сетевые настройки в файле /etc/network/interfaces , перезапускаем сервис сети командой
Использование апплета сети, он же nm-applet , апплет NetworkManager и т.д.
В файле /etc/network/interface , закомментируйте знаком # или сотрите все строки кроме следующих
Отредактируйте файл /etc/NetworkManager/nm-system-settings.conf установив параметр managed=true в разделе [ifupdown] чтобы получилось как в примере указанном ниже
Перезапустите апплет сети командой
Для ubuntu-14.04 (i386, AMD64):
файл для редактирования /etc/NetworkManager/nm-system-settings.conf теперь расположен по другому пути и с другим именем: /etc/NetworkManager/NetworkManager.conf
Подключение к мобильному интернету в командной строке
Создайте мобильное подключение в нетворк-менеджере.
Проверьте возможность подключение через гуи. Потом можно воспользоваться для подключения к примеру следующими командами:
Источник
Ubuntu Documentation
Network Manager
Network Manager aims for Network Connectivity which «Just Works». The computer should use the wired network connection when it’s plugged in, but automatically switch to a wireless connection when the user unplugs it and walks away from the desk. Likewise, when the user plugs the computer back in, the computer should switch back to the wired connection. The user should, most times, not even notice that their connection has been managed for them; they should simply see uninterrupted network connectivity.
More information about Network Manager is available in Gnome website and wiki .
Installation
NetworkManager should be installed by default on Ubuntu Desktop installs, as well as most flavours of Ubuntu.
To install NetworkManager:
To install the GNOME applet / indicator:
VPN support
Network Manager VPN support is based on a plug-in system. If you need VPN support via network manager you have to install one of the following packages:
The network-manager-pptp plugin is installed by default.
On GNOME, you also need to install the -gnome packages for the VPN plugin you choose:
Start
The steps to start NetworkManager depend on which of the initialization subsystems are running: Upstart or Systemd.
Using Upstart
Start network manager
Using Systemd
Systemd became the default initialization system in Ubuntu 15.04. Here’s how to start Network Manager and enable it to be restarted after a reboot:
Start network manager
Enable restarting the network manager when the system reboots
NM-applet Overview
The network-manager or the nm-applet is the one which is found in the systray. The icon of two computers, one below to the other on the left-side.
Clicking on NM-applet will give you the types of connection/hardware you have available.
For e.g. if you have a wired connection clicking on it will give you something like: Wired Network (D-Link System RTL-8139/8139C/8139C+ Auto eth1
Now let’s break down what such a notification would mean.
a. Wired/Wireless/Mobile Broadband/VPN/DSL — the interface/hardware you have.
b. (D-Link System RTL-8139/8139C/8139C+ :- the chipset which enables the connection to be made.
c. Auto/Manual eth1 :- If the connection is has been made automatically or generated through the system settings or/and done manually. Any one connection can only have only of the states not both. The eth1 is just a name to make it easier for the user to know which way he’s connected through to the network/Internet.
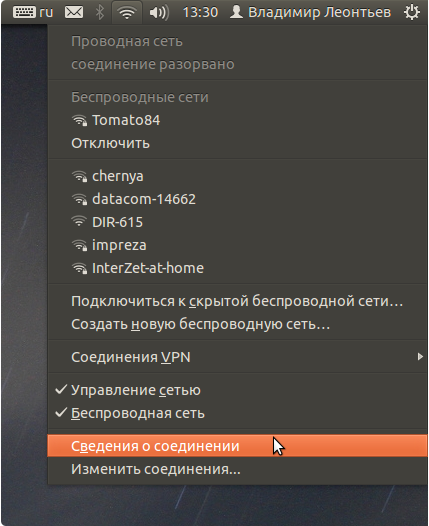
Right-click Options
Right-clicking on the applet will give you the following options
a. A checkbox saying Enable Networking or not.
b. Connection Information: Giving info. on the same below.
c. Edit Connections: This is the NM-connections editor which we will talk about a little later.
d. About: Which gives the status of current version of network-manager installed and a link to the upstream network-manager site.
Connection Information
- This figure is shown right-clicking on the nm-applet and then clicking on the blue (i) Connection information option in the drop-down menu of nm-applet. It gives information about the interface being used, the MAC or Hardware Address of the device, what driver is being used to do the networking, at what speed is the network card capable of communicating, any security protocols used.
Then there is some distance and information regarding how the actual connection is set up in terms of the IP Address taken/given, the IP Address at which its broadcasting its presence to others, the Subnet Mask used and lastly the DNS address.
NM-connections editor
The NM-connections editor is where the user can edit and create the various connection types. To invoke the nm-connections editor you need to right-click on the nm-applet and then click on Edit Connections. Clicking on that option would result in a tabbed window called network connections having different ways to connect to the network/Internet.
Connection Types
Wired connections
This type of connection is one where you are connecting to the Internet through an Ethernet connection to some router/modem.
Wireless
This type of connection is one where one is connected to the Internet through a wireless card & base-station combo.
Mobile Broadband
This type of connection is similar to wireless, the only difference would be the hardware. Its normally based on a high-speed portable wireless card which may follow GPRS, 3G, WiMAX, UMTS/HSPA or/and EV-DO standards.
This type of connection is usually used by corporates to connect to their workplace via the internet or by universities to make special services available to their students and staff. Currently no more than one VPN connection at a time is supported (see here). The VPN packages are not installed by default. See VPN for how to do that.
This type of connection is when one is transferring data over the public telephone network (also known as POTS). Need some type of XDSL modem (ADSL is common type of connection).
Creating/Modifying a User connection
Hint: Making any change to an existing wired connection will only be applied after you finish editing and then left-click the connection name (left-click the Network Manager icon to access the list of connections) or by rebooting your system. Changes will also be automatically applied if your change the Connection name of a connection.
So how do we add or modify a user connection. Let’s start by adding a user connection. So we do the following steps:
a. Invoke nm-connection-editor by right-clicking on network-manager icon, clicking on Edit Connections which brings up the network-connections having various options to connect to the local network or/and the Internet.
b. Choose one of the options depending on the hardware and the way the connection is set up. We would be looking at all the 5 options in the network connections one by one as to what information needs to be filled up.
Adding Wired connections
Wired Tab
For this one needs to click on the Add button after selecting the Wired tab in Network Connections as shown above.
Clicking on that tab would bring you to another box having three tabs, i.e. Wired, 802.1x and lastly IPv4 settings.
At the top one needs to give some name to the connection, by default it is showing as Wired Connection 1. You can either use that or make it something which is recognizable and easily remembered by you.
A little distance below there are two options with check-boxes just next to them. The first option asks whether you want network-manager to connect automatically or not. Clicking on that would make network-manager automatically try to resolve or making that connection happen for you.
The second one says System Settings. Systems settings are an option so one can configure connections system-wide, so they get enabled without you being logged in. This was not possible to do before 0.7.
Just below that is the wired tab. The Wired tab has a field called «MAC address». The MAC (Media Access Control) address is a unique identifier for the Ethernet card/Network Interface card. The MAC address is written in the form of a set of 6 grouped hexadecimal digits, e.g. 01:23:45:67:89:AB.
To find out your MAC address you can run:
You will get something like this:
802.1x security
This tab is for secure communications where one wants to have port-based authentication using some authentication server. After checking the box to use 802.1x security for the connection you have to choose which authenticated protocol to use from TLS, Tunneled TLS or Protected EAP. Would also need to give some identity as well as choose a user or/and some certifying authority’s certificate. You would also need to give your private key particulars as well as a Private Key password. You may choose or not to show the password.
IPv4 Settings
This is the last but perhaps the most interesting tab in the Wired Networking tab, where one has various options of connecting:
a. Automatic (DHCP)
b. Automatic (DHCP Addresses only)
c. Manual
d. Link-local only and lastly
e. Shared to other computers
User Settings and System Settings
All the connection configuration files will be stored here.
User settings are defined as files in those directories that include specific access controls to limit the access to a specific user.
Issues
If it is not managing your network connections, you’ll need to comment out the references to all interfaces (except lo) in /etc/network/interfaces to let Network Manager handle them.
It should look similar to this when you are done:
Then reboot and you should be good to go!
Stopping and Disabling NetworkManager
The steps to disable NetworkManager depend on which of the initialization subsystems are running: Upstart or Systemd.
Using Upstart
According to this bug here’s how to disable Network Manager without uninstalling it:
Stop network manager
Create an override file for the Upstart job:
Using Systemd
Systemd became the default initialization system in Ubuntu 15.04. Here’s how to stop and disable Network Manager without uninstalling it (taken from AskUbuntu):
Stop network manager
Disable network manager (permanently) to avoid it restarting after a reboot
Editing Network Settings in nm-connection-editor
Nm-connection-editor is the configuration applet that provides easy access to advanced network settings and allows greater configuration options through a simple interface. To access nm-connection-editor, right-click on the network icon in the notification area and select Edit Connections.
Changing a network’s encryption key
Nm-connection-editor enables you to easily update a network’s encryption key by displaying the current key for each network and giving you the option of displaying it in clear text while you edit.
Ensuring connection to particular access points
You can specify a particular BSSID directly in nm-connection-editor. This means that in a wireless network with more than one access point, you can choose the one NetworkManager will connect to.
Using NetworkManager on the command line
NetworkManager now ships with nmcli, a simple interface to allow users to connect to particular networks, and even create connections to new wireless networks they have never connected to:
Provides all the information about how to use the nmcli utility.
Источник
Gui network manager linux
NordVPN Network Manager GUI


NordVPN Network Manager GUI is a graphical frontend for both NordVPN and the system Network Manager. All connections are handled directly by the network manager and user secrets are only stored in memory before being passed to the Network Manager. Currently it operates 100% as a user process with no need for root privileges.
This project was inspired by NordVPN-NetworkManager by Chadsr. Many thanks for the code and knowledge that they published into the public domain.
- Light — Uses the system Network Manager, application doesn’t need to be running
- Clean — All configuration files are deleted after disconnection
- Secure — User secrets are passed directly from memory to the Network manager, root access is not required
- Powerful — Supports a variety of different protocols and server types with more on the way.
- Kill Switch — internet connection is disabled if VPN connection is lost
- Auto Connect — VPN is connection is established on system start
- Randomize MAC — Random MAC address is assigned before establishing connection
Using Installation Script
Installation script should support Debian, Fedora, and Arch Linux. It will attempt to install the one dependency this program has (networkmanager-openvpn). It will also add a menu entry pointing to the current working directory of the installation script. So make sure you place the folder where you want the install to be located.
Installation script is only intended for the release version, not the python script itself.
Usage: sudo ./install.sh
- No support for obfuscated servers
Make sure to disable webrtc in your browser of choice. Using WebRTC may leak your original IP address.
About
A NordVPN GUI client for linux using the native Network Manager
Источник


