Kali Linux – Hacking Wi-Fi
These days the Wi-Fi networks are more secure than the older days, These days most wireless access points use WPA(Wi-Fi Protection Access) 2 Pre Shared Key in order to secure the network. This WPA 2 uses a stronger encryption algorithm which is known as AES which is very difficult to crack.
When it comes to security nothing is 100% flawless and so as with WPA PSK 2. WPA PSK 2 has a vulnerability which is that the password in the encrypted form is shared by means of a 4-way handshake. When a user authenticates through the Access Point the user and the Access Point have to go through a 4-way Handshake in order to complete the authentication process. In Wi-Fi hacking, we capture the 4-way handshake packet and look for the encrypted key in those packets. After getting the encrypted key we try a specific wordlist in order to crack the encrypted password. Though there are many other ways as well to crack a wifi password the one with wordlist is the easiest to use and is widely used by the attackers.
Hacking Wi-Fi
1. List all the available network Interfaces.
The airmon-ng tool is used to work with network interfaces. Enter the following command to get the list of all the available network interfaces.

2. Monitor the desired network interface
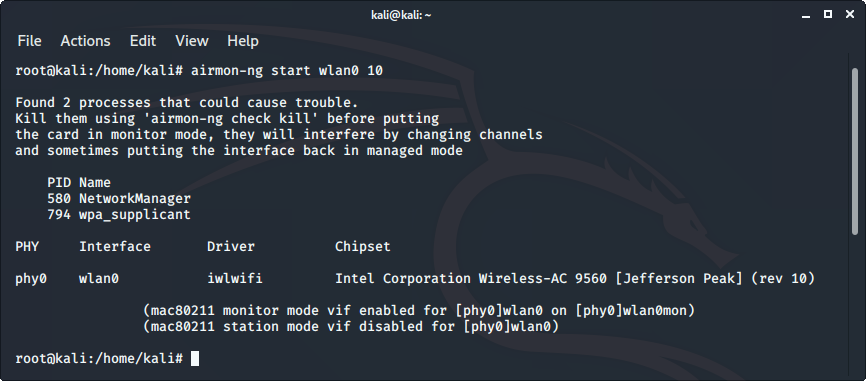
The next step is to monitor the wireless network interface, so that we may see all the traffic that passes through the interface. airmon-ng command is used for the purpose.
Replace wlan0 with your desired wifi network and 1 with the desired channel number.
3. Capture the network interface traffic
Now as we are monitoring our wireless network interface, it’s time to capture the traffic. To do so we will use airodump-ng tool. Enter the following command to display the captured information.
Note: Copy the bssid of the desired network.
Replace wlan0mon with the wireless interface which you want to use.
4. Capture required data from the specific network
Now, we have to attack a specific network, so in order to do that, we will capture the traffic on that network and will start the capturing of the 4-way handshake. Enter the following command to do that.
Here, 09:98:98:98:98:98 is the bssid of the network copied from the above step, -c 1 is the channel number, psk is the file in which the captured traffic would be written and wlan0mon is the network interface that is being monitored.
Note: Do not quit the command being executed in the terminal till the 6th step.

5. De authenticate the client
Now, we have to de authenticate the client against the AP in case they’re already authenticated. To do so we use aireplay-ng command. Enter the following command to de authenticate the client in the new terminal window.
Here, 09:98:98:98:98:98 is the bssid of the network, 100 is the number of de authenticate frames to be sent and wlan0mon is the network interface that is being monitored.
6. Verify the captured handshake file.
Now, our handshake file is captured successfully which can be confirmed with the “ls” command.

Now our handshake file is successfully captured.
7. Stop Wi-Fi interface monitoring
Now, we have successfully captured our handshake file and it’s time to get our Wi-Fi interface back to its defaults. Enter the following command to stop monitoring the Wi-Fi interface.

8. Cracking password from the captured handshake file.
Now everything is done it’s time to brute force the password. In order to get the password by means of a brute force attack, we need a wordlist and our handshake file. Inn order to generate a good wordlist use crunch utility in Kali Linux or use the one from predefined wordlists. and after that enter the following command in terminal.
Here,
- psk*.cap : It is the file which has the captured handshake file.
- wordlist: It is the wordlist that contains the password to be tested.

It will display key Found along with the key after successfully cracking the password.
Источник
Kali Linux Howto’s
Complete and professional how-to tutorials for Kali Linux and its numerous tools.
Pages
How To Hack WPA/WPA2 Wi-Fi With Kali Linux & Aircrack-ng
Kali Linux can be used for many things, but it probably is best known for its ability to penetration test, or “hack,” WPA and WPA2 networks. There are hundreds of Windows applications that claim they can hack WPA; don’t get them! They’re just scams, used by professional hackers, to lure newbie or wannabe hackers into getting hacked themselves. There is only one way that hackers get into your network, and that is with a Linux-based OS, a wireless card capable of monitor mode, and aircrack-ng or similar. Also note that, even with these tools, Wi-Fi cracking is not for beginners. Playing with it requires basic knowledge of how WPA authentication works, and moderate familiarity with Kali Linux and its tools. If you feel you have the necessary skills, let’s begin:
These are things that you’ll need:
- A successful install of Kali Linux (which you probably have already done). If not, follow my tutorial here: http://lewiscomputerhowto.blogspot.com/complete-guide-on-how-to-install-kali.html
- A wireless adapter capable of injection/monitor mode. Some computers have network cards capable of this from the factory. If you’re, like most however, you’ll have to buy an external one. Here is a list of the best: http://blackmoreops.com/recommended-usb-wireless-cards-kali-linux
- A wordlist to attempt to “crack” the password once it has been captured
- Time and patients
If you have these then roll up your sleeves and let’s see how secure your network is!
Important notice: Hacking into anyone’s Wi-Fi without permission is considered an illegal act or crime in most countries. We are performing this tutorial for the sake of penetration testing, hacking to become more secure, and are using our own test network and router.
By reading and/or using the information below, you are agreeing to our Disclaimer
Step One:
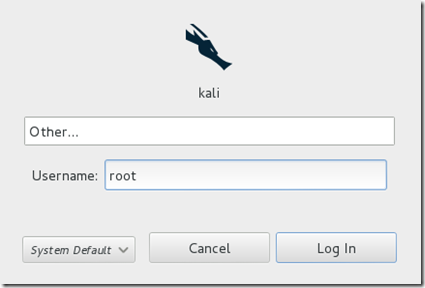
Start Kali Linux and login, preferably as root.
Step Two:
Plugin your injection-capable wireless adapter, (Unless your native computer wireless card supports it). If you’re using Kali in VMware, then you might have to connect the card via the  icon in the device menu.
Step Three:
Disconnect from all wireless networks, open a Terminal, and type airmon-ng

This will list all of the wireless cards that support monitor (not injection) mode. If no cards are listed, try disconnecting and reconnecting the adapter (if you’re using one) and check that it supports monitor mode. If you’re not using an external adapter, and you still don’t see anything listed, then your card doesn’t support monitor mode, and you’ll have to purchase an external one (see the link in the requirements). You can see here that my card supports monitor mode and that it’s listed as wlan0.
Step Four:
Type airmon-ng start followed by the interface name of your wireless card. mine is wlan0, so my command would be: airmon-ng start wlan0
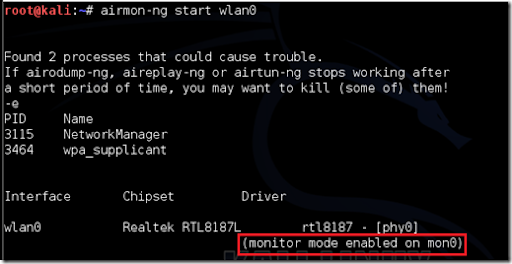
The “(monitor mode enabled)” message means that the card has successfully been put into monitor mode. Note the name of the new monitor interface, mon0.
EDIT:
A bug recently discovered in Kali Linux makes airmon-ng set the channel as a fixed “-1” when you first enable mon0. If you receive this error, or simply do not want to take the chance, follow these steps after enabling mon0:
Type: ifconfig [interface of wireless card] down and hit Enter.
Replace [interface of wireless card] with the name of the interface that you enabled mon0 on; probably called wlan0. This disables the wireless card from connecting to the internet, allowing it to focus on monitor mode instead.
After you have disabled mon0 (completed the wireless section of the tutorial), you’ll need to enable wlan0 (or name of wireless interface), by typing: ifconfig [interface of wireless card] up and pressing Enter.
Step Five:
Type airodump-ng followed by the name of the new monitor interface, which is probably mon0.

If you receive a “fixed channel –1” error, see the Edit above.
Step Six:
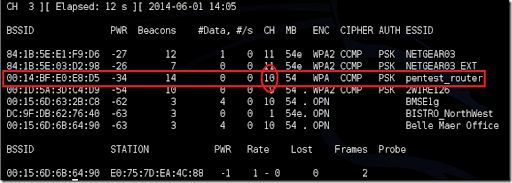
Airodump will now list all of the wireless networks in your area, and a lot of useful information about them. Locate your network or the network that you have permission to penetration test. Once you’ve spotted your network on the ever-populating list, hit Ctrl + C on your keyboard to stop the process. Note the channel of your target network.
Step Seven:
Copy the BSSID of the target network

Now type this command:
airodump-ng -c [channel] —bssid [bssid] -w /root/Desktop/ [monitor interface]
Replace [channel] with the channel of your target network. Paste the network BSSID where [bssid] is, and replace [monitor interface] with the name of your monitor-enabled interface, (mon0). The “–w” and file path command specifies a place where airodump will save any intercepted 4-way handshakes (necessary to crack the password). Here we saved it to the Desktop, but you can save it anywhere.
A complete command should look similar this:
airodump-ng -c 10 —bssid 00:14:BF:E0:E8:D5 -w /root/Desktop/ mon0

Now press enter.
Step Eight:
Airodump with now monitor only the target network, allowing us to capture more specific information about it. What we’re really doing now is waiting for a device to connect or reconnect to the network, forcing the router to send out the four-way handshake that we need to capture in order to crack the password.
Also, four files should show up on your desktop, this is where the handshake will be saved when captured, so don’t delete them!
But we’re not really going to wait for a device to connect, no, that’s not what impatient hackers do. We’re actually going to use another cool-tool that belongs to the aircrack suite called aireplay-ng, to speed up the process. Instead of waiting for a device to connect, hackers can use this tool to force a device to reconnect by sending deauthentication (deauth) packets to one of the networks devices, making it think that it has to reconnect with the network.
Of course, in order for this tool to work, there has to be someone else connected to the network first, so watch the airodump-ng and wait for a client to show up. It might take a long time, or it might only take a second before the first one shows. If none show up after a lengthy wait, then the network might be empty right now, or you’re to far away from the network.
You can see in this picture, that a client has appeared on our network, allowing us to start the next step.

Step Nine:
Leave airodump-ng running and open a second terminal. In this terminal, type this command:
aireplay-ng –0 2 –a [router bssid] –c [client bssid] mon0
The –0 is a short cut for the deauth mode and the 2 is the number of deauth packets to send.
-a indicates the access point/router’s BSSID, replace [router bssid] with the BSSID of the target network, which in my case, is 00:14:BF:E0:E8:D5.
-c indicates the client’s BSSID, the device we’re trying to deauth, noted in the previous picture. Replace the [client bssid] with the BSSID of the connected client, this will be listed under “STATION.”
And of course, mon0 merely means the monitor interface, change it if yours is different.
My complete command looks like this:
aireplay-ng –0 2 –a 00:14:BF:E0:E8:D5 –c 4C:EB:42:59:DE:31 mon0

Step Ten:
Upon hitting Enter, you’ll see aireplay-ng send the packets. If you were close enough to the target client, and the deauthentication process works, this message will appear on the airodump screen (which you left open):

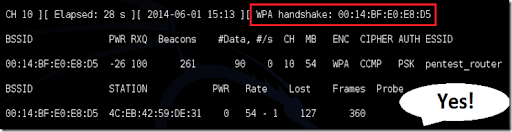
This means that the handshake has been captured, the password is in the hacker’s hands, in some form or another. You can close the aireplay-ng terminal and hit Ctrl + C on the airodump-ng terminal to stop monitoring the network, but don’t close it yet just incase you need some of the information later.
If you didn’t receive the “handshake message,” then something went wrong in the process of sending the packets. Unfortunately, a variety of things can go wrong. You might just be too far away, and all you need to do is move closer. The device you’re attempting to deauth might not be set to automatically reconnect, in which case you’ll either have to try another device, or leave airodump on indefinitely until someone or something connects to the network. If you’re very close to the network, you could try a WiFi spoofing tool like wifi-honey, to try to fool the device into thinking that you’re the router. However, keep in mind that this requires that you be significantly closer to the device than the router itself. So unless you happen to be in your victim’s house, this is not recommended.
Do note that, despite your best efforts, there are many WPA networks that simply can’t be cracked by these tools. The network could be empty, or the password could be 64 characters long, etc.
Step 11:
This concludes the external part of this tutorial. From now on, the process is entirely between your computer, and those four files on your Desktop. Actually, it’s the .cap one, that is important. Open a new Terminal, and type in this command:
aircrack-ng -a2 -b [router bssid] -w [path to wordlist] /root/Desktop/*.cap
-a is the method aircrack will use to crack the handshake, 2=WPA method.
-b stands for bssid, replace [router bssid] with the BSSID of the target router, mine is 00:14:BF:E0:E8:D5.
-w stands for wordlist, replace [path to wordlist] with the path to a wordlist that you have downloaded. I have a wordlist called “wpa.txt” in the root folder.
/root/Desktop/*.cap is the path to the .cap file containing the password. The * means wild card in Linux, and since I’m assuming that there are no other .cap files on your Desktop, this should work fine the way it is.
My complete command looks like this:
aircrack-ng –a2 –b 00:14:BF:E0:E8:D5 –w /root/wpa.txt /root/Desktop/*.cap
Now press Enter.
Step 12:
Aircrack-ng will now launch into the process of cracking the password. However, it will only crack it if the password happens to be in the wordlist that you’ve selected. Sometimes, it’s not. If this is the case, you can try other wordlists. If you simply cannot find the password no matter how many wordlists you try, then it appears your penetration test has failed, and the network is at least safe from basic brute-force attacks.
Cracking the password might take a long time depending on the size of the wordlist. Mine went very quickly.
If the phrase is in the wordlist, then aircrack-ng will show it too you like this:
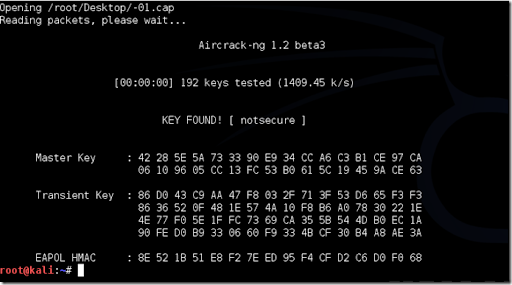
The passphrase to our test-network was “notsecure,” and you can see here that it was in the wordlist, and aircrack found it.
If you find the password without a decent struggle, then change your password, if it’s your network. If you’re penetration testing for someone, then tell them to change their password as soon as possible.
Please use this information only in legal ways
Источник


