- Enabling Hardware Acceleration on Chrome for Mac
- Basic Hardware Acceleration
- Step 1
- Step 2
- Step 3
- Experimental Hardware Acceleration
- Step 1
- Step 2
- Step 3
- Step 4
- Current State of 3D Hardware Acceleration on macOS Guest VMs
- Yebubbleman
- Ritsuka
- Yebubbleman
- Tech198
- How To Enable Hardware Acceleration In VLC And Save Battery | Windows, Linux, OS X
- What is Hardware Acceleration? Why is it useful?
- Is Hardware Acceleration available for all video codecs?
- How To Enable Hardware Acceleration In VLC?
- Enabling hardware acceleration in VLC | Windows PC
- Supported video codecs in Windows:
- Enabling hardware acceleration in VLC | Mac OS X
- Supported video codecs in Mac OS X:
- Enabling hardware acceleration in VLC | GNU/Linux
- Supported video codecs in GNU/Linux:
- MP 1,1-5,1 Activate AMD hardware acceleration
- h9826790
- OpenCore on the Mac Pro
Enabling Hardware Acceleration on Chrome for Mac
By Andrew Schrader
No matter how fast Google Chrome performs on your Mac, enabling hardware acceleration can help load media faster while improving your graphics quality. Hardware acceleration uses your graphics card, or GPU, to load and view media, rather than relying on your computer’s slower CPU. You can enable a basic hardware acceleration setting in Google Chrome’s general settings; however, you can also power Google Chrome almost entirely with your GPU by unlocking two experimental Google Chrome options.
Basic Hardware Acceleration
Step 1
Click the «Chrome» menu option at the top of the Chrome window, and then select «Preferences.»
Step 2
Click the «Show Advanced Settings» button near the bottom of the Settings page.
Step 3
Select the «Use hardware acceleration when available» option in the System portion of the menu.
Experimental Hardware Acceleration
Step 1
Type «about:flags» (without quotation marks) into Google Chrome’s address bar, and then press «Enter.»
Step 2
Scroll down to the «GPU compositing on all pages» option, and then select «Enable» from the drop-down menu.
Step 3
Scroll down to the «GPU accelerated canvas 2D» option, and then click the «Enable» option.
Step 4
Close and reopen Google Chrome to save your changes.
- The features listed in about:flags are experimental; according to Google, they may break, disappear entirely or cause malfunction within Chrome. Google advises to proceed with caution.
Andrew Schrader has been a professional writer and filmmaker since 2004. He works as a writer and director, holding a Bachelor of Arts in film and media studies from UC Santa Barbara. Schrader specializes in writing about technology and computer software.
Источник
Current State of 3D Hardware Acceleration on macOS Guest VMs

Yebubbleman
macrumors 601
Running versions of macOS in a VM (running on an actual Apple Mac, of course ) is a big part of what I am going to be doing on a Mac. ( I work in IT and doing testing in VMs before rolling things out to actual systems will be key for me going forward. That being said, the one thing that Parallels Desktop and VMware Fusion seem to do just fine for virtualizing Windows boxes is 3D graphics acceleration. This has been sorely lacking when it comes to virtualized macOS boxes. Though, admittedly, it has been a long while since I last did this (I think I last had a VM running the developer beta of OS X Mountain Lion).
My question is, has this improved at all since then? I vaguely remember reading somewhere that VMware now supports 3D acceleration in Fusion so long as both the host and guest operating systems are Big Sur or newer. But that’s all the hubbub I’m familiar with. I’ve heard nothing to indicate that it’s available for guests running anything earlier than Big Sur. Does anyone have any knowledge about this? 3D acceleration (even for basic OS effects) would be nice.
Similarly, if anyone knows anything that might indicate how this situation might be on Apple Silicon Macs, I’d love to hear it as well!
Ritsuka
Cancelled
Yebubbleman
macrumors 601
Tech198
macrumors P6
Running versions of macOS in a VM (running on an actual Apple Mac, of course ) is a big part of what I am going to be doing on a Mac. ( I work in IT and doing testing in VMs before rolling things out to actual systems will be key for me going forward. That being said, the one thing that Parallels Desktop and VMware Fusion seem to do just fine for virtualizing Windows boxes is 3D graphics acceleration. This has been sorely lacking when it comes to virtualized macOS boxes. Though, admittedly, it has been a long while since I last did this (I think I last had a VM running the developer beta of OS X Mountain Lion).
My question is, has this improved at all since then? I vaguely remember reading somewhere that VMware now supports 3D acceleration in Fusion so long as both the host and guest operating systems are Big Sur or newer. But that’s all the hubbub I’m familiar with. I’ve heard nothing to indicate that it’s available for guests running anything earlier than Big Sur. Does anyone have any knowledge about this? 3D acceleration (even for basic OS effects) would be nice.
Similarly, if anyone knows anything that might indicate how this situation might be on Apple Silicon Macs, I’d love to hear it as well!
You should instead be asking «What is the state of performance of MacOS VM» to which the answer would be «Not very good».
I don’t expect hardware graphics to be any better if they can’t even get the performance right and ,instead, favor the bigger market (Windows) for such tasks.
Источник
How To Enable Hardware Acceleration In VLC And Save Battery | Windows, Linux, OS X
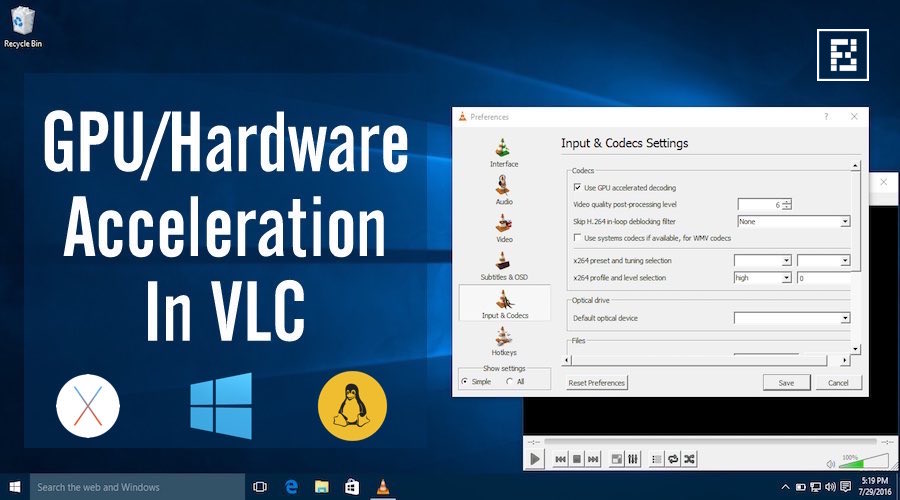 Short Bytes: Few people know about the hardware acceleration option provided in their VLC media player. It allows your laptop to play videos smoothly and extend its battery life. To enable hardware acceleration in VLC, you just need to look for options like GPU acceleration or hardware acceleration in the settings menu and enable them.
W hile using Microsoft’s latest operating system offering Windows 10, you might have observed that playing movies using Microsoft’s default Movies & TV app allows your PC to run for a longer time. The default player also might prove beneficial if you are playing some high-resolution videos.
So, what’s the reason behind this? This difference in performance and battery life could be easily explained with the help of hardware acceleration or GPU acceleration. The pre-installed media players of your operating system often use hardware acceleration by default.
What is Hardware Acceleration? Why is it useful?
While playing a video, media players make use of two techniques. Software decoding, the first technique, decodes the video and reads the information using your PC’s CPU.
On the other hand, hardware acceleration allows the CPU to transfer the decoding job to PC’s GPU. With this option enabled, your PC is able to decode a video faster, using lesser battery. Overall, you get a smoother performance, better battery life, and more entertainment.
Is Hardware Acceleration available for all video codecs?
Well, if you refer to VLC’s GPU Decoding page, you’ll find the not all video codecs are hardware accelerated. I’ll be telling you further about supported hardware accelerated video codecs one by one when I’ll be discussing how to enable hardware acceleration in VLC on Windows, Linux, and OS X.
In general, try to use the H.264 video codec. It’s very popular these days and comes with .mp4 extension.
How To Enable Hardware Acceleration In VLC?
Enabling hardware acceleration is highly recommended if you love to watch movies and TV shows on your laptop or old desktop. Just in case this thing doesn’t turn out fine and you experience a buggy performance, you can revert back to original configuration any time. So, let’s get help you get up and running!
Enabling hardware acceleration in VLC | Windows PC
To enable the hardware acceleration option in your Windows PC, open VLC media player and find the Preferences option in Tools.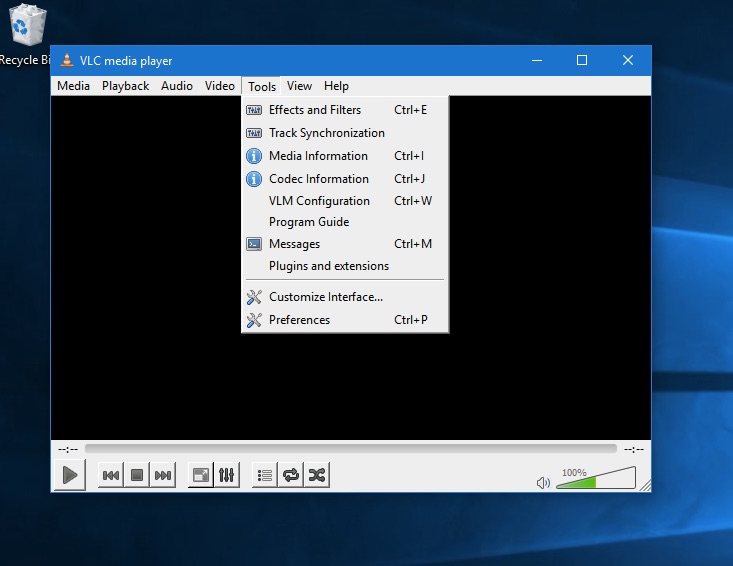
Here, you’ll need to click on the Input/Codecs tab and look for options Hardware-accelerated decoding or GPU accelerated decoding–it might differ depending upon your VLC version.
Now choose the Automatic option, or tick-mark the GPU accelerated decoding box.
Supported video codecs in Windows:
MPEG-1, MPEG-2, WMV3, VC-1 and H.264 (MPEG-4 AVC) are supported.
Enabling hardware acceleration in VLC | Mac OS X
To enable the GPU acceleration option on your Mac, open VLC media player and find the Preferences option in VLC menu.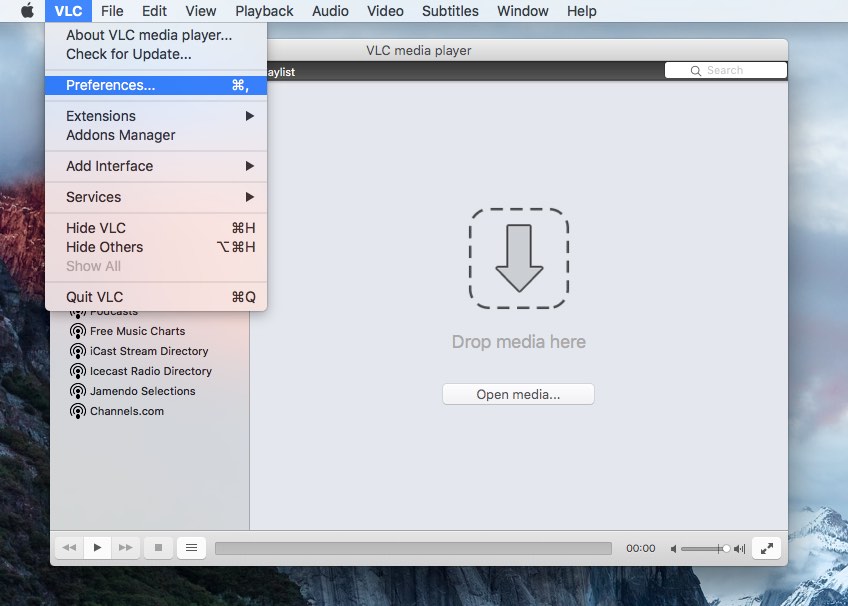
Here, you’ll need to find the Input/Codecs tab and look for the option Hardware-acceleration.
Now choose the Automatic option to enable hardware acceleration in VLC.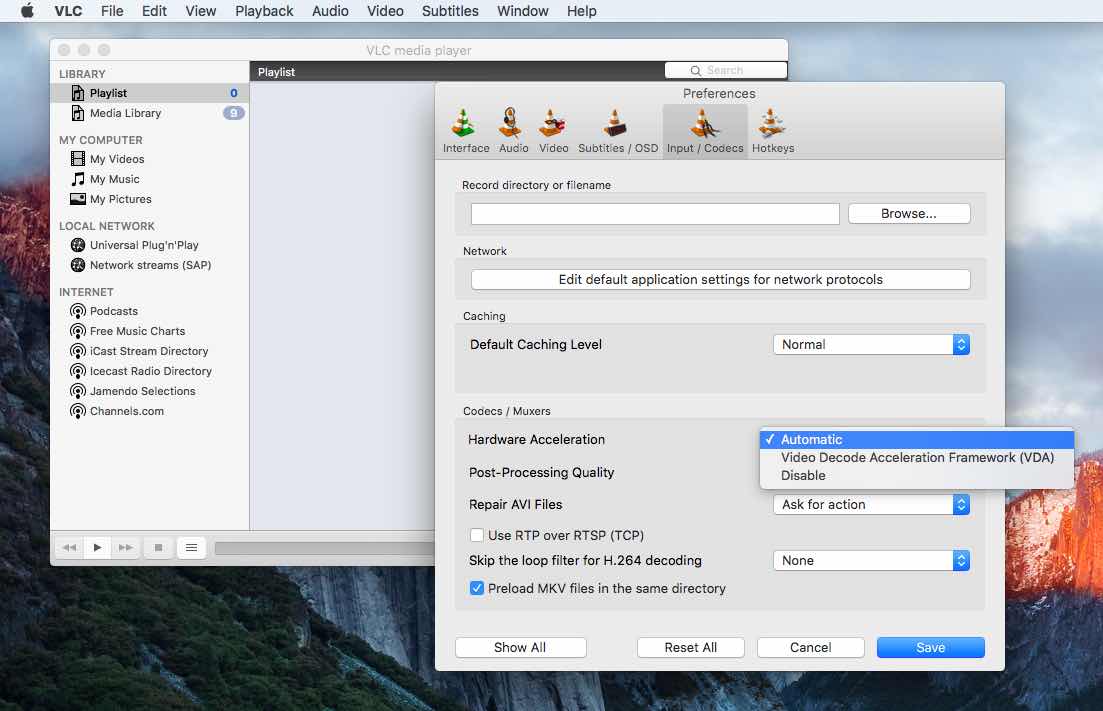
Supported video codecs in Mac OS X:
Only H.264 (MPEG-4 AVC) is supported.
Enabling hardware acceleration in VLC | GNU/Linux
For enabling the hardware acceleration option in VLC, on my Ubuntu desktop, I opened VLC media player and located the Preferences option in VLC menu.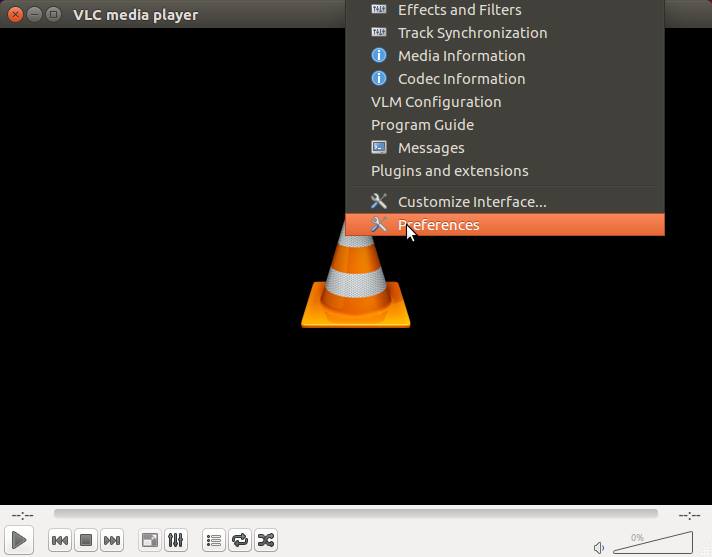
There, I found the Input/Codecs tab and looked for the option Hardware-accelerated decoding. Now, one just needs to select the Automatic option and the job is done.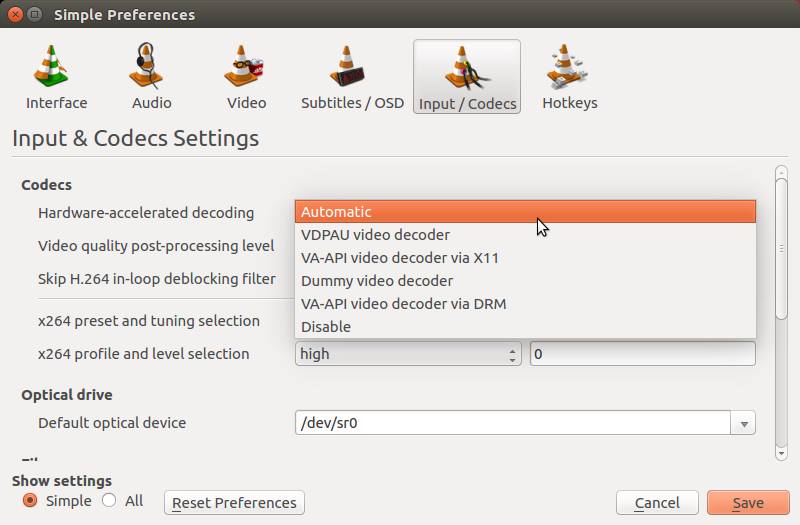
Supported video codecs in GNU/Linux:
MPEG-1, MPEG-2, MPEG-4 Visual, WMV3, VC-1 and H.264 (MPEG-4 AVC) are supported.
Note:
As told earlier, hardware acceleration allows your PC’s CPU to transfer the video decoding job your PC’s GPU. So, if you are already using a powerful desktop PC or using a brand-new and fast laptop whose power adapter is connected, the hardware acceleration won’t help you.
Did you find this tutorial on hardware acceleration in VLC useful? Share your views in the comments below.
Источник
MP 1,1-5,1 Activate AMD hardware acceleration

h9826790
macrumors P6
[For existing OpenCore users, you can always download my latest OpenCore package at post #1314 for update]
Full HWAccel achieved now!
Everything is covered in the OpenCore thread. The step by step tutorial to enable AMD hardware acceleration is now at here, but I strongly recommend you go through the OpenCore thread before you do anything.

OpenCore on the Mac Pro
Sidecar (and AirPlay Display) should also work, but I have no iPad to test it yet. The latest config.plist in post #594 and #1314 will now keep the cMP ident as 5,1. Therefore, will NOT activate Sidecar by default now.
—— The procedure below is depreciated, just keep in this post as a record ( but I will still maintain the FAQ section to keep that up to date. Please read through the FAQ before you ask anything. Any question that already covered in FAQ won’t be answered by me .). For those who don’t need HEVC hardware encode, and prefer not to install OpenCore. You may still follow the procedure below to activate HWAccel ——
10.14.5 is now official. And I can confirm that AMD card users (Polaris or above) can enjoy H264 hardware encode / H264 hardware decode / and HEVC hardware decode.
The procedure is as follow: (please read through the entire Q&A section BEFORE you do anything. You should know how to recover, or may need to use alternate procedure, etc)
1) Keep SIP disabled
4) open Lilu.kext (right click -> show package contents)
5) enter Contents
6) create folder «Plugins» (N.B. This folder is INSIDE Contents, please do NOT miss step 5)
7) Copy the WhateverGreen.kext into Plugins
8) Copy the whole modded Lilu kext to /Library/Extensions/
9) Open terminal
(you may get some strange return with this command, don’t worry about it)
For Catalina, you may need to enter the no compat check boot argument as well, otherwise, you may stuck at the no boot situation until you fix the boot argument in recovery partition.
FAQ, please read through this section BEFORE you ask. I won’t answer anything that already covered in this section.
Q1: Is this safe?
A: Tested since 10.14.5 beta 4, so far, no system damaged by this mod. (Update: OpenCore may write something into the cMP’s firmware. So, if you want to stay safe, avoid OpenCore. And only use Lilu + WhareverGreen, or hex edit method)
Q2: Is there any down side?
A: Yes, for Lilu or hex edit method, iTunes, TV+, and Safari Netflix DRM streaming may not work, but fully download DRM movie should not be affected. And Netflix on Chromium base browsers (Chrome, Brave, Edge, etc) are OK.
DRM streaming can work flawlessly with the OpenCore method.
Q3: Any other known issue?
A: Photos app crash if HDMIAudio.kext is also installed. Besides, few more users reported system freeze (in 10.14.5). It seems only Polaris GPU is affected e.g. RX580. So far, all freeze only occur in Apple apps. e.g. FCPX, Photos, Compressor, etc. 3rd party apps such as PP, DV, VideoProc are not affected. However, Polaris GPU hwaccel seems perfectly stable in 10.14.6 beta by hex editing the AppleGVA file. Beside, Adobe Media Encoder seems will cause the video engine stall. Not system freeze / crash, but the video engine simply like stop working, perform extremely bad. Normal performance can only recover by reboot. (Update: 10.14.6 official release seems fixed most of these issue. At least, I have no way to reproduce any freeze with my RX580)
Q4: If my system crash after the mod, how to fix it?
A: For Lilu / OpenCore 0.5.5 method, NVRAM reset will remove the boot argument, and disable the kexts / OpenCore. So, will effective revert your system back to the original state. Once your system boot again, you can remove the kext / OpenCore.
For Hex edit method, I ran lots of tests, no way to crash the system. But if there is any instability, please restore the original file from your backup.
For OpenCore 0.5.6 and later, you have to re-mount the EFI partition -> remove the BOOT and OC folder -> reset NVRAM
Q5: What’s the benefit?
A: Able to play some very demanding HEVC video (e.g. this one)
https://4kmedia.org/sony-swordsmith-hdr-uhd-4k-demo/
This is how my cMP can play this video now. Smooth playback with very low CPU usage (please use a browser that support VP9 to watch all the following Youtube videos in 4k, otherwise, you may not able to read the details)
Able to record the screen at 4k smoothly. As you can see from the above link. My cMP now can do those stuff and still record the screen smoothly at the same time.
Able to play VP9 video smoothly. My cMP now can play this 8K 24FPS youtube video with zero frame drop. (VP9 hardware decode is NOT supported in macOS up to Catalina.)
Q6: Can this work in 10.14.4 or before?
A: One user reported that latest 10.13.6 with Vega also work with Lilu mehtod. But RX580 will cause GPURestart fault, which freeze the display and make the OS unusable. (update: users reported hardware decode works, but H264 hardware encode will cause the crash)
Q7: Can this work in 10.15?
A: Not as good as 10.14.6. Only Lilu method, or OpenCore method work. Also, in 10.15.2, Polaris (e.g. RX580) HEVC HWAccel support is removed by Apple (WhateverGreen should fix this Polaris supportability issue. But I haven’t test it personally)
Update: HWAccel works quite well in all 10.14.6, 10.15.7, and 11.2.3 now.
Q8: Can this work for Nvidia GPU?
A: NO
Q9: Can this work for flashed 7950 etc?
A: I don’t know. Please test it for me. (Update: The answer is NO, thanks bazza5938 to perform the test)
Q10: Which software can benefit from this mod?
A: This will provide hardware acceleration at system level. So far, all my tested software works (e.g. FCPX, iMovie, Handbrake, Compressor, VideoProc, DVDFab, DV, AE, PP, FFMpeg, QuickTime Player, VLC, IINA. )
Q11: If I do a NVRAM reset due to other reason, how to regain these functions?
A: For Lilu method, repeat step 14 and reboot.
Hex edit method / OpenCore 0.5.6 (post #1314) is not affected.
For OpenCore 0.5.5 (in post #594), depends on your setup, you may need to re-bless to boot via OpenCore again.
Q12: What’s the recommended GPU?
A: RX560, RX580, Vega 56, Vega 64, Vega FE. As long as that card can work on cMP, brand / model doesn’t really matter (Update: for this particular purpose, Vega is definitely better than Polaris card. There is zero crash / freeze report from Vega users yet).
Q13: Why not recommend the Radeon VII or RX570, etc.
A: AFAIK, all Polaris, Vega, Navi GPU works, I just not sure how mature the overall support is. (Update: I upgraded my GPU to Radeon VII, perfectly stable, and hardware encoding is about 100% faster than RX580. Navi’s HWAccel also confirmed can be activated.)
Q14: Is this QuickSync?
A: NO, QuickSync is the hardware acceleration for Intel iGPU, not the generic term for GPU video hardware acceleration. AMD GPU use UVD (Unified Video Decoder) for decoding, and VCE (Video Coding Engine) for encoding. All this will be controlled by VideoToolBox automatically in macOS, virtually transparent to users. It’s the same concept as QuickSync, but not QuickSync.
Q15: I can see that my GPU is working in Compressor before this mod (on a cMP). Is that mean I already have hardware acceleration?
A: NO, we are talking about H264 / HEVC hardware acceleration here. Not the general compute hardware acceleration. They are completely different.
Q16: How’s the quality of the hardware encoded video?
A: Not as good as software encoder in general. But if at high bitrate, the difference isn’t that noticeable.
Q17: When will we able to get HEVC encoding as well?
A: I don’t know. But you can always boot to Windows and use HEVC hardware encode. (Update: FULL HWAccel including HEVC encoding can also be achieved by using OpenCore. Not sure how safe, but it works stably on my cMP)
77% (on a dual X5680 cMP).
Q19: Why VideoProc shows no HEVC decode after the mod?
A: I don’t know why, but this is normal in this case. My recommendation is to download demo HEVC video from the above link, and play it via QuickTime (or simply via Finder preview). As long as the CPU usage only stay around 20% (but not 800%), that means HEVC decoding is working properly.
For those who use OpenCore method, you should able to see HEVC HWAccel avail. If not there, please click the little reload icon.
Q20: Should I install the newer version of Lilu and WhateverGreen?
A: NO. Despite the newer version can work, but provide no extra function in this case, and I have no idea if the newer one has poorer stability. If I found a better way / kext to use. I will update the post accordingly. (Update: For Catalina, please install Lilu 1.4.0 and WhateverGreen 1.3.5. And so far, all newer Lilu and WEG only provide better result due to bug fix. Users should be OK to install the latest version)
Q21: I experienced system freeze, Console log shows «GPU Restart» event, what should I do?
A: PRAM reset will bring your system back to normal. If you are with Polaris GPU (RX560, RX570, RX580, etc), it seems some people are affected by this bug. What I found is an alternate method by directly hex edit the AppleGVA file seems more stable for these GPUs. Initial test shows very safe to do so, even I completely destroy the AppleGVA file, the OS can still boot to desktop. If you prefer to go this route, please make sure you know how to restore the file (or even completely recover from an unbootable OS). The info is at post #205. (update: 10.14.6 shows extremely good stability, highly recommended for RX580 users)
Q22: How do I know if hardware acceleration is really working?
A: My suggestion is by using Terminal. Detail info in post #273. You may also use OpenGL Driver Monitor to observe the UVD / VCE activities (link).
Q23: Can I use this mod with MVC flashed RX580?
A: According to this post, the answer is YES.
Q24: Is it possible to turn OFF hwaccel without reboot. So that I can enjoy DRM streaming anytime?
A: Only the alternate method allow ON/OFF on the fly. If you don’t want to use terminal / Finder to do that every time, you can make two simple apps to do that, procedures at here. (Update: My OpenCore package should allow you to play DRM streaming video by default)
Q25: Does background rendering still works in FCPX?
A: Background rendering still works for both methods. This is completely independent to hwaccel. I turned that off in the above demo is just to illustrate the real time timeline editing performance. Not because of it can’t work.
Q26: I tried the hex edit method many many times, it doesn’t work, but I am sure I did everything right. What should I do?
A: May be you should try open a new user profile, and see if it help (reference link)
Q27: Why the «Graphics» in VideoProc HWAccel page shows N/A?
A: No idea, but it’s just a cosmetic error in this case. (Update: It seems VideoProc looking for the key word «AMD». e.g. If the card ident as AMD Radeon VII , VideoProc can show it properly. But if the card ident as Radeon VII , then VideoProc can’t show its name)
P.S. For those who want to add the prefix AMD in front of they graphic card’s name, please join the OpenCore thread. We can rename the graphic card to whatever we want in OpenCore.
Q28: Why VideoProc shows that I am use «Intel «HWAccel when converting videos?
A: Also no idea, but again, it’s just a cosmetic error in this case. (Update: So far, it shows that VideoProc only knows if HWAccel is working (via VideoToolBox), but it can’t tell which hardware is providing HWAccel in macOS. Therefore, it use a «one size fit all» solution. Due to most Mac out there use the iGPU Intel Quick Sync to provide HWAccel. VideoProc seems only will display Intel whenever HWAccel is in use, regardless if the computer is actually using AMD VCE / VCN, Intel Quick Sync, or even M1.)
Q29: Why VideoProc shows nothing activated but everything seems working as expected?
A: As long as you can see this tick, which mean HWAccel is activated. From my observation, this tick always change automatically.
For the Hardware Info Detected page, please click the little reload icon in order to let VideoProc to show you the latest status.
Q30: will this work on 6,1?
A: Only via eGPU (Polaris or higher).
Q31: will this work on 3,1?
A: Yes (link)
Источник


